
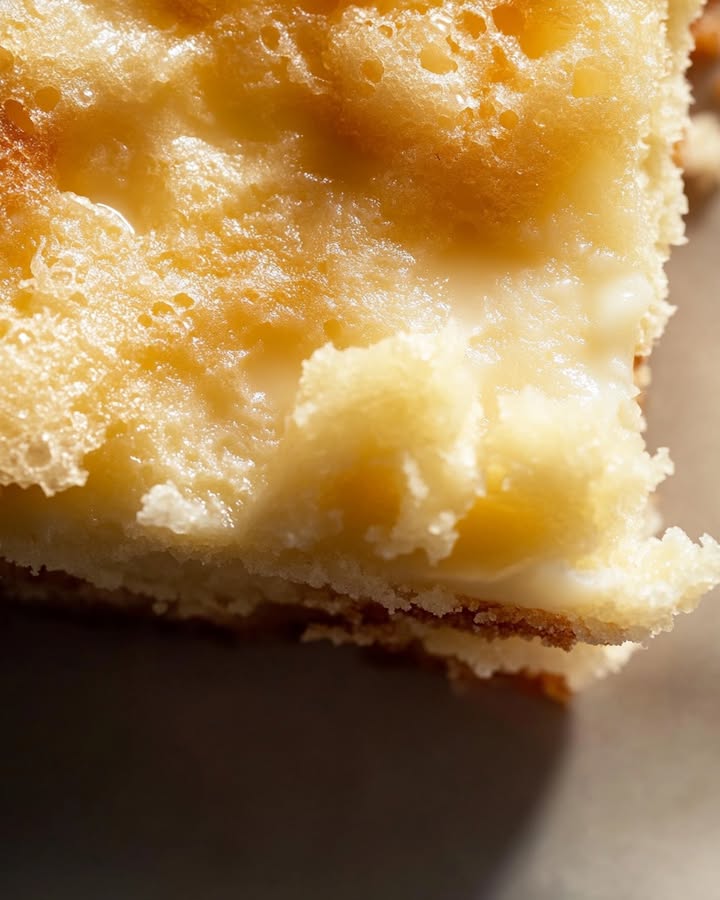
Le meilleur Gooey Butter Cake avec une touche de cheesecake
Imaginez ceci: vous avez besoin d’un dessert, et vite. Vous attendez des invités, les enfants réclament quelque chose de sucré, ou, soyons honnêtes—vous avez simplement besoin d’une part de joie pure et simple. Mes amis, voici le gâteau de vos rêves. C’est l’enfant magique d’une croûte beurrée type cookie et d’un nuage de garniture crémeuse au cheesecake. La première fois que je l’ai fait, ma famille est restée silencieuse. C’est le plus beau des compliments chez moi ! Ce Gâteau Crémeux Délicieux est désormais mon arme secrète pour faire sourire à table.
Une part d’histoire sucrée
Ce gâteau a une histoire amusante ! Le gooey butter cake classique serait issu d’une heureuse erreur à Saint-Louis, dans le Missouri. Un boulanger des années 1930 aurait mélangé les proportions pour un gâteau normal. Au lieu d’un désastre, il a créé un chef-d’œuvre fondant et beurré. Ma version ajoute une couche de cheesecake parce que, eh bien, pourquoi ne pas rendre une bonne chose encore meilleure ? C’est le mélange parfait entre tradition et un petit indulgence moderne. C’est le gâteau que votre grand-mère aurait pu faire, avec une dose supplémentaire de rêve crémeux.
Pourquoi vous allez adorer cette recette de Gooey Butter Cake
Vous allez adorer cette recette pour tant de raisons ! D’abord, elle utilise des ingrédients simples que vous avez probablement déjà. Ensuite, elle est incroyablement facile. Pas de techniques compliquées ici. Enfin, le résultat est spectaculaire. Le contraste entre la croûte ferme et beurrée et la garniture moelleuse, crémeuse et légèrement affaissée est pure magie. Il est riche sans être lourd, sucré mais pas écœurant. C’est le dessert réconfort ultime qui donne l’impression que vous avez passé la journée en cuisine, alors qu’en réalité, vous vous êtes à peine fatiguée.
Les occasions parfaites pour ce dessert délicieux
Ce gâteau est une star pour n’importe quel événement. Apportez-le à un repas partagé et regardez-le disparaître en premier. C’est un succès assuré aux anniversaires, baby showers et clubs de lecture. J’adore le préparer pour les dîners familiaux du dimanche—il rend la journée spéciale. C’est aussi un dessert de fêtes fantastique, surtout à Noël ou à Pâques. Franchement, tout jour qui se termine par un « i » est un bon jour pour ce Délice de Gooey Butter Cake.
Ce dont vous aurez besoin : les ingrédients
- 1 boîte (environ 430g) de préparation pour gâteau jaune
- 3 gros œufs (à utiliser séparément)
- ½ tasse (115g) de beurre, fondu
- 1 paquet (225g) de fromage à la crème, ramolli
- 1 cuillère à café d’extrait de vanille
- 3 tasses (environ 360g) de sucre glace
- Du sucre glace supplémentaire pour saupoudrer
Substitutions d’ingrédients astucieuses
Vous n’avez pas exactement ce qui est listé ? Pas de souci ! Voici quelques échanges faciles :
- Préparation pour gâteau : Vous pouvez utiliser une préparation pour gâteau blanc ou au citron pour une saveur différente.
- Beurre : Utilisez du beurre salé ou non salé. Si vous utilisez du beurre doux, vous pouvez ajouter une petite pincée de sel à la croûte.
- Fromage à la crème : Le fromage entier donne la meilleure texture, mais allégé fera l’affaire en cas de besoin.
- Vanille : Essayez l’extrait d’amande pour une délicieuse variation.
C’est parti pour la cuisson ! Votre guide étape par étape
Étape 1 : Préchauffer et préparer
Commencez par préchauffer votre four à 180°C (350°F). Cela lui laisse le temps de devenir parfaitement chaud. Pendant ce temps, prenez un moule à gâteau rectangulaire de 23×33 cm (9×13 pouces). Beurrez-le bien ou utilisez un spray anti-adhésif. J’aime utiliser l’emballage du beurre pour ça—riEN ne se perd ! L’odeur du four qui chauffe et la vue du moule brillant vous mettent dans l’ambiance.
Étape 2 : Préparer la croûte beurrée
Dans un saladier moyen, mélangez la préparation pour gâteau jaune (en poudre), un œuf et le beurre fondu. Le beurre grésillera un peu lorsque vous le mélangerez. Mélangez le tout jusqu’à former une pâte épaisse, lisse et un peu collante. Maintenant, pressez fermement et uniformément cette pâte au fond de votre moule graissé. Utilisez vos doigts ou le fond d’un verre. Vous créez la base dorée parfaite pour toute la moelleuse bonté à venir. Astuce de pro : Mouillez légèrement vos doigts pour éviter que la pâte ne colle.
Étape 3 : Préparer la garniture onctueuse
Maintenant, la meilleure partie ! Dans un autre bol propre, placez le fromage à la crème ramolli. À l’aide d’un batteur électrique ou d’un fouet robuste, battez-le jusqu’à ce qu’il soit lisse et crémeux. Ajoutez les deux œufs restants (battus) et l’extrait de vanille. Mélangez jusqu’à ce que tout soit bien incorporé. Ajoutez graduellement le sucre glace, environ une tasse à la fois, en mélangeant bien après chaque ajout. Vous obtiendrez une garniture luxueusement épaisse, crémeuse et pâle. Versez-la sur votre croûte et étalez-la délicatement en une couche uniforme avec une spatule.
Étape 4 : Cuire jusqu’à la perfection dorée
Placez soigneusement votre moule au centre du four préchauffé. Faites cuire pendant 40 à 45 minutes. Vous saurez qu’il est cuit lorsque les bords sont d’un beau brun doré et que le dessus est légèrement pris. Le centre paraîtra encore mou et pourra s’affaisser un peu en refroidissant. C’est exactement ce que vous voulez ! C’est de là que vient le côté « fondant ». Résistez à l’envie de trop le cuire. Laissez le gâteau refroidir complètement dans le moule sur une grille.
Étape 5 : La touche sucrée finale
Une fois votre gâteau complètement refroidi, il est temps pour la touche finale. Placez un peu de sucre glace dans une passoire fine. Tappez-la doucement sur toute la surface du gâteau. Il tombera comme une douce neige, créant une belle finition d’aspect professionnel. Maintenant, coupez en carrés, servez, et préparez-vous aux compliments ! Astuce du chef : Pour des coupes nettes, essuyez votre couteau entre chaque part.
Votre chronologie de préparation
Ce gâteau se prépare si vite ! Voici le détail :
- Temps de préparation : 10 minutes
- Temps de cuisson : 40 minutes
- Temps de refroidissement : 1 heure (la partie la plus dure !)
- Temps total : Environ 1 heure 50 minutes
- Nombre de parts : 12 généreux carrés
Mon secret pour la texture ultime
Voici mon petit secret : assurez-vous que votre fromage à la crème est vraiment à température ambiante. Je sors le mien du réfrigérateur au moins une heure avant de cuisiner. Cela garantit que votre garniture se mélange parfaitement lisse, sans aucun grumeau. Le fromage à la crème froid donnera une texture granuleuse, et nous ne voulons que de la soie pour notre Gâteau Crémeux Délicieux.
Une anecdote amusante sur le sucre glace
Cette belle neige poudreuse sur le dessus n’est pas seulement jolie. Le sucre glace, aussi appelé sucre impalpable, contient une petite quantité d’amidon de maïs. Cet amidon empêche le sucre de former des blocs dans la boîte, mais il aide aussi à stabiliser notre garniture crémeuse pendant la cuisson. C’est un petit ingrédient qui fait un gros travail !
Les outils dont vous aurez besoin
- Moule à gâteau rectangulaire 23×33 cm
- Deux saladiers (un moyen, un grand)
- Batteur électrique ou fouet solide
- Spatule pour étaler
- Tasses et cuillères à mesurer
- Passoire fine pour saupoudrer
- Grille de refroidissement
Conserver votre Délice de Gooey Butter Cake
Couvrez le moule hermétiquement avec du film alimentaire ou du papier d’aluminium. Vous pouvez stocker le gâteau à température ambiante pendant 2 à 3 jours. Il restera merveilleusement moelleux et fondant de cette façon.
Si votre cuisine est chaude ou que vous souhaitez le garder plus longtemps, mettez-le au réfrigérateur. Conservé dans un contenant hermétique, il restera frais et délicieux pendant 5 à 7 jours. Le gâteau froid a une belle texture ferme.
Ce gâteau se congèle à merveille ! Enveloppez chaque carré refroidi ou le gâteau entier dans du film alimentaire, puis dans du papier alu. Placez-le dans un sac ou un contenant allant au congélateur. Il se conservera bien 4 à 5 mois. Décongelez-le une nuit au frigo ou quelques heures à température ambiante.
Mes meilleurs conseils pour réussir
- Ne négligez pas de graisser le moule. Ce gâteau est collant et vous voulez pouvoir le démouler facilement.
- Pressez vraiment la croûte fermement. Cela l’empêche de se mélanger à la garniture.
- Laissez le gâteau refroidir complètement avant de couper. Cela permet aux couches de bien se figer.
- Pour un boost de saveur, ajoutez une cuillère à café de zeste de citron à la garniture au fromage à la crème.
Idées pour une belle présentation
- Servez chaque carré sur une petite assiette colorée.
- Ajoutez quelques baies fraîches comme des framboises ou des fraises sur le côté.
- Saupoudrez de cacao en poudre au lieu de sucre glace pour un look dramatique.
- Ajoutez une cuillerée de crème fouettée légèrement sucrée juste avant de servir.
6 variations savoureuses à essayer
Vous aimez cette recette ? Variez les plaisirs avec ces idées délicieuses !
- Gooey Butter Cake au chocolat : Utilisez une préparation pour gâteau au chocolat pour la croûte et ajoutez ¼ de tasse de cacao en poudre à la garniture au fromage à la crème.
- Épices de citrouille : Ajoutez ½ tasse de purée de citrouille et une cuillère à café d’épices pour tarte à la citrouille à la couche de fromage à la crème pour un régal d’automne.
- Citron et myrtilles : Utilisez une préparation pour gâteau au citron et incorporez délicatement 1 tasse de myrtilles fraîches à la garniture au fromage avant de l’étaler.
- Délice aux noix : Mélangez 1 tasse de noix de pécan ou de noix finement hachées et toastées à la pâte de la croûte pour un croquant merveilleux.
- Pâte à cookies : Mélangez ½ tasse de pépites de chocolat mini à la croûte. Vous pouvez aussi en saupoudrer davantage sur le dessus après le sucre glace.
- Moka : Dissolvez 1 cuillère à soupe de poudre de café instantané dans l’extrait de vanille avant de l’ajouter à la garniture au fromage.
Si vous cherchez d’autres délices fruités, vous devez absolument essayer mes incroyables scones glacés aux baies mélangées—ils changent la donne au petit-déjeuner ! Pour une autre obsession crémeuse sans cuisson, ce fudge simple au beurre de cacahuète est dangereusement bon. Vous aimez les douceurs du Sud ? Mes pralines aux pacanes et babeurre sont de la pure magie. Et pour un en-cas chocolaté croquant et festif, ces biscuits Graham au chocolat et à la menthe font toujours fureur pendant les fêtes.
Erreurs courantes à éviter
Erreur 1 : Utiliser du fromage à la crème froid
C’est l’erreur numéro un. Le fromage à la crème froid ne se mélangera pas en douceur avec le sucre glace et les œufs. Vous obtiendrez une garniture grumeleuse, inégale, qui ne cuira pas correctement. Prévoyez toujours à l’avance et laissez votre fromage à la crème sur le comptoir jusqu’à ce qu’il soit mou au toucher. Si vous êtes pressé, vous pouvez l’assouplir doucement au micro-ondes pendant 10-15 secondes, mais faites très attention à ne pas le faire fondre.
Erreur 2 : Ne pas presser fermement la croûte
Si vous vous contentez de saupoudrer vaguement le mélange de la croûte dans le moule, il ne formera pas une base correcte. Pendant la cuisson, la garniture crémeuse peut s’infiltrer et se mélanger à la croûte, créant une couche boueuse au lieu de deux textures distinctes. Prenez une bonne minute pour vraiment presser et tasser la pâte en une couche solide et uniforme. Cela crée la fondation parfaite pour votre couche de dessert au cheesecake.
Erreur 3 : Trop cuire le gâteau
Le mot d’ordre est « fondant » ! Si vous faites cuire le gâteau jusqu’à ce que le centre soit complètement ferme et gonflé, vous êtes allé trop loin. Vous perdrez cette merveilleuse texture moelleuse et légèrement peu cuite au milieu. Le gâteau est cuit lorsque les bords sont d’un brun doré profond et se détachent du moule, mais que le centre tremble encore légèrement. Il se figera davantage en refroidissant. Faites confiance au processus et au temps indiqué.
Erreur 4 : Couper le gâteau alors qu’il est encore chaud
Je sais que la tentation est immense, mais couper un gooey butter cake encore chaud est une recette pour un désastre tout en coulisses. Les couches n’ont pas eu le temps de se figer, donc la garniture va déborder partout et la croûte ne se coupera pas nettement. Pour des carrés parfaits et beaux, vous devez laisser le gâteau refroidir complètement dans le moule sur une grille. Cette patience est payante pour la présentation et la texture.
N’oubliez pas, bien que ce gâteau soit une fantastique gourmandise, l’équilibrer avec des repas nutritifs est essentiel pour un mode de vie sain. Vous pouvez trouver de bonnes idées pour un repas équilibré auprès de sources fiables à savourer parallèlement à vos aventures culinaires.
Ce Délice de Gooey Butter Cake n’est qu’une des nombreuses délices de notre collection. Si vous êtes amoureux des gâteaux, vous trouverez bien plus d’inspiration dans notre bibliothèque complète de recettes de gâteaux et pâtisseries.
Vos questions, nos réponses
Puis-je préparer ce gâteau à l’avance ?
Absolument ! Ce gâteau est même encore meilleur le lendemain. Les saveurs ont plus de temps pour se mélanger, et la texture devient parfaitement prise tout en restant merveilleusement fondante. Vous pouvez le cuire une journée entière à l’avance. Gardez-le couvert à température ambiante ou au frigo. Saupoudrez-le de sucre glace juste avant de le servir pour que le sucre reste d’un blanc brillant et ne se dissolve pas dans la garniture.
Pourquoi mon gâteau a-t-il tellement affaissé au milieu ?
Un léger affaissement au centre est complètement normal et même souhaitable pour ce type de gâteau. C’est le signe d’une garniture crémeuse et dense. Cependant, un affaissement drastique peut se produire si le gâteau est insuffisamment cuit, s’il y avait trop d’humidité dans la pâte, ou si la porte du four a été ouverte trop tôt. Assurez-vous que votre four est à la bonne température, faites cuire pendant tout le temps indiqué jusqu’à ce que les bords soient bruns, et évitez d’ouvrir la porte avant qu’au moins 35 minutes se soient écoulées.
Puis-je utiliser une préparation maison au lieu d’une boîte ?
Vous le pouvez, mais la préparation en boîte fait partie de ce qui rend cette recette si facile et fiable. Elle a le ratio parfait de farine, d’agent levant et de stabilisants pour créer la texture de croûte idéale. Si vous voulez faire votre propre mélange sec, combinez 1 ½ tasses de farine, 1 tasse de sucre, 2 ½ cuil. à café de poudre à lever et ½ cuil. à café de sel. Utilisez ce mélange à la place de la boîte. Le résultat peut être légèrement différent, mais il sera toujours délicieux.
Ma garniture s’est fissurée sur le dessus. Qu’ai-je fait de travers ?
Quelques petites fissures sont normales, mais de larges fissures signifient généralement que le gâteau a cuit à une température trop élevée ou est resté trop longtemps dans le four. La montée et la chute rapides provoquent des craquelures. Assurez-vous que votre four est correctement calibré (un thermomètre de four aide !). Évitez aussi de trop mélanger la garniture au fromage une fois les œufs ajoutés, car cela peut incorporer trop d’air qui se dégonfle ensuite dramatiquement.
Est-ce qu’il est censé être très fondant et presque pas cuit ?
Oui, c’est la marque d’un excellent gooey butter cake ! Le centre doit être pris mais encore très mou, presque comme une crème épaisse ou un cheesecake très dense. Il ne doit pas être liquide ou coulant, mais il doit avoir un certain « mou » quand vous appuyez doucement dessus. Ce centre moelleux est ce qui crée cette sensation en bouche incroyable qui rend ce dessert si spécial et différent d’un gâteau ordinaire.
Puis-je congeler des parts individuelles ?
Congeler des parts individuelles est une idée fantastique. Cela vous permet d’avoir une gourmandise prête à tout moment. Enveloppez chaque part refroidie hermétiquement dans du film alimentaire, puis placez-les toutes dans un grand sac congélation ou un contenant hermétique. Elles se conserveront 4 à 5 mois. Pour les déguster, décongelez une part une nuit au frigo ou quelques heures sur le comptoir. Vous pouvez même passer une part congelée au micro-ondes 15-20 secondes pour une friandise tiède et fondante.
Quelle est la meilleure façon d’obtenir des parts nettes ?
Pour les coupes les plus nettes, utilisez un couteau tranchant à lame fine. Passez la lame sous l’eau très chaude, essuyez-la, puis coupez. La chaleur aide le couteau à glisser à travers la garniture crémeuse sans accrocher. Essuyez la lame et réchauffez-la sous l’eau entre chaque coupe. Cela vous donne ces carrés parfaits et professionnels que l’on voit dans les pâtisseries.
Puis-je ajouter des fruits à cette recette ?
Vous le pouvez, mais avec prudence. Ajouter des fruits frais à forte teneur en eau (comme des baies) directement dans la garniture peut la rendre détrempée et l’empêcher de se figer. Si vous voulez des fruits, je recommande de les servir à côté ou en topping. Une meilleure option est d’utiliser une préparation pour gâteau aux fruits (comme la fraise) ou d’ajouter une couche de confiture ou de garniture pour tarte entre la croûte et la couche de fromage avant la cuisson.
Que puis-je utiliser à la place d’un moule 23×33 cm ?
Si vous n’avez pas de moule 23×33 cm, vous pouvez utiliser deux moules ronds de 23 cm de diamètre. Le temps de cuisson sera légèrement réduit, commencez donc à vérifier à partir de 30-35 minutes. Vous pouvez aussi utiliser un moule à génoise de 25×38 cm pour un gâteau plus fin, type barre—réduisez le temps de cuisson à environ 25-30 minutes. Assurez-vous simplement d’ajuster le temps et de surveiller ces bords brun doré.
Ce gâteau se sert-il tiède ou froid ?
Il est vraiment excellent des deux manières, c’est une partie de son charme ! À température ambiante, vous obtenez toute la texture fondante et moelleuse. Frois sorti du frigo, il se raffermit et devient presque comme une barre de cheesecake riche. Certains l’adorent même légèrement tiède, ce qui rend le centre extra moelleux et fait fondre un peu le sucre glace. Essayez de différentes façons et voyez ce que vous préférez. Je l’aime à température ambiante avec une tasse de café.
La dernière part
Ce Gooey Butter Cake avec sa garniture crémeuse au cheesecake est plus qu’une recette. C’est un petit morceau de réconfort, un plaisir garanti pour les convives, et la preuve que les meilleurs desserts sont souvent les plus simples. Il a gagné une place permanente dans mon cahier de recettes, et j’espère qu’il en sera de même pour vous. Alors prenez votre saladier, préchauffez ce four, et préparez-vous à créer quelque chose de vraiment délicieux. Bonne pâtisserie
Equipment
- Moule de 23x33 cm
- Deux bols à mélanger
- Mixeur à main ou fouet robuste
- Spatule pour étaler
- Passoire fine pour saupoudrer
Ingrédients
- 1 boîte (15,25 onces) mélange à gâteau jaune
- 3 grands œufs œufs utilisation divisée
- ½ tasse beurre fondu
- 1 paquet (8 onces) fromage à la crème ramolli
- 1 cuillère à café extrait de vanille
- 3 tasses sucre glace
- au besoin sucre glace supplémentaire pour saupoudrer
Instructions
- Préchauffez le four à 175°C (350°F) et graissez un moule de 23x33 cm.
- Dans un bol moyen, mélangez le mélange à gâteau jaune, un œuf et le beurre fondu jusqu'à obtenir une pâte épaisse et collante. Pressez-la uniformément au fond du moule graissé.
- Dans un bol séparé, battez le fromage à la crème ramolli jusqu'à consistance lisse. Ajoutez les deux œufs restants et l'extrait de vanille, puis mélangez bien.
- Incorporez progressivement le sucre glace, une tasse à la fois, jusqu'à obtenir un mélange épais et crémeux. Versez-le sur la croûte.
- Faites cuire au four pendant 40 à 45 minutes, jusqu'à ce que les bords soient dorés et que le dessus soit légèrement pris. Laissez refroidir complètement sur une grille.
- Une fois refroidi, saupoudrez de sucre glace et découpez en carrés.
Notes
Nutrition

Je suis Céline, une véritable passionnée d’ustensiles et de matériel de cuisine ! J’adore tester, comparer et découvrir les meilleurs équipements pour rendre la cuisine plus efficace et agréable. Que ce soit un bon couteau, un robot performant ou une poêle incontournable, je suis toujours à la recherche des outils qui feront la différence. Mon but est de vous guider dans vos choix pour que vous ayez le bon matériel adapté à vos besoins.