
Graham Chocolat Menthe Festif : La Friandise de Noël Plus Facile à Faire !
Vous connaissez ce moment en décembre où le calendrier semble s’accélérer et vous vous rappelez avoir promis d’apporter trois friandises différentes à trois événements différents ? C’était moi la semaine dernière. J’avais besoin d’une solution miracle. Voici mes chères Grahams chocolat menthe festifs. Ces barres délicieuses sont le mélange parfait de croquant, de crémeux et de fraîcheur mentholée. Le meilleur ? Pas besoin de cuisson et seulement 15 minutes de préparation. Elles ont été un succès fou, et je vous jure, la moitié de la soirée planait autour du plateau. Cette recette de Graham Chocolat Menthe Festif est maintenant mon atout (pas si) secret pour la saison des fêtes trop chargée !
Une Petite Histoire derrière le Graham Chocolat Menthe Festif
Cette recette est comme un raccourci beau et délicieux. Elle réunit deux saveurs classiques des fêtes—le chocolat riche et la menthe poivrée fraîche—sur l’humide biscuit graham. Sans être une tradition ancestrale, c’est une version moderne du simple concept de « bark » (éclats). Imaginez une bark de chocolat sublimée avec une base croustillante fantastique. C’est la friandise que vous trouveriez dans un échange de biscuits de quartier chaleureux, celle qui disparaît en premier parce qu’elle est simplement irrésistible. Pour moi, elle est spéciale parce que mes enfants peuvent aider à la préparer. Saupoudrer ces bonbons menthe écrasés est une mission qu’ils se disputent, et la joie sur leurs visages quand nous cassons la grande plaque en morceaux est pure magie de Noël.
Pourquoi Vous Adorerez Absolument Cette Recette de Fêtes
Premièrement, elle est incroyablement facile. Pas besoin d’équipement spécial ou de talents de pâtissier. Deuxièmement, la combinaison de saveurs est un classique intemporel des fêtes qui plaît à tous, des enfants aux grands-parents. Les textures sont aussi merveilleuses : le craquement du chocolat, le croustillant du biscuit et la petite explosion mentholée. Enfin, elle est très versatile. Vous pouvez préparer une grande quantité sans effort et l’adapter avec différentes garnitures ou chocolats. C’est le dessert solution-rapide ultime qui donne l’impression (et le goût) d’un travail de plusieurs heures.
Les Occasions Idéales pour vos Friandises Chocolat Menthe
Franchement, ces grahams s’adaptent à toute scène festive ! Ils sont parfaits pour :
- Les soirées d’échange de biscuits : Ils se distinguent avec beauté sur un plateau.
- Les invités imprévus : Préparez-les en 15 minutes et mettez-les au frigo pendant que vous faites le café.
- Les fêtes de classe : Faciles à préparer en grande quantité et les enfants les adorent.
- Les cadeaux gourmands : Empaquetez-les dans une belle boite métallique avec un ruban pour un présent maison plein de cœur.
- Les petits snacks de la veille de Noël : Accompagnez-les avec un chocolat chaud pour une soirée cosy parfaite.
Rassemblez vos Ingrédients
Voici la liste simple pour votre création festive. Vous avez probablement déjà la plupart des ingrédients !
- 1 paquet de biscuits Graham (environ 14.4 oz / 10 feuilles complètes)
- 1 tasse de pépites de chocolat au lait
- 1/2 tasse de bonbons à la menthe écrasés (les cannes de bonbon fonctionnent parfaitement !)
- 1/4 tasse de pépites de chocolat blanc
- 1 cuillère à café d’huile végétale (ou huile de coco)
Idées de Substitutions Pratiques
Pas besoin de paniquer si vous manquez un ingrédient. Voici quelques alternatives faciles :
- Chocolat : Utilisez des pépites de chocolat noir ou demi-sucré pour une saveur plus riche et moins sucrée. Les pépites de caramel au beurre seraient aussi une variation amusante !
- Bonbons Menthe : Utilisez des morceaux de menthe pour pâtisserie déjà écrasés, ou remplacez par des noix grillées hachées ou des vermicelles de fêtes.
- Base : Des biscuits Graham blé complet, ou même des crackers salés peuvent ajouter une dimension sucrée-salée.
- Huile : La cuillère à café d’huile aide à fluidifier le chocolat blanc pour le filet. Toute huile neutre fonctionne, ou utilisez un peu de shortening.
Préparons les Grahams Chocolat Menthe Festifs !
Réservons 15 minutes tranquilles—c’est la partie fun et créative. Créons quelque chose délicieux et beau.
Étape 1 : Préparez votre Toile
Prenez une grande plaque de cuisson et tapissez-la de papier sulfurisé. C’est la règle absolue pour un nettoyage facile ensuite. Maintenant, disposez vos biscuits Graham en une seule couche, serrés comme des pièces de puzzle. Vous devrez peut-être casser quelques biscuits pour remplir les extrémités. Vous construisez votre fondation délicieuse et croustillante. L’odeur des Grahams seule est si nostalgique et réconfortante.
Étape 2 : Faites Fondre le Chocolat au Lait
Versez vos pépites de chocolat au lait dans un bol adapté au micro-ondes. Faites-les fondre par intervalles de 30 secondes. Après chaque période de chaleur, retirez le bol et mélangez bien les pépites. Cela évite les brûlures et favorise une fonte uniforme. Vous verrez passer d’un état granuleux à un état magnifiquement lisse et brillant. L’arôme du chocolat fondant remplira votre cuisine—c’est divin ! Astuce pro : Un bol sec et propre est crucial. Une seule petite goutte d’eau peut faire « figer » le chocolat et le rendre granuleux.
Étape 3 : Étalez la Base de Chocolat
Maintenant pour la partie la plus satisfaisante ! Versez le chocolat fondu directement sur les biscuits Graham qui attendent. Utilisez une spatule offset ou le dos d’une cuillère pour l’étaler en une belle couche uniforme, en veillant à recouvrir tous les bords. Travaillez assez vite car le chocolat commencera à durcir sur les biscuits cool. Vous créez cette riche base brun profond qui accueillera toutes les garnitures festives.
Étape 4 : Créez le Filet de Chocolat Blanc
Dans un petit bol séparé, combinez vos pépites de chocolat blanc avec cette cuillère à café d’huile végétale. L’huile est le secret pour une consistance lisse et facile à fileter. Faites fondre ce mélange avec la même méthode prudente de 30 secondes, mélangez bien. Vous voulez une texture fluide sans grumeaux. Le contraste du blanc brillant sur le chocolat au lait rend ces grahams si jolis et professionnels.
Étape 5 : Filetez et Décorer
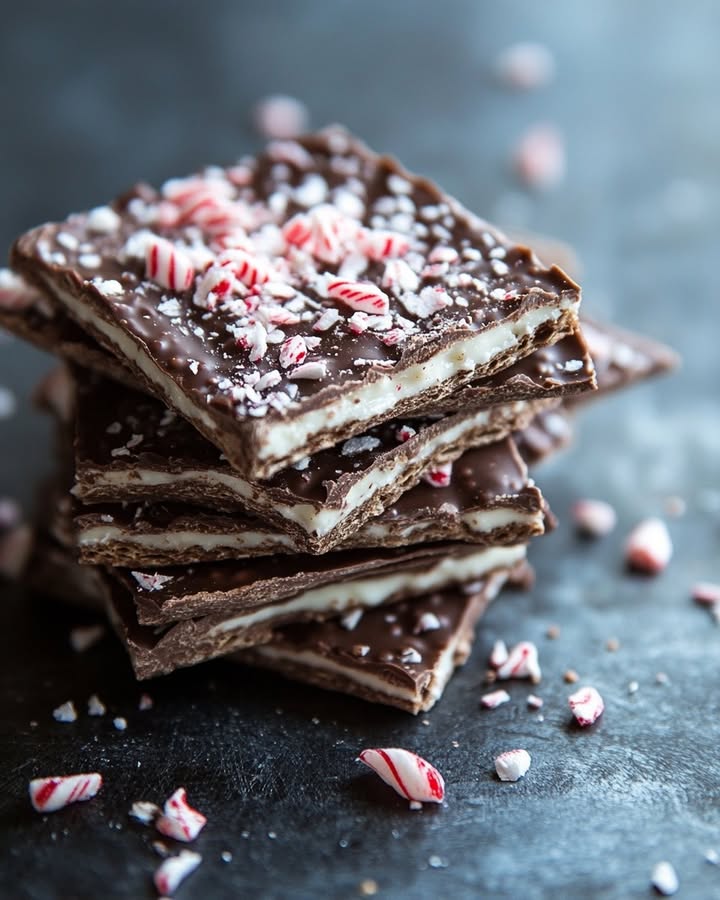
Voici la touche artistique ! Vous pouvez utiliser une cuillère, une fourchette, ou même un petit sac à douille pour fileter le chocolat blanc fondu d’un côté à l’autre sur la couche de chocolat au lait. Ne réfléchissez pas trop—des filets artistiques et un peu désordonnés sont parfaits. Immédiatement, tandis que le chocolat est encore mouillé et collant, saisissez votre bol de bonbons menthe écrasés. Saupoudrez-les généreusement sur le dessus ! Vous entendrez un petit *tink* charmant quand les morceaux de bonbon tombent. C’est l’étape que les enfants adorent aider.
Étape 6 : Durcissez et Cassez
Glissez doucement toute la plaque de cuisson dans le réfrigérateur. Laissez la magie opérer pendant au moins 30 minutes. Le chocolat durcira magnifiquement. Une fois complètement dur, vous n’avez même pas besoin d’un couteau. Soulevez simplement la grande plaque de crackers du papier sulfurisé et cassez-la en morceaux rustiques et irréguliers avec vos mains. C’est tellement amusant et donne une sensation merveilleusement homemade. Le son du chocolat qui craque est une pure joie.
Le Timing est Tout
C’est la beauté de cette recette :
- Temps de Préparation : 15 minutes de travail actif et fun.
- Temps de Refroidissement : 30 minutes minimum (un bon moment pour nettoyer !).
- Temps Total : Environ 45 minutes du début à la dégustation.
- Portions : Donne environ 20 morceaux généreux.
Le Secret du Chef pour le Graham Chocolat Menthe Ultime
Mon astuce secrète concerne le contraste des textures. Pour une touche extra spéciale, j’utilise des morceaux de menthe de deux tailles. Je garde certains bonbons écrasés assez fins, et je laisse quelques morceaux en petits bouts plus gros. Quand vous saupoudrez les deux, vous obtenez ce fantastique croquis fin et puis des petites explosions occasionnelles de saveur mentholée plus forte. Cela élève l’expérience gustative de « super » à « wow, qu’est-ce que c’est ? ».
Un Fun Fact sur vos Ingrédients
Savez-vous que les biscuits Graham ont été originellement inventés dans les années 1830 par un ministre presbytérien nommé Sylvester Graham comme partie d’un régime pour réduire les pulsions « malsaines » ? Ils étaient fades et sans sucre ! Je pense qu’il serait horrifié et secrètement ravi de voir ses biscuits wholesome transformés en une friandise festive décadente et joyeuse. Comme les temps (et les recettes) ont changé pour le mieux !
Ce dont Vous Avez besoin pour les Préparer
Pas besoin d’outils spéciaux ! Juste rassemblez :
- Grande plaque de cuisson
- Papier sulfurisé
- Deux bols adaptés au micro-ondes
- Spatule ou cuillère pour étaler
- Un outil pour le filet (fourchette, cuillère ou petit sac)
- Un espace dans le réfrigérateur !
Conserver votre Œuvre de Fêtes
Ces friandises se conservent merveilleusement, ce qui les rend parfaites pour une préparation anticipée. Une fois cassés en morceaux, disposez-les entre des feuilles de papier sulfurisé dans un contenant hermétique. Cela empêche qu’ils collent ensemble.
Placez le contenant dans le réfrigérateur. La température cool maintient le chocolat dur et la menthe croustillante. Ils resteront absolument parfaits jusqu’à 2 semaines ainsi.
Vous pouvez aussi les congeler pour une conservation plus longue, jusqu’à un mois. Assurez-vous simplement que le contenant est vraiment hermétique pour éviter les odeurs du congélateur. Laissez-les reposer à température ambiante quelques minutes avant de servir pour la meilleure texture et saveur.
Mes Conseils & Astuces Principales
- Écraser les Bonbons : Placez les cannes de bonbon dans un sac zip robuste et utilisez un rouleau à pâtisserie. C’est un excellent moyen de se déstresser !
- Qualité du Chocolat : Alors que les pépites fonctionnent bien, utiliser une tablette de chocolat de bonne qualité que vous avez coupée vous-même donnera une fonte encore plus lisse et un goût plus riche.
- Durcissement Rapide : Si vous êtes très pressée, vous pouvez mettre la plaque dans le congélateur environ 15 minutes plutôt que dans le frigo.
- Casses Nettes : Pour des carrés parfaitement nets, marquez légèrement le chocolat avec un couteau avant le refroidissement, puis cassez selon les lignes après.
Idées de Présentation pour Épater vos Invités
La présentation transforme cela d’un snack en une célébration ! Essayez ces idées :
- Empilez-les haut sur un présentoir vintage pour une pièce maîtresse.
- Emballer de petites piles dans des sacs en cellophane transparent noués avec un ruban rouge pour des cadeaux gourmands charmants.
- Disposer-les sur un plateau avec des brins de romarin frais pour une touche festive verte.
- Servez-les à côté d’autres friandises de fêtes comme des scones aux fruits rouges glacés ou un bol de fruits citrus pour une belle table de dessert.
6 Variations Délicieuses à Essayer
Une fois que vous maîtriserez la version classique, amusez-vous avec les saveurs ! Voici six variations inspirées de votre nouvelle favorite Graham Chocolat Menthe Festif.
- Chocolat Noir & Sel de Mer : Utilisez du chocolat noir pour la base et saupoudrez avec une petite pincée de sel de mer en flakes plutôt que de la menthe. Sophistiqué et addictif.
- Dream de Cookie Butter : Incorporer du cookie butter biscoff ou speculoos fondu dans la couche de chocolat au lait avant le filet blanc. Saveur caramel et incroyable.
- Croquant aux Noix : Saupoudrez le chocolat avec des amandes, noix de pécan ou cacahuètes grillées hachées. Vous obtenez une combinaison sucrée-salée merveilleuse.
- Style S’mores : Après étalage du chocolat au lait, saupoudrez avec des mini marshmallows. Grillez rapidement avec un chalumeau de cuisine, puis filetez et ajouter des miettes de Graham.
- Classique Bark Menthe : Oubliez la base de biscuit Graham. Étalez simplement le chocolat au lait sur du papier sulfurisé, filetez avec le blanc et ajoutez la menthe pour une bark traditionnelle. Pour plus de pâtisseries de fêtes classiques, explorez notre collection complète de gâteaux et pâtisseries.
- Fiesta de Vermicelles de Fêtes : Remplacez la menthe par des vermicelles de fêtes colorées ou des quin candies pour une friandise purement visuelle et colorée que les enfants adorent.
Erreurs Courantes à Éviter
Éviter ces pièges simples garantit un résultat parfait chaque fois.
Erreur 1 : Brûler le Chocolat au Micro-ondes
Le chocolat peut facilement brûler et devenir granuleux et inutilisable. Cela arrive quand on est impatient et le fait fondre trop longtemps d’un coup. Utilisez toujours la méthode des intervalles de 30 secondes, même si cela semble lent. Mélangez vigoureusement entre chaque période. La chaleur résiduelle continuera à fondre le chocolat pendant que vous mélangez. Si votre chocolat devient un peu épais, vous pouvez incorporer un peu plus d’huile (juste 1/4 cuillère à café) pour aider à le fluidifier.
Erreur 2 : Saupoudrer les Garnitures Après que le Chocolat Durcisse
Si vous attendez trop longtemps pour ajouter la menthe, elle ne collera pas. Vous finirez avec une belle bark de chocolat et un tas de bonbons qui tombent au fond de votre contenant. Le secret est d’avoir vos garnitures mesurées et prêtes à utiliser avant de commencer à fondre le chocolat. Le moment où vous finissez le filet de chocolat blanc, saisissez ce bol et recouvrez le dessus. Les bonbons se nichèrent dans le chocolat mou et mouillé et resteront.
Erreur 3 : Oublier l’Huile dans le Chocolat Blanc
Le chocolat blanc est connu pour être capricieux et figer. Il est beaucoup plus épais que le chocolat au lait ou noir quand il est fondu. Ajouter cette cuillère à café d’huile végétale est une étape non négociable. Cela fluidifie le chocolat juste suffisamment pour des filets beaux et fluides. Sans cela, vous aurez probablement un mélange épais et pâteux impossible à fileter et qui pourrait former des grumeaux sur votre bark.
Erreur 4 : Ne Pas Utiliser du Papier Sulfurisé
Essayer de faire durcir ceci directement sur une plaque ou utiliser du papier paraffiné plutôt que du papier sulfurisé est source de problèmes. Le chocolat collera, et vous aurez des difficultés à retirer les morceaux en un seul bloc. Le papier sulfurisé est non-collant et assure que vous pouvez soulever toute la plaque facilement. C’est la meilleure assurance pour une bark parfaite.
Questions Fréquemment Posées (FAQ)
Peut-on utiliser des cannes de bonbon plutôt que des bonbons à la menthe ?
Absolument ! Les cannes de bonbon sont l’option la plus festive et facile à trouver, surtout pendant les fêtes. Déballez-les simplement, placez-les dans un sac plastique robuste et écrasez-les avec un rouleau à pâtisserie ou le fond d’une casserole lourde. Vous obtiendrez la même saveur mentholée merveilleuse et les tourbillons festifs rouge et blanc dans votre Graham Chocolat Menthe Festif. C’est aussi une façon parfaite d’utiliser les cannes de bonbon restantes après les fêtes.
Comment obtenir des morceaux nets et réguliers quand je casse la bark ?
Pour des portions parfaites, utilisez une astuce intelligente avant le refroidissement. Après avoir ajouté les garnitures, utilisez un grand couteau de chef et marquez légèrement (appuyez doucement pour marquer, ne coupez pas) la bark en carrés ou rectangles. Ensuite, après qu’elle a durci complètement dans le frigo, vous pouvez simplement la casser selon ces lignes pré-faites. Cela donne beaucoup plus de contrôle et un produit final plus net pour les boîtes cadeaux ou plateaux.
Mon chocolat blanc est devenu granuleux. Qu’ai-je fait et peut-on le réparer ?
Le chocolat blanc est très sensible à la chaleur et l’humidité. Un chocolat granuleux ou « figé » signifie généralement qu’il a été trop chauffé ou qu’une petite goutte de steam ou d’eau a atteint le bol. Pour essayer de le sauver, mélangez avec 1/2 cuillère à café supplémentaire d’huile végétale ou de shortening. Si cela ne fonctionne pas, malheureusement, il est mieux de recommencer. Utilisez toujours un bol complètement sec et faites fondre lentement pour éviter ce problème.
Peut-on rendre cette recette sans lactose ou vegan ?
Oui, vous pouvez facilement l’adapter ! Utilisez des pépites de chocolat sans lactose (de nombreuses marques existent) et assurez que vos biscuits Graham sont vegan (certains contiennent du honey). L’huile végétale est déjà végétale. Pour la menthe, vérifiez simplement l’étiquette pour éviter un glaze de confiseur (qui peut contenir de la shellac) si vous suivent un régime vegan strict. Cela sera aussi délicieux et festif.
Pourquoi faut-il réfrigérer ces friandises ?
La réfrigération est cruciale pour deux raisons. Premièrement, cela durcit le chocolat rapidement et fermement, donc vous pouvez manipuler et servir les morceaux sans qu’ils fondent. Deuxièmement, cela garde tout frais et crisp. Le chocolat et la menthe maintiennent leur texture mieux quand ils sont refroidis. Cela rend aussi cela un dessert parfait pour préparer en avance pour une soirée. Sortez-les environ 10 minutes avant de servir pour réduire le froid extrême.
Peut-on utiliser le four plutôt que le micro-ondes pour fondre le chocolat ?
Vous pouvez, mais cela demande plus d’attention. Utilisez une méthode du bain-marie : placez un bol résistant à la chaleur sur une casserole d’eau frémissante, assurez que le fond du bol ne touche l’eau. Mélangez constamment jusqu’à la fonte. Cette méthode donne plus de contrôle et est moins susceptible de brûler le chocolat, même si cela prend un peu plus longtemps. Le micro-ondes est simplement l’option plus rapide et plus pratique pour cette friandise rapide.
Ces friandises peuvent-elles être envoyées comme cadeaux ?
Elles peuvent, avec un packaging soigné. Comme le chocolat peut fondre, il est mieux de les envoyer pendant un climat cool. Placez les morceaux en une seule couche dans un contenant hermétique robuste avec du papier sulfurisé entre les couches. Protégez bien le contenant dans une boite d’expédition. Pour une touche pro, considérez utiliser une doublure isolée ou un pack réfrigéré si vous expédiez pendant des mois plus chauds. Elles sont un cadeau homemade merveilleux qui montre que vous avez pris du soin.
Quelles autres garnitures peut-on utiliser à part la menthe ?
Libérez votre créativité ! La base est un canvas parfait. Essayez des morceaux de toffee écrasés, des mini-pretsel, des framboises lyophilisées (écrasées), des flocons de coconut grillés, ou même un saupoudrage de poudre espresso pour une twist mocha. Des noix hachées comme pistaches ou noisettes ajoutent aussi une saveur et un croquant merveilleux. Laissez votre pantry et votre mood de fêtes vous guider.
Combien de temps cela se conserve, et peut-on les congeler ?
Stockés correctement dans un contenant hermétique dans le frigo, ils sont au meilleur jusqu’à 2 semaines. Ils peuvent aussi être congelés jusqu’à 1 mois. Pour congeler, placez du papier sulfurisé entre les couches dans un contenant adapté au congélateur. Faites dégeler dans le réfrigérateur pendant la nuit. Cela rend cela une excellente option de préparation anticipée pour la saison des fêtes chargée.
Cette recette est-elle sûre pour que les enfants participent ?
C’est une des meilleures premières recettes pour les enfants ! Ils peuvent aider à disposer les biscuits Graham, saupoudrer les garnitures (leur mission favorite !), et casser la bark durcie en morceaux. Un adulte devrait manipuler la fonte du chocolat due aux bols chauds, mais tout le reste est merveilleusement adapté aux enfants. C’est une façon fantastique de créer des souvenirs heureux de fêtes dans la cuisine. Pour plus d’inspiration sweet que toute la famille aimera, essayez notre classique pain donut à la cannelle ou notre fabuleusement simple fudge crémeux au beurre de cacahuète. Si vous cherchez un bonbon traditionnel, nos pralines pecan au buttermilk sucré sont une joie du Sud.
Reflexions Finales sur votre Nouvelle Friandise de Fêtes Favorite
Voilà donc— votre nouvelle recette de secours quand vous avez besoin d’un dessert impressionnant mais zéro temps à perdre. Ces Grahams chocolat menthe festifs sont plus qu’une friandise ; ils sont un petit morceau de joie de fêtes que vous pouvez préparer et partager. Ils prouvent que les meilleurs choses n’ont pas besoin de être compliquées. J’adore comment ils font sourire chacun. Que vous les donnez en cadeau, les partagez, ou gardez juste un stock secret dans le frigo pour vous (aucun jugement ici !), ils sont l’essence de la magie simple et délicieuse des fêtes. Essayez-les, et que les festives dégustations commencent !
Equipment
- Plaque de cuisson
- Papier sulfurisé
- Bols adaptés au micro-ondes
- Spatule ou cuillère pour étaler
- Outil pour faire des filets (fourchette, cuillère ou petit sachet)
Ingrédients
- 1 paquet crackers Graham environ 410 g / 10 feuilles entières
- 1 tasse pépites de chocolat au lait
- 1/2 tasse bonbons à la menthe écrasés les cannes en bonbon fonctionnent parfaitement !
- 1/4 tasse pépites de chocolat blanc
- 1 c. à café huile végétale ou d'huile de coco
Instructions
- Préparez une plaque de cuisson en la tapissant de papier sulfurisé et disposez les crackers Graham en une seule couche.
- Faites fondre les pépites de chocolat au lait au micro-ondes par intervalles de 30 secondes, en remuant entre chaque.
- Étalez le chocolat fondu sur les crackers Graham en une couche uniforme.
- Dans un petit bol, mélangez les pépites de chocolat blanc avec l'huile et faites fondre comme précédemment.
- Avec une cuillère ou un sachet, faites des filets de chocolat blanc sur la couche de chocolat au lait, puis saupoudrez immédiatement de bonbons à la menthe écrasés.
- Placez la plaque au réfrigérateur pendant au moins 30 minutes avant de casser le slab en morceaux irréguliers.
Notes
Nutrition

Je suis Céline, une véritable passionnée d’ustensiles et de matériel de cuisine ! J’adore tester, comparer et découvrir les meilleurs équipements pour rendre la cuisine plus efficace et agréable. Que ce soit un bon couteau, un robot performant ou une poêle incontournable, je suis toujours à la recherche des outils qui feront la différence. Mon but est de vous guider dans vos choix pour que vous ayez le bon matériel adapté à vos besoins.