
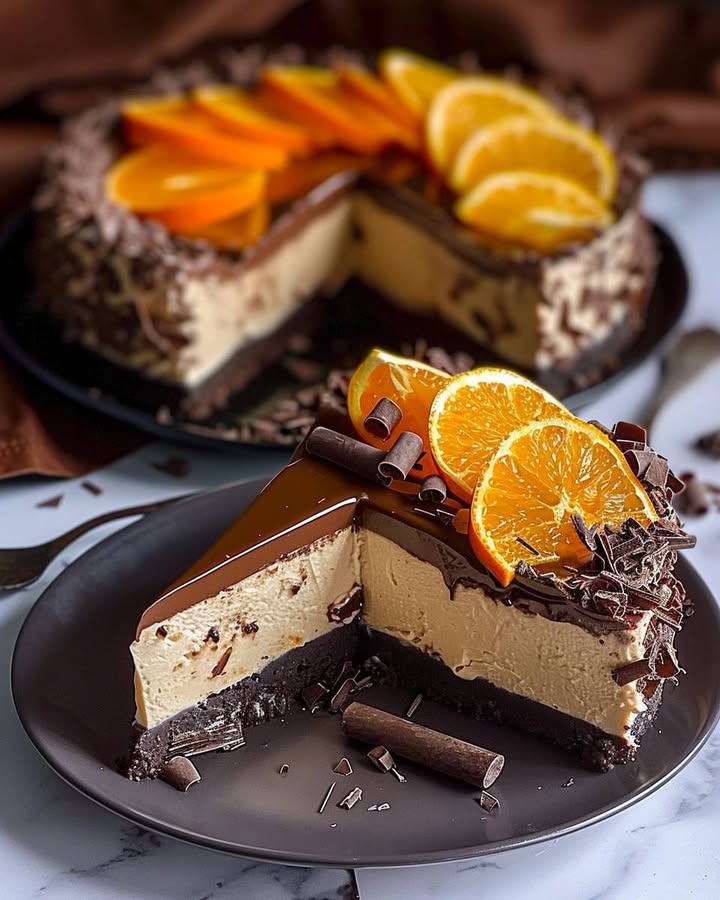
Le Cheesecake Chocolat-Orange Ultime : Un Mariage Parfait
Il y a quelque chose magique dans l’association du chocolat et de l’orange. C’est comme si ils étaient faits pour être ensemble. J’ai découvert ce duo dans un café cozy il y a des années, et depuis, c’est une obsession. Ce cheesecake chocolat-orange est mon hommage maison à ce mariage de saveurs parfait. Il est crémeux, riche, et possède cette note brillante et solaire de citrus qui équilibre la richesse. Une part, et vous en tomberez amoureux !
Une Part d’Histoire : D’où Vient Cette Saveur ?
Chocolat et orange, un classique aux racines anciennes. Bien que l’origine exacte de ce cheesecake soit moderne, l’association elle-même enchante les papilles depuis des siècles. En Europe, notamment au Royaume-Uni, les oranges chocolatées sont une friandise de Noël incontournable. Transposer cette saveur iconique dans un cheesecake onctueux, sans cuisson (ou cuisiné !), est une idée géniale. Cela transforme un bonbon cher en un dessert sophistiqué parfait pour les dîners festifs.
Pourquoi Vous Allez Aimer Ce Cheesecake
Ce n’est pas juste un dessert ; c’est un succès garanti. La texture est incroyablement lisse et luxueuse. Le zeste et le jus d’orange ne sont pas juste une note—ils sont une saveur vibrante qui rend chaque bouchée intéressante. Et bien qu’il semble impressionnant, les étapes sont simples et fiables. C’est le type de recette qui vous fait ressembler à un pro, même si vous êtes juste une cuisinière maison cherchant un plaisir spécial pour votre famille.
Quand Servir Votre Cheesecake Chocolat-Orange
Ce cheesecake rayonne à toute occasion ! Il est élégant pour une table de fête, comme Noël ou Pâques. Il est une alternative spectaculaire pour un gâteau d’anniversaire. Je adore le porter aux repas partagés car il disparaît toujours en premier. Honnêtement, il fait aussi un projet de week-end “juste parce que”. Le préparer est un plaisir, et les visages heureux quand vous le servez sont la meilleure récompense.
Rassembler Vos Ingrédients
Préparons tout ! Utiliser des ingrédients de qualité fait la différence ici, surtout un bon chocolat et des oranges fraîches et juteuses.
Pour la base :
- 2 cups de chapelure de biscuits chocolatés (comme des Oreo®, le cœur blanc retiré)
- 1/2 tasse de beurre doux, fondu
Pour la garniture du cheesecake :
- 24 oz (680g) de cream cheese, ramolli à température ambiante
- 1 tasse de sucre granulé
- 1 tasse de crème fraîche épaisse, à température ambiante
- 3 gros œufs, à température ambiante
- Zeste d’une grande orange
- 1/4 tasse de jus d’orange frais (environ 1 orange)
- 1 c.à.c. d’extrait de vanille pur
- 4 oz (113g) de chocolat mi-sucré, fondu et légèrement refroidi
Pour la ganache chocolatée & la garniture :
- 4 oz (113g) de chocolat mi-sucré, finement haché
- 1/2 tasse de crème liquide entière
- Zeste d’orange supplémentaire, pour une belle garniture
Pas de problème ! Substitutions pratiques
Vous manquez quelque chose ? Pas de souci ! Voici quelques alternatives :
- Base biscuitée : Utilisez des biscuits digestifs (Graham crackers) avec 2 c.à.s de cocoa powder mélangés.
- Crème fraîche épaisse : Le yaourt grec nature entier est une excellente alternative.
- Crème liquide (pour ganache) : Vous pouvez utiliser du lait de coco entier pour une version sans lactose.
- Jus d’orange : En cas de besoin, un jus de qualité du commerce fonctionne. Mais le zeste frais est non négociable pour cet aroma brillant !
Créer Votre Cheesecake Chocolat-Orange : Pas à Pas
Étape 1 : La Fondation – Préparer la Base
Préchauffez votre four à 325°F (160°C). Prenez votre moule à fond amovible et légèrement graissez-le. Dans un bol moyen, combinez la chapelure de biscuits chocolatés et le beurre fondu doré. Mélangez jusqu’à ce que chaque crumb soit enrobé et que le mélange ressemble à du sable humide. Versez-le dans le moule et tassez-le fermement et uniformément avec le fond d’un verre ou d’une tasse mesure. Une base solide et compacte est cruciale pour des tranches faciles ! Faites cuire cela 10 minutes, puis laissez refroidir. Votre cuisine sera déjà parfumée.
Étape 2 : Le Cœur – Faire la Garniture
Maintenant, place à la magie crémeuse ! Dans un grand bol, mélangez le cream cheese ramolli et le sucre jusqu’à obtenir une texture complètement lisse et sans mottes. C’est crucial pour la texture veloutée. Ajoutez la crème fraîche épaisse et mélangez à nouveau jusqu’à incorporation. Ajoutez les œufs, un à un, mélangez bien après chaque ajout. Enfin, incorporez le glorieux zeste d’orange frais, le jus acidulé et la vanille. La garniture deviendra pale, parfumée et merveilleusement aérienne.
Pro tip : Utilisez une microplane pour le zeste d’orange pour obtenir une texture super fine et libérer plus d’huiles. Évitez le péricarpe blanc amer !
Étape 3 : La Magie du Marbré – Incorporer le Chocolat
Prenez environ 1 tasse de votre garniture de cheesecale nature et placez-la dans un bol séparé. Versez votre chocolat fondu légèrement refroidi dans cette tasse de garniture et mélangez jusqu’à obtenir un brun uniforme et luxueux. Maintenant, versez la garniture orange restante sur votre base refroidie. Ajoutez la garniture chocolatée par-dessus en plusieurs grosses cuillerées. Prenez un couteau ou une spatule et tournez doucement dans les deux préparations. Ne mélangez pas trop ! Vous voulez des superbes rubans de chocolat.
Étape 4 : La Cuisson Douce & le Refroidissement
Placez votre moule dans le four préchauffé. Cuisez 45-50 minutes. L’objectif est que les bords soient pris et gonflés, tandis que le centre garde un léger, doux tremblement—comme du Jell-O. Quand il semble parfait, coupez le four. Ouvrez la porte du four avec une cuillère en bois et laissez le cheesecake refroidir à l’intérieur pendant une heure complète. Ce refroidissement lent empêche le formation de fissures sur sa belle surface.
Étape 5 : La Touche Finale – Ganache Chocolatée
Une fois le cheesecake complètement refroidi (au moins 4 heures, une nuit est meilleure), préparer la ganache. Chauffez la crème liquide dans une petite casserole jusqu’à légère ébullition—des petites bulles se formeront sur les bords. Versez la crème chaude sur votre chocolat haché dans un bol résistant à la chaleur. Laissez reposer 2 minutes pour fondre le chocolat, puis mélangez lentement jusqu’à se transformer en une cascade de chocolat magnifique, glossy et lisse. Laissez refroidir 5 minutes, puis versez-la au centre du cheesecake refroidi. Tilt le moule pour aider à étaler uniformément jusqu’aux bords.
Secret du chef : Pour des tranches nettes, trempez votre couteau dans de l’eau chaude et nettoyez-le entre chaque coup. Cela glisse facilement à travers la ganache et la garniture pour des parts parfaites !
Votre Timeline du Cheesecake
- Préparation : 30 minutes
- Cuisson : 50 minutes
- Refroidissement : 1 heure (dans le four)
- Refroidissement au frigo : Minimum 4 heures, mieux une nuit
- Ganache & Finalisation : 1 heure supplémentaire
- Total (sans intervention) : Approximativement 7 heures, largely inactive
Un Petit Fun Fact de Science Culinaire
Saviez-vous que l’acide dans le jus d’orange frais et la crème fraîche épaisse aide à attendrir les protéines dans le cream cheese et les œufs ? Cela contribue à cette texture incroyablement lisse, fondante. C’est un exemple parfait de comment les saveurs et la chimie travaillent ensemble pour créer quelque chose magique. Pour plus sur comment les ingrédients interagissent et maintiennent la qualité, des ressources comme 1071223530056036524 offrent insights sur la science alimentaire.
Votre Boîte à Outils Culinaire
Pas besoin d’équipment complexe ! Un moule à fond amovible de 9 pouces (23cm) est essentiel. Vous aurez aussi besoin d’un grand bol de mixage, d’un mixeur à main ou sur socle, d’un microplane zesteur, d’une casserole pour la ganache, et d’une spatule. C’est vraiment tout !
Conserver Votre Cheesecake Parfaitement Frais
Après garniture avec le zeste d’orange final, ce cheesecake doit rester au frais. Couvrez-le bien avec film plastique ou placez sous un dome. Il se gardera parfaitement au frigo jusqu’à 5 jours.
Vous pouvez aussi congeler ce dessert pour un stockage plus long. Congelez le cheesecake entier ou des parts individuelles sur un plateau avec papier sulfurisé jusqu’à solidité. Ensuite, emballez chaque pièce dans film plastique et foil. Il se gardera jusqu’à 2 mois.
Pour servir une part congelée, transférée simplement au frigo pour thaw overnight. Cela fait un dessert fantastique à préparer en avance pour des semaines chargées ou des invités surprises !
Mes Meilleurs Tips pour un Cheesecake Succès
- Température Ambiance est Crucial : Laissez votre cream cheese, œufs et crème fraîche épaisse reposer une heure avant de commencer. Cela empêche une garniture avec mottes et assure une cuisson uniforme.
- Ne Pas Trop Mélanger : Après ajouter les œufs, mixez juste jusqu’à incorporation. Trop mélanger incorpore trop d’air, ce qui cause un cheesecake à gonfler et tomber dramatiquement, leading to cracks.
- Le Trick du Bain d’eau : Pour une onctuosité ultime sans risque de fissures, cuisez votre cheesecake dans un bain d’eau. Enveloppez l’extérieur de votre moule amovible dans foil résistant, placez dans un grand plat, et versez de l’eau chaude dans le plat jusqu’à atteindre mitad autour du moule.
Donner l’Apparence d’une Patisserie
La présentation est la touche finale ! Essayez ces idées :
- Placez délicates boucles de chocolat noir sur la ganache avec le zeste d’orange.
- Servez chaque part avec quelques segments d’orange fraîche ou une dollop de crème fraîche légèrement sucrée whipped cream.
- Pour une touche festive, garnissez avec une branche de mint ou une dusting de poudre d’or edible.
Explorez Plus de Desserts Chocolatés Décadents !
Si vous aimez cette recette, mon blog est un treasure trove de delights chocolatés. Vous pourrait adorer les layers intenses et dark de mon Devil’s Food Cake ou l’élégant, berry-infused Heavenly Raspberry Chocolate Mousse Cake. Pour un classique qui never fails, Matilda’s Chocolate Cake est pure comfort. Et si vous appréciez la note café dans le chocolat, le Coffee & Walnut Cake est un treat sophistiqué. Vous pouvez trouver tous ces and plus dans ma collection de favorite cakes and pastries.
Variations Santé & Adaptées aux Régimes
Vous pouvez facilement adapt ce cheesecake à différents diets ! Voici six idées gourmandes :
- Gluten-Free : Utilisez juste vos biscuits chocolatés sans gluten favoris pour la base. La garniture est naturellement sans gluten.
- Version Légère : Utilisez du Neufchâtel cheese (cream cheese moins riche), sour cream légère, et un sucre substitut adapté au baking. La saveur sera toujours wonderful !
- Cheesecake Chocolat-Orange Vegan : Utilisez une base de noix et dates. Pour la garniture, mixez des noix de cajou soaked avec crème de coco, chocolat vegan melted, orange, et maple syrup. Set au frigo—no baking required !
- Mini Cheesecakes : Portionnez la garniture dans un moule muffin avec paper liners. Reduce baking time à approximativement 20 minutes. Perfect pour parties et portion control.
- Chocolat Blanc & Orange Sang : Remplacez le chocolat mi-sucré par du chocolat blanc dans garniture et ganache. Utilisez jus et zeste d’orange sang pour une hue rose stunning et flavor plus complexe.
- Version Épicée : Ajoutez un pinch de cinnamon, cardamom ou même un tiny bit de chili powder à la garniture chocolatée pour un twist « chocolat chaud Mexicain » sur le pairing classique.
Erreurs Courantes à Éviter Avec Votre Cheesecake
Erreur 1 : Utiliser des Ingrédients Froids
C’est la raison numéro 1 pour une garniture de cheesecake avec mottes, uneven. Quand le cream cheese est cold, il ne se mélange pas smoothly avec le sucre et autres ingrédients. Vous aurez des petits bits dans votre garniture crémeuse. Planifie ahead ! Sortez votre cream cheese, œufs et sour cream du frigo au moins une heure avant baking. Ils doivent être cool mais not cold.
Erreur 2 : Trop Cuire le Cheesecake
Nous voulons une texture custard-like, pas un cake dry ! Over-baking cause cracks et garniture dry et grainy. Le cheesecake est done quand l’outer 2-3 inches appear set, mais le centre (size d’un lemon) garde un tremblement wobbly quand vous shake le pan doucement. Il firm up perfectly pendant cooling. Remember, il continue à cuire avec heat résidu même après turning oven off.
Erreur 3 : Négliger le Refroidissement Lent
Retirer un cheesecake hot du oven et placer sur counter est un shock pour son système. Le changement temperature sudden cause contraction too quickly, leading to dreaded giant cracks sur le top. Patience est votre ami ici. Le laisser cool graduellement dans oven turned-off avec door ajar permet un settle doux, preserving sa surface smooth, flawless.
Erreur 4 : Couper dans un Cheesecake Warm
Je sais c’est tentant, mais vous must attendre ! Un cheesecake nécessite time pour sa structure à fully set dans frigo. Couper avant refroidissement complet results in une part messy, runny qui ne hold sa shape. Le long chill—preferably overnight—est not a suggestion, c’est une requirement. Il permet toutes saveurs à meld et texture à devenir perfectly firm et sliceable.
Questions Sur Votre Cheesecake Chocolat-Orange Répondues
Je peux faire ce cheesecake sans moule à fond amovible ?
Un moule amovible est highly recommended pour easy removal, mais vous pouvez utiliser un regular moule cake de 9 pouces (23cm). Vous devrez le liner très thoroughly avec parchment paper, letting paper hang over sides pour créer « handles ». Cela aidera à lifter le cheesecake chilled out. C’est a bit trickier, mais ça marche in a pinch. Be extra careful quand loosening les sides avec un knife avant lifting.
Why did my cheesecake crack sur le top ?
Cracks usually happen from over-mixing batters (adding trop air), over-baking, ou cooling too quickly. Following tips pour température ambiante ingredients, test de tremblement, et slow cool-down dans oven prevent 99% de cracks. Et remember, même si ça crack, il taste incredible ! Une layer de ganache glossy covers all sins beautifully.
Quelle est the meilleure façon de zest an orange ?
Utilisez un microplane grater fin ou les holes plus petits sur un box grater. Gently rub L’orange contre le grater, turning pendant. Vous voulez juste le bright orange outer layer de skin (zeste), qui est packed avec oils flavors. Avoid le bitter white pith underneath. Do ceci over un small plate ou piece de parchment pour catcher all précieux zest.
Je peux utiliser bottled orange juice au lieu de fresh ?
Pour le juice dans garniture, vous pouvez utiliser un high-quality, not-from-concentrate bottled juice dans un absolute emergency. Cependant, le zest fresh est absolutely non-negotiable. Le zest hold intense, aromatic citrus oils qui donnent ce dessert son signature perfume « Chocolat-Orange ». Bottled juice won’t provide ceci, donc never skip l’orange fresh pour zesting.
Je peux faire ce cheesecake en avance ?
C’est un fantastic dessert à faire en avance ! Vous pouvez bake et chill cheesecake (without ganache) jusqu’à 2 jours avance. Ajoutez la ganache et garnish final le jour vous plan serve pour le look plus fresh et orange flavor plus bright. La ganache gardera son shine perfectly overnight dans frigo aussi.
Ma ganache est trop liquide/thick. Comment fixer ?
Consistance ganache dépend ratio cream à chocolate et son température. Si trop liquide, vous likely besoin le laisser cool et thicker à température ambiante pour 10-15 minutes plus. Stir occasionally. Si trop thick et gloopy, il peut avoir cooled trop. Gently re-warm pour bursts de 5-secondes dans microwave, stirring entre, jusqu’à atteindre consistency pourable again.
Est-il nécessaire d’utiliser un bain d’eau ?
Pour cette recette spécifique avec crème fraîche épaisse, un bain d’eau est not strictly necessary si vous follow méthode baking douce et cooling. La sour cream adds moisture extra et stability. Cependant, si vous êtes prone to cracks ou vouloir texture absolutely silky, plus professional imaginable, un bain d’eau est une guarantee foolproof. Il crée un environnement oven steamy, doux pour cooking plus even.
Je peux congeler le cheesecake fini ?
Absolument ! Congelez le cheesecake entier ou slices individuelles. First, freeze uncovered sur tray jusqu’à solid (environ 2 hours). Then, wrap tightly dans plastic wrap puis foil. Label et store jusqu’à 2 months. Thaw overnight dans refrigerator avant servir. Texture remain wonderfully creamy.
Je fais quoi avec leftover cheesecake ?
Restes ? Un problème rare ! Mais si vous en avez, store covered dans fridge. Vous pouvez être créatif aussi : crumble une slice over vanilla ice cream, blend une piece dans un milkshake, ou même utiliser small bits comme topping pour votre oatmeal morning ou yogurt pour un start très decadent du jour.
Je peux utiliser un type différent de chocolate ?
Yes, vous pouvez experiment ! Utiliser chocolat noir (70%) donnera une flavour intense, moins sweet qui pair wonderfully avec orange. Milk chocolate rendra beaucoup plus sweet et mild. Je ne recommend pas chocolat unsweetened, car rendra garniture trop bitter. Stick avec bonnes barres baking pour melting, plutôt que chips chocolatés, qui often contain stabilizers.
La Part Finale
Ce Cheesecake Chocolat-Orange est plus qu’un dessert. C’est un petit projet d’amour qui fini en pure joie. Le process de swirl batters, smelling zest d’orange mix avec chocolate, et finally unveiling ce masterpiece glossy, fini est si gratifiant. Il est devenu mon dessert go-to pour faire sentir les gens spécials. J’espère il bring autant happiness à votre table que à mine. Alors, allez préchauffez cet oven et préparez-vous pour compliments !
Equipment
- Moule à charnière
- Grand bol de mélange
- Mixeur à main ou batteur sur socle
- Râpe microplane
- Casserole pour la ganache
Ingrédients
- 2 tasses miettes de biscuits au chocolat comme les miettes d'Oreo®, garniture retirée
- 1/2 tasse beurre non salé fondu
- 680 g fromage à la crème ramolli à température ambiante
- 1 tasse sucre granulé
- 1 tasse crème aigre à température ambiante
- 1 c. à café extrait de vanille
- 1/4 tasse jus d'orange frais environ 1 orange
- 1 orange zeste d'une grosse orange
- 113 g chocolat semi-sucré fondu et légèrement refroidi
- 113 g chocolat semi-sucré finement haché pour la ganache
- 1/2 tasse crème épaisse pour la ganache
Instructions
- Préchauffez le four à 160°C (325°F) et graissez légèrement un moule à charnière.
- Dans un bol moyen, mélangez les miettes de biscuits au chocolat avec le beurre fondu jusqu'à ce que le mélange ressemble à du sable humide.
- Versez dans le moule et pressez fermement le mélange pour former une croûte compacte. Faites cuire pendant 10 minutes, puis réservez pour refroidir.
- Dans un grand bol, battez le fromage à la crème et le sucre jusqu'à obtenir un mélange lisse et homogène.
- Ajoutez la crème aigre et mélangez jusqu'à ce qu'elle soit bien incorporée.
- Incorporez les œufs un par un, en battant bien après chaque ajout.
- Ajoutez le zeste d'orange, le jus d'orange et la vanille, puis mélangez jusqu'à ce que le mélange soit léger et aéré.
- Prenez environ 1 tasse de la préparation et mélangez-y le chocolat fondu.
- Versez le mélange d'orange sur la croûte refroidie, puis déposez le mélange chocolaté par cuillerées sur le dessus.
- Utilisez un couteau pour marbrer le chocolat dans la préparation d'orange, sans trop mélanger.
- Enfournez pendant 45 à 50 minutes, jusqu'à ce que les bords soient pris et que le centre ait encore un léger mouvement.
- Éteignez le four, entrouvrez la porte et laissez le cheesecake refroidir à l'intérieur pendant une heure.
- Une fois le cheesecake complètement refroidi (au moins 4 heures, de préférence toute la nuit), préparez la ganache.
- Chauffez la crème épaisse jusqu'à ébullition, puis versez-la sur le chocolat haché. Laissez reposer 2 minutes avant de remuer jusqu'à obtenir un mélange lisse.
- Versez la ganache sur le cheesecake refroidi et inclinez le moule pour répartir uniformément.
- Décorez avec du zeste d'orange supplémentaire.
Notes
Nutrition

Je suis Céline, une véritable passionnée d’ustensiles et de matériel de cuisine ! J’adore tester, comparer et découvrir les meilleurs équipements pour rendre la cuisine plus efficace et agréable. Que ce soit un bon couteau, un robot performant ou une poêle incontournable, je suis toujours à la recherche des outils qui feront la différence. Mon but est de vous guider dans vos choix pour que vous ayez le bon matériel adapté à vos besoins.