
Le Gâteau au Chocolat de Matilda : Le Dessert Divin Qui Réchauffe les Cœurs
Avez-vous déjà tellement, mais tellement eu envie d’une part de gâteau au chocolat, que cela ressemblait à un câlin pour l’âme ? C’est exactement ça, le gâteau au chocolat de Matilda. Je me souviens encore de la première fois que je l’ai préparé pour l’anniversaire de ma fille, de l’incroyable arôme qui a envahi la cuisine, et de la pure joie chocolatée sur tous les visages. Ce n’était pas juste un gâteau ; c’était un moment magique. Ce n’est pas simplement un gâteau chocolat délicieux ; c’est celui qui devient une légende dans votre propre famille, et aujourd’hui, je partage tous ses secrets pour qu’il devienne aussi le vôtre.
La Merveilleuse Histoire Derrière Ce Gâteau Célèbre
Ce gâteau emprunte son nom à une histoire vraiment spéciale – le personnage bien-aimé de Roald Dahl, Matilda. Vous savez, cette petite fille brillante qui trouve du réconfort dans les livres et, bien sûr, dans le défi épique du gâteau au chocolat de Bruce Bogtrotter. Bien que cette recette ne soit pas exactement celle de l’histoire (ouf, sinon il nous faudrait une brouette pour le servir !), elle capture ce même esprit de plaisir pur et sans complexe. C’est l’hommage de la cuisinière moderne à cette scène iconique : un gâteau riche, moelleux, qui donne l’impression d’une récompense triomphante. Au fil des ans, j’ai testé d’innombrables versions, ajustant ci et là, pour aboutir à cet équilibre parfait entre une mie fondante et ce glaçage luxueux et crémeux. C’est mon incontournable pour rendre n’importe quel jour extraordinaire.
Pourquoi Vous Allez Adorer Cette Recette de Gâteau au Chocolat
Vous allez tomber amoureux de cette recette parce qu’elle fonctionne, à chaque fois. Elle donne un gâteau au chocolat ultra-moelleux de niveau professionnel, sans aucune complication. Le secret ? La tasse d’eau bouillante à la fin. Cela peut sembler étrange, mais cela « réveille » la poudre de cacao, intensifie la saveur du chocolat, et crée une pâte qui cuit de manière incroyablement tendre. De plus, le glaçage est un rêve à étaler – soyeux, pas trop sucré, et d’un chocolat inouï. C’est le genre de recette qui vous fait passer pour une cheffe pâtissière, même si vous cuisinez en pyjama un dimanche matin.
Les Occasions Parfaites pour Votre Gâteau Super Moelleux
C’est votre arme secrète culinaire. Il est parfait pour les anniversaires, pour transformer un simple dîner en une occasion festive, ou comme pièce maîtresse spectaculaire pour les fêtes. J’adore l’apporter aux repas partagés car il disparaît toujours en premier. C’est aussi mon gâteau « sans raison » préféré – parfois, un mardi après-midi mérite bien une part de bonheur avec une tasse de café. Quel que soit l’événement, ce gâteau au chocolat facile promet d’être la star.
Ingrédients pour Votre Gâteau au Chocolat Divin
Pour le gâteau :
- 2 tasses de farine tout usage
- 1 tasse et 3/4 de sucre en poudre
- 3/4 de tasse de cacao en poudre non sucré (de qualité, c’est le mieux !)
- 2 cuillères à café de levure chimique
- 1/2 cuillère à café de bicarbonate de soude
- 1 cuillère à café de sel
- 1 tasse de babeurre, à température ambiante
- 1/2 tasse d’huile végétale
- 2 gros œufs, à température ambiante
- 2 cuillères à café d’extrait de vanille pur
- 1 tasse d’eau bouillante
Pour le glaçage au chocolat :
- 340 g (3 sticks) de beurre doux, ramolli
- 1 tasse de cacao en poudre non sucré
- 5 tasses de sucre glace, tamisé
- 1/2 tasse de lait (lait entier de préférence)
- 2 cuillères à café d’extrait de vanille
- 1/4 de cuillère à café de sel
Des Substitutions Astucieuses Selon Votre Placard
Pas de babeurre ? Pas de problème ! Fabriquez-le vous-même en ajoutant 1 cuillère à soupe de jus de citron ou de vinaigre blanc à une tasse de lait normal. Laissez reposer 5 minutes jusqu’à ce qu’il caille. Plus d’huile végétale ? Une quantité égale d’huile de coco fondue ou même d’huile d’olive douce fonctionne très bien. Pour une version sans lait, utilisez votre boisson végétale préférée et remplacez le beurre du glaçage par un équivalent de beurre végétalien de qualité. Le gâteau est merveilleusement adaptable !
Comment Réaliser l’Ultime Gâteau au Chocolat de Matilda
Suivez ces étapes pour un gâteau infaillible et magnifique. Souvenez-vous, la pâtisserie est une science joyeuse, alors amusez-vous !
Étape 1 : Préchauffer et Préparer Vos Moules
Commencez par préchauffer votre four à 180°C (350°F). Cela garantit qu’il sera parfaitement chaud quand votre pâte sera prête. Pendant le chauffage, prenez vos deux moules à gâteau ronds de 23 cm et beurrez-les généreusement ou vaporisez-les avec un spray antiadhésif. Chemisez le fond avec des cercles de papier sulfurisé – cette astuce magique garantit que vos gâteaux se démouleront sans qu’une miette ne reste collée. Je ne saute jamais cette étape ! Astuce de pro : Une légère pincée de cacao en poudre sur les côtés beurrés (au lieu de la farine) évite toute traînée blanche sur votre gâteau fini.
Étape 2 : Créer la Magique Pâte au Chocolat
Dans un grand saladier, mélangez au fouet vos ingrédients secs : farine, sucre, cacao, levure, bicarbonate et sel. Observez le cacao foncé créer de beaux tourbillons avec la farine blanche. Dans un autre bol ou un grand verre mesureur, fouettez les ingrédients humides : le babeurre à température, l’huile végétale, les œufs et la vanille. Versez le mélange humide sur les ingrédients secs et battez avec un batteur électrique à vitesse moyenne jusqu’à ce que tout soit juste combiné – environ 2 minutes. La pâte sera épaisse et brillante. Maintenant, versez lentement l’eau bouillante. La pâte deviendra très fine et liquide ; c’est exactement ce que vous voulez ! C’est la clé de cette texture super moelleuse.
Étape 3 : Cuire à la Perfection
Divisez soigneusement la pâte mince de façon égale entre vos moules préparés. Ils devraient être à moitié pleins. Glissez-les au centre de votre four préchauffé. Laissez cuire 30 à 35 minutes. Vous saurez qu’ils sont cuits quand le dessus revient légèrement sous le doigt et qu’un cure-dent inséré au centre en ressort avec seulement quelques miettes humides. L’odeur sera absolument divine. Astuce de pro : Évitez d’ouvrir la porte du four avant la marque des 30 minutes pour empêcher les gâteaux de s’affaisser. Une fois cuits, laissez-les refroidir dans les moules 10 minutes avant de les démouler sur une grille pour qu’ils refroidissent complètement. La patience est cruciale pour un glaçage facile !
Étape 4 : Préparer le Glaçage au Chocolat Rêvé
Pendant que les gâteaux refroidissent, préparez le glaçage dont on rêve. Dans un grand bol, battez le beurre ramolli avec le cacao en poudre jusqu’à obtenir une pâte lisse, foncée et crémeuse. Cette étape assure qu’il ne reste aucun grumeau de cacao. Ajoutez progressivement le sucre glace tamisé, environ une tasse à la fois, en alternant avec des filets de lait. Battez à vitesse moyenne-élevée pendant 3 à 4 minutes après que tout est incorporé. Le glaçage va se transformer, devenir léger, aérien et facile à étaler. Enfin, battez la vanille et le sel. Le sel est l’arme secrète qui coupe le sucré et fait ressortir la saveur du chocolat.
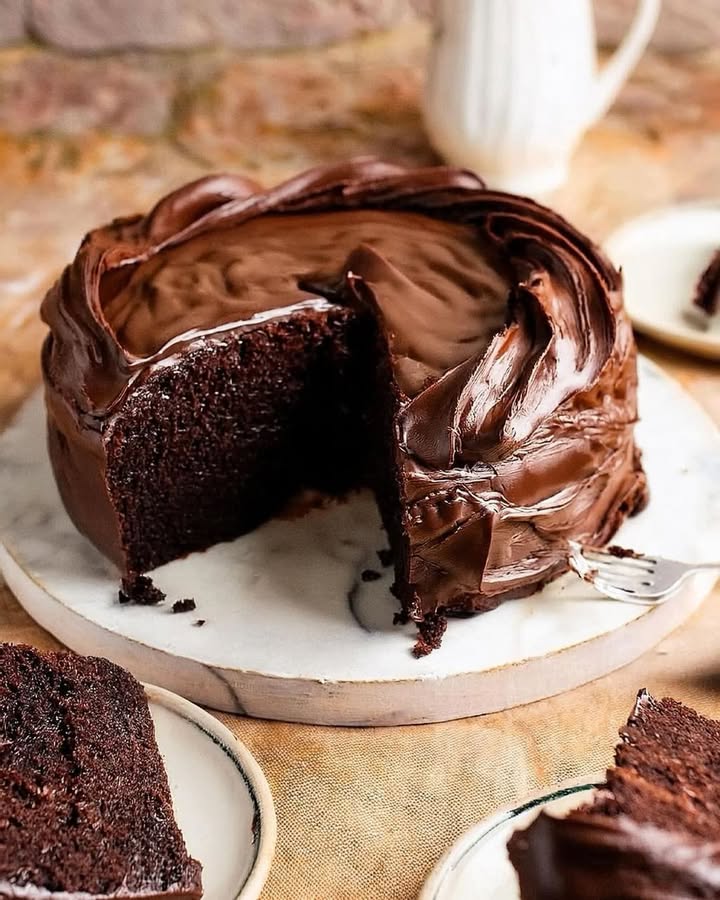
Étape 5 : L’Assemblage Final et Grandiose
C’est le moment de la meilleure partie ! Placez une couche de gâteau complètement froide sur votre plateau de service. Étalez une couche généreuse et régulière de glaçage sur le dessus. Posez délicatement la seconde couche par-dessus, face retournée pour une surface parfaitement plate. Maintenant, recouvrez tout le gâteau avec le glaçage restant. Utilisez une spatule coudée ou un simple couteau à beurre pour créer de beaux tourbillons. Ne vous inquiétez pas si ce n’est pas parfaitement lisse – des tourbillons rustiques ont l’air délicieusement appétissants. J’aime entasser le glaçage supplémentaire sur le dessus et le laisser cascader doucement sur les côtés.
Le Secret du Chef
Pour une mie incroyablement moelleuse, je badigeonne parfois chaque couche de gâteau avec un sirop simple (parts égales de sucre et d’eau, chauffées jusqu’à dissolution, puis refroidies) avant de glacer. C’est une étape supplémentaire, mais si vous préparez le gâteau un jour à l’avance, cela le garde phénoménalement frais.
Décomposition du Temps
- Temps de préparation : 25 minutes
- Temps de cuisson : 35 minutes
- Temps de refroidissement : 1 heure (très important !)
- Temps de glaçage & assemblage : 20 minutes
- Temps total : Environ 2 heures 20 minutes
Un Petit Morceau d’Info Supplémentaire
Saviez-vous qu’ajouter du café ou de l’eau bouillante aux recettes au chocolat ne leur donne pas un goût de café ? Cela rehausse plutôt la profondeur et la richesse de la saveur du chocolat. C’est une astuce classique utilisée par les pâtissiers pour faire chanter leurs desserts au chocolat. Donc, même si vous n’aimez pas le café, faites confiance au processus – vous ne le goûterez pas, vous goûterez juste un meilleur chocolat !
L’Équipement Nécessaire
- Deux moules à gâteau ronds de 23 cm (9 pouces)
- Papier sulfurisé
- Saladiers (grand et moyen)
- Fouet et spatule
- Batteur électrique ou robot pâtissier
- Tasses et cuillères de mesure
- Grille de refroidissement
- Spatule coudée pour glacer (un couteau à beurre fonctionne aussi !)
Comment Conserver Votre Chef-d’Œuvre
Si votre gâteau survit à la journée (un événement rare chez moi !), il faudra le conserver correctement. À cause du glaçage au beurre périssable, le gâteau doit être conservé dans un contenant hermétique ou sous une cloche à gâteau à température ambiante pendant 2 jours maximum. Le glaçage restera mou et parfait.
Pour une conservation plus longue, le réfrigérateur est votre ami. Placez le gâteau dans un contenant hermétique ou emballez-le bien dans du film alimentaire. Il se conservera jusqu’à 5 jours. Le froid durcira le glaçage, alors laissez les parts à température ambiante 20-30 minutes avant de servir pour retrouver cette texture crémeuse.
Vous pouvez aussi congeler ce gâteau avec succès. Enveloppez les couches de gâteau non glacées individuellement dans du film puis du papier alu, et congelez jusqu’à 3 mois. Décongelez une nuit au réfrigérateur. Le glaçage peut aussi être congelé dans un contenant scellé. Décongelez et battez-le brièvement avant de l’utiliser.
Mes Meilleurs Conseils
- La température ambiante est cruciale : Votre babeurre, vos œufs et le beurre pour le glaçage doivent être à température ambiante. Cela permet une meilleure émulsion et une mie de gâteau et un glaçage plus lisses et réguliers.
- Mesurez votre farine correctement : Mettez la farine dans la tasse à mesurer avec une cuillère, puis nivelez avec un couteau. La prendre directement avec la tasse la tasse et donne une mesure trop importante, ce qui rend le gâteau sec.
- Tamisez votre cacao et votre sucre glace : Cela casse les grumeaux et donne une pâte et un glaçage soyeux et lisses.
- Ne pas trop mélanger : Une fois la farine ajoutée, mélangez juste jusqu’à ce que tout soit combiné. Trop mélanger développe le gluten et peut rendre le gâteau compact.
Idées de Présentation Inspirées
- Décorez avec des fruits rouges frais, comme des framboises ou des fraises, pour une touche de couleur et de fraîcheur.
- Appuyez des copeaux ou des frisottis de chocolat sur les côtés du gâteau glacé pour une touche élégante.
- Une simple pincée de sucre glace ou de cacao juste avant de servir est magnifique.
- Arrosez d’un peu de caramel au beurre salé ou de beurre de cacahuète fondu pour un plaisir suprême.
- Servez chaque part avec une quenelle de crème fouettée légèrement sucrée.
6 Délicieuses Variantes à Essayer
Une fois que vous maîtrisez cette version classique, le monde des variantes de gâteau au chocolat facile s’ouvre à vous ! Voici quelques inspirations :
- Chocolat Caramel Sel de Mer : Ajoutez une couche de sauce caramel salé entre les couches du gâteau et saupoudrez de fleur de sel sur le glaçage fini.
- Chocolat-Orange : Ajoutez le zeste d’une orange à la pâte et une cuillère à soupe de liqueur d’orange au glaçage pour une touche citronnée et lumineuse.
- Chocolat Beurre de Cacahuète : Incorporez 1/2 tasse de beurre de cacahuète fondu dans la moitié du glaçage pour un effet marbré, ou utilisez-le comme garniture entre les couches.
- Chocolat-Menthe : Ajoutez 1/2 cuillère à café d’extrait de menthe au glaçage et incorporez 1/2 tasse de pépites de chocolat mini pour une saveur rafraîchissante.
- Cookies and Cream : Écrasez environ 15 cookies Oreo et incorporez-les au glaçage juste avant de l’étaler pour une texture croustillante et amusante.
- Moka : Remplacez l’eau bouillante dans le gâteau par du café fort bouillant pour créer une saveur moka riche que les adultes adoreront.
Si vous vous sentez aventureux avec d’autres combinaisons de fruits et de fruits secs, vous devez absolument essayer le spectaculaire Gâteau Caramel Banane Noix de Pécan. Pour une option plus légère et fruitée, mon Gâteau à l’Orange aux Pépites de Chocolat est un favori familial. Si vous avez envie d’un chocolat intense, le Gâteau Diabolique au Chocolat est un voyage décadent. Et pour un gâteau mousseux spectaculaire, le Gâteau Mousse Framboise Chocolat Céleste est d’une élégance pure.
Erreurs Courantes à Éviter
Erreur 1 : Utiliser des Ingrédients Froids
C’est l’écueil le plus courant ! Le babeurre et les œufs froids ne se mélangent pas bien à l’huile, ce qui fait que la pâte se sépare et donne un gâteau dense et irrégulier. Le beurre froid pour le glaçage ne deviendra jamais léger et aérien ; il donnera juste un glaçage grumeleux et gras. Pensez toujours à sortir vos ingrédients du frigo au moins 30-45 minutes avant de commencer à cuisiner.
Erreur 2 : Trop Cuire les Couches de Gâteau
C’est facile d’être inquiet et de laisser le gâteau « juste pour être sûr ». Mais un gâteau au chocolat trop cuit est un gâteau au chocolat sec. Le gâteau continue de cuire par la chaleur résiduelle même après être sorti du four. Mettez votre minuteur et commencez à vérifier à partir de 30 minutes. Le gâteau est cuit quand un cure-dent en ressort avec quelques miettes humides attachées, pas complètement propre. Souvenez-vous, un gâteau au chocolat moelleux est l’objectif !
Erreur 3 : Glacer un Gâteau Encore Tiède
L’impatience mène à la débâcle du glaçage – littéralement. Si les couches de gâteau sont même légèrement tièdes, le riche glaçage au beurre va fondre, glisser et devenir une soupe informe. Il va aussi emprisonner la chaleur, rendant le gâteau détrempé. Vous devez laisser les couches refroidir complètement sur une grille. Cela peut prendre une bonne heure. Profitez-en pour ranger et préparer votre glaçage.
Erreur 4 : Ne Pas Tamiser les Ingrédients Secs
Verser farine, cacao et sucre glace directement du sac donne souvent des grumeaux. Ces grumeaux peuvent créer des poches de poudre sèche dans votre gâteau ou des parties granuleuses dans votre glaçage. Prendre une minute supplémentaire pour tamiser votre cacao et votre sucre glace (et fouetter votre farine avec les autres ingrédients secs) assure une pâte parfaitement lisse et une texture de glaçage soyeuse et luxueuse. C’est une petite étape aux grands bénéfices.
Questions Fréquemment Posées
Puis-je faire ce gâteau dans un moule différent, comme un moule 23×33 cm ?
Absolument ! Cette pâte fonctionne très bien dans un moule rectangulaire de 23×33 cm beurré et chemisé. Le temps de cuisson sera un peu plus long, généralement autour de 35 à 40 minutes. Vérifiez la cuisson avec un cure-dent au centre. Vous pouvez le glacer directement dans le moule pour un gâteau rapide qui fait plaisir à la foule.
Pourquoi dois-je ajouter de l’eau bouillante ? La pâte a l’air si liquide !
Je sais, cela semble fou, mais faites-moi confiance ! L’eau bouillante fait deux choses cruciales. D’abord, elle « réveille » la poudre de cacao, un peu comme on fait infuser les épices dans de l’huile chaude, ce qui intensifie sa saveur chocolatée profonde. Ensuite, elle hydrate la farine d’une manière qui crée une mie exceptionnellement moelleuse et tendre à la cuisson. La pâte liquide est normale et va cuire pour donner un gâteau parfait et léger.
Je n’ai pas de babeurre. Par quoi puis-je le remplacer ?
Pas de babeurre, pas de souci ! Vous pouvez facilement faire un excellent substitut maison. Pour cette recette, prenez 1 cuillère à soupe de jus de citron frais ou de vinaigre blanc et ajoutez-la dans une tasse à mesurer. Complétez ensuite avec du lait normal jusqu’à la marque des 250 ml. Mélangez et laissez reposer 5 à 10 minutes. Il va cailler et épaissir légèrement, et cela fonctionne aussi bien que le babeurre du commerce dans cette recette.
Comment savoir si ma levure chimique et mon bicarbonate sont encore actifs ?
C’est une excellente question, car des agents levants vieux sont une raison courante pour laquelle les gâteaux ne lèvent pas. Pour tester la levure chimique, mélangez 1/2 cuillère à café avec un quart de tasse d’eau chaude. Ça doit pétiller vigoureusement. Pour le bicarbonate, mélangez 1/2 cuillère à café avec quelques gouttes de vinaigre ou de jus de citron. Ça doit bouillonner immédiatement. Si la réaction est faible, il est temps d’acheter des boîtes neuves pour que votre gâteau chocolat délicieux puisse lever à son plein potentiel.
Puis-je préparer ce gâteau à l’avance ?
Oui, et il est souvent encore meilleur le lendemain ! Vous pouvez cuire les couches jusqu’à deux jours à l’avance. Laissez-les refroidir complètement, puis enveloppez chaque couche hermétiquement dans du film alimentaire et conservez à température ambiante. Vous pouvez aussi préparer le glaçage 1 à 2 jours à l’avance et le garder couvert au réfrigérateur. Laissez-le revenir à température ambiante et battez-le brièvement avec votre batteur avant de l’utiliser. Assemblez le gâteau le jour où vous prévoyez de le servir pour une présentation au top.
Mon glaçage est trop liquide/ trop épais. Comment le rectifier ?
La consistance du glaçage est facile à ajuster. S’il est trop liquide et coulant, c’est probablement que le beurre était trop mou ou que vous avez ajouté un peu trop de lait. Mettez-le simplement au réfrigérateur 15-20 minutes, puis battez-le à nouveau. S’il est trop épais et difficile à étaler, c’est peut-être que le beurre était trop froid, ou qu’il manque de liquide. Ajoutez du lait, une cuillère à soupe à la fois, en battant bien après chaque ajout jusqu’à obtenir une consistance lisse et facile à étaler.
Est-il nécessaire d’utiliser du papier sulfurisé dans le fond des moules ?
Pour un démoulage garanti et sans stress, je le recommande vivement. Beurrer et fariner (ou cacaoter) fonctionne la plupart du temps, mais le papier sulfurisé est une assurance infaillible. Il n’y a rien de pire qu’un beau gâteau qui colle et se déchire. Découper deux simples cercles, c’est une minute de travail qui évite un désastre potentiel et assure que vos couches sortent parfaitement intactes pour l’assemblage.
Puis-je utiliser du cacao alcalinisé (type hollandais) au lieu du cacao naturel ?
Soyez prudent ici, car ils sont chimiquement différents. Cette recette utilise de la poudre de cacao non sucrée naturelle (comme Hershey’s), qui est acide. Le bicarbonate de soude dans la recette réagit avec cette acidité pour aider le gâteau à lever. Le cacao alcalinisé est neutre et moins acide. Si vous l’utilisez, le gâteau risque de moins lever. Pour de meilleurs résultats avec cette recette spécifique, tenez-vous-en au cacao naturel en poudre.
Pourquoi mon gâteau s’est-il affaissé au milieu ?
Un milieu affaissé indique généralement une cuisson insuffisante ou un problème avec les agents levants. Assurez-vous que la température de votre four est exacte avec un thermomètre de four. N’ouvrez pas la porte du four pendant les 25 premières minutes de cuisson, car un afflux d’air froid peut faire s’effondrer le gâteau. Vérifiez aussi que votre levure et votre bicarbonate sont frais. Suivre de bonnes pratiques d’hygiène et de préparation alimentaire, comme une mesure et un stockage corrects des ingrédients, garantit des résultats constants.
Ce gâteau a l’air riche. Pour combien de personnes ?
C’est un gâteau à deux couches généreux qui peut facilement servir 12 à 16 personnes, selon la taille des parts ! Les parts sont riches et satisfaisantes, donc les gens se contentent souvent d’un morceau un peu plus petit. C’est le dessert idéal pour un rassemblement familial ou une fête. Pour plus d’inspiration sur des desserts incroyables, explorez notre collection complète de gâteaux et pâtisseries pour toutes les occasions.
À Votre Tour de Créer la Magie
Voilà, vous avez maintenant tous les conseils, astuces et secrets pour créer l’ultime gâteau au chocolat de Matilda. Cette recette est plus qu’une liste d’instructions ; c’est une invitation à créer un moment de pur bonheur partagé. Que ce soit pour une fête ou juste pour un goûter improvisé, ce gâteau garantit des sourires. Préchauffez votre four, rassemblez vos ingrédients, et préparez-vous à cuisiner un souvenir. J’ai hâte que vous viviez la magie. Allez, à vous de jouer et bon appétit !
Equipment
- Deux moules à gâteau ronds de 9 pouces
- Papier sulfurisé
- Bols de mélange (grands et moyens)
- Fouet et spatule
- Mixeur électrique ou robot pâtissier
Ingrédients
- 240 g farine tout usage
- 350 g sucre granulé
- 75 g cacao en poudre non sucré de haute qualité est préférable !
- 10 g levure chimique
- 2 g bicarbonate de soude
- 5 g sel
- 240 ml lait ribot à température ambiante
- 125 ml huile végétale
- 2 gros œufs à température ambiante
- 10 ml extrait de vanille pur
- 240 ml eau bouillante
Instructions
- Préchauffez votre four à 175°C (350°F) et préparez vos moules à gâteau en les graissant et en les tapissant de papier sulfurisé.
- Dans un grand bol, mélangez vos ingrédients secs : farine, sucre, cacao, levure chimique, bicarbonate de soude et sel.
- Dans un autre bol, mélangez les ingrédients humides : lait ribot, huile, œufs et vanille. Ajoutez-les aux ingrédients secs et battez jusqu'à ce que le mélange soit homogène.
- Incorporez lentement l'eau bouillante à la pâte, qui devient très liquide.
- Répartissez la pâte dans les moules préparés et enfournez pendant 30 à 35 minutes, jusqu'à ce qu'un cure-dent en ressorte avec quelques miettes humides.
- Laissez les gâteaux refroidir dans les moules pendant 10 minutes, puis démoulez-les et laissez refroidir complètement sur une grille.
- Pendant le refroidissement, préparez le glaçage en battant le beurre ramolli et le cacao en poudre jusqu'à obtenir une consistance lisse et crémeuse.
- Ajoutez progressivement le sucre glace et le lait, en battant jusqu'à obtenir une texture légère et crémeuse. Incorporez la vanille et le sel.
- Assemblez le gâteau en étalant une couche de glaçage sur la première couche, puis placez la deuxième couche dessus et couvrez le tout avec le glaçage restant.
Notes
Nutrition

Je suis Céline, une véritable passionnée d’ustensiles et de matériel de cuisine ! J’adore tester, comparer et découvrir les meilleurs équipements pour rendre la cuisine plus efficace et agréable. Que ce soit un bon couteau, un robot performant ou une poêle incontournable, je suis toujours à la recherche des outils qui feront la différence. Mon but est de vous guider dans vos choix pour que vous ayez le bon matériel adapté à vos besoins.