
La Magie de la Carlota au Citron Gélifiée : un Rêve Acidulé sans Cuisson
Vous connaissez ces recettes qui vous font passer pour un magicien en cuisine avec presque zéro effort ? Celles que vous préparez quand le soleil tape et que la dernière chose que vous souhaitez, c’est un four chaud ? C’est exactement ce qui m’est arrivé quand j’ai réalisé cette Carlota au Citron Gélifiée pour la première fois. J’avais des amis à la maison, j’avais complètement oublié le dessert, et j’ai paniqué. Puis je me suis souvenue de ce miracle frais, crémeux et acidulé. En quelques minutes, j’avais un plat de bonté citronnée en train de prendre au frigo. Le résultat ? Une standing ovation et des assiettes vides. C’est mon arme secrète incontournable pour un régal superbe et sans prise de tête.
La Douce Histoire de la Carlota au Citron
La Carlota, ou Charlotte, est un dessert classique aux racines européennes, impliquant souvent des biscuits à la cuiller et des garnitures crémeuses. Notre version d’inspiration mexicaine, surtout cette variante à la gelée au citron, en est une magnifique adaptation. Elle remplace les couches de gâteau moelleux traditionnel par des biscuits Maria croquants, créant une merveilleuse danse de textures. Ce petit joyau sans cuisson est devenu très populaire pour sa simplicité et son goût rafraîchissant, parfait pour les climats chauds et les cuisiniers pressés. Ma grand-mère en faisait une version au citron vert, mais j’adore la note ensoleillée et vive des citrons frais. C’est un beau mélange de tradition et de touche personnelle.
Pourquoi Vous Allez Tomber Amoureux de Cette Recette
Si vous avez besoin de raisons pour essayer cette Carlota au Citron, j’en ai toute une liste ! Premièrement, c’est une merveille sans cuisson, qui vous évite la chaleur de la cuisine. Deuxièmement, l’équilibre entre le lait concentré sucré et le jus de citron acidulé est de la pure magie. C’est crémeux et pourtant léger, sucré et pourtant acidulé. Troisièmement, elle est incroyablement indulgente. Aucun talent de pâtissier n’est requis ici. Que vous soyez un boulanger aguerri ou un parfait débutant, cette recette promet le succès et des sourires. C’est le genre de dessert qui a l’air sophistiqué mais qui est secrètement simple comme bonjour.
Les Occasions Parfaites pour ce Délices Acidulé
Cette Carlota au Citron Gélifiée est un vrai succès populaire pour tous les événements. C’est une star des barbecues d’été, des baby showers et des fêtes d’anniversaire. J’adore la servir après un repas copieux — sa fraîcheur est le parfait palais nettoyant. C’est aussi une bouée de sauvetage pour les dîners en semaine quand on veut quelque chose de spécial sans le stress. À chaque fois que vous avez besoin d’un succès garanti, c’est votre réponse.
Rassembler Vos Ingrédients pour la Carlota au Citron
Des ingrédients frais et simples sont la clé de la magie de ce dessert. Voici ce dont vous aurez besoin :
- 1 boîte (395g) de lait concentré sucré
- 1 boîte (410ml) de lait évaporé
- 1 boîte (190ml) de media crema (crème à café ou crème liquide entière)
- Jus de 4 gros citrons (environ ½ – ⅔ de tasse)
- 21g (environ 3 cuillères à soupe) de gélatine neutre en poudre (grenetina)
- ½ tasse d’eau froide
- Biscuits Maria (Galletas Marías), autant que nécessaire
- Un peu de lait pour mouiller les biscuits (facultatif)
- Zeste de citron, pour une belle décoration parfumée
Substitutions Pratiques selon Votre Garde-manger
Il vous manque un ingrédient ? Pas de problème ! Voici quelques échanges faciles :
- Media Crema : Vous pouvez utiliser la même quantité de crème liquide entière ou de crème fleurette. La texture sera légèrement plus riche.
- Biscuits Maria : Des biscuits Graham ou des biscuits digestifs fonctionnent à merveille.
- Feuilles de Gélatine : Si vous utilisez de la gélatine en feuilles, utilisez environ 4-5 feuilles (pesant 21g au total). Faites-les tremper dans de l’eau froide jusqu’à ce qu’elles soient molles, puis dissolvez-les.
- Plus de Peps : Vous pouvez utiliser des citrons verts à la place des citrons jaunes pour une touche d’agrume différente.
Créer Votre Carlota au Citron Crémeuse : Étape par Étape
Étape 1 : Réveiller la Gélatine
Saupoudrez la poudre de gélatine uniformément sur l’eau froide dans un petit bol. Laissez reposer 5 minutes. Vous la verrez se transformer, absorber l’eau et devenir une masse molle et spongieuse. Ce processus, appelé « fleurissement », est crucial pour que la gélatine se dissolve bien plus tard et fige notre Carlota parfaitement. C’est comme lui donner une petite sieste énergisante avant son grand travail.
Étape 2 : Le Mélange Rêveur et Crémeux
Dans votre mixeur, combinez le lait concentré, le lait évaporé, la crème liquide, et le jus de citron frais. Le moment où le jus de citron jaune vif rencontre les laits blancs est si joli ! Mixez à haute vitesse pendant une bonne minute jusqu’à ce que le mélange soit parfaitement lisse, homogène et légèrement mousseux. L’arôme citronné vif commencera à remplir votre cuisine, promettant quelque chose de délicieux.
Étape 3 : Faire Fondre et Intégrer
Prenez votre gélatine fleurie et faites-la fondre. Vous pouvez le faire au micro-ondes pendant 10-15 secondes jusqu’à ce qu’elle devienne un liquide clair, ou au bain-marie. Astuce de pro : Ne la laissez pas bouillir ! Faites-la juste fondre. Avec le mixeur en marche à faible vitesse, versez soigneusement la gélatine liquide dans le mélange crémeux au citron. Mixez encore 30 secondes pour garantir une incorporation parfaite. Cette étape est la colle qui va maintenir ensemble notre beau dessert.
Étape 4 : Préparer le Support
Prenez votre moule préféré — un moule à cake, un moule à gâteau rond, ou même un joli plat en verre — et passez-y un tout léger voile d’huile neutre ou un spray de cuisson. Cette simple astuce est votre meilleure amie au moment du démoulage. Elle assure que votre Carlota glisse dehors, impeccable et digne d’une photo, avec toutes ses jolies couches bien visibles.
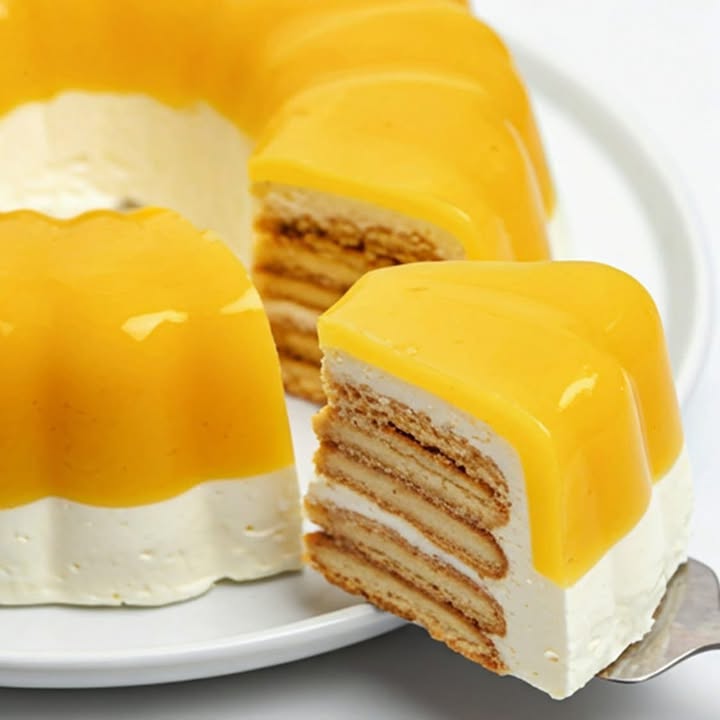
Étape 5 : La Danse des Couches
Maintenant, place à la partie amusante et créative ! Versez juste assez du mélange crémeux au fond de votre moule pour créer une fine couche. Ensuite, disposez une seule couche de biscuits Maria dessus. Vous pouvez rapidement tremper chaque biscuit dans du lait si vous aimez une texture plus tendre, ou les laisser secs pour plus de structure. Répétez ce processus — crème, biscuits, crème, biscuits — jusqu’à avoir utilisé tout le mélange, en terminant par une couche crémeuse sur le dessus. Tapez doucement le moule sur le plan de travail pour éliminer les bulles d’air.
Étape 6 : Le Repas Frais et Patient
Placez soigneusement votre création au réfrigérateur. Laissez-la prendre sans y toucher pendant au moins 3 heures, mais toute une nuit est l’idéal. Ce temps calme permet à la gélatine de faire sa magie, de raffermir la crème et d’attendrir les biscuits juste comme il faut. L’attente est la partie la plus difficile, mais ça en vaut tellement la peine !
Étape 7 : Le Grand Démoulage et la Décoration
Une fois prise, passez un couteau fin autour des bords du moule. Placez une assiette de service sur le dessus et retournez-le avec confiance. Donnez-lui une petite secousse ou un petit coup, et retirez le moule. La voilà ! Maintenant, prenez un citron frais et râpez un peu de son zeste jaune vif sur le dessus. Cela ajoute une touche de couleur et une explosion supplémentaire d’huile de citron parfumée. Astuce du chef : Pour une touche spéciale, ajoutez quelques gouttes d’essence de vanille au mélange crémeux à l’Étape 2. Cela ajoute une note chaude et complexe qui complète magnifiquement le citron.
Chronologie pour Votre Carlota au Citron
| Temps de Préparation : | 20 minutes |
| Temps de Repos/Prise : | 3 heures minimum (nuit idéale) |
| Temps Total (incl. prise) : | 3 heures 20 minutes |
| Portions : | 8-10 personnes |
Un Petit Secret de Ma Cuisine
Pour une texture encore plus luxueuse, utilisez du lait évaporé et de la crème liquide bien froids. Je mets parfois les boîtes au frigo une heure avant de commencer. Un mélange plus froid aide la préparation à commencer à prendre plus vite et peut donner une sensation finale encore plus crémeuse. C’est une toute petite étape qui fait une différence notable !
Une Info Amusante sur le Citron
Saviez-vous que le jus d’un citron fournit environ la moitié de vos besoins quotidiens en vitamine C ? Bien que nous soyons ici pour la saveur incroyable de notre Carlota au Citron, c’est plaisant de savoir que nous recevons un petit coup de pouce d’un antioxydant vital, qui soutient la fonction immunitaire et la santé de la peau. Choisir des citrons frais et mûrs garantit non seulement le meilleur goût, mais maximise aussi les bienfaits nutritionnels.
Le Matériel dont Vous Aurez Besoin
Aucun équipement sophistiqué requis ! Il vous faut juste :
- Un mixeur
- Un saladier moyen
- Un petit bol pour la gélatine
- Un moule à cake ou un plat rond de 22 cm (9 pouces)
- Une râpe fine ou un zesteur
- Une spatule
Conserver Votre Carlota au Citron Fraîche
Ce dessert se conserve à merveille. Gardez-le couvert de film alimentaire ou dans un récipient hermétique au réfrigérateur. Il restera parfait jusqu’à 3-4 jours. Les saveurs se marient et s’approfondissent même après le premier jour, le rendant encore plus délicieux.
Je ne recommande pas de congeler cette Carlota au Citron Gélifiée. La prise de la gélatine peut se désagréger à la congélation et décongélation, rendant la texture aqueuse et granuleuse. Il est préférable de la déguster fraîche du frigo.
Si vous devez la préparer à l’avance, c’est le dessert « make-ahead » parfait ! Préparez-la la veille de votre événement. Cela lui donne amplement le temps de prendre fermement et vous permet de vous concentrer sur d’autres parties de votre repas sans stress de dernière minute.
Astuces et Conseils pour un Résultat Impeccable
- Goûtez en chemin : Après avoir mixé les laits et le jus de citron, trempez une cuillère et goûtez. Vous voulez plus de peps ? Ajoutez un peu plus de jus de citron. Souvenez-vous, les biscuits ajouteront du sucre, donc un bon équilibre acidulé est clé.
- Placement des biscuits : Cassez des biscuits pour combler les trous dans vos couches. Une couche solide garantit que chaque part a ce ratio parfait biscuit-crème.
- Démoulage propre : Pour un démoulage le plus net possible, vous pouvez tremper brièvement le fond du moule dans de l’eau tiède (juste 10-15 secondes) avant de le retourner sur l’assiette.
Présenter Votre Chef-d’Œuvre
Faites-en sorte que votre Carlota soit aussi belle que bonne ! Voici quelques idées :
- Servez-la sur un beau pied de gâteau pour une touche festive.
- Décorez avec de fines tranches de citron, des feuilles de menthe, ou des fleurs comestibles en plus du zeste.
- Pour des portions individuelles, faites les couches dans de jolis verres ou des pots plutôt que dans un grand moule.
- Versez un filet de lait concentré supplémentaire ou un coulis de fruits rouges sur l’assiette avant d’y déposer une part.
Explorez D’Autres Délicieuses Aventures Dessert
Si vous avez adoré créer cette merveille sans cuisson, vous pourriez apprécier d’autres douceurs. Pour un projet réconfortant d’automne, essayez ces incroyables Donuts aux Pommes Farcis faits maison avec une pâte briochée moelleuse. Les amateurs de chocolat ne devraient pas manquer les couches décadentes de ce Gâteau Prestige Chocolat Coco. Si vous êtes fasciné par des textures uniques, le Gâteau Soufflé Castella tout mou et gigotant est à essayer absolument. Et pour un régal vraiment indulgent, réservé aux adultes, le Gâteau Crémeux au Baileys est absolument irrésistible.
6 Variations Fantastiques à Tester
La beauté de cette recette est sa versatilité. Une fois que vous maîtrisez le citron classique, le monde est à vous ! Voici quelques adaptations inspirées :
- Carlota aux Fraises : Remplacez le jus de citron par des fraises fraîches mixées et une cuillère à soupe de jus de citron pour équilibrer le sucré. Utilisez des biscuits roses ou chocolatés pour un look magnifique.
- Carlota Mangue Tango : Utilisez de la mangue mûre en purée au lieu du jus de citron. La saveur tropicale est incroyable, et elle se marie à merveille avec des biscuits à la noix de coco.
- Rêve Chocolat-Orange : Ajoutez ¼ de tasse de cacao en poudre au mélange de lait et utilisez du jus d’orange au lieu du citron. C’est comme un Terry’s Chocolate Orange glacé et crémeux !
- Carlota Café et Crunch Caramel : Dissolvez du café instantané dans le lait évaporé avant de mixer. Intercalez des éclats de caramel ou de barre heath écrasés entre les biscuits.
- Style Cheese-cake aux Fruits Rouges : Substituez la moitié du lait évaporé par du fromage à la crème entier (ramolli) pour une base plus riche et acidulée. Incorporez-y un coulis de fruits rouges.
- Carlota Piña Colada : Utilisez du jus d’ananas et ajoutez un trait d’extrait de noix de coco. Intercalez de l’ananas écrasé (bien égoutté) et parsemez de noix de coco râpée toastée sur le dessus.
Erreurs Courantes à Éviter avec la Carlota au Citron
Erreur 1 : Oublier de Faire Fleurir la Gélatine
Verser la poudre de gélatine directement dans le liquide chaud ou tiède est une recette pour des grumeaux. La poudre s’agglomère instantanément et devient impossible à dissoudre correctement, vous laissant avec une prise granuleuse et irrégulière. Toujours, toujours, saupoudrez-la sur de l’eau froide et laissez reposer. Cette étape de cinq minutes hydrate chaque granule individuellement, garantissant qu’elle fondra en un liquide lisse qui se mélangera parfaitement à votre préparation crémeuse.
Erreur 2 : Utiliser du Jus de Citron en Bouteille
Bien que pratique, le jus de citron en bouteille manque de la saveur vive, fraîche et éclatante des citrons fraîchement pressés. Il peut avoir un goût plat, parfois légèrement amer, qui ternira tout le dessert. Le jus frais est la star ici ! Rouler vos citrons sur le plan de travail avant de les presser vous aide à récupérer chaque dernière goutte de ce précieux liquide parfumé qui rend la Carlota au Citron si spéciale.
Erreur 3 : Ne Pas Laisser Prendre Complètement
L’impatience est l’ennemi des desserts à la gélatine. Si vous essayez de démouler ou de couper votre Carlota après seulement une heure ou deux, ce sera un désordre aqueux et triste. La gélatine a besoin de suffisamment de temps à une température froide constante pour former un réseau ferme. Respectez le minimum de 3 heures, mais si vous pouvez, laissez-la prendre toute la nuit. La texture sera parfaite, permettant de belles parts nettes. Cela permet aussi aux biscuits de s’attendrir jusqu’à une consistance agréable, proche du gâteau.
Erreur 4 : Trop Mixer après l’Ajout de la Gélatine
Une fois que vous avez ajouté la gélatine fondue et donné un dernier mix pour l’incorporer, arrêtez ! Trop mixer à ce stade peut incorporer trop d’air, créant des bulles dans votre préparation. À la prise, ces bulles peuvent rendre la texture moins lisse et visuellement moins agréable. Mixez juste jusqu’à ce que vous ne voyiez plus de stries de gélatine liquide, puis passez aux couches.
Réponses à Vos Questions sur la Carlota au Citron
Puis-je faire cette recette sans gélatine pour une version végétarienne ?
Oui, vous pouvez ! L’agar-agar est une alternative végétale fantastique dérivée d’algues. La substitution n’est pas toujours du 1:1, alors vérifiez les instructions sur l’emballage. Typiquement, vous utiliseriez environ 2 cuillères à café de poudre d’agar-agar pour cette quantité de liquide. Souvenez-vous, l’agar-agar a besoin de mijoter quelques minutes pour s’activer, alors vous devrez chauffer doucement une partie du mélange de lait avec avant de combiner avec le reste.
Ma Carlota n’a pas pris. Qu’est-ce qui a mal tourné et puis-je la rattraper ?
Cela arrive généralement si la gélatine n’était pas complètement dissoute, si vous avez utilisé de la gélatine vieille/inactive, ou si le ratio de liquide était trop élevé. D’abord, essayez de la remettre au frigo pour plusieurs heures supplémentaires. Si c’est toujours liquide, vous pouvez tenter un sauvetage : faites doucement fondre toute la préparation dans une casserole à feu très doux (ne pas bouillir !), dissolvez un nouveau sachet de gélatine dans de l’eau, ajoutez-le, remixez, et refroidissez à nouveau. Souvent, cela sauve la situation !
Combien de Temps à l’Avance Puis-je Préparer la Carlota au Citron ?
C’est l’une de ses meilleures caractéristiques ! Vous pouvez facilement la préparer 1-2 jours à l’avance. En fait, je recommande vivement de la faire la veille du jour où vous en avez besoin. Cela lui laisse amplement le temps de prendre fermement et permet aux saveurs de se marier à merveille. Les biscuits s’attendrissent parfaitement, et la saveur du citron infuse tout le dessert. Gardez-la simplement couverte au frigo jusqu’au service.
Puis-je Utiliser Différents Types de Biscuits ?
Absolument ! Bien que les biscuits Maria soient traditionnels et parfaits, n’hésitez pas à expérimenter. Les biscuits Graham, les digestifs, les boudoirs, ou même les biscuits à la cuiller fonctionnent bien. Chacun apportera une légère différence de saveur et de texture. Pour une version chocolat, essayez des biscuits chocolatés. Évitez simplement les biscuits trop épais ou durs, car ils risquent de ne pas assez s’attendrir.
Est-il Nécessaire de Mouiller les Biscuits avant de les Disposer ?
Ce n’est pas strictement nécessaire, mais c’est une question de préférence de texture. Si vous trempez rapidement les biscuits dans du lait (ou même dans le mélange crémeux lui-même), ils s’attendriront plus complètement, devenant presque comme du gâteau. Si vous les laissez secs, ils garderont un peu de croquant et créeront des couches plus définies. Je vous suggère d’essayer les deux façons pour voir ce que vous et votre famille préférez !
Pourquoi ma Carlota est-elle Devenue Aqueuse après le Réfrigérateur ?
Un aspect aqueux, ou « synérèse », où le liquide se sépare du gel, peut se produire si la gélatine était mal répartie, si le dessert a été congelé et décongelé, ou s’il y avait une forte proportion de jus de fruit acide. Garantir que votre gélatine est complètement dissoute et bien incorporée est la clé. Aussi, utiliser des ingrédients frais et de qualité, comme les produits laitiers et les citrons mentionnés, contribue à une émulsion stable. Pour en savoir plus sur la qualité des aliments, des ressources comme la page de l’ANSES sur les acides gras oméga-3 discutent de l’importance d’aliments frais et riches en nutriments dans notre alimentation.
Puis-je Doubler cette Recette pour une Grande Foule ?
Vous pouvez certainement ! Doublez simplement tous les ingrédients. Vous devrez peut-être mixer la préparation crémeuse en plusieurs fois pour éviter de trop remplir votre mixeur. Utilisez un moule plus grand, comme un plat à gratin de 23×33 cm (9×13 pouces), parfait pour les fêtes. Assurez-vous juste d’avoir assez de place dans votre réfrigérateur pour qu’il refroidisse à plat.
Que Puis-je Utiliser si je n’ai pas de Moule pour Démouler ?
Pas de moule, pas de problème ! La solution la plus simple est d’assembler votre Carlota directement dans le plat dans lequel vous voulez la servir. Utilisez un beau bol à trifle en verre ou un joli plat à gratin. Faites les couches comme indiqué, et servez avec une cuillère. Vous avez toutes les belles couches visibles sur les côtés, et il n’y a aucun stress lié à l’étape du démoulage.
Ma Dernière Couche de Biscuits Dépasse. Est-ce Grave ?
Il est préférable de terminer par une couche crémeuse, pas par une couche de biscuits. La dernière couche de crème scelle les biscuits, les garde moelleux et offre un beau fond pour votre garniture. Si vous manquez de préparation, assurez-vous simplement que votre dernière couche de biscuits est complètement immergée. Si quelques bords dépassent, ils risquent de sécher un peu au frigo, mais le goût restera délicieux.
Puis-je Ajouter des Morceaux de Fruits Frais à l’Intérieur de la Carlota ?
Soyez prudent avec cela. Les fruits frais comme l’ananas, le kiwi, la papaye et la mangue contiennent des enzymes (bromélaïne, actinidine, etc.) qui dégradent les protéines — y compris la gélatine. Cela peut empêcher votre dessert de prendre. Si vous voulez des fruits, utilisez des fruits en conserve (qui sont cuits), une compote de fruits cuite, ou des baies comme des fraises et des myrtilles, généralement sans risque. Ajoutez-les toujours entre les couches, pas mixés dans la crème.
J’espère que cette recette apporte autant de joie à votre table qu’à la mienne. Pour plus d’idées sucrées inspirantes, des douceurs simples aux gâteaux spectaculaires, explorez ma collection complète de recettes de gâteaux et pâtisseries juste ici.
Une Dernière Part de Soleil
Voilà donc — le secret d’un dessert à la fois incroyablement élégant et drôlement simple. Cette Carlota au Citron Gélifiée est plus qu’une recette ; c’est la promesse d’une fin de repas fraîche, crémeuse et heureuse. C’est le goût du soleil dans une part, le dessert pour lequel on vous redemande la recette à chaque fois. Maintenant, allez chercher ces citrons et faites de la magie. Votre frigo (et vos invités) vous remercieront !
Equipment
- Mélangeur
- Moule à cake ou plat rond de 9 pouces
- Petit bol
- Spatule
- Zesteur ou râpe fine
Ingrédients
- 395 g lait concentré sucré
- 410 ml lait évaporé
- 190 ml media crema (crème fluide)
- 4 grands citrons (jus) environ ½ - ⅔ tasse
- 21 g gélatine en poudre
- 120 ml eau froide
- quantité nécessaire unité Biscuits Maria (Galletas Marías)
- un peu unité lait pour humidifier les biscuits (facultatif)
- au goût unité zeste de citron pour la décoration
Instructions
- Saupoudrer la gélatine en poudre sur l'eau froide dans un petit bol et laisser reposer 5 minutes.
- Dans un mélangeur, combiner le lait concentré, le lait évaporé, la media crema et le jus de citron frais. Mixer jusqu'à ce que le mélange soit lisse et légèrement mousseux.
- Faire fondre la gélatine ramollie au micro-ondes ou au bain-marie, puis l'incorporer dans le mélange crémeux pendant que le mélangeur fonctionne à basse vitesse.
- Graisser légèrement le moule choisi pour faciliter le démoulage.
- Verser une fine couche de mélange crémeux au fond du moule, puis disposer une couche de biscuits Maria. Répéter l'opération jusqu'à épuisement des ingrédients, en terminant par une couche crémeuse.
- Placer le moule au réfrigérateur pendant au moins 3 heures pour que la gélatine prenne.
- Pour démouler, passer un couteau autour des bords du moule, retourner le moule sur une assiette et ajouter le zeste de citron sur le dessus.
Notes
Nutrition

Je suis Céline, une véritable passionnée d’ustensiles et de matériel de cuisine ! J’adore tester, comparer et découvrir les meilleurs équipements pour rendre la cuisine plus efficace et agréable. Que ce soit un bon couteau, un robot performant ou une poêle incontournable, je suis toujours à la recherche des outils qui feront la différence. Mon but est de vous guider dans vos choix pour que vous ayez le bon matériel adapté à vos besoins.