
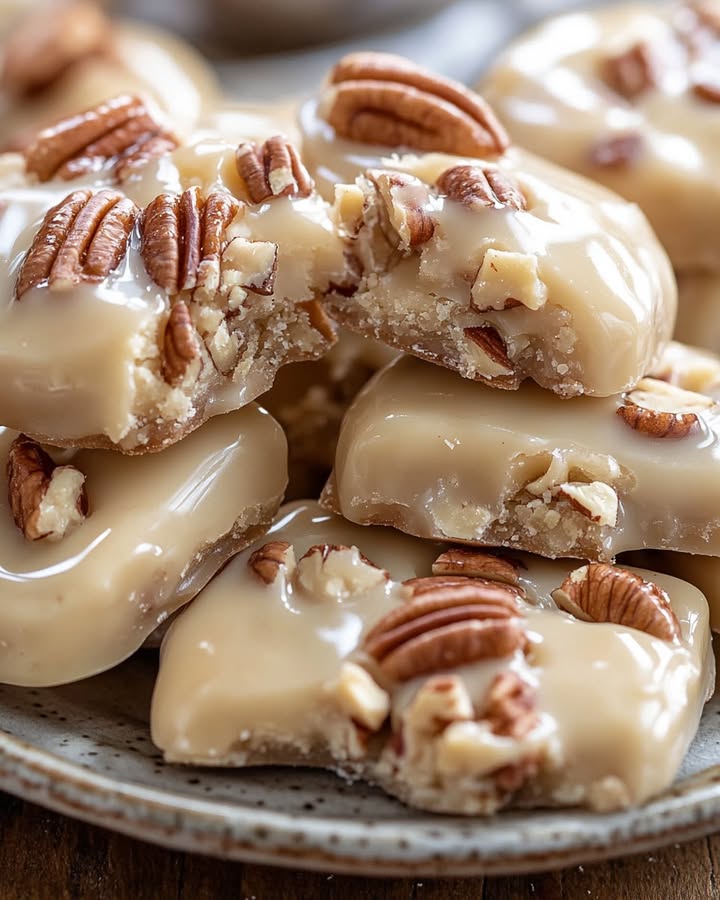
La cuisine de ma grand-mère sentait toujours le caramel et les noix grillées les dimanches après-midi. C’est là que j’ai appris que les meilleures douceurs ne sont pas qu’une question de goût – elles permettent de créer de petits moments de bonheur. Si vous cherchez un peu de ce charme du Sud, vous êtes au bon endroit. Aujourd’hui, nous préparons une batch de Pralines aux Pécans, Lait Ribot et Sucre, une confiserie si simple et pourtant si magique qu’elle ressemble à un câlin réconfortant.
Bien plus qu’une friandise : Un morceau d’histoire du Sud
Les pralines ont une histoire aussi riche que leur saveur. Originaires de France avec des amandes et du sucre, elles ont trouvé une véritable maison dans le Sud américain. Les chefs de La Nouvelle-Orléans ont remplacé les amandes par nos pécans locaux et ont ajouté du lait ribot onctueux. C’est ce qui a créé la texture fondante et moelleuse que nous adorons aujourd’hui. Elles sont devenues une icône de la street food, vendues par les femmes créoles connues sous le nom de « pralinières ». Chaque batch porte en elle cette histoire d’adaptation et de communauté. Les préparer nous connecte à des générations de cuisiniers à la maison qui ont transformé des ingrédients simples en quelque chose d’extraordinaire.
Pourquoi vous allez adorer ces Pralines aux Pécans et Lait Ribot
Cette recette est une réussite pour tant de raisons. D’abord, elle se prépare en moins de 20 minutes avec juste une poignée d’ingrédients de base. Le résultat est une confiserie merveilleusement moelleuse, et pas dure à se casser les dents. Le sucre brun et le lait ribot créent une douceur complexe, presque acidulée, qui se marie parfaitement avec le beurre des pécans. Elles sont assez impressionnantes pour être offertes mais assez faciles pour une gourmandise en semaine. Vous aurez la satisfaction d’une confiserie maison sans équipement spécial ni tracas.
Quand préparer une batch de pralines
Ces petits trésors sont polyvalents. C’est le cadeau d’hôtesse parfait fait maison pendant les fêtes, glissé dans une jolie boîte en fer. Imaginez-les sur une table de dessert lors d’un barbecue d’été, offrant un doux contraste avec les viandes fumées. Emballez-les dans des sachets en cellophane pour des faveurs de mariage ou d’anniversaire. Une assiette avec un café transforme une visite ordinaire d’après-midi en une occasion spéciale. Honnêtement, chaque jour qui a besoin d’un soupçon de douceur est un bon jour pour les pralines.
De quoi vous aurez besoin : Ingrédients pour les Pralines
Rassemblez ces ingrédients simples pour vos Pralines Sucrées aux Pécans et Lait Ribot :
- 1 tasse de sucre blanc
- 1 tasse de sucre brun bien tassé (pour cette saveur profonde de mélasse)
- 1/2 tasse de lait ribot (buttermilk)
- 1/4 de tasse de beurre non salé
- 1 tasse de moitiés de pécans (pour la meilleure texture)
Échanges faciles : Options de substitution pour les Pralines
Il vous manque un ingrédient ? Pas de problème ! Voici des solutions faciles :
- Lait ribot (Buttermilk) : Faites-le vous-même en ajoutant 1/2 cuillère à soupe de jus de citron ou de vinaigre blanc à 1/2 tasse de lait. Laissez reposer 5 minutes. Pour un goût plus riche, vous pouvez utiliser de la crème liquide épaisse.
- Pécans : Les noix font un substitut délicieux, légèrement plus amer. Pour une version sans noix, essayez des flocons d’avoine toastés ou de la noix de coco râpée.
- Sucre brun : Si vous n’en avez plus, utilisez tout du sucre blanc et ajoutez une cuillère à soupe de mélasse ou de sirop d’érable au mélange.
Confectionner vos Pralines Sucrées aux Pécans et Lait Ribot : Un pas-à-pas gourmand
Transformons ces ingrédients en bonheur. Suivez chaque étape attentivement pour un résultat parfait.
Étape 1 : La base sucrée
Prenez une casserole moyenne à fond épais. C’est crucial pour une chaleur uniforme. Mélangez le sucre blanc, le sucre brun, le lait ribot et le beurre directement dans la casserole. Le mélange paraîtra pâle et séparé – c’est normal. Placez-le sur feu moyen. Remuez doucement avec une cuillère en bois ou une spatule résistante à la chaleur jusqu’à ce que le beurre fonde et que le tout commence à ressembler à une soupe granuleuse couleur caramel. Astuce de pro : Passez un pinceau de pâtisserie humidifié sur les parois de la casserole pour éviter la formation de cristaux de sucre, qui peuvent rendre vos pralines granuleuses.
Étape 2 : La patiente ébullition
Maintenant, arrêtez de remuer. Laissez le mélange atteindre un bouillon régulier. Fixez un thermomètre à sucre si vous en avez un – vous visez le stade « petit boulé », environ 113°C. Si vous n’avez pas de thermomètre, laissez bouillir pendant 3-4 minutes après avoir atteint une pleine ébullition. Vous verrez les bulles devenir épaisses et brillantes. L’air sentira profondément le sucre et le beurre en train de caraméliser. C’est le moment magique où le sirop épaissit à la consistance parfaite.
Étape 3 : Refroidissement et l’ajout des noix
Retirez immédiatement la casserole du feu. Laissez-la reposer sans y toucher pendant exactement une minute. Cette brève période de refroidissement est cruciale. Elle abaisse suffisamment la température pour que les pécans ne fassent pas « saisir » ou se séparer le sucre chaud. Maintenant, ajoutez votre tasse de moitiés de pécans. Remuez vigoureusement. Observez le sirop brillant s’épaissir, devenir mat et commencer à enrober les noix. Ça marche ! Secret de chef : Pour un boost de saveur incroyable, toastez vos pécans dans une poêle sèche quelques minutes avant de les ajouter. Cela libère leurs huiles naturelles.
Étape 4 : Le dressage rapide
Travaillez vite maintenant. Tapissez une plaque de cuisson de papier sulfurisé ou d’une feuille silicone. À l’aide de deux cuillères, déposez rapidement des monticules du mélange à pralines sur la plaque. Visez environ 2 cuillères à soupe par praline. Si le mélange dans la casserole devient trop épais à manipuler, ajoutez quelques gouttes d’eau très chaude et remuez doucement pour le détendre. Ne vous souciez pas des formes parfaites ; leur aspect rustique fait partie de leur charme.
Étape 5 : La prise finale
Laissez les pralines tranquilles. Laissez-les refroidir complètement à température ambiante. Cela peut prendre de 30 minutes à une heure. En refroidissant, elles se transformeront de monticules brillants et collants en confiseries mates et fermes. Vous saurez qu’elles sont prêtes quand vous pourrez en décoller une proprement du papier. L’attente est la partie la plus dure, mais elle est essentielle pour cette texture idéale moelleuse-mais-ferme.
Votre timeline pour les Pralines
- Temps de préparation : 5 minutes
- Temps de cuisson : 10 minutes
- Temps de refroidissement : 30-60 minutes
- Temps total : Environ 45-75 minutes
- Nombre de portions : Donne environ 12 pralines
Un petit secret de ma cuisine
Vous voulez une astuce de pro ? Ajoutez une toute petite pincée de sel marin en flocons sur le dessus de chaque praline juste après les avoir dressées. Le contraste entre la confiserie douce et beurrée et les cristaux de sel piquants est absolument divin. Ça élève toute l’expérience.
Pourquoi le Lait Ribot fait toute la différence
Le lait ribot n’est pas juste pour les pancakes. Dans cette recette, son acidité légère opère deux miracles. D’abord, elle empêche les sucres de trop cristalliser, vous offrant cette texture lisse et crémeuse au lieu d’une texture cassante. Ensuite, elle ajoute une pointe acidulée qui contrebalance la douceur, rendant ces pralines totalement addictives et bien plus intéressantes qu’une simple friandise au sucre monotone.
Outils essentiels pour la réussite de vos Pralines
Vous n’avez pas besoin de grand-chose !
- Une casserole moyenne à fond épais
- Une cuillère en bois ou une spatule silicone résistante à la chaleur
- Des tasses et cuillères à mesurer
- Une plaque de cuisson
- Du papier sulfurisé ou un tapis de cuisson en silicone
- Deux cuillères pour dresser (ou une mini cuillère à cookie)
- Un thermomètre à sucre (très utile, mais pas obligatoire)
Conserver vos Pralines à la perfection
Un bon stockage garde vos Pralines Sucrées aux Pécans et Lait Ribot délicieuses. Une fois complètement refroidies, superposez-les entre des feuilles de papier sulfurisé dans un contenant hermétique. Elles resteront fraîches à température ambiante jusqu’à deux semaines. Le contenant les protège de l’absorption de l’humidité de l’air, qui peut les rendre collantes.
Pour un stockage plus long, vous pouvez les congeler. Placez les pralines superposées dans un contenant ou un sac adapté au congélateur. Elles se conserveront jusqu’à trois mois. Décongelez-les une nuit au réfrigérateur, puis laissez-les revenir à température ambiante sur le comptoir avant de servir. Cela empêche la formation de condensation sur la confiserie.
Ne stockez jamais les pralines au réfrigérateur. L’humidité à l’intérieur d’un frigo les rendra molles et elles perdront leur texture parfaite. Une étagère de garde-manger fraîche et sèche est l’endroit idéal pour votre pot à bonbons.
Astuces pour des Pralines parfaites
- Surveillez la météo : Les jours humides ou pluvieux sont délicats pour la confiserie. Le sucre peut absorber l’humidité de l’air et rester collant. Essayez de viser un jour sec si possible.
- La taille de la casserole compte : Utiliser une casserole trop grande peut faire bouillir le sirop trop vite et le brûler. Une casserole moyenne est parfaite.
- Ne doublez pas les doses : C’est tentant de faire une plus grosse batch, mais la confiserie demande de la précision. Cuisinez une recette à la fois pour des résultats constants.
- Testez la cuisson : Pas de thermomètre ? Faites tomber un tout petit peu de sirop dans un verre d’eau froide. S’il forme une petite boule molle que vous pouvez écraser entre vos doigts, c’est prêt.
Présenter vos trésors du Sud
La présentation les rend encore plus spéciales. Empilez-les dans un bol en bois rustique pour une vibe décontractée. Enveloppez les pralines individuellement dans des torsades de papier ciré pour un cadeau charmant et désuet. Disposez-les sur une jolie assiette en porcelaine avec un napperon en dentelle pour un tea time chic. Vous pouvez même en émietter une sur une boule de glace à la vanille pour un sundae incroyable !
D’autres aventures sucrées à essayer
Si vous avez aimé préparer ces pralines, vous pourriez apprécier d’explorer d’autres gourmandises maison. Pourquoi ne pas essayer ces Donuts Longs Fourrés au Chocolat Blanc et Mascarpone Luxueux pour un projet vraiment décadent ? Pour un petit-déjeuner réconfortant, ce Pain Donut à la Cannelle est le préféré de la famille. Quand la saison des baies arrive, ces Scones aux Fruits Rouges Mixés Glacés sont incontournables. Et pour la gourmandise ultime express, ce Fudge Crémeux au Beurre de Cacahuète est incroyablement facile et satisfaisant.
Erreurs courantes à éviter avec les Pralines
Évitez ces pièges pour réussir vos confiseries à chaque fois.
Erreur 1 : Remuer après le début de l’ébullition
C’est l’erreur la plus fréquente. Une fois que le mélange commence à bouillir, posez la cuillère. Remuer peut provoquer la cristallisation du sucre en petits grains, vous donnant une texture granuleuse et sucrée au lieu d’une texture lisse. Le sucre doit bouillir sans être dérangé pour atteindre le bon stade. Faites confiance au processus et laissez-le simplement bouillonner.
Erreur 2 : Zapper la minute de refroidissement
Retirer la casserole du feu et ajouter immédiatement les pécans est une recette pour un désastre. Le sirop est si chaud qu’il peut « trop cuire » les noix, libérant des huiles et risquant de faire séparer la graisse du sucre. Le laisser reposer juste 60 secondes abaisse légèrement la température et assure une émulsion parfaite.
Erreur 3 : Utiliser des pécans pré-hachés
Les moitiés de pécans sont spécifiées pour une raison. Les morceaux hachés sont souvent trop petits et peuvent donner une sensation granuleuse aux pralines. Les moitiés offrent un croquant satisfaisant et substantiel et sont bien plus jolies dans la confiserie finie. Prenez ce moment supplémentaire pour utiliser des moitiés entières pour la meilleure texture et apparence.
Erreur 4 : Ne pas travailler vite à l’Étape 4
Le mélange à pralines prend vite en refroidissant dans la casserole. Si vous traînez en dressant, les dernières pralines seront trop rigides pour former de jolis monticules. Ayez votre plaque tapissée prête et utilisez deux cuillères pour travailler efficacement. Si le mélange devient vraiment trop dur, une toute petite goutte d’eau chaude peut aider à le détendre.
FAQ sur les Pralines Sucrées aux Pécans et Lait Ribot
Puis-je faire des pralines sans thermomètre à sucre ?
Absolument. Le test de l’eau froide est une méthode fiable à l’ancienne. Après environ 3-4 minutes d’ébullition, faites tomber un petit peu de sirop dans une tasse d’eau très froide. Utilisez vos doigts pour essayer de former la goutte en boule. Si elle est souple et garde une forme molle, elle est au stade « petit boulé » et prête. Si elle se dissout ou est trop liquide, faites bouillir encore 30 secondes et testez à nouveau.
Pourquoi mes pralines sont-elles devenues granuleuses ?
Le grain est presque toujours dû à la formation de cristaux de sucre. Cela peut arriver si des grains de sucre collés sur le côté de la casserole retombent dedans, ou si vous avez remué le mélange une fois l’ébullition commencée. Pour l’éviter, brossez les parois de la casserole avec un pinceau de pâtisserie humide au début, et ne remuez jamais après l’ébullition. S’assurer que vos sucres sont bien dissous au départ aide aussi.
Mes pralines sont trop liquides et n’ont pas pris. Qu’est-ce qui n’a pas marché ?
Cela signifie que le sirop n’a pas atteint une température suffisamment élevée. Vous ne l’avez probablement pas assez fait bouillir. La prochaine fois, utilisez un thermomètre ou soyez patient avec le test de l’eau froide jusqu’à ce qu’il forme vraiment un petit boulé. La météo peut aussi être un facteur ; une humidité élevée peut empêcher la prise de la confiserie.
Puis-je utiliser du beurre salé à la place du non salé ?
Vous pouvez, mais sachez que cela changera le profil de saveur. Le sel dans le beurre sera amplifié, ce que certaines personnes apprécient pour le contraste sucré-salé. Si vous utilisez du beurre salé, vous devriez omettre tout sel additionnel demandé dans la recette (bien que celle-ci n’en ait pas). Pour un goût maîtrisé, le beurre non salé est préférable.
Combien de temps se conservent les pralines maison ?
Stockées correctement dans un contenant hermétique à température ambiante, elles resteront fraîches et savoureuses jusqu’à deux semaines. Elles peuvent durer un peu plus, mais leur texture est optimale la première semaine. Pour un stockage plus long, congelez-les comme décrit précédemment.
Puis-je ajouter d’autres saveurs, comme de la vanille ou de la cannelle ?
Oui ! Une cuillère à café d’extrait de vanille pur ou une demi-cuillère à café de cannelle en poudre ajoutée avec les pécans est délicieuse. Vous pourriez aussi ajouter une pincée de noix de muscade ou même un trait de bourbon pour une touche adulte. Ajoutez ces extras avec parcimonie pour qu’ils ne couvrent pas la saveur classique et beurrée des pécans.
Existe-t-il un moyen de faire des pralines sans lait animal ?
Vous pouvez expérimenter avec des substituts. Pour le lait ribot, utilisez un lait végétal (comme l’amande ou le soja) mélangé à 1/2 cuillère à soupe de jus de citron. Pour le beurre, utilisez un bâton de beurre végétal de qualité. La saveur sera légèrement différente, mais vous pouvez tout de même obtenir une bonne texture.
Quel est le meilleur type de casserole à utiliser ?
Une casserole à fond épais, comme en acier inoxydable ou à cœur d’aluminium, est idéale. Elle distribue la chaleur uniformément, évitant les points chauds qui pourraient brûler le sucre. Évitez les casseroles fines et légères, car elles ont plus de chances de faire brûler votre confiserie.
Puis-je doubler cette recette de pralines ?
Ce n’est pas recommandé. La confiserie est une science exacte. Doubler le volume change la façon dont le sirop chauffe et se comporte, rendant plus difficile d’atteindre le stade parfait du petit boulé. Il est bien plus sûr et fiable de faire des batchs simples séparées.
Mon sirop a foncé très vite. Est-ce que je l’ai brûlé ?
Peut-être. S’il sent l’âcre ou l’amer, il a probablement brûlé. Cela arrive si le feu est trop fort. La confiserie demande une chaleur régulière et moyenne. S’il est juste devenu d’une couleur ambrée foncée mais sent toujours bonbon, ça va probablement – c’est la caramélisation des sucres. La couleur est un bon indicateur ; visez un brun doré riche, pas un brun foncé.
Pour conclure votre aventure sucrée
Préparer des Pralines Sucrées aux Pécans et Lait Ribot, c’est bien plus que suivre une recette. C’est embrasser un peu de patience, faire confiance au processus et créer quelque chose de ses propres mains qui apporte un pur plaisir. Le son du sucre qui bout, l’odeur des pécans toastés et la satisfaction d’une praline parfaitement prise – voilà les joies de la cuisine maison. J’espère que cette recette deviendra une tradition chérie chez vous, comme elle l’est chez moi. Pour plus d’inspirations sucrées comme celle-ci, parcourez notre collection complète de recettes de desserts et pâtisseries. Et rappelez-vous, comme pour toute douceur sucrée, en profiter dans le cadre d’une alimentation équilibrée est essentiel. Il vaut la peine de considérer des recommandations générales pour une alimentation équilibrée, comme celles que l’on trouve dans les ressources sur une saine alimentation et les choix pauvres en sel, pour que toutes vos aventures culinaires restent joyeuses et conscientes. Allez, maintenant, à vos tabliers et faites quelque chose de doux !
Equipment
- Casserole à fond épais
- Cuillère en bois
- Plaque à pâtisserie
- Papier sulfurisé
- Spatule en silicone
Ingrédients
- 1 tasse sucre granulé
- 1 tasse cassonade tassée pour une saveur molasse
- 1/2 tasse lait caillé
- 1/4 tasse beurre non salé
- 1 tasse moitiés de noix de pécan
Instructions
- Dans une casserole en métal à fond épais, mélanger le sucre granulé, la cassonade, le lait caillé et le beurre.
- Cuire à feu moyen en remuant doucement jusqu'à ce que le beurre fonde et que le mélange devienne une soupe caramélisée.
- Ne pas remuer et porter à ébullition jusqu'à atteindre la température de 113°C (235°F) ou faire bouillir pendant 3-4 minutes.
- Retirer du feu et laisser reposer pendant une minute, puis incorporer les moitiés de noix de pécan.
- Tapisser une plaque à pâtisserie de papier sulfurisé, puis utiliser deux cuillères pour déposer des mounds de mélange de praline sur la plaque.
- Laisser refroidir complètement à température ambiante pendant 30 à 60 minutes.
Notes
Nutrition

Je suis Céline, une véritable passionnée d’ustensiles et de matériel de cuisine ! J’adore tester, comparer et découvrir les meilleurs équipements pour rendre la cuisine plus efficace et agréable. Que ce soit un bon couteau, un robot performant ou une poêle incontournable, je suis toujours à la recherche des outils qui feront la différence. Mon but est de vous guider dans vos choix pour que vous ayez le bon matériel adapté à vos besoins.