
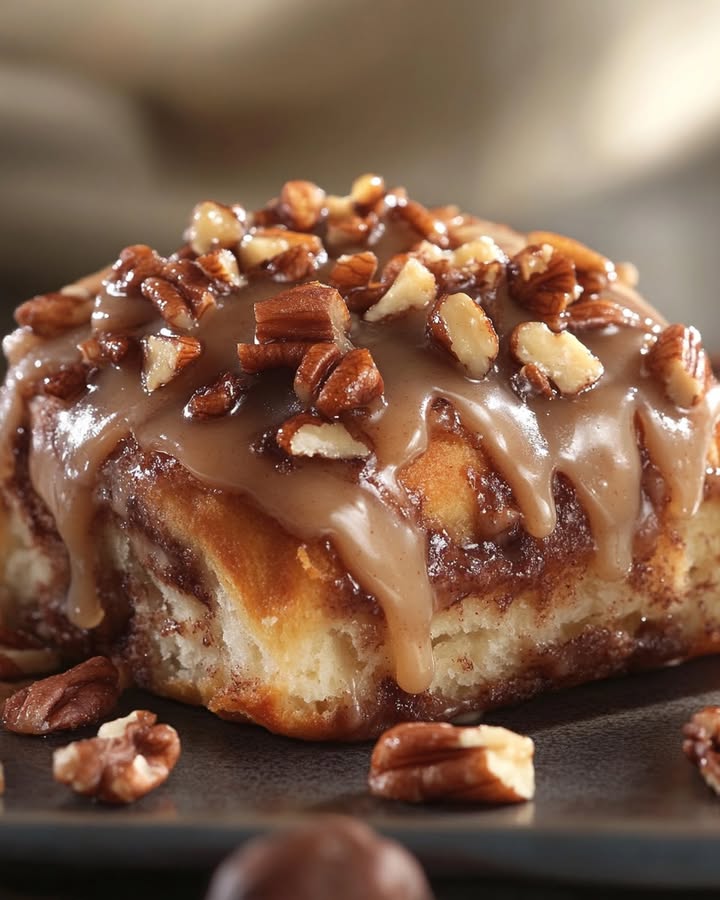
Roulés à la Cannelle Croquants aux Noix : Un Câlin dans un Plaque !
Y a-t-il une odeur plus accueillante que celle des roulés à la cannelle qui cuisent au four ? C’est le parfum des week-ends paresseux, des fêtes douillettes et de la joie pure et simple. Oubliez les tubes du commerce ; aujourd’hui, on fait la vraie chose. Ces Roulés à la Cannelle Croquants aux Noix sont des nuages moelleux de pâte enroulée autour d’un sucre cannelle beurré et de noix de pécan grillées, le tout recouvert d’un glaçage vanillé sucré. C’est ma recette préférée pour transformer une matinée ordinaire en quelque chose de magique, et je vous promets que votre cuisine sentira la boulangerie d’exception.
L’Histoire de la Spirale la Plus Douce
Même si on considère souvent les roulés à la cannelle comme une douceur américaine classique, leur histoire remonte en réalité au nord de l’Europe. Les kanelbullar suédois et les Zimtschnecken allemands sont les gracieux ancêtres de notre pâtisserie de petit-déjeuner moderne et généreuse. L’ajout génial d’un glaçage sucré et collant est une véritable touche américaine, transformant un petit pain épicé en une pièce maîtresse gourmande. Ma version rend hommage à cette tradition mais ajoute un délicieux croquant avec des noix grillées. C’est le mélange parfait entre le charme de l’ancien monde et l’exigence de ma propre famille d’avoir un peu plus de texture dans chaque bouchée.
Pourquoi Vous Allez Aimer Ces Roulés à la Cannelle
Cette recette, ce n’est pas seulement le goût incroyable. C’est l’expérience. Dès que vous voyez la levure mousser jusqu’au filet de glaçage final, c’est un projet de pâtisserie gratifiant et tout à fait réalisable. La pâte douce et moelleuse est indulgente. La garniture se prépare en quelques secondes. Et le résultat ? Une plaque de 12 roulés dorés, croquants et parfumés qui vous donneront l’impression d’être un champion de la pâtisserie. Vous allez les adorer parce qu’ils sont :
- Parfaitement Équilibrés : Pas trop sucrés, avec la chaleur de la cannelle parfaitement coupée par le sel des noix.
- Étonnamment Simples : Pas besoin de compétences spéciales, juste un peu de patience pour la levée de la pâte.
- Le Réconfort Ultime : Ils procurent cette sensation douce et réconfortante à chaque bouchée.
Quand Préparer une Fournée de Ces Roulés
Ces roulés sont la réponse culinaire à tout. Ils disent « Je t’aime » pour un petit-déjeuner en famille, « Bienvenue ! » pour des invités, et « Célébrons ! » pour n’importe quelle occasion. J’adore les préparer pour :
- Les Matins de Fêtes : Le petit-déjeuner de Noël ou de Thanksgiving devient instantanément spécial.
- Un Brunch entre Amis : Accompagnez-les de café et de fruits frais pour un buffet qui impressionne sans effort.
- Un Beau Projet de Dimanche : Faites participer les enfants au roulage et à la répartition de la garniture !
- Juste Comme Ça : Parfois, un mardi mérite un roulé à la cannelle tout chaud.
De Quoi Vous Aurez Besoin : La Liste des Ingrédients
Rassemblez ces ingrédients simples. Je parie que vous en avez déjà la plupart dans votre placard !
Pour la Pâte :
- 240 ml de lait tiède (environ 43°C)
- 2 cuillères à café de levure boulangère sèche active
- 65 g de sucre en poudre
- 75 g de beurre fondu
- 1 gros œuf
- 375 g de farine tout usage (type T55)
- ½ cuillère à café de sel
Pour la Garniture :
- 75 g de beurre ramolli
- 150 g de sucre roux
- 2 cuillères à soupe de cannelle en poudre
- 90 g de noix concassées (noix de pécan ou cerneaux de noix)
Pour le Glaçage :
- 125 g de sucre glace
- 2-3 cuillères à soupe de lait
- ½ cuillère à café d’extrait de vanille
Pas de Panique ! Des Substitutions Pratiques
Il vous manque quelque chose ? Ne vous inquiétez pas. Voici des échanges faciles :
- Lait : N’importe quel lait convient — entier, demi-écrémé, ou même un lait végétal non sucré comme l’amande ou l’avoine.
- Noix : Vous n’aimez pas les noix ? Remplacez-les par des raisins secs ou retirez-les complètement pour des roulés classiques.
- Sucre Roux : Vous pouvez utiliser du sucre en poudre pour la garniture, mais vous perdrez la profondeur de la mélasse.
- Farine Tout Usage : Pour des roulés plus rustiques, remplacez jusqu’à 125 g de la farine par de la farine complète.
On Passe à la Pratique ! Votre Guide Pas-à-Pas pour des Roulés Parfaits
Étape 1 : Réveillez la Levure
Dans un grand saladier, mélangez le lait tiède, la levure et une pincée du sucre en poudre. Le lait doit être à une température agréable, comme celle d’un bain — trop chaud et il tue la levure, trop froid et elle ne se réveillera pas. Laissez reposer ce mélange 5 à 10 minutes. Vous saurez qu’il est prêt quand une couche mousseuse et crémeuse se forme à la surface. Cette mousse est le signe que votre levure est vivante et prête à faire lever votre pâte comme par magie.
Étape 2 : Formez la Pâte
Incorporez le beurre fondu et l’œuf au mélange de levure mousseux. Le beurre doit être un peu refroidi pour ne pas cuire l’œuf. Ensuite, ajoutez graduellement la farine et le sel. Je commence avec une cuillère en bois et je finis avec les mains quand ça devient irrégulier. Mélangez jusqu’à ce qu’il n’y ait plus de traces de farine et qu’une pâte souple et légèrement collante se forme. Elle ne doit pas être trop sèche ; une pâte un peu collante donne des roulés plus moelleux. Astuce de pro : Si elle colle vraiment à vos mains, ajoutez une cuillère à soupe de farine à la fois, mais avec parcimonie !
Étape 3 : Pétrissez et Laissez Lever
Sortez la pâte sur un plan de travail légèrement fariné. Pétrissez-la pendant 5 à 7 minutes. Vous devez obtenir une boule lisse et élastique qui revient quand vous appuyez doucement dessus. Placez cette belle boule dans un bol huilé, en la retournant une fois pour l’enrober. Couvrez avec un torchon humide ou du film alimentaire. Trouvez un endroit chaud et sans courant d’air (comme l’intérieur d’un four éteint). Laissez lever pendant 1 à 2 heures jusqu’à ce qu’elle ait doublé de volume. Cette patience est votre secret pour des couches moelleuses.
Étape 4 : Préparez la Garniture Épicée
Une fois que la pâte est bien gonflée, appuyez doucement dessus pour chasser l’air. Sur un plan fariné, étalez-la en un rectangle d’environ 38×23 cm. Étalez le beurre ramolli sur toute la surface, en laissant un petit bord. Dans un petit bol, mélangez le sucre roux et la cannelle. Saupoudrez ce mélange parfumé uniformément sur le beurre, puis ajoutez les noix concassées. Pressez légèrement la garniture pour qu’elle adhère au beurre.
Étape 5 : Roulez, Découpez et Disposez
En commençant par le côté long, roulez la pâte bien serrée pour former un boudin. Utilisez un couteau dentelé bien aiguisé ou un morceau de fil dentaire non parfumé pour couper le boudin en 12 parts égales. Placez les roulés, face coupée vers le haut, dans un plat à four graissé de 23×33 cm. Ils doivent être bien serrés mais pas tassés — ils ont besoin d’espace pour gonfler à nouveau. Astuce du chef : Pour encore plus de croquant, saupoudrez quelques noix concassées supplémentaires sur le dessus des roulés avant la deuxième levée.
Étape 6 : La Dernière Levée et la Cuisson
Couvrez le plat et laissez les roulés lever à nouveau pendant environ 30 minutes. Ils doivent paraître gonflés et presque se toucher. Pendant ce temps, préchauffez votre four à 180°C (th. 6). Quand le four est chaud et les roulés prêts, enfournez-les pour 25 à 30 minutes. Vous saurez qu’ils sont cuits quand le dessus est d’un magnifique brun doré et que toute votre maison sent incroyablement bon.
Étape 7 : La Touche Sucrée Finale
Pendant que les roulés cuisent, fouettez ensemble le sucre glace, le lait et la vanille pour le glaçage. Commencez avec 2 cuillères à soupe de lait et ajoutez-en si nécessaire pour obtenir une consistance épaisse mais coulante. Dès que les roulés sortent du four, versez ce glaçage généreux sur eux. Il fondra dans les recoins, créant cette finition iconique collante et sucrée. Laissez-les refroidir juste assez pour ne pas vous brûler la langue, puis régalez-vous !
Votre Chronologie de Préparation
Voici un récapitulatif rapide de la répartition de votre temps :
- Temps de Préparation : 20 minutes (manuelles)
- Temps de Levée : 1h30 – 2h30 (principalement sans surveillance)
- Temps de Cuisson : 25-30 minutes
- Temps Total : Environ 2h30 – 3h30 (du début à la fin)
- Nombre de Parts : 12 roulés divins
- Calories : Environ 350 kcal par roulé
Le Secret des Roulés les Plus Moelleux
Mon plus grand secret ? Ne lésinez pas sur le gras ! Le beurre et le lait dans la pâte (et le beurre supplémentaire dans la garniture) sont ce qui crée cette texture tendre, riche et digne d’une boulangerie. Aussi, laisser les roulés refroidir un peu dans le plat après la cuisson les garde moelleux. Une étude sur la satiété suggère même que la combinaison de protéines, de lipides et de glucides complexes dans les noix peut aider à se sentir rassasié. Alors ce croquant de noix n’est pas seulement délicieux, c’est aussi un petit bonus pour votre corps !
Une Petite Anecdote de Cuisine
Saviez-vous qu’autrefois, la cannelle valait plus que l’or ? C’était une épice rare échangée le long de routes périlleuses. Aujourd’hui, nous avons la chance de l’avoir dans nos placards ! Le fait de rouler et de couper la pâte en spirales est une technique ancienne, symbolisant le cycle des saisons dans certaines cultures. Chaque fois que vous faites ces roulés, vous participez à un délicieux bout d’histoire culinaire.
Le Matériel Dont Vous Aurez Besoin
Pas besoin d’équipement spécial ! Juste :
- Un grand saladier
- Des tasses et cuillères à mesurer
- Un rouleau à pâtisserie
- Un couteau bien aiguisé ou du fil dentaire pour couper
- Un plat à four de 23×33 cm
- Un fouet pour le glaçage
Conserver Vos Roulés à la Cannelle pour Plus Tard
À Température Ambiante : Une fois complètement refroidis, conservez les roulés glacés dans un contenant hermétique à température ambiante jusqu’à 2 jours. Ils sont meilleurs dans les 24 heures pour une texture optimale.
Au Réfrigérateur : Pour une conservation plus longue, vous pouvez les garder au frigo jusqu’à 5 jours. Laissez-les revenir à température ambiante ou réchauffez-les 10-15 secondes au micro-ondes avant de servir pour retrouver la texture du frais.
Congélation pour Plus Tard : Ils se congèlent à merveille ! Congelez les roulés non glacés individuellement sur une plaque, puis transférez-les dans un sac de congélation. Ils se conservent jusqu’à 3 mois. Décongelez une nuit au frigo, réchauffez au four, et versez un glaçage frais au moment de servir.
Astuces et Conseils pour des Roulés Impeccables
- Vérifiez la Levure : Si votre mélange lait-levure ne mousse pas, votre levure est peut-être trop vieille ou le lait était trop chaud/froid. Recommencez avec de la levure fraîche.
- Le Beurre Ramolli est Clé : Pour la garniture, un beurre vraiment ramolli s’étale facilement sans déchirer la pâte délicatement étalée.
- Coupe Nettoyante :> Utilisez un couteau dentelé bien aiguisé ou du fil dentaire non parfumé (passez-le sous le boudin, croisez-le au-dessus et tirez) pour des coupes nettes sans écraser les roulés.
- Le Timing du Glaçage : Versez toujours le glaçage pendant que les roulés sont encore chauds afin qu’il fonde et imprègne légèrement.
Idées de Présentation pour les Mettre en Valeur
- Servez-les empilés sur un beau pied de gâteau pour une pièce maîtresse de brunch.
- Saupoudrez d’un peu de cannelle supplémentaire juste avant de servir pour une finition digne d’une photo.
- Placez un petit bol avec du glaçage supplémentaire à côté pour vos invités qui aiment le très sucré.
- Décorez avec quelques noix de pécan ou cerneaux de noix entiers grillés sur le dessus pour une touche élégante.
Envie de Créativité ? Essayez Ces Délicieuses Variantes
Une fois que vous maîtrisez cette recette classique, le monde est à vous ! Voici quelques idées amusantes :
- Roulés Tarte aux Pommes : Ajoutez une couche de pommes finement coupées et revenues à la poêle sur la garniture avant de rouler.
- Glaçage au Fromage Frais : Remplacez le glaçage vanillé par une couche épaisse de glaçage au fromage frais type cream cheese.
- Spirale aux Pépites de Chocolat : Saupoudrez des pépites de chocolat miniatures sur la garniture cannelle-sucre pour une surprise sucrée.
- Glaçage au Zeste d’Orange : Ajoutez le zeste d’une orange à votre glaçage pour une touche fraîche et acidulée.
- Pécan Caramélisé Collant : Versez une couche de caramel maison ou du commerce au fond du plat avant d’y ajouter les roulés. Retournez-les après cuisson pour une présentation spectaculaire.
- Épices de Citrouille : Ajoutez une cuillère à soupe d’épices pour tarte à la citrouille à la garniture et utilisez un glaçage au sirop d’érable pour une douceur parfaite d’automne.
Si vous adorez l’association cannelle et desserts crémeux, vous devez absolument essayer ce spectaculaire Cheesecake aux Roulés à la Cannelle pour une expérience vraiment décadente. Ou, pour un autre dessert de chef, ce Gâteau Tuxedo Triple Mousse au Chocolat est d’une pure élégance. Besoin d’une envie de noix rapide ? Ces Barres aux Noix de Pécan Faciles sont une bouée de sauvetage. Et pour les amoureux du chocolat ultimes, une part de ce Gâteau au Chocolat Décadent ne rate jamais son effet.
Erreurs Courantes à Éviter
Erreur 1 : Tuer la Levure avec du Lait Trop Chaud
C’est la raison numéro un pour laquelle la pâte ne lève pas. Si votre lait est trop chaud, il désactive la levure. S’il est trop froid, la levure ne se réveillera pas. Utilisez toujours un thermomètre si vous n’êtes pas sûr. La température parfaite est d’environ 43°C — elle doit être tiède au toucher. Une bonne astuce : elle doit avoir la température d’un biberon agréablement chaud.
Erreur 2 : Ajouter Trop de Farine en Pétrissant
On a tendance à vouloir ajouter de la farine lorsque la pâte semble collante. Mais une pâte souple et légèrement collante, c’est ce qui crée des roulés tendres et moelleux. Trop de farine les rend denses et secs. Faites confiance au processus ! La pâte deviendra moins collante en pétrissant. Saupoudrez juste un peu de farine sur votre plan de travail pour éviter qu’elle colle, pas directement dans la pâte.
Erreur 3 : Étaler la Pâte Trop Fine
Si vous étalez votre rectangle trop fin, vous obtiendrez des roulés tout petits et serrés, sans cette belle texture moelleuse qui se détache. Visez une épaisseur d’environ 0,5 à 1 cm. Cela vous donne assez de pâte pour créer de belles couches distinctes quand vous la roulez et la coupez.
Erreur 4 : Ne Pas Les Laisser Lever Assez la Deuxième Fois
Après avoir coupé et placé les roulés dans le plat, cette deuxième levée (appelée « l’apprêt ») est cruciale. Si vous vous précipitez et les mettez directement au four, ils seront denses. Laissez-les reposer, couverts, jusqu’à ce qu’ils aient l’air gonflés et aient bien rempli le plat. Ils devraient presque doubler de volume à nouveau. Cette dernière levée garantit qu’ils seront légers et aérés après cuisson.
Erreur 5 : Trop Les Cuire Jusqu’à Ce Qu’ils Soient Secs
Nous voulons un brun doré, pas un brun foncé. Un roulé à la cannelle trop cuit est un roulé triste. Commencez à vérifier à partir de 25 minutes. Les roulés sont cuits quand ils sont dorés sur le dessus et qu’ils sonnent légèrement creux si vous les tapotez doucement. La température interne doit être d’environ 88°C.
Questions Fréquemment Posées
Puis-je préparer la pâte à l’avance ?
Absolument ! C’est un excellent gain de temps. Après la première levée, dégazez la pâte, enveloppez-la bien dans du film alimentaire et réfrigérez-la toute la nuit. Le lendemain matin, sortez-la, laissez-la à température ambiante 30 minutes, puis poursuivez avec l’étalage, la garniture et la deuxième levée. La fermentation à froid développe même plus de saveur.
Ma pâte n’a pas levé. Qu’est-ce qui s’est passé ?
Les coupables les plus probables sont une levure trop vieille ou un liquide trop chaud ou trop froid. La levure a une date de péremption et perd de sa puissance avec le temps. Vérifiez toujours la date. Assurez-vous aussi que votre spot de levée est chaud et sans courant d’air. Un four avec seulement la lampe allumée (pas la chaleur) est une étuve parfaite.
Puis-je congeler les roulés à la cannelle non cuits ?
Oui, et c’est une astuce fantastique ! Après avoir placé les roulés découpés dans le plat pour leur deuxième levée, couvrez le plat hermétiquement avec du film alimentaire et du papier d’aluminium, puis congelez. La veille de la cuisson, transférez-les au frigo pour décongeler et lever lentement. Le matin, laissez-les finir de lever à température ambiante pendant environ une heure, puis faites cuire comme indiqué.
Quelle est la meilleure façon de réchauffer des roulés restants ?
Pour la meilleure texture, réchauffez-les au four. Préchauffez à 150°C, enveloppez les roulés dans du papier d’aluminium et faites chauffer environ 10 minutes. Le micro-ondes fait l’affaire en cas de besoin (10-15 secondes) mais peut les rendre un peu caoutchouteux. Ajoutez toujours un glaçage frais après réchauffage, pas avant.
Puis-je utiliser de la levure instantanée au lieu de la levure sèche active ?
Oui, vous pouvez. La levure instantanée n’a pas besoin d’être réactivée dans un liquide tiède au préalable. Vous pouvez la mélanger directement avec vos ingrédients secs. Utilisez la même quantité (2 cuillères à café). Votre première levée pourrait être un peu plus rapide.
Pourquoi mes roulés à la cannelle sont-ils secs ?
Des roulés secs viennent généralement d’une cuisson trop longue ou de l’utilisation de trop de farine. Mesurez toujours votre farine en la versant dans la tasse et en nivelant — ne plongez pas directement la tasse dans le sac. Et surveillez bien le four ; quelques minutes peuvent faire une grande différence.
Puis-je omettre les noix à cause d’une allergie ?
Bien sûr ! Les roulés sont tout aussi délicieux sans. Vous pouvez les retirer complètement ou les remplacer par une quantité égale d’un autre ajout comme des raisins secs, des cranberries séchées, ou même une pincée de flocons d’avoine.
Comment obtenir un glaçage épais et blanc, pas fin et transparent ?
La clé est le ratio liquide/sucre. Commencez avec seulement 2 cuillères à soupe de lait pour 125 g de sucre glace. Fouettez bien et n’ajoutez plus de lait, qu’une cuillère à café à la fois, jusqu’à ce qu’il soit juste coulant. Pour un glaçage blanc pur, utilisez du lait au lieu d’eau et évitez l’extrait de vanille, qui le teinte légèrement.
Quelle taille de plat à four est la meilleure ?
Un moule standard de 23×33 cm est parfait pour 12 roulés bien serrés qui pourront lever vers le haut. Si vous préférez des roulés avec des bords plus séparés et croustillants, essayez une plaque à pâtisserie plus grande où ils auront plus d’espace entre eux.
Comment savoir si les roulés sont parfaitement cuits ?
Cherchez une belle couleur brun doré sur le dessus. Les côtés doivent se décoller légèrement du moule. La méthode la plus fiable est un thermomètre sonde ; la température interne doit atteindre 88°C. Ils sonneront aussi creux si vous tapotez doucement le dessus de l’un d’eux.
Voilà — tout ce dont vous avez besoin pour créer une plaque de roulés à la cannelle maison absolument irrésistibles. Le processus fait partie du plaisir, emplissant votre maison de cet incroyable arôme. Ces Roulés à la Cannelle Croquants aux Noix sont plus qu’une recette ; c’est un souvenir en train de se créer. Alors, attachez votre tablier, faites confiance au processus et préparez-vous pour le meilleur petit-déjeuner (ou dessert !) que vous ayez pris depuis longtemps. N’oubliez pas de consulter toute notre collection de douceurs dans la catégorie Gâteaux et Pâtisseries pour plus d’inspiration en pâtisserie. Maintenant, à vos fourneaux !
Equipment
- Grand bol de mélange
- Plat de cuisson de 9x13 pouces
- Rouleau à pâtisserie
- Couteau bien aiguisé ou du fil dentaire pour couper
- Fouet pour le glaçage
Ingrédients
- 240 ml lait tiède 110°F/43°C
- 2 c.s levure sèche active
- 67 g sucre granulé ⅓ tasse
- 67 g beurre fondu ⅓ tasse
- 1 gros œuf
- 360 g farine tout usage 3 tasses
- 2 c.c sel ½ cuillère à café
- 67 g beurre ramolli pour la garniture
- 150 g cassonade ¾ tasse
- 30 g cannelle moulue 2 cuillères à soupe
- 90 g noix hachées ¾ tasse de noix de pécan ou noix
- 120 g sucre en poudre pour le glaçage
- 20 ml lait pour le glaçage
- 2 c.c extrait de vanille pour le glaçage
Instructions
- Dans un grand bol, mélanger le lait tiède, la levure et une pincée de sucre. Laisser reposer 5-10 minutes jusqu'à l'apparition d'une mousse.
- Incorporer le beurre fondu et l'œuf au mélange de levure. Ajouter progressivement la farine et le sel, puis former une pâte douce et légèrement collante.
- Pétrir la pâte sur une surface légèrement farinée pendant 5-7 minutes. Placer dans un bol graissé et couvrir. Laisser lever 1-2 heures dans un endroit chaud.
- Une fois la pâte levée, écraser doucement pour libérer l'air, étaler en un rectangle de 15x9 pouces.
- Étaler le beurre ramolli sur la pâte, puis saupoudrer de mélange de cassonade, cannelle et noix.
- Enrouler la pâte en un boudin serré et couper en 12 morceaux égaux. Placer dans un plat de cuisson graissé.
- Couvrir et laisser lever 30 minutes. Préchauffer le four à 350°F (175°C).
- Cuire au four pendant 25-30 minutes jusqu'à ce qu'ils soient dorés.
- Préparer le glaçage en mélangeant le sucre en poudre, le lait et la vanille, puis verser sur les rouleaux encore chauds.
Notes
Nutrition

Je suis Céline, une véritable passionnée d’ustensiles et de matériel de cuisine ! J’adore tester, comparer et découvrir les meilleurs équipements pour rendre la cuisine plus efficace et agréable. Que ce soit un bon couteau, un robot performant ou une poêle incontournable, je suis toujours à la recherche des outils qui feront la différence. Mon but est de vous guider dans vos choix pour que vous ayez le bon matériel adapté à vos besoins.