
Gâteau Tuxedo Exquis : Votre Délice Ultime à la Mousse Triple Chocolat
Imaginez présenter un gâteau si élégant qu’il semble habillé pour une soirée de gala. C’était mon objectif pour notre dernière grande fête familiale. Je voulais plus qu’un simple gâteau au chocolat ; je voulais des couches de textures onctueuses et de saveurs riches qui feraient briller les yeux de tout le monde. Après de nombreux tests (et des dégustateurs heureux !), ce Délice Tuxedo Cake à la Mousse Triple Chocolat est né. C’est la pièce maîtresse qui est maintenant réclamée pour chaque occasion spéciale, et je suis ravie de partager ses secrets avec vous.
L’Histoire derrière le Gâteau Tuxedo : L’Élégance dans Chaque Part
Le nom « Gâteau Tuxedo » capture parfaitement son essence : un dessert aux contrastes raffinés, à l’image du costume noir et blanc classique. Bien que son origine exacte soit un peu mystérieuse, il est devenu un classique moderne dans les pâtisseries et les cuisines familiales. Il représente le mariage parfait du chocolat noir et du chocolat blanc, du gâteau moelleux et de la mousse aérienne. Ma version sublime cette idée avec une attaque triple-chocolat — un gâteau cacao moelleux, deux mousses distinctes et un manteau de ganache brillant. C’est un travail d’amour, mais chaque étape est un processus joyeux pour créer quelque chose de vraiment magnifique.
Pourquoi Vous Allez Tomber Amoureux de Cette Recette de Gâteau Tuxedo
Ce n’est pas juste un autre gâteau au chocolat. C’est une expérience. Premièrement, les textures sont incroyables — la mie tendre du gâteau contre la mousse nuageuse est de la pure magie. Deuxièmement, c’est étonnamment gérable ! Chaque composant est simple en soi ; l’art réside dans l’assemblage. Enfin, il est extrêmement polyvalent. Vous pouvez le préparer à l’avance, et il s’adapte magnifiquement à différents chocolats. C’est le genre de dessert qui renforce votre confiance en pâtisserie et vous vaut des compliments sans fin.
Occasions Parfaites pour Votre Chef-d’Œuvre Triple Chocolat
Ce gâteau est fait pour les moments qui valent d’être célébrés. C’est la star des fêtes d’anniversaire, le grand final des dîners d’anniversaire de mariage, et un succès garanti lors des réunions de fêtes comme Noël ou le réveillon du Nouvel An. J’adore l’apporter aux repas partagés car il devient toujours le centre des conversations. Il est aussi parfait pour un thé de l’après-midi sophistiqué ou simplement comme une gourmandise glorieuse pour rendre un week-end ordinaire extraordinaire.
Rassembler Vos Ingrédients pour Réussir
La qualité compte ici, surtout pour le chocolat. Utiliser le meilleur que vous puissiez trouver fait une différence notable dans la profondeur des saveurs. Voici votre liste de courses :
- Pour le Gâteau au Chocolat : Farine tout usage, sucre granulé, cacao en poudre néerlandais, poudre à pâte, bicarbonate de soude, sel, gros œufs, lait entier, huile végétale, extrait de vanille, café chaud ou eau chaude avec de la poudre d’expresso.
- Pour la Mousse au Chocolat Noir : 225 g de chocolat noir (70% de cacao), 500 ml de crème liquide entière, 2 c. à soupe de sucre granulé, 1 c. à café d’extrait de vanille.
- Pour la Mousse au Chocolat Blanc : 225 g de chocolat blanc, 500 ml de crème liquide entière, 2 c. à soupe de sucre granulé, 1 c. à café d’extrait de vanille.
- Pour la Ganache au Chocolat : 225 g de chocolat noir (70% de cacao), 250 ml de crème liquide entière, 1 c. à soupe de beurre doux.
Substitutions Simples d’Ingrédients (Parce que la Vie Arrive !)
- Poudre de Cacao : Si vous n’avez pas de cacao néerlandais, le cacao naturel non sucré fonctionne. Le gâteau sera légèrement plus clair et aura une saveur chocolatée plus prononcée.
- Crème Liquide Entière : Pour les mousses, vous devez utiliser une crème riche en matière grasse (au moins 30%) pour qu’elle monte correctement. Il n’y a pas de substitut direct pour la structure qu’elle apporte.
- Café Chaud : C’est mon secret pour une saveur chocolatée plus profonde sans goût de café. Si vous préférez, utilisez simplement de l’eau chaude. La poudre d’expresso rehausse simplement les notes de chocolat.
- Chocolat : Pour les mousses et la ganache, utilisez des tablettes de pâtisserie de bonne qualité, pas des pépites. Les pépites contiennent des stabilisants qui peuvent empêcher une fonte lisse et soyeuse.
Créer Votre Gâteau Tuxedo : Un Voyage Étape par Étape
Construisons cette beauté ensemble. Réservez un après-midi tranquille, mettez de la musique et profitez du processus. L’arôme du chocolat qui cuit est une pure thérapie !
Étape 1 : Cuire le Fond de Gâteau au Chocolat
Commencez par préchauffer votre four à 180°C (350°F). Beurrez et chemisez vos moules à gâteau — cela garantit un démoulage parfait à chaque fois. Dans un grand bol, fouettez ensemble tous vos ingrédients secs. Vous obtiendrez une poudre brun foncé riche qui sent déjà divinement bon. Faites un puits au centre et ajoutez vos ingrédients humides : œufs, lait, huile et vanille. Fouettez jusqu’à obtenir une pâte épaisse et onctueuse. Maintenant, versez lentement le café chaud en filet. La pâte deviendra merveilleusement fine et brillante. Répartissez-la entre les moules et enfournez. Votre cuisine se remplira du parfum chaleureux et réconfortant du chocolat. Un cure-dent propre signifie qu’ils sont cuits. Laissez-les refroidir complètement ; la patience ici est essentielle pour une manipulation facile plus tard.
Astuce de pro : Pour des étages parfaitement plats qui s’empilent facilement, utilisez un couteau à pain pour aplanir le dessus des gâteaux refroidis.
Étape 2 : Préparer la Mousse au Chocolat Noir
Cette mousse, c’est la décadence dans un bol. D’abord, hachez finement votre chocolat noir et placez-le dans un bol résistant à la chaleur. Faites chauffer la moitié de la crème jusqu’à ce qu’elle frémisse — de petites bulles sur les bords sont votre signal. Versez-la sur le chocolat, laissez reposer quelques minutes pour qu’il fonde doucement, puis remuez jusqu’à obtenir une ganache lisse et brillante. Laissez refroidir à température ambiante ; si elle est trop chaude, elle fera retomber la crème fouettée. Pendant qu’elle refroidit, fouettez la crème froide restante avec le sucre et la vanille jusqu’à ce qu’elle forme des pics mous. Maintenant, incorporez délicatement la crème fouettée à la ganache au chocolat. Soyez doux ! Vous voulez conserver tout ce volume aérien. Le résultat doit être un nuage léger mais intensément chocolaté.
Étape 3 : Créer la Mousse Veloutée au Chocolat Blanc
Le processus est exactement le même que pour la mousse noire, mais avec du chocolat blanc. Soyez très prudent lors de la fonte du chocolat blanc, car il peut plus facilement « figer ». Assurez-vous que votre crème est chaude mais ne bout pas vigoureusement. La ganache au chocolat blanc doit être parfaitement lisse et froide avant d’incorporer la crème fouettée. Cette mousse sera d’une belle couleur ivoire et offrira un contraste doux et crémeux à la couche de chocolat noir.
Astuce du chef : Pour une mousse extra stable qui garde parfaitement sa forme à la découpe, vous pouvez ajouter une cuillère à café de gélatine en poudre neutre (réhydratée dans un peu d’eau froide) à la crème chaude avant de la verser sur le chocolat pour chaque mousse.
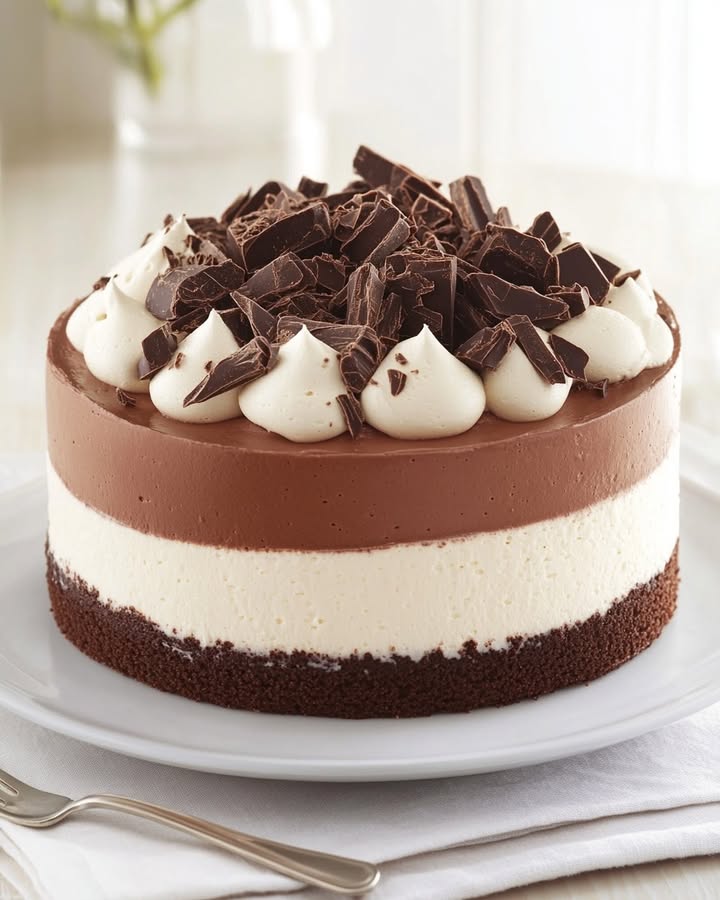
Étape 4 : Assembler les Couches du Tuxedo
Placez votre premier disque de gâteau sur une assiette de service ou un support à gâteau. J’aime mettre une petite noix de mousse en dessous pour l’empêcher de glisser. Étalez toute la mousse au chocolat noir uniformément sur cette couche, jusqu’aux bords. Placez soigneusement le deuxième disque de gâteau par-dessus. Maintenant, étalez la mousse au chocolat blanc sur cette couche supérieure. Prenez un moment pour admirer les belles rayures que vous avez créées à l’intérieur ! Placez l’ensemble au réfrigérateur pendant au moins une heure. Ce temps de repos au froid est non négociable — il raffermit les mousses pour que le nappage à la ganache ne les dérange pas.
Étape 5 : Napper le Gâteau d’une Ganache Soyeuse
C’est la partie amusante et spectaculaire ! Hachez votre chocolat noir pour la ganache et placez-le dans un bol. Faites chauffer la crème jusqu’à frémissement et versez-la sur le chocolat. Laissez reposer, puis remuez jusqu’à obtenir un mélange velouté. Incorporez le beurre à température ambiante pour plus de brillance et une touche de richesse. Laissez la ganache refroidir pendant environ 10-15 minutes pour qu’elle épaississe légèrement. Vous voulez qu’elle soit coulante mais pas liquide. Sortez votre gâteau réfrigéré. Versez la ganache au centre de la couche supérieure. Utilisez une spatule coudée pour la pousser doucement vers les bords, créant ces élégants filets. Travaillez rapidement pour une finition lisse et professionnelle.
Étape 6 : La Touche d’Élégance Finale
Avant que la ganache ne prenne complètement, ajoutez votre garniture finale. Des copeaux ou des frisottis de chocolat sont superbes. Vous pouvez les faire en passant un économe sur le côté d’une tablette de chocolat. Parsemez-en généreusement sur le dessus. Pour un véritable effet « tuxedo », vous pourriez ajouter quelques framboises fraîches ou une pincée de poudre d’or alimentaire. Une fois décoré, remettez le gâteau au réfrigérateur pendant au moins 30 minutes pour laisser la ganache prendre complètement. Cela permet une découpe nette.
Planifier Votre Succès en Pâtisserie
- Temps de Préparation : 1 heure (préparation active)
- Temps de Cuisson : 35 minutes (pour les disques de gâteau)
- Temps de Repos au Froid : Au moins 1 heure 30 (assemblage + prise de la ganache)
- Temps Total : Environ 3 heures 5 minutes
- Nombre de Parts : 12 généreuses parts
Le Secret du Chef pour un Gâteau Tuxedo Impeccable
L’astuce ultime pour une découpe nette et spectaculaire ? Chauffez votre couteau ! Passez un long couteau bien aiguisé sous l’eau chaude, essuyez-le et découpez. La chaleur traverse la ganache ferme et la mousse délicate sans accrocher, vous donnant des couches impeccables dans chaque assiette. Réchauffez et essuyez le couteau entre chaque part pour des présentations dignes d’une photo.
Un Peu d’Histoire du Chocolat
Saviez-vous que le terme « procédé hollandais » pour votre cacao en poudre fait référence à une invention du 19ème siècle par Coenraad van Houten ? Il traitait le cacao avec un alcali pour neutraliser son acidité naturelle. Cela nous donne une poudre de cacao plus foncée, au goût plus doux, et qui se dissout plus facilement — ce qui en fait le choix parfait pour la base de notre gâteau au chocolat tendre et profondément coloré.
Les Outils Dont Vous Aurez Besoin
- Deux moules à gâteau ronds de 23 cm (9 pouces)
- Papier sulfurisé
- Bol à mélanger (de différentes tailles)
- Fouet et spatules en silicone
- Batteur sur socle ou batteur électrique (pour fouetter la crème)
- Petites casseroles
- Grilles de refroidissement
- Spatule coudée pour lisser et la ganache
- Couteau à pain (pour aplanir les gâteaux)
Conserver Votre Chef-d’Œuvre au Chocolat
Ce gâteau doit être conservé au réfrigérateur à cause des produits laitiers dans la mousse et la ganache. Couvrez-le légèrement avec un dôme à gâteau ou placez-le dans un grand contenant hermétique. Cela l’empêche d’absorber les odeurs du frigo tout en protégeant la surface délicate de la ganache.
Pour une fraîcheur et une texture optimales, dégustez le gâteau dans les 3-4 jours. Les couches de mousse resteront légères et le gâteau moelleux. Si vous devez le conserver plus longtemps, vous pouvez le congeler.
Pour congeler, placez le gâteau entièrement assemblé et nappé (sans garnitures fraîches comme des baies) au congélateur sans emballage pendant 2-3 heures jusqu’à ce qu’il soit solide. Ensuite, enveloppez-le hermétiquement dans plusieurs couches de film alimentaire et de papier d’aluminium. Il se conservera jusqu’à 2 mois. Décongelez-le toute une nuit au réfrigérateur avant de servir.
Conseils et Astuces pour une Cuisson Parfaite à Chaque Fois
- La Température Ambiante est Clé : Les œufs, le lait et le beurre pour la ganache doivent être à température ambiante. Cela garantit que tout s’émulsionne en douceur, évitant un gâteau gras ou une ganache qui se sépare.
- Ne Fouettez Pas Trop la Crème : Pour les mousses, arrêtez de fouetter lorsque vous avez des pics mous. Une crème trop fouettée devient granuleuse et est difficile à incorporer en douceur.
- Incorporation Délicate : Utilisez une spatule large et souple et une main légère lorsque vous incorporez la crème fouettée à la ganache. Incorporez du bas vers le haut pour conserver l’air.
- Testez la Cuisson : Les fours varient. Commencez à vérifier vos disques de gâteau à 30 minutes. Le cure-dent doit ressortir avec quelques miettes humides, pas de la pâte liquide.
Idées de Présentation pour Épater Vos Invités
- Servez chaque part sur une assiette blanche avec un filet de coulis de framboise et une feuille de menthe fraîche.
- Pour une réunion hivernale, décorez le dessus avec des canneberges glacées et des brins de romarin.
- Créez un effet « chemise de smoking » en dressant un petit « V » de crème fouettée sucrée sur la ganache près de la base de chaque part.
- Saupoudrez le bord de l’assiette de service d’un mélange de cacao en poudre et de sucre glace pour une touche style restaurant.
Variations Inspirées sur le Thème du Gâteau Tuxedo
Vous aimez ce concept ? Voici six délicieuses façons de jouer avec la formule :
- Tuxedo Framboise : Ajoutez une fine couche de confiture de framboise sans pépins entre le gâteau et la mousse au chocolat noir.
- Tuxedo Moka : Ajoutez 1 à 2 cuillères à soupe de poudre d’expresso instantané à la ganache de la mousse au chocolat noir pour une touche café.
- Tuxedo Menthe-Chocolat : Ajoutez ¼ de cuillère à café d’extrait de menthe poivrée (pas de menthe verte, c’est différent !) à la mousse au chocolat blanc.
- Tuxedo Noisette : Parsemez des noisettes ou des amandes finement hachées et toastées entre les couches de mousse pour du croquant.
- Tuxedo Zeste d’Orange : Ajoutez le zeste d’une orange à la pâte du gâteau au chocolat pour une note d’agrume lumineuse.
- Tuxedo Tourbillon de Fruits Rouges : Avant le repos au froid, marbrez délicatement quelques cuillerées de fraises réduites en purée sur le dessus de la mousse au chocolat blanc pour un effet marbré.
Si vous adorez les projets de desserts à étages, vous pourriez aussi être inspiré par notre superbe Gâteau Sensation à la mousse de fraise ou le combo classique de notre riche Gâteau au Chocolat Ganache. Pour les pâtissiers qui aiment les fusions de saveurs inattendues, le Gâteau Bundt Baklava est à essayer absolument, et les fans de cheesecake vont perdre la tête avec notre incroyable Cheesecake aux roulés à la cannelle.
Erreurs Courantes à Éviter avec Votre Gâteau Tuxedo
Erreur 1 : Utiliser des Ingrédients Froids pour la Pâte à Gâteau
C’est une erreur très fréquente ! Lorsque des œufs ou du lait froids rencontrent la matière grasse (l’huile), ils peuvent la faire légèrement solidifier, conduisant à une pâte qui ne s’émulsionne pas correctement. Le résultat peut être un gâteau dense, légèrement gras, qui ne lève pas aussi bien. Anticipez toujours et sortez vos œufs et votre lait du frigo au moins 30 minutes avant de commencer à cuisiner. La différence dans la pâte lisse et homogène que vous obtenez est frappante.
Erreur 2 : Ajouter une Ganache Chaude à de la Crème Fouettée
L’impatience ici peut ruiner votre mousse. Si votre ganache au chocolat (pour l’une ou l’autre mousse) est même légèrement tiède lorsque vous incorporez la crème fouettée, elle fera fondre la crème au contact. Vous perdrez tout l’air que vous avez incorporé, finissant avec un mélange lourd, dense et parfois granuleux au lieu d’une mousse légère. Soyez patient. Laissez la ganache refroidir jusqu’à ce qu’elle soit vraiment à température ambiante — le dos de votre main contre le bol ne doit sentir aucune chaleur.
Erreur 3 : Sauter les Étapes de Repos au Froid Pendant l’Assemblage
Il est tentant de se précipiter vers l’étape de la ganache, mais ne sautez pas le temps au frigo ! Le gâteau assemblé a besoin de cette heure pour raffermir les couches de mousse. Si vous versez une ganache tiède sur une mousse molle, elle va y fondre et créer un désastre de couches brouillées au lieu de belles rayures nettes et définies. Considérez le temps de repos au froid comme une pause nécessaire qui laisse chaque composant prendre, préservant ainsi votre beau travail.
Erreur 4 : Trop Mélanger la Pâte à Gâteau
Une fois que vous ajoutez la farine aux ingrédients humides, vous devez mélanger juste jusqu’à ce que les ingrédients soient combinés. Trop mélanger la pâte développe le gluten de la farine, ce qui peut rendre votre gâteau caoutchouteux et dense au lieu de tendre et moelleux. C’est particulièrement vrai après avoir ajouté le café chaud — remuez juste jusqu’à ce que la pâte soit lisse et qu’il ne reste plus de traces de farine, puis arrêtez immédiatement.
Erreur 5 : Choisir le Mauvais Chocolat
Tous les chocolats ne se valent pas pour cette recette. Utiliser des pépites de chocolat pour la mousse ou la ganache est une grave erreur. Les pépites contiennent des stabilisants (comme la lécithine de soja) qui les aident à garder leur forme, ce qui signifie aussi qu’elles ne fondent pas aussi bien en une ganache soyeuse. Utilisez toujours des tablettes de pâtisserie de haute qualité, finement hachées. La qualité de votre chocolat est l’âme de ce dessert, et utiliser une bonne source garantit une saveur riche et une texture parfaite. En considérant les vitamines et minéraux essentiels présents dans le chocolat noir de qualité, comme le fer et le magnésium, c’est aussi un choix délicieusement bénéfique.
Questions Fréquemment Posées
Puis-je préparer ce Gâteau Tuxedo la veille ?
Absolument ! En fait, je le recommande vivement. Préparer le gâteau la veille permet à toutes les saveurs de se marier à merveille et aux textures de se fixer parfaitement. Assemblez le gâteau complet avec la ganache, puis conservez-le couvert au réfrigérateur toute la nuit. Cela rend aussi votre journée d’hôte beaucoup plus détendue. Sortez-le simplement environ 20-30 minutes avant de servir pour atténuer le froid de la mousse et obtenir la meilleure texture.
Pourquoi dois-je ajouter du café chaud à la pâte à gâteau ?
Le café chaud fait deux choses magiques. Premièrement, il « active » la poudre de cacao, intensifiant sa saveur chocolatée profonde. Ne vous inquiétez pas — vous ne goûterez pas le café dans le gâteau fini. Deuxièmement, la chaleur aide à créer une pâte très lisse et fine qui donne une mie exceptionnellement moelleuse et tendre. C’est un secret de pâtissier professionnel pour un gâteau au chocolat ultra-riche. Si vous évitez la caféine, vous pouvez utiliser de l’eau chaude, mais je recommande d’ajouter une cuillère à café de poudre d’expresso à l’eau pour imiter l’effet rehausseur de saveur.
Mon chocolat blanc a figé quand j’ai ajouté la crème. Qu’ai-je fait de mal ?
Le chocolat blanc est très sensible à la chaleur et à l’humidité. Le figement se produit lorsqu’une toute petite goutte d’eau ou de vapeur pénètre dans le chocolat, ou si la crème est trop chaude. Pour éviter cela, assurez-vous que votre bol et vos ustensiles sont parfaitement secs. Faites chauffer votre crème jusqu’à ce qu’elle frémisse à peine, pas qu’elle bouille. Si cela arrive, vous pouvez parfois le sauver en ajoutant immédiatement une cuillère à soupe de crème chaude (prise sur la quantité mesurée) et en remuant vigoureusement jusqu’à ce qu’il redevienne lisse.
Puis-je utiliser un moule à gâteau de taille différente ?
Vous pouvez, mais cela changera le temps de cuisson et l’apparence finale. Si vous utilisez des moules de 20 cm (8 pouces), les disques seront plus épais, donc vous devrez augmenter le temps de cuisson de 5 à 10 minutes. Si vous utilisez trois moules de 15 cm (6 pouces), le temps de cuisson sera légèrement réduit. N’oubliez pas que modifier la taille du moule change aussi la hauteur de vos couches de mousse par rapport au gâteau. Pour l’apparence classique, restez sur deux disques de 23 cm (9 pouces).
Comment obtenir ces filets de chocolat parfaits sur les côtés ?
La consistance de votre ganache est primordiale. Laissez-la refroidir après mélange jusqu’à ce qu’elle ait la texture d’un miel tiède ou d’une sauce épaisse. Faites un test de filet à l’intérieur du bol ou sur le côté du gâteau. Il doit couler lentement, pas dégouliner rapidement. Si elle est trop liquide, laissez-la refroidir plus longtemps. Si elle est trop épaisse, vous pouvez la réchauffer doucement quelques secondes. Versez la majeure partie de la ganache au centre, puis utilisez une spatule coudée pour la pousser vers les bords et guider les filets.
Y a-t-il un moyen de rendre ce gâteau moins riche ?
Vous pouvez faire quelques ajustements. Pour les mousses, vous pouvez utiliser un chocolat noir plus léger (comme 50-60% de cacao) et un bon chocolat blanc qui n’est pas trop sucré. Vous pouvez aussi réduire de moitié le sucre dans la crème fouettée pour les mousses. Cependant, c’est intrinsèquement un dessert riche et festif. Servir des parts plus petites et plus fines est souvent la meilleure solution !
Puis-je congeler les composants individuellement ?
Oui, vous pouvez ! Les disques de gâteau cuits et refroidis se congèlent très bien, emballés, jusqu’à 2 mois. Décongelez-les à température ambiante. Vous pouvez aussi congeler le gâteau fini et nappé comme détaillé dans la section conservation. Je ne recommande pas de congeler les couches de mousse seules, car la texture peut devenir légèrement granuleuse à la décongélation.
Par quoi puis-je remplacer la poudre d’expresso ?
Si vous n’avez pas de poudre d’expresso, vous pouvez utiliser une quantité égale de café instantané en grains. Assurez-vous simplement de le dissoudre complètement dans l’eau chaude. Alternativement, vous pouvez utiliser simplement de l’eau chaude. Le gâteau sera toujours délicieux, mais il manquera cette note de chocolat plus profonde et complexe que le café apporte.
Ma mousse semble trop molle. Comment la rendre plus ferme ?
Si votre cuisine est chaude ou si votre crème n’était pas assez froide quand vous l’avez fouettée, la mousse peut être molle. Pour une prise ferme garantie, utilisez l’astuce à la gélatine mentionnée dans l’Astuce du Chef. Ajouter juste une cuillère à café de gélatine (réhydratée dans de l’eau froide, puis fondue dans la crème chaude avant de la verser sur le chocolat) donnera à la mousse une excellente structure sans changer le goût ni la rendre caoutchouteuse.
Comment transporter ce gâteau en toute sécurité ?
Le transport est une préoccupation courante ! D’abord, assurez-vous que le gâteau est bien froid et que la ganache a pris. Utilisez une boîte à gâteau avec un fond plat et stable. Si vous n’en avez pas, placez le gâteau (sur son assiette) sur un tapis antidérapant dans une grande boîte plate. Conduisez prudemment, en gardant le gâteau à l’horizontale. S’il fait très chaud, envisagez d’utiliser un sac isotherme avec un bloc de glace, mais assurez-vous qu’aucune condensation ne tombe sur le gâteau. Pour plus d’idées de desserts spectaculaires et transportables, explorez notre collection complète de gâteaux et pâtisseries pour toutes les occasions.
Dernières Pensées de Ma Cuisine à la Vôtre
Ce Gâteau Tuxedo Exquis est plus qu’une recette ; c’est un projet qui se termine en pure joie. Oui, il a quelques étapes, mais chacune est simple et satisfaisante. Le moment où vous le découpez et révélez ces couches parfaites, et voyez les sourires autour de votre table, chaque minute passée semblera en valoir la peine. C’est un dessert qui dit « Je tiens à vous » de la manière la plus délicieuse possible. Alors rassemblez vos ingrédients, faites confiance au processus, et préparez-vous à créer un chef-d’œuvre au chocolat qui fera que tout le monde vous demandera votre secret. Bonne pâtisserie
Equipment
- Deux moules à gâteau ronds de 23 cm
- Papier sulfurisé
- Bols de mélange
- Fouet et spatules en silicone
- Mélangeur sur socle ou batteur à main
Ingrédients
- 250 g farine tout usage
- 200 g sucre granulé
- 75 g cacao en poudre traité à l Dutch
- 2 cuil. à café levure chimique
- 1 cuil. à café bicarbonate de soude
- 1 cuil. à café sel
- 3 œufs grands
- 250 ml lait entier
- 120 ml huile végétale
- 1 cuil. à café extrait de vanille
- 240 ml café chaud ou d'eau chaude avec de la poudre d'espresso
Instructions
- Préchauffez votre four à 175°C (350°F). Graissez et tapissez vos moules.
- Dans un grand bol, mélangez tous les ingrédients secs pour le gâteau.
- Créez un puits au centre et ajoutez les ingrédients humides : œufs, lait, huile, et vanille. Mélangez jusqu'à obtenir une pâte lisse.
- Incorporez lentement le café chaud et remuez.
- Divisez la pâte entre les moules et faites cuire au four jusqu'à ce qu'un cure-dent en ressorte propre, environ 30-35 minutes. Laissez refroidir complètement.
- Pour la mousse au chocolat noir, faites fondre le chocolat avec la crème chauffée jusqu'à ce qu'elle soit juste en ébullition, puis mélangez jusqu'à obtenir une ganache lisse.
- Refroidissez la ganache à température ambiante, puis incorporez la crème fouettée avec du sucre et de la vanille.
- Répétez le même processus pour la mousse au chocolat blanc.
- Assemblez le gâteau : placez la première couche de gâteau, étalez la mousse au chocolat noir, puis ajoutez la seconde couche de gâteau.
- Étalez la mousse au chocolat blanc sur le dessus et réfrigérez au moins une heure.
- Pour le ganache, faites chauffer la crème et incorporez-la au chocolat jusqu'à obtenir une texture lisse. Ajoutez le beurre.
- Versez le ganache sur le gâteau et laissez-le prendre au réfrigérateur.
- Garnissez avec des copeaux de chocolat ou des fruits frais avant de servir.
Notes
Nutrition

Je suis Céline, une véritable passionnée d’ustensiles et de matériel de cuisine ! J’adore tester, comparer et découvrir les meilleurs équipements pour rendre la cuisine plus efficace et agréable. Que ce soit un bon couteau, un robot performant ou une poêle incontournable, je suis toujours à la recherche des outils qui feront la différence. Mon but est de vous guider dans vos choix pour que vous ayez le bon matériel adapté à vos besoins.