
Un Goût de Paradis : Mon Parcours vers le Gâteau au Chocolat Parfait
Vous connaissez ce sentiment quand vous prenez une bouchée de quelque chose de si bon que vous devez fermer les yeux une seconde ? C’est ce que fait ce gâteau. Je me souviens de la première fois où j’ai essayé cette recette, ma cuisine sentait la pâtisserie parisienne, et le visage de mes enfants était recouvert de sourires chocolatés. C’était de la pure magie. C’est cette magie que je veux partager avec vous aujourd’hui—un chemin simple vers un véritable Gâteau Chocolat Délicieux.
L’Humble et Glorieuse Histoire du Gâteau au Chocolat
Notre histoire d’amour avec le gâteau au chocolat remonte à des siècles ! Tout a commencé avec des pains au chocolat denses et simples au XIXe siècle. Au fil du temps, des pâtissiers astucieux ont ajouté de la levure chimique pour une texture plus légère et ont créé les gâteaux moelleux et riches que nous adorons aujourd’hui. Il y a la version classique familiale, et puis il y a les merveilles modernes avec des couches de mousse. D’un réconfortant basique à un dessert digne d’un roi, le gâteau au chocolat a vraiment gagné sa couronne. Chaque famille a sa version, et celle-ci est la mienne.
Pourquoi Vous Allez Tombez Sous le Charme de ce Gâteau au Chocolat
Qu’est-ce qu’il ne faut pas aimer ? D’abord, il est incroyablement indulgent. Même s’il se fissure un peu sur le dessus, il reste moelleux et délicieux à l’intérieur. La saveur est profonde, riche et intensément chocolatée sans être trop sucrée. Il se réalise avec des ingrédients simples que vous avez probablement sous la main. Que vous soyez novice en pâtisserie ou un pro chevronné, cette recette vous fera passer pour un génie du dessert. C’est ma valeur sûre pour réunir les gens, une part divine à la fois.
Quand Brillier avec Votre Gâteau Maison
Ce gâteau est le parfait plaisir pour toute occasion ! Servez-le tiède un dimanche après-midi douillet en famille. C’est la star des fêtes d’anniversaire (ajoutez juste des vermicelles !). Impressez vos amies du club de lecture ou apportez-le à un repas partagé—il disparaît toujours en premier. C’est aussi une merveilleuse façon de célébrer les petites victoires, comme « Hé, j’ai survécu à la semaine ! » Tous les jours sont bons pour un gâteau au chocolat.
Rassembler Vos Ingrédients pour Réussir
Préparons tout. Avoir vos ingrédients prêts rend tout le processus fluide et amusant.
- 200g de chocolat noir de bonne qualité (70% de cacao), finement haché
- 200g de beurre non salé, plus un peu pour le moule
- 200g de sucre en poudre
- 4 gros œufs, à température ambiante
- 1 cuillère à café d’extrait de vanille pur
- 120g de farine tout usage
- Une pincée de sel de mer
Substitutions Sans Stress
Il vous manque quelque chose dans la liste ? Pas de problème ! Voici quelques échanges simples :
- Chocolat : Vous pouvez utiliser des pépites de chocolat mi-sucré si vous n’avez pas de tablette. Le gâteau sera un peu plus sucré.
- Beurre : Une bonne margarine peut dépanner, mais le beurre donne la meilleure saveur.
- Sucre : Le sucre semoule fonctionne aussi bien. Pour une saveur plus profonde, essayez la moitié de sucre blanc et la moitié de sucre brun.
- Farine : Pour une version sans gluten, utilisez un mélange de farine sans gluten 1 pour 1.
Créer Votre Délicieux Gâteau au Chocolat : Étape par Étape
Étape 1 : Faire fondre le Chocolat & le Beurre
D’abord, préchauffez votre four à 180°C (350°F). Maintenant, créons notre base chocolatée. Hachez votre chocolat en petits morceaux et coupez le beurre en dés. Placez-les ensemble dans un bol résistant à la chaleur. Posez le bol sur une casserole d’eau frémissante doucement, en veillant à ce que le fond du bol ne touche pas l’eau. Regardez le beurre fondre et le chocolat commencer à briller et à ramollir. Remuez doucement avec une spatule jusqu’à obtenir une piscine lisse, brillante et incroyablement aromatique d’or liquide. Astuce de pro : Retirez le bol du feu juste avant que tout soit complètement fondu—la chaleur résiduelle finira le travail et évitera que le chocolat ne brûle.
Étape 2 : Fouetter les Œufs et le Sucre jusqu’au Ruban
Pendant que votre chocolat refroidit légèrement, prenez un grand saladier. Cassez-y les œufs et versez le sucre. Maintenant, fouettez de toutes vos forces ! Vous pouvez utiliser un batteur électrique si vous le souhaitez. Vous devez fouetter jusqu’à ce que le mélange devienne pâle, épais et crémeux. Lorsque vous soulevez le fouet, le mélange doit retomber dans le bol en formant un ruban qui garde sa forme quelques secondes. Cette étape incorpore de l’air, c’est le secret d’un gâteau léger. Il devrait ressembler à une crème anglaise volumineuse et belle.
Étape 3 : L’Incorporation Douce
C’est l’étape la plus importante pour une texture moelleuse. Versez le mélange chocolaté légèrement refroidi et luxueux et l’extrait de vanille dans la mousse aux œufs. À l’aide d’une grande spatule, incorporez doucement. Vous voulez les combiner sans chasser tout l’air précieux que vous venez de battre. Voyez cela comme une douce étreinte, pas comme un mélange vigoureux. La pâte deviendra d’un beau brun foncé.
Étape 4 : Incorporer la Farine
Tamisez la farine et la pincée de sel directement sur la pâte au chocolat. Cela évite les grumeaux et ajoute un peu plus d’air. Encore une fois, avec votre fidèle spatule, incorporez doucement et patiemment. Arrêtez dès que vous ne voyez plus de traces de farine blanche. La pâte sera épaisse, fondante et terriblement tentante. Astuce du chef : Pour un gâteau encore plus moelleux, ajoutez une cuillère à soupe de café fort infusé à la pâte. Vous ne sentirez pas le café, mais il amplifie merveilleusement la saveur du chocolat !
Étape 5 : Cuire à la Perfection
Beurrez un moule à gâteau rond de 20 cm (8 pouces) et tapissez le fond de papier sulfurisé. Versez votre magnifique pâte dans le moule préparé et lissez le dessus. Placez-le au centre de votre four préchauffé. Maintenant, la partie la plus difficile : n’ouvrez pas la porte pendant les 25 premières minutes ! Cuisez pendant 25 à 35 minutes. Le gâteau est cuit lorsque le dessus est pris et présente une croûte légèrement craquelée, et qu’un cure-dent inséré au centre en ressort avec quelques miettes humides attachées, et non de la pâte liquide.
Votre Chronologie de Préparation
- Temps de préparation : 20 minutes
- Temps de cuisson : 30 minutes
- Temps de repos/refroidissement : 1 heure (minimum, si vous pouvez résister !)
- Temps total : Environ 1 heure 50 minutes
Le Secret d’une Texture Super Moelleuse
Mon secret absolu numéro un ? Laissez le gâteau refroidir COMPLÈTEMENT dans le moule sur une grille. Je sais que c’est tentant d’y goûter, mais en refroidissant, il finit de prendre et conserve toute son incroyable humidité. Se précipiter à cette étape peut donner un gâteau friable. La patience est la meilleure amie du pâtissier !
Une Douce Tranche d’Histoire
Saviez-vous que la première recette de gâteau au chocolat a été publiée en 1847 ? Elle demandait du chocolat râpé, un vrai luxe à l’époque. Avant cela, le chocolat était surtout une boisson ! Nous avons fait du chemin pour arriver à nos gâteaux fondants et faciles d’aujourd’hui.
Votre Boîte à Outils de Cuisine
Pas besoin d’équipement sophistiqué ! Rassemblez simplement : une casserole moyenne, un bol à mélanger résistant à la chaleur, un fouet (électrique ou à main), une spatule, un tamis, un moule à gâteau rond de 20 cm (8 pouces) et du papier sulfurisé.
Garder Votre Gâteau Frais et Fabuleux
Une fois complètement refroidi, vous pouvez conserver ce gâteau à température ambiante, couvert d’une cloche à gâteau ou d’un bol retourné, jusqu’à 3 jours. Il reste merveilleusement moelleux.
Pour un stockage plus long, enveloppez le gâteau entier ou des parts individuelles hermétiquement dans du film alimentaire puis dans du papier aluminium. Il se congèlera parfaitement jusqu’à 2 mois. Décongelez-le une nuit au réfrigérateur.
Si vous avez ajouté une garniture de crème fouettée ou de ganache, conservez toujours le gâteau au réfrigérateur. Sortez-le à température ambiante environ une heure avant de servir pour laisser briller les saveurs.
Mes Meilleurs Conseils pour la Victoire du Gâteau au Chocolat
- La Température Ambiante est Clé : Utiliser des œufs et du beurre à température ambiante aide à un mélange lisse et crée une meilleure texture.
- Ne Pas Trop Cuire : Il vaut mieux avoir un centre légèrement pas assez cuit (qui prendra en refroidissant) qu’un gâteau sec.
- La Qualité Compte : Utilisez le meilleur chocolat que vous pouvez vous offrir—c’est la principale saveur, donc cela fait une grande différence !
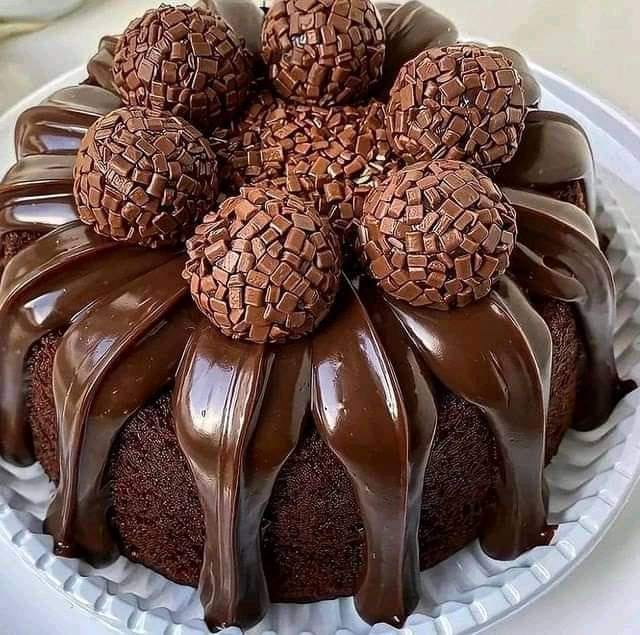
Habilez pour Impressionner : Idées de Présentation
- Une simple neige de sucre glace ou de cacao en poudre a un air élégant.
- Surmontez-le d’un tas de baies fraîches comme des framboises ou des fraises pour une touche de couleur et de fraîcheur.
- Nappez-le d’un ganache chocolaté brillant ou d’une cuillerée de sauce caramel.
- Servez-le avec une quenelle de crème fouettée légèrement sucrée ou une boule de glace à la vanille.
Explorez Plus de Desserts Décadents
Si vous avez aimé la texture mousseuse de ce gâteau, vous devez essayer notre superbe Gâteau Sensation, qui superpose une génoise et une mousse à la fraise onirique. Pour une touche originale, notre Cheesecake aux roulés à la cannelle combine deux classiques en une gourmandise inoubliable. Quand vous avez besoin d’un dessert vraiment spectaculaire, les couches élégantes de notre Exquis Gâteau Tuxedo sont de la pure magie. Et pour des gourmandises parfaites à croquer, ces faciles Barres aux Pécan font toujours un tabac.
Erreurs Courantes à Éviter pour un Gâteau Parfait
Erreur 1 : Utiliser des Œufs Froids Sortis Directement du Frigo
Les œufs froids ne montent pas aussi bien, ce qui signifie moins d’air dans votre pâte. Cela peut donner un gâteau plus dense et plus plat. Prévoyez toujours de sortir vos œufs au moins 30 minutes avant de commencer. Si vous oubliez, placez-les dans un bol d’eau tiède (pas chaude) pendant 5 à 10 minutes pour enlever le froid.
Erreur 2 : Trop Mélanger Après Ajout de la Farine
C’est le coupable numéro un du gâteau caoutchouteux et dur. Lorsque vous mélangez vigoureusement la farine avec du liquide, vous développez du gluten. Nous voulons une texture moelleuse, pas de la pâte à pain ! Une fois la farine ajoutée, rangez le batteur électrique. Utilisez une spatule et incorporez doucement jusqu’à ce que ce soit juste combiné. Quelques petites traces de farine valent mieux qu’un mélange excessif.
Erreur 3 : Ouvrir la Porte du Four Trop Tôt
Nous l’avons tous fait—jeter un œil pour voir comment il lève. Mais ce courant d’air froid peut faire s’effondrer votre beau gâteau au centre. Faites confiance au processus et à la minuterie. Évitez d’ouvrir la porte pendant au moins les 20-25 premières minutes de cuisson, pour que la structure ait le temps de se fixer correctement.
Erreur 4 : Ne Pas Laisser le Gâteau Refroidir Convenablement
Essayer de glacer ou démouler un gâteau encore tiède est une recette pour un désastre. Il s’émiettera, collera, et le glaçage fondra en pagaille. Laissez le gâteau refroidir dans le moule pendant 10-15 minutes, puis retournez-le sur une grille pour qu’il refroidisse complètement. Cette patience assure des parts parfaites et une décoration facile.
Choisir des ingrédients de haute qualité, ce n’est pas qu’une question de goût ; cela peut tout affecter, de la texture à votre sensation après le repas. Pour plus d’informations sur la façon dont la qualité des aliments impacte votre bien-être, vous pouvez lire sur la digestion et la nutrition auprès d’experts de santé de confiance.
Ce Gâteau Chocolat Délicieux n’est qu’un début ! Pour plus d’inspiration en pâtisserie, des gâteaux simples aux pâtisseries grandioses, explorez toutes nos merveilleuses créations dans notre collection principale de gâteaux et pâtisseries.
Vos Questions sur le Gâteau au Chocolat, Répondues
Puis-je faire ce gâteau sans robot pâtissier ?
Absolument ! Un bon vieux fouet et un peu d’huile de coude fonctionneront parfaitement. Fouetter les œufs et le sucre à la main prendra un peu plus de temps pour atteindre le stade du ruban, mais c’est un bon exercice et tout aussi efficace. Assurez-vous que votre bol est stable (vous pouvez mettre un torchon humide dessous) et fouettez d’un mouvement circulaire énergique. Vous saurez que c’est bon lorsque le mélange est épais, pâle et laisse une trace.
Mon gâteau a creusé au milieu. Que s’est-il passé ?
Ne vous inquiétez pas, il est toujours délicieux ! Un centre qui s’affaisse signifie généralement que le gâteau n’était pas tout à fait cuit, ou qu’il y avait trop d’agent levant, ou que la porte du four a été ouverte trop tôt. La prochaine fois, assurez-vous que votre levure chimique est fraîche, n’ouvrez pas le four trop tôt, et testez la cuisson avec un cure-dent—il doit ressortir avec des miettes humides, pas de la pâte liquide. Le centre doit aussi revenir légèrement lorsqu’on le touche.
Puis-je utiliser du chocolat au lait à la place du chocolat noir ?
Vous pouvez, mais le résultat sera différent. Le chocolat au lait est plus sucré et contient plus de solides de lait et de sucre. Votre gâteau sera plus sucré, moins intensément chocolaté, et aura peut-être une texture légèrement différente. Si vous l’utilisez, vous pourriez vouloir réduire le sucre dans la recette d’environ 50g. Pour la saveur classique et profonde, le chocolat noir est préférable.
Comment savoir quand le gâteau est parfaitement cuit ?
Cherchez ces signes : Le dessus sera pris et présentera une fine croûte légèrement craquelée. Les bords commenceront à se détacher légèrement des parois du moule. Plus important encore, insérez un cure-dent ou un couteau fin au centre. Il doit ressortir avec quelques miettes humides accrochées. S’il ressort complètement propre, il est peut-être trop cuit. S’il a de la pâte liquide, il a besoin de plus de temps.
Puis-je ajouter des noix ou des pépites de chocolat à la pâte ?
Oui ! Incorporez jusqu’à 150g de noix concassées (noix, pécan) ou même des pépites de chocolat après avoir incorporé la farine. Cela ajoute une texture et une saveur merveilleuses. Enrobez-les d’un peu de farine d’abord—cela les empêche de couler au fond pendant la cuisson.
Comment faire une version sans gluten ?
C’est très simple. Utilisez un mélange de farine sans gluten de haute qualité, déjà dosé en équivalence, contenant de la gomme xanthane. Remplacez la farine tout usage dans la recette par exactement la même quantité du mélange sans gluten. Les autres étapes restent identiques. Le résultat est un gâteau sans gluten merveilleusement fondant et délicieux que tout le monde peut apprécier.
Quelle est la meilleure façon de conserver les restes ?
Pour garder un gâteau super moelleux, conservez-le (une fois complètement refroidi) sous une cloche à gâteau ou un grand bol retourné à température ambiante jusqu’à 3 jours. Vous pouvez aussi l’envelopper hermétiquement dans du film alimentaire. Si votre cuisine est très chaude ou humide, vous pouvez le conserver au frigo, mais laissez-le revenir à température ambiante avant de servir pour la meilleure texture et saveur.
Puis-je congeler le gâteau cuit ?
Oui, ce gâteau se congèle à merveille ! Laissez-le refroidir complètement, puis enveloppez-le hermétiquement en deux couches : d’abord du film alimentaire, puis du papier aluminium. Vous pouvez congeler le gâteau entier ou des parts individuelles. Il se conservera bien jusqu’à 2 mois. Décongelez-le une nuit au réfrigérateur ou quelques heures à température ambiante.
Pourquoi mon gâteau est-il sec ?
Un gâteau sec est généralement causé par une cuisson excessive ou une sur-mesure de la farine. Réglez toujours un minuteur et vérifiez la cuisson quelques minutes avant le temps suggéré. Pour mesurer la farine, versez-la dans votre tasse à mesurer avec une cuillère et nivelez avec un couteau. En puisant directement avec la tasse, vous tassez trop de farine, ce qui absorbe l’humidité et mène à la sécheresse.
Puis-je en faire des muffins ?
Certainement ! Cette pâte fait des cupcakes décadents et fantastiques. Chemisez un moule à muffins avec des caissettes en papier. Remplissez chaque caissette aux 2/3. Cuisez à la même température (180°C/350°F) pendant 18 à 22 minutes, ou jusqu’à ce qu’un cure-dent ressorte propre. Laissez-les refroidir dans le moule 5 minutes avant de les transférer sur une grille. Ils sont parfaits pour les fêtes !
Prêts, Feu, Cuisinez !
Alors voilà—mon cœur, mes astuces et ma recette préférée pour un véritable Gâteau Chocolat Délicieux partagés avec vous. Faire ce gâteau, ce n’est pas seulement suivre des étapes ; c’est créer un moment de joie, un sourire partagé, un souvenir. J’espère que votre cuisine s’emplira de cet incroyable arôme chocolaté et que votre première bouchée sera aussi magique que la mienne. Maintenant, allez préchauffer ce four et faites-vous plaisir. Vous allez y arriver !
Equipment
- Casserole moyenne
- Bol de mélange résistant à la chaleur
- Fouet (électrique ou classique)
- Spatule
- Tamis
Ingrédients
- 200 g chocolat noir de bonne qualité (70% de cacao), finement haché
- 200 g beurre non salé plus un peu pour le graissage
- 200 g sucre granulé
- 4 gros œufs, à température ambiante
- 1 c. à café extrait de vanille pur
- 120 g farine tout usage
- 1 pincée sel de mer
Instructions
- Préchauffez votre four à 180°C (350°F).
- Faites fondre le chocolat et le beurre dans un bol résistant à la chaleur au-dessus d'une casserole d'eau frémissante.
- Dans un grand bol, cassez les œufs et ajoutez le sucre, puis fouettez jusqu'à obtenir un mélange pâle et crémeux.
- Incorporez doucement le mélange de chocolat fondu et la vanille dans le mélange d'œufs.
- Tamisez la farine et le sel au-dessus de la pâte, puis pliez délicatement.
- Graissez un moule à gâteau rond de 20 cm (8 pouces) et tapissez le fond de papier sulfurisé.
- Versez la pâte dans le moule et lissez le dessus.
- Faites cuire au four pendant 25 à 35 minutes, jusqu'à ce que le dessus soit légèrement craquelé.
- Laissez le gâteau refroidir complètement dans le moule sur une grille.
Notes
Nutrition

Je suis Céline, une véritable passionnée d’ustensiles et de matériel de cuisine ! J’adore tester, comparer et découvrir les meilleurs équipements pour rendre la cuisine plus efficace et agréable. Que ce soit un bon couteau, un robot performant ou une poêle incontournable, je suis toujours à la recherche des outils qui feront la différence. Mon but est de vous guider dans vos choix pour que vous ayez le bon matériel adapté à vos besoins.