
Cheesecake Roll Cannelle : La Fusion De Desserts Dont Vous Rêviez
Imaginez : c’est un dimanche matin paresseux. L’odeur des brioches à la cannelle embaume la cuisine et fait gargouiller tous les estomacs. Puis, une folle idée vous traverse l’esprit. Et si l’on combinait la douceur réconfortante de la cannelle avec le luxe crémeux et riche d’un cheesecake classique ? Mes amis, après un peu de joyeux chaos en cuisine (et quelques parts « de test » qui ont mystérieusement disparu à vitesse grand V), ce Cheesecake Roll Cannelle est né. C’est la fusion ultime des plats réconfortants, qui transforme une simple gourmandise en un dessert spectaculaire.
D’où Vient Cette Douce Idée ?
La brioche à la cannelle et le cheesecake ont chacun leur histoire légendaire. Les brioches à la cannelle, avec leurs tourbillons épicés et sucrés, sont un câlin sous forme de nourriture. Le cheesecake, quant à lui, est le dessert élégant et intemporel que l’on réserve pour les grandes occasions. Mon moment de « révélation » est venu du désir de créer un dessert à la fois fun et sophistiqué pour un brunch en famille. Je voulais la facilité d’une pâte prête à l’emploi mais l’indéniable effet « waouh » d’un cheesecake maison. Cette recette est une version moderne de la tradition – elle prend deux classiques adorés et les fait cuire en une expérience inoubliable.
Pourquoi Vous Allez Tomber Amoureux De Ce Cheesecake à la Cannelle
Cette recette plaît à coup sûr, et voici pourquoi. Premièrement, elle est incroyablement indulgente. La couche magique de brioche à la cannelle agit comme une barrière sucrée et épicée entre la croûte et la garniture crémeuse, donc vous n’aurez jamais à craindre un fond détrempé. Deuxièmement, l’association des saveurs est du pur génie. La garniture acidulée au fromage à la crème équilibre parfaitement les tourbillons moelleux et chaleureux de cannelle. Et enfin, c’est visuellement superbe avec un minimum d’effort. Décorez-le avec un peu de crème chantilly, et vous passerez pour un pro de la pâtisserie !
Pour Quelles Occasions Sortir Votre Dessert Spectaculaire ?
Ce cheesecake aux brioches à la cannelle n’est pas pour n’importe quel jour. C’est la star des brunchs de fête, l’alternative parfaite au gâteau d’anniversaire ou un succès garanti lors des buffets. Il fait le pont entre le petit-déjeuner et le dessert d’une manière si belle. J’adore le servir le matin de Noël ou pour un dîner cosy entre amis à l’occasion d’un « Friendsgiving ». C’est ce plat spécial que les gens vous redemanderont encore et encore.
Ce Dont Vous Aurez Besoin : Les Ingrédients Du Cheesecake à la Cannelle
Pour 8 à 10 généreuses parts
Pour la croûte :
- 1 ½ tasse (150g) de chapelure de biscuits type « petit beurre » (graham cracker)
- ¼ de tasse (50g) de sucre en poudre
- 6 c.à.s (85g) de beurre fondu
Pour la couche magique :
- 1 rouleau (225g) de pâte à brioche à la cannelle réfrigérée
Pour la garniture crémeuse :
- 450g (2 paquets) de fromage à la crème (type Philadelphia), parfaitement ramolli
- 1 tasse (200g) de sucre en poudre
- ¼ de tasse (30g) de farine tout usage
- 1 c.à.c d’extrait de vanille pur
- 3 gros œufs, à température ambiante
Pour la décoration (optionnel) :
- Crème chantilly
- Morceaux supplémentaires de brioche à la cannelle ou glaçage fourni avec la pâte
Substitutions D’Ingrédients : L’Appropriez-Vous
Pas de biscuits « petit beurre » ? Essayez des biscuits digestifs ou des biscuits à la cuiller pour une croûte légèrement différente. Plus d’extrait de vanille ? Une touche d’extrait d’amande fonctionne à merveille avec la cannelle. Pour un peu de croquant, vous pouvez ajouter une poignée de noix de pécan ou de noix concassées au mélange de la croûte. Si vous vous sentez ambitieux, vous pouvez même utiliser une pâte à brioche à la cannelle maison, mais la version réfrigérée rend cette recette si merveilleusement simple.
Créez Votre Chef-d’œuvre De Cheesecake à la Cannelle
Étape 1 : Préchauffez et Préparez
Commencez par bien chauffer votre four. Préchauffez-le à 180°C (th.6). Cette première étape toute simple est cruciale pour une cuisson uniforme. Pendant qu’il chauffe, sortez votre moule à manqué (springform) de 23 cm. Le graisser légèrement avec du beurre ou un spray aide pour le nettoyage ensuite, même avec une croûte. Préparer votre poste de travail maintenant rend tout le processus plus fluide et plus agréable.
Étape 2 : Construisez la Base Beurrée
Dans un saladier moyen, mélangez la chapelure de biscuits, le sucre et le beurre fondu. Vous saurez que c’est parfait quand le mélange ressemble à du sable mouillé et qu’il tient ensemble quand vous le pressez. Tassez ce mélange fermement et uniformément au fond de votre moule. Utilisez le fond d’un verre ou d’une tasse à mesurer pour bien le compacter. Enfournez cette croûte pendant 10 minutes jusqu’à ce qu’elle soit juste prise et sente délicieusement grillée. Astuce de pro : Laissez cette croûte refroidir complètement avant d’ajouter les couches suivantes – cela la gardera croustillante !
Étape 3 : La Magique Couche de Brioche à la Cannelle
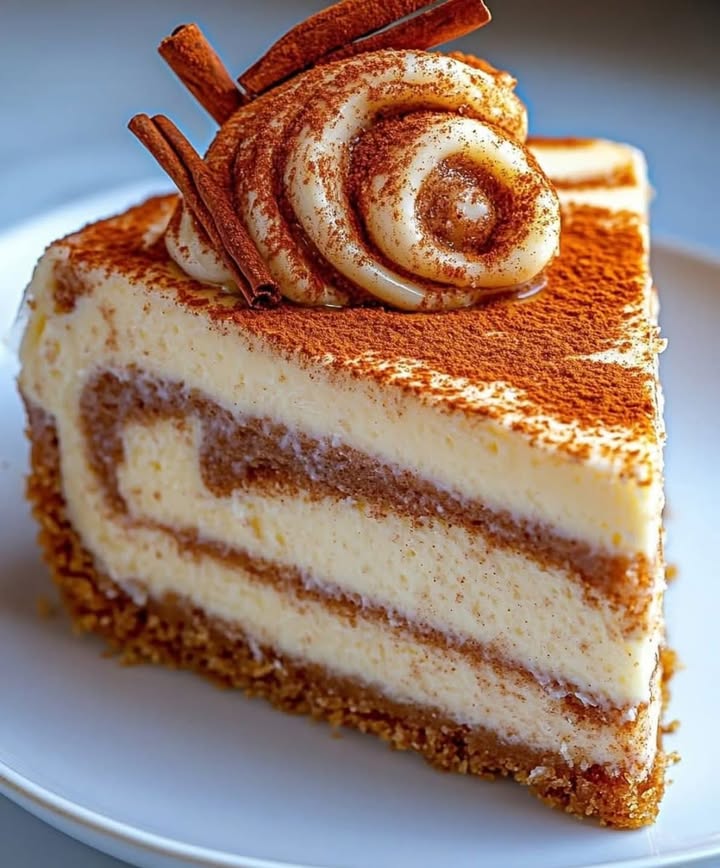
C’est la partie amusante ! Prenez votre pâte à brioche à la cannelle réfrigérée et déroulez soigneusement chaque brioche. Maintenant, disposez les longs rubans en spirale de pâte sur la croûte refroidie. Joignez et pressez doucement les morceaux ensemble pour former une couche complète qui couvre toute la croûte. Cela crée une délicieuse barrière moelleuse entre la croûte et la garniture. Les doux arômes de cannelle commenceront déjà à emplir votre cuisine.
Étape 4 : Préparez la Garniture Crémeuse de Rêve
Dans un grand saladier, battez le fromage à la crème ramolli avec le sucre, la farine et la vanille. Commencez à vitesse basse pour éviter un nuage de sucre, puis battez à vitesse moyenne-élevée pendant 2 à 3 bonnes minutes. Vous voulez un mélange parfaitement lisse, sans grumeaux. Raclez souvent les bords du saladier. Ajoutez maintenant les œufs un par un, en battant juste jusqu’à ce que chaque jaune disparaisse dans le mélange. Trop battre après avoir ajouté les œufs peut incorporer trop d’air et provoquer des fissures. La pâte doit être veloutée et pâle.
Étape 5 : La Cuisson, Étape Cruciale
Versez soigneusement votre délicieuse garniture au fromage à la crème sur la couche de brioche à la cannelle. Inclinez doucement le moule pour la répartir uniformément. Placez-le au centre de votre four préchauffé. Faites cuire pendant 50 à 60 minutes. Les bords doivent être gonflés et pris, mais le tout centre (un cercle d’environ 5 cm) doit encore avoir un léger tremblement lorsque vous bougez doucement le moule. C’est la clé pour un cheesecake crémeux, pas sec. Ensuite, éteignez le four, entrouvrez la porte et laissez-le reposer à l’intérieur pendant encore 30 minutes. Ce refroidissement lent aide à éviter les grosses fissures.
Étape 6 : Refroidissez, Réfrigérez et Couronnez de Gloire
Après son repos au four, sortez le cheesecake et laissez-le refroidir complètement sur une grille. Cela demande de la patience – peut-être une heure ou deux. Ensuite, couvrez-le et réfrigérez-le pendant au moins 4 heures, ou idéalement toute une nuit. Ce temps de repos au frais est non-négociable ; il permet aux saveurs de se marier et à la texture de devenir parfaitement tranchable. Au moment de servir, passez la lame d’un couteau fin autour du bord, retirez le cercle du moule à manqué, et décorez avec de la crème chantilly et des morceaux des brioches à la cannelle cuites restantes.
Le Secret du Chef
Pour la texture de garniture la plus crémeuse qui soit, assurez-vous que TOUT soit à température ambiante – le fromage à la crème, les œufs, même la crème fraîche si vous en utilisez. Les ingrédients froids provoquent un sur-battage lorsque vous essayez d’éliminer les grumeaux, ce qui donne un cheesecake dense et des fissures sur le dessus. Anticipez et sortez ces ingrédients du réfrigérateur environ 1 à 2 heures avant de cuisiner.
Votre Calendrier de Préparation
Détaillons votre investissement en temps pour qu’il n’y ait pas de surprise :
- Temps de préparation : 25 minutes (mesurer, mélanger, tasser la croûte)
- Temps de cuisson : 60 minutes (plus les 10 minutes de cuisson de la croûte)
- Temps de refroidissement/repos : Environ 30 minutes dans le four, puis 2 heures à température ambiante
- Temps de réfrigération : Au moins 4 heures, mieux toute une nuit
- Temps total (préparation + cuisson) : Environ 1 heure 45 minutes
- Temps total jusqu’au service : Minimum 6 heures, incluant la réfrigération
Un Peu d’Info Douce en Plus
Saviez-vous que l’association cannelle et fromage frais est un classique dans de nombreuses régions du monde ? Du Moyen-Orient à la Scandinavie, les épices chaudes associées à des fromages frais et doux sont une gourmandise aimée depuis des siècles. Ce Cheesecake Roll Cannelle n’est qu’une délicieuse interprétation moderne de ce mariage intemporel. Choisir des ingrédients comme des biscuits complets pour la croûte peut même ajouter une touche bénéfique de fibres alimentaires à votre dessert gourmand.
Votre Liste de Matériel de Cuisine
Vous n’avez pas besoin d’équipement sophistiqué pour cette recette. Voici ce que vous devez rassembler :
- Moule à manqué (springform) de 23 cm (la star des cheesecakes !)
- Saladiers (moyen et grand)
- Batteur électrique ou robot de cuisine
- Spatule
- Tasses et cuillères à mesurer
- Grille de refroidissement
Comment Conserver Vos Restes à la Perfection
Conservez tout reste de cheesecake au réfrigérateur. Couvrez-le bien avec du film alimentaire ou placez les parts dans un contenant hermétique. Bien conservé, il restera frais et délicieux jusqu’à 5 jours. Les saveurs continuent en réalité de se développer, faisant du deuxième ou troisième jour un vrai régal.
Pour une conservation plus longue, ce cheesecake se congèle à merveille. Enveloppez le cheesecake entier ou les parts individuellement dans du film alimentaire, puis à nouveau dans du papier aluminium. Placez-les dans un sac adapté à la congélation. Il se conservera jusqu’à 2 mois. C’est un moyen fantastique d’avoir un dessert impressionnant prêt pour des invités imprévus ou une future envie.
Pour le décongeler, transférez simplement le cheesecake ou les parts congelés au réfrigérateur et laissez-les dégeler pendant la nuit. Cette décongélation lente aide à préserver la texture crémeuse parfaite. Évitez une décongélation à température ambiante, qui peut rendre la texture légèrement aqueuse.
Mes Meilleurs Conseils pour un Cheesecake Réussi
- Température ambiante est la clé : Je ne le dirai jamais assez. Le fromage à la crème ramolli s’incorpore parfaitement, créant une pâte lisse et sans grumeaux.
- Ne sur-battez pas les œufs : Une fois les œufs ajoutés, mélangez juste jusqu’à incorporation. Trop battre ajoute trop d’air, qui se dilate au four puis s’affaisse, provoquant des fissures.
- Utilisez un bain-marie pour la perfection : Pour une texture sans fissure et ultracrémeuse, faites cuire votre cheesecake au bain-marie. Enveloppez simplement l’extérieur de votre moule à manqué dans du papier aluminium épais et placez-le dans un plat à four plus large. Versez de l’eau chaude dans le plat à four jusqu’à mi-hauteur du moule à manqué.
- Réfrigérez complètement : Trancher un cheesecake encore tiède est la recette pour un désastre. Laissez-le refroidir totalement pour des parts nettes et belles.
Idées de Présentation pour Épater Vos Invités
Transformez votre belle pâtisserie en un chef-d’œuvre dans l’assiette !
- Nappez artistiquement le glaçage fourni avec les brioches à la cannelle sur la

Je suis Céline, une véritable passionnée d’ustensiles et de matériel de cuisine ! J’adore tester, comparer et découvrir les meilleurs équipements pour rendre la cuisine plus efficace et agréable. Que ce soit un bon couteau, un robot performant ou une poêle incontournable, je suis toujours à la recherche des outils qui feront la différence. Mon but est de vous guider dans vos choix pour que vous ayez le bon matériel adapté à vos besoins.
Contenus masquer
