
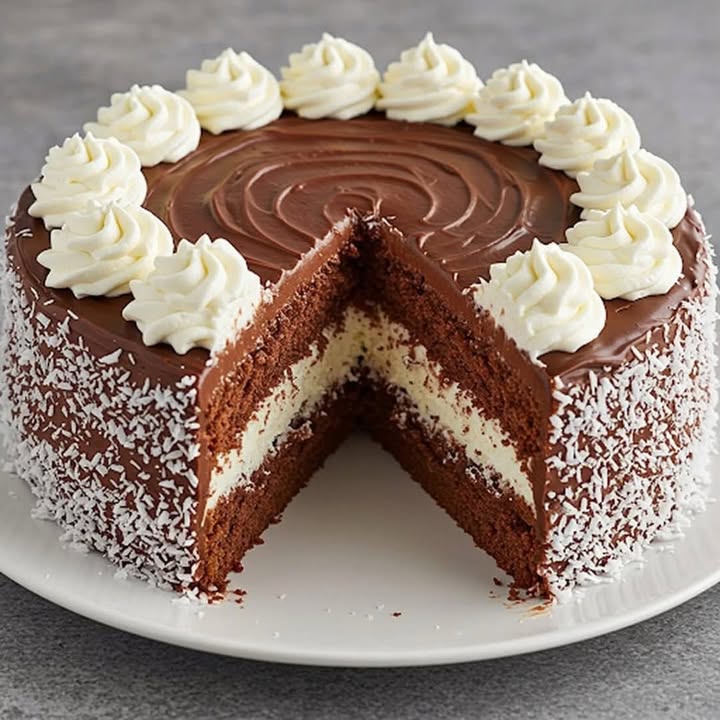
Une Partie de Paradis Nommée Gâteau Prestige
Avez-vous déjà préparé quelque chose qui a rendu tout le monde silencieux ? C’est ce qui s’est passé avec ce Gâteau Prestige. Je l’ai fait pour l’anniversaire de ma nièce, et au moment où elle a pris la première bouchée, ses yeux se sont illuminés. On ne pouvait entendre que le son des fourchettes contre les assiettes. C’est cette combinaison magique où le chocolat noir intense rencontre le rêve tropical et crémeux du coco. Il semble sophistiqué, comme quelque chose dans une vitrine de pâtisserie, mais croyez-moi, le processus est un pur plaisir de cuisine simple. Ce gâteau n’est pas juste un dessert ; c’est un créateur de souvenirs.
L’histoire de ce rêve chocolat-coco
Le nom « Prestige » dit tout. Bien que son origine exacte soit un joyeux mystère, ce gâteau est une fusion magnifique. Pensez au bien-aimé « Gâteau Chocolat Coco » français, où le coco joue souvent un rôle principal. Au fil du temps, les cuisiniers amateurs comme nous l’ont élevé avec des couches luxueuses et des enrobages veloutés. Ma version provient d’une carte de recette usée que mon ami a ramenée d’un voyage des années ago. J’ai l’ai ajustée, l’ai fait mienne, et maintenant c’est la gourmandise la plus demandée lors de nos réunions familiales. C’est la tradition et l’innovation en une seule délicieuse part.
Pourquoi vous devez préparer ce Gâteau Chocolat Coco
Cette recette est un succès pour tellement de raisons ! Premièrement, les saveurs s’accordent parfaitement. Le gâteau chocolaté intense est surprenamment léger, et il absorbe l’incroyable garniture crème-coco comme un rêve. Deuxièmement, c’est un dessert fantastique à préparer à l’avance. Il a besoin de temps pour refroidir, ce qui signifie que vous pouvez le préparer le matin et être un hôte relaxé pour le dîner. Finalement, il est absolument magnifique avec un effort minimal. Une simple touche de coco grillé sur le dessus, et vous avez un véritable spectacle. C’est une élégance sans prise de tête.
Quand servir votre Gâteau Prestige Chocolat Coco
Ce gâteau transforme chaque jour en une célébration. Il est parfait pour les anniversaires où vous voulez quelque chose différent du glaçage habituel. Il est une superstar lors des fêtes d’été, apportant une touche tropicale. J’adore le présenter lors du repas de Noël—le coco blanc contre le gâteau noir est tellement festif. Honnêtement, un simple dimanche familial se sent spécial quand cette beauté attend sur la table. Toute occasion est l’occasion pour ce gâteau.
Rassembler vos ingrédients pour réussir
Préparez tout ! Avoir les ingrédients à température ambiante (comme les œufs et le lait) fait une grande différence pour une pâte plus homogène.
- Pour le gâteau chocolaté :
- 4 gros œufs
- 1 tasse (200g) de sucre granulé
- 1 tasse (125g) de farine blanche
- 1 cuillère à café de levure chimique
- 1 tasse (240ml) de lait
- 1/2 tasse (120ml) d’huile végétale (comme tournesol ou colza)
- 1 cuillère à café d’extrait de vanille pur
- 1/2 tasse (50g) de cacao en poudre non sucré
- Pour l’incroyable garniture & enrobage coco :
- 1 tasse (240ml) de crème liquide froide à fouetter (min. 30% de matière grasse)
- 1 tasse (300g) de lait concentré sucré
- 1 tasse (80g) de coco râpé (plus un peu extra pour décorer)
- 1/2 tasse (120ml) de lait de coco (d’une boîte, bien agité)
- 1/4 tasse (50g) de sucre
- 1 cuillère à café d’extrait de vanille
Alternatives d’ingrédients (si vous êtes à court !)
Pas de souci si vous manquez quelque chose. Voici quelques changements faciles :
- Farine de blé : Un bon mélange de pâtisserie sans gluten 1:1 fonctionne très bien.
- Huile végétale : Du beurre fondu et refroidi ou de l’huile de coco ajouteront une saveur plus riche.
- Crème liquide : Pour une version plus légère, vous pouvez utiliser du yaourt grec entier bien réfrigéré, mais la texture sera moins aérienne.
- Lait concentré sucré : Vous pouvez faire une substitution en faisant mijoter 1 tasse de lait en poudre avec 1 tasse de sucre et 1/2 tasse d’eau bouillante jusqu’à légèrement épaissi, mais celui du commerce est plus facile.
- Coco frais : Si vous avez un coco frais, sa chair râpée ajoutera une texture et une saveur incroyables.
Créer votre Gâteau Prestige Chocolat Coco, étape par étape
Étape 1 : Donner vie au gâteau chocolaté
Commencez par préchauffer votre four à 180°C (350°F). Graisser et chemiser un moule rond de 20cm (8 pouces). Dans un grand bol, cassez ces œufs et versez le sucre. Maintenant, fouettez ! Utilisez un mixeur électrique si vous en avez un, et battez pendant 5 bonnes minutes jusqu’à que le mélange soit clair, épais et merveilleusement mousseux. Il doit laisser une trace en ruban quand vous soulevez les batteurs. Cet air est ce qui donne à notre gâteau sa belle légèreté. Tamiser ensemble la farine, le cacao en poudre et la levure chimique. Incorporer doucement ces ingrédients secs dans le mélange d’œufs, en alternant avec des éclats de lait et d’huile. Procédez lentement pour garder tout cet air. Finalement, ajouter la vanille. Votre pâte sera lisse, brillante et sentira comme un rêve chocolaté.
Astuce pro : Tamiser le cacao en poudre est essentiel ! Cela évite les grumeaux et assure une texture de gâteau parfaitement lisse et veloutée.
Étape 2 : Cuisson et refroidissement avec patience
Versez la belle pâte dans votre moule préparé. Tapotez doucement sur le comptoir pour libérer les grosses bulles d’air. Glissez-le au centre de votre four préchauffé. Maintenant, la partie la plus difficile : ne ouvrez pas la porte du four pendant les premières 20 minutes ! La cuisson est une science, et nous avons besoin de cette chaleur constante. Cuire pendant 25-30 minutes total. Vous saurez qu’il est fait lorsque le dessus rebondit légèrement au toucher et qu’une pointe insérée au centre ressort propre. Laisser le gâteau refroidir dans son moule environ 10 minutes, puis le démouler sur une grille. Il doit refroidir complètement. Un gâteau chaud ferait fondre notre garniture coco luxueuse !
Étape 3 : Préparer la magie crémeuse au coco
Pendant que le gâteau refroidit, préparons la garniture qui rend ce « Gâteau Prestige » si spécial. Prenez un grand bol propre et versez la crème liquide froide à fouetter. Avec des batteurs froids, fouettez la crème juste jusqu’à qu’elle forme des pics mous. Vous voulez qu’elle soit gonflée et douce, pas ferme et butyrique. Dans un autre bol, combinez le lait concentré sucré, le coco râpé, le lait de coco, le sucre et la vanille. Remuez jusqu’à qu’il soit magnifiquement homogène. Maintenant, avec une main douce, incorporez la crème fouettée dans le mélange coco. Regardez ça ! Vous avez créé un nuage de plaisir crémeux tropical. Couvrez-le et mettez-le au frigo tandis que vous préparer les couches du gâteau.
Astuce pro : Refroidissez votre bol et vos batteurs dans le congélateur pendant 15 minutes avant de fouetter la crème. Elle monte plus vite et garde sa forme mieux.
Étape 4 : Assembler votre chef-d’œuvre
Prenez votre gâteau chocolaté complètement refroidi. Avec un long couteau à pain dentelé, coupez-le horizontalement en deux couches égales. C’est plus facile si vous marquez une ligne autour du cercle d’abord. Placez la couche du bas sur votre plateau de service. Versez une quantité généreuse de la crème coco sur cette couche et étalez-la uniformément jusqu’aux bords. Placez doucement la deuxième couche de gâteau sur le dessus. Maintenant, utilisez le reste de la crème coco pour couvrir le gâteau entier—dessus et côtés. Ne visez pas des bordures perfectes et coupantes ; une finition rustique et ondulée semble magnifique et invitante. C’est votre toile vierge pour la décoration.
Étape 5 : La grande finale : réfrigérer et servir !
Avant de vous jeter dessus, le gâteau demande une dernière étape. Couvrez-le légèrement et refrigerer pendant au moins 2 heures, idéalement 4 heures ou toute la nuit. Ce temps de repos est le véritable secret. Cela permet au gâteau d’absorber un peu de l’humidité crémeuse du coco, devenant incroyablement tendre, et permet à toutes les saveurs de se marier dans une perfection pure. Quand vous êtes prête, coupez-le avec un couteau chaud pour des côtés nets. Préparez-vous à voir les compliments arriver !
Astuce du chef : Pour une finition éblouissante, torrez légèrement du coco râpé extra dans une poêle sèche jusqu’à doré et fragrance. Sprinkle-le sur le dessus du gâteau juste avant de servir. Le crunch et l’arôme de noix sont incroyables.
Le calendrier de votre gâteau en un coup d’œil
| Stage | Time |
|---|---|
| Préparation (Mise en place & Pâte) | 20 minutes |
| Cuisson du gâteau | 25-30 minutes |
| Refroidissement du gâteau (Crucial !) | 1-2 heures |
| Préparation de la garniture | 10 minutes |
| Assemblage & Enrobage | 15 minutes |
| Refrigération (Essentiel) | Minimum 2 heures |
| Total temps (Actif + Inactif) | Approximativement 4 heures |
Un secret de ma cuisine pour vous
Pour une couche de saveur supplémentaire qui aura les gens devinant votre secret, passé chaque couche de gâteau très légèrement avec un sirop simple fait de parts égales de lait de coco et de sucre avant d’ajouter la garniture. Cela garde le gâteau suprêmement moist et amplifie la saveur coco de la façon plus élégante.
Un petit morceau d’histoire
Saviez-vous que la combinaison du chocolat et du coco est une histoire d’amour relativement moderne ? Bien que tous les ingrédients ont des racines anciennes, c’était seulement avec la production massive de chocolat et du coco râpé sucré au 19ème et 20ème siècles que les cuisiniers ont commencé à les associer régulièrement. Notre bien-aimé « Gâteau Chocolat Coco » est un témoignage délicieux de l’innovation culinaire, rassemblant le cacao de la rainforest et le coco tropical sur une plate.
Ce que vous aurez besoin dans votre arsenal de cuisine
- Deux bols de mélange (un grand)
- Mixeur électrique de main ou de stand (une whisk et un bras ferme fonctionnera aussi !)
- Moule rond de 20cm (8 pouces)
- Papier parchment
- Spatule
- Couteau dentelé de pain pour diviser le gâteau
- Grille de refroidissement
- Tasses et spoons de mesure
Comment garder votre gâteau délicieux
Parce de la garniture à base de lait, ce gâteau doit être stocké dans le réfrigerateur. Couvrez-le avec une dome de gâteau ou placez-le soigneusement dans un conteneur hermétique. Il gardera magnifiquement pour jusqu’à 3 jours. Les saveurs améliorent actuellement le deuxième jour !
Si vous voulez préparer les composants à l’avance, vous pouvez cuire le gâteau chocolaté un jour en avance. Wrap-le bien dans un wrap plastique quand refroidi et stockez-le à température ambiante. Faire la garniture coco le jour que vous planifiez assembler, comme la crème fouettée peut séparer si faite trop en avance.
Ce gâteau n’est pas idéal pour freezing après assemblage, comme la garniture crémeuse peut devenir watery en thawing. Cependant, vous pouvez freezer les couches de gâteau chocolaté plain, unfilled wrapped fermement pour au mois un mois. Thaw à température ambiante avant garnissage.
Mon meilleur conseil pour une joie de pâtisserie
- Température ambiante est clé : Utiliser des œufs et lait directement du réfrigerateur peut faire votre pâte curdle ou ne rises pas aussi bien. Prenez-les environ 30 minutes avant que vous commencez.
- Ne overmix la pâte : Once vous ajoutez les ingrédients secs, incorporez doucement jusqu’à juste combiné. Overmixing développe gluten, leading à un gâteau tough.
- Test for done-ness : Fours varient. Start checking votre gâteau à 25 minutes. Le test toothpick est votre meilleur ami.
- Chill à set : Ne skip le temps de refrigeration ! C’est non juste pour setting ; c’est là où la magie de fusion de flavour et texture happen.
Présenter votre Gâteau Prestige comme un pro
- Placez le gâteau sur un beautiful cake stand ou une plate blanche simple.
- After frosting, run le côté d’une spoon autour du gâteau pour créer des patterns de wave.
- Sprinkle le dessus avec toasted coconut flakes et une légère dusting de cacao en poudre ou chocolat noir shaved.
- Pour des serveings individuels, ajoutez une raspberry fresh ou une twist de lime zest sur le côté de chaque plate pour un pop de couleur et freshness.
- Servez avec un dollop de extra crème fouettée sur le côté pour une indulgence true.
Vous aimez cette recette ? Essayez ces variantes !
Once vous avez maîtrisé cette classique, le fun réellement commence ! Vous pouvez jouer avec tellement de variantes délicieux. Pour une indulgence chocolatée différente, vous must try my Nanay’s Decadent Chocolate Fudge Brownie Cake—c’est un riche, hybrid treat qui combine le meilleur d’un cake et d’un brownie. Si vous êtes dans une mood festive, my Peppermint Brownies sont chewy, minty et perfect pour les holidays. Craving chocolate mais cooking pour one ou two ? My Small Batch Brownies recette est votre meilleur ami new. Et pour une adventure dessert completely différente, these Stuffed Apple Donuts avec dough brioche sont un heavenly fall project.
- Passion Tropicale : Ajouter 2-3 tablespoons de pulp de passion fruit à la garniture coco pour une twist tangy.
- Prestige Mocha : Dissoudre 1 tablespoon de powder espresso instant dans le milk pour la pâte de gâteau pour créer une base mocha-flavored.
- Crunch Almond Toasted : Incorporer 1/2 tasse de almonds finely chopped toasted dans la garniture coco et utiliser almonds slivered pour décorer les côtés du cake.
- Soaked Rum : Pour une version adults-only, passé les couches de gâteau avec un syrup de rum ou Malibu avant assembling.
- Delight Dairy-Free : Utiliser cream de coco (la partie solide d’une can de lait de coco full-fat) pour fouetter au lieu de cream dairy, et utiliser un alternatif de lait concentré plant-based.
- Gâteaux Prestige Individuals : Cuire la pâte dans un tin de cupcake (fill seulement halfway) pour 15-18 minutes. Once cooled, hollow out le centre de chaque, fill avec cream coco et replace le top pour des desserts single-serving adorables.
Erreurs courantes à éviter pour un Gâteau Chocolat Coco Parfait
Erreur 1 : Ne pas fouetter les œufs et le sucre assez
C’est la foundation d’un gâteau léger et aérien. Si vous ne fouettez les œufs et sucre jusqu’à qu’il est clair, thick et forme ribbons, votre gâteau sera dense et flat. Cette étape incorpore air, qui agit comme un agent levant avec la levure chimique. Set un timer pour 5 full minutes de beating avec un mixeur électrique. Vous saurez qu’il est prêt quand le mixture a doubled en volume et laisse une trace claire sur la surface pour quelques seconds quand vous soulevez les batteurs.
Erreur 2 : Ajouter la garniture à un gâteau warm
La patience est le meilleur tool d’un baker. Assembling le gâteau tandis que ses couches sont still even slighly warm est une recette pour disaster. La heat causera la garniture coco crémeuse à melt, slide right off et fait le gâteau soggy. Vous must let le gâteau refroidir complètement sur une grille. Cela peut prendre 1-2 heures. Pour speed it up, vous pouvez couper le gâteau en couches once il est juste cool to the touch et puis let les couches séparées refroidir faster.
Erreur 3 : Fouetter la crème à stiff peaks
When making la garniture, nous voulons une texture douce, dreamy, pas stiff crème fouettée. Fouetter la crème jusqu’il est stiff before folding it in fait la garniture final heavy et difficile à spreader. Cela peut aussi look grainy. Stop beating quand la crème holds soft, billowy peaks qui gently fold over quand vous soulevez la whisk. Elle devrait still look silky. Quand fold dans le mixture coco, cela créera une texture légère, mousse-like qui est simplement divine.
Erreur 4 : Sauter le temps de refrigeration
Resisting l’urgence de slice dans le gâteau right away est tough, mais c’est essentiel. Le temps de refrigeration (au moins 2 heures) est non juste pour set la crème. Cela permet aux couches de gâteau à slowly absorber un peu de moisture de la garniture, devenant incroyablement tender et allowing toutes les saveurs à meld ensemble perfectly. Un gâteau sliced too soon sera messy et les couches pourrait slide. Un gâteau well-chilled cuts dans des slices clean, beautiful où chaque composant est in harmony.
Erreur 5 : Utiliser dull ou soggy coconut
La texture de votre coco râpé matters. Si vous utiliser packaged coconut, donnez-lui a sniff. Il devrait smell sweet et fresh, pas musty ou stale. Stale coconut peut ruin la flavour de votre garniture entier. Pour un upgrade amazing, prendre les extra 5 minutes to toast le coco vous utiliser pour décoration (et même un peu to mix in). Toasting dans une poêle sèche jusqu’à doré brings out une flavour de coco nutty, intense et adds un wonderful crunch qui contraste la garniture crémeuse beautifully.
Questions fréquemment demandées (FAQ)
Peut-on faire ce gâteau sans gluten ?
Absolutement ! Ce gâteau adapte très bien à une diet sans gluten. Simply replace la farine de blé regular avec un mélange de farine de pâtisserie sans gluten 1:1 de bonne qualité. Assurez que le blend contient gum xanthan, qui aide mimic la structure que gluten provides. Reste de recette reste exactement same. Vous obtiendrez un gâteau wonderfully tender et delicious que tout le monde peut enjoy, no one devinerait il est sans gluten !
Mon garniture coco semble trop runny. Qu’ai-je fait wrong ?
A garniture runny pointers généralement à un de deux issues. First, la crème fouettée peut ne avoir été assez froide ou était under-whipped. La crème doit être très froide pour hold air et form peaks. Second, le gâteau lui-même pourrait avoir été even slighly warm quand vous assemblé-il, melting la crème. Pour fixer il, pop le gâteau assembled entier dans le freezer environ 45 minutes pour set everything firmly, puis transfers-le au fridge. Next time, ensure votre crème, bowl, et batteurs sont ice-cold, et double-check que le gâteau est complètement refroidi.
À quelle avance peut-on préparer le Gâteau Prestige ?
Ce gâteau est un fantastic dessert make-ahead. Vous pouvez cuire la couche chocolat du gâteau jusqu’à un jour en avance. Let il cool complètement, wraps-il fermement dans wrap plastique et stockez-le à température ambiante. La garniture coco est meilleure faite le jour que vous planifiez assembler, comme la crème fouettée peut parfois weep ou séparer si faite trop en avance. Once complètement assemblée, le gâteau besoin au moins 2 heures pour refroidir, mais il taste même mieux si fait la nuit avant. Il keep perfectly dans le fridge jusqu’à 3 jours.
Peut-on utiliser un milk différents pour la pâte du gâteau ?
Yes, vous pouvez. While lait entier donne le meilleur richness, vous pouvez utiliser lait faible en gras ou même un lait plant-based comme almond ou oat milk dans la pâte du gâteau. La texture pourrait être légèrement différente, mais il fonctionnera bien. However, pour la garniture, I advise strongly contre substituer le lait de coco, comme il provides la flavour tropicale essentielle et texture crémeuse qui définir cette recette.
Why mon gâteau a sunk dans le milieu ?
A gâteau sinking est souvent causé par ouvrir la porte du oven trop early durante baking. Le drop sudden en temperature fait la structure delicate collapse. Always wait jusqu’au au moins 20-minute mark avant peeking. Autres causes pourrait être underbaking (le centre n’est pas set) ou une température du oven inaccurate. Utiliser un thermometer de oven pour vérifier votre oven true temperature est un baker meilleur investissement pour éviter issues comme cela.
Est-ce possible décorer ce gâteau avec crème piped ?
Parce que la garniture coco est assez douce et luxueuse, c’est non idéal pour des piped travaux détaillés. Si vous voulez piped decorations, I recommend réserver un petit amount de crème fouettée plain (sweetened avec un peu de sucre powdered) avant que vous mixez-il avec la base de coconut condensé. Utiliser cette crème fouettée fermer pour vos piping bags. Vous pouvez piped pretty rosettes ou bordures, puis sprinkle-les avec toasted coconut pour un look cohesive.
Peut-on utiliser coconut fresh au lieu de coco râpé packaged ?
Vous absolument pouvez, et il ajoutera une flavour et texture spectaculaire ! Râpez la flesh d’une coconut fresh. Vous aurez besoin de toast-it lightly pour dry it out un peu avant l’ajouter à la garniture, comme coconut fresh has plus moisture. La taste sera far supérieur à plupart de packaged varieties. C’est un peu plus de travail, mais pour une occasion spéciale, c’est worth l’effort.
Quoi peut-on faire avec lait de coco leftover de la can ?
Ne let it go au waste ! Lait de coco leftover est un treasure. Vous pouvez freezer-it dans un tray de ice cube pour future smoothies ou curries. Utiliser-le pour cook rice pour une twist tropical, ajouter-le à votre oatmeal morning ou incorporer-le dans une soup, comme une soup pumpkin Thai-inspired. C’est un ingrédient versatile qui ajoute creaminess et flavour à tous dishes sweet et savory. Pour plus d’idées sur utiliser des ingrédients wisely et cuisine healthy, resources comme celle sur healthy eating and food quality peuvent être vraiment helpful.
Le lait condensé fait-il très sweet pour moi. Peut-on réduire le sugar ?
Vous pouvez ajuster la sweetness à votre taste. Dans la garniture, vous pouvez réduire ou même omettre l’extra 1/4 tasse de sucre granulé, comme le lait condensé est déjà très sweet. Pour le gâteau, vous pouvez réduire le sucre environ 1/4 tasse. Be aware que sucre contribue à moisture et texture, alors une réduction significative pourrait faire le gâteau un peu drier. I suggère trying une réduction modeste d’abord.
Peut-on transformer ceci en un gâteau de couches avec trois tiers ?
Pour un gâteau taller, more dramatique, vous pouvez certainement faire trois couches. Simply doubler la recette de garniture coco pour assure vous avez enough pour generously fill et couvrer le gâteau. When baking, divisez la pâte entre trois moulés préparés de 20cm. Le temps de baking sera légèrement moins, alors start checking environ 18-20 minutes. Un gâteau Prestige trois-couches est un true showstopper ! Pour plus inspiration sur creations layered magnifiques, explore notre collection full de cakes and pastries.
La dernière part
Voilà pour vous, mon cher ami. Ce Gâteau Prestige, ce glorious Gâteau Chocolat Coco, est plus qu’une liste d’ingrédients et étapes. C’est une promesse d’une cuisine heureuse, une table filled avec loved ones, et ce moment de pure delight quand les saveurs dance ensemble. Il semble impressionnant mais est construit sur des techniques simples et bonnes. Ne intimidated. Roll up vos sleeves, mettre some music et préparer ce gâteau. Je promettre, le silence que follows la première bouchée—c’est votre succès parler loud et clear. Bonne pâtisserie !
Equipment
- Mixeur électrique
- Moule à gâteau rond de 20 cm
- Grille de refroidissement
- Spatule
- Couteau à pain dentelé
Ingrédients
- 200 g sucre granulé
- 125 g farine de blé tout usage
- 240 ml lait
- 120 ml huile végétale tournesol ou canola
- 50 g poudre de cacao non sucrée
- 4 gros œufs
- 1 c.s extrait de vanille
- 1 c.c levure chimique
Instructions
- Préchauffez votre four à 180°C (350°F). Graissez et chemisez un moule à gâteau rond de 20 cm (8 pouces).
- Dans un grand bol, cassez les œufs et ajoutez le sucre. Battez pendant 5 minutes jusqu’à un mélange pâle et mousseux.
- Tamisez ensemble la farine, la poudre de cacao et la levure chimique, puis incorporez délicatement aux œufs en alternant avec le lait et l'huile.
- Versez la pâte dans le moule préparé et tapez légèrement sur le comptoir pour libérer les bulles d'air. Enfournez sans ouvrir la porte pendant les 20 premières minutes.
- Faites cuire pendant 25 à 30 minutes, jusqu'à ce que le dessus rebondisse et qu'un cure-dent en ressorte propre. Laissez refroidir dans son moule pendant 10 minutes, puis démoulez sur une grille pour refroidir complètement.
- Pendant ce temps, préparez la garniture : fouettez la crème en pics souples. Dans un autre bol, mélangez le lait concentré, la noix de coco râpée, le lait de coco, le sucre et la vanille. Incorporez délicatement la crème fouettée à ce mélange.
- Une fois le gâteau refroidi, coupez-le horizontalement en deux. Étalez la garniture de noix de coco sur la couche inférieure, puis placez la couche supérieure et recouvrez le gâteau avec le reste de la garniture.
- Réfrigérez le gâteau pendant au moins 2 heures, idéalement 4 heures ou plus pour que les saveurs se mélangent.
- Servez avec des flocons de noix de coco grillés pour la décoration.
Notes
Nutrition

Je suis Céline, une véritable passionnée d’ustensiles et de matériel de cuisine ! J’adore tester, comparer et découvrir les meilleurs équipements pour rendre la cuisine plus efficace et agréable. Que ce soit un bon couteau, un robot performant ou une poêle incontournable, je suis toujours à la recherche des outils qui feront la différence. Mon but est de vous guider dans vos choix pour que vous ayez le bon matériel adapté à vos besoins.