
Le Gâteau Matera : Votre Nouveau Gâteau Fétiche pour les Moments Douillets
Il y a une joie particulière à couper un gâteau qui promet à la fois du réconfort et de la célébration. Pour moi, ce gâteau, c’est le Gâteau Matera. Je l’ai préparé pour la première fois un dimanche pluvieux, avec l’espoir de remonter le moral de toute la famille. À l’instant où son doux parfum vanillé a envahi la cuisine, tout le monde s’est rassemblé autour du four. Ce n’était pas qu’un gâteau qui cuisait ; c’était la promesse d’une part chaude et partagée, recouverte d’une crème pâtissière soyeuse. Simple, fiable et profondément réconfortant, cette recette a définitivement conquis ma maison.
Une Tranche de Douce Tradition : L’Histoire du Gâteau Matera
Bien que ses origines exactes soient simples, le Gâteau Matera ressemble à une recette transmise de génération en génération. C’est le genre de gâteau que l’on trouve dans une boulangerie française ou sur la table d’une réunion de famille. La magie réside dans sa belle simplicité : un gâteau au beurre moelleux rencontre une crème vanille luxueuse. Ma version, inspirée par d’innombrables après-midis de tests, simplifie le processus sans perdre une once de son charme. Elle prouve que parfois, les traditions les plus appréciées commencent juste dans nos propres cuisines.
Pourquoi Vous Allez Tomber Amoureux de Ce Gâteau Matera
Ce gâteau gagne les cœurs pour tant de raisons. D’abord, sa texture est incroyablement moelleuse, aérée et fondante. La crème pâtissière dorée ajoute une touche d’indulgence qui semble sophistiquée mais est étonnamment facile à réaliser. Il est aussi merveilleusement polyvalent. Vous pouvez l’habiller pour recevoir des invités ou le garder simple pour un petit plaisir du mardi. Le mieux, c’est qu’il utilise des ingrédients de base, ce qui en fait un choix économique qui ne fait jamais de compromis sur le goût. Chaque bouchée est un câlin en version dessert.
Les Occasions Parfaites pour Ce Gâteau Classique
Ce gâteau est votre arme secrète culinaire. Il est parfait pour les brunchs tranquilles du weekend, où il s’accorde merveilleusement avec un café fort. Il brille lors des anniversaires en famille comme une alternative moins compliquée aux gâteaux à étages glacés. J’adore l’apporter aux repas partagés parce qu’il se transporte bien et ravit tous les âges. Honnêtement, toute occasion est améliorée par une part de Gâteau Matera. Il transforme un après-midi ordinaire en une petite et douce célébration.
Réunir Vos Ingrédients pour le Gâteau Matera Crémeux
Rassemblons tout ce dont vous avez besoin. Vous avez probablement déjà la plupart de ces choses dans votre cuisine !
Pour le gâteau :
- 250 g de farine tout usage (type T55)
- 200 g de sucre en poudre
- 100 g de beurre ramolli
- 3 gros œufs, à température ambiante
- 120 ml de lait
- 1 cuillère à café de levure chimique (baking powder)
- 1 cuillère à café d’extrait de vanille
Pour la crème pâtissière dorée :
- 250 ml de lait
- 2 gros jaunes d’œuf
- 50 g de sucre
- 20 g de maïzena (fécule de maïs)
- 1 cuillère à café d’extrait de vanille
Substitutions Astucieuses : De la Flexibilité dans Votre Cuisine
Il vous manque un ingrédient ? Pas de problème. Voici comment adapter :
- Beurre : La margarine ou une huile neutre peuvent dépanner.
- Lait : Tout lait fera l’affaire : entier, demi-écrémé, ou même une alternative végétale.
- Vanille : Les graines d’une demi-gousse de vanille naturelle donneront un arôme incroyable.
- Maïzena : Vous pouvez utiliser la même quantité de farine tout usage, bien que la crème sera un peu moins soyeuse.
Créer Votre Gâteau Matera : Un Voyage Étape par Étape
Passons maintenant à la partie la plus agréable ! Suivez ces étapes pour un résultat parfait.
Étape 1 : La crème pâtissière dorée
Commencez par la crème pour qu’elle ait le temps de refroidir. Faites chauffer le lait et la vanille dans une casserole jusqu’à l’apparition de petites bulles de vapeur. Dans un saladier à part, fouettez les jaunes d’œuf avec le sucre jusqu’à ce qu’ils blanchissent et deviennent crémeux. Incorporez la maïzena en fouettant jusqu’à ce que le mélange soit parfaitement lisse. Maintenant, l’étape-clé : versez lentement le lait chaud sur le mélange aux œufs tout en fouettant constamment. Cela élève doucement la température sans faire coaguler les œufs. Reversez le tout dans la casserole et faites cuire à feu moyen. Remuez sans cesse avec une cuillère en bois. Vous sentirez la préparation épaissir magnifiquement. Une fois qu’elle bout doucement pendant une minute, retirez-la du feu. Versez-la dans un bol propre, appuyez un film alimentaire directement sur la surface pour éviter la formation d’une peau, et laissez refroidir complètement. Astuce de pro : Une bonne crème pâtissière doit napper le dos d’une cuillère et laisser une trace nette quand vous passez votre doigt au milieu.
Étape 2 : La pâte à gâteau
Préchauffez votre four à 180°C (thermostat 6). Beurrez et farinez un moule à cake ou un moule rond. Dans un grand saladier, travaillez le beurre ramolli et le sucre ensemble jusqu’à ce que le mélange blanchisse et devienne crémeux. Utilisez un batteur électrique ou un fouet vigoureux. Vous voulez obtenir un mélange léger et aéré, presque comme un nuage pâle. Ajoutez les œufs, un par un, en battant bien après chaque ajout. Le mélange deviendra onctueux et bien émulsionné. Incorporez la vanille. Dans un autre bol, mélangez la farine et la levure. Ajoutez environ un tiers de ce mélange sec aux ingrédients humides, et mélangez jusqu’à ce que ce soit juste combiné. Ajoutez ensuite la moitié du lait. Répétez l’opération, en terminant par le dernier tiers de farine. Mélangez jusqu’à obtenir une pâte homogène et moelleuse. Trop mélanger est l’ennemi d’une texture fondante !
Étape 3 : La cuisson jusqu’à la perfection
Versez cette belle pâte épaisse dans votre moule préparé. Lissez le dessus avec une spatule. Placez-le au centre de votre four préchauffé. Enfournez pour 35 à 40 minutes. Le dessus doit être d’un brun doré profond, et les bords commencer à se détacher du moule. Le test ultime ? Enfoncez un pic à brochette ou un couteau fin au centre. S’il ressort propre, votre gâteau est cuit. L’arôme sera absolument enivrant.
Étape 4 : L’assemblage et la touche finale
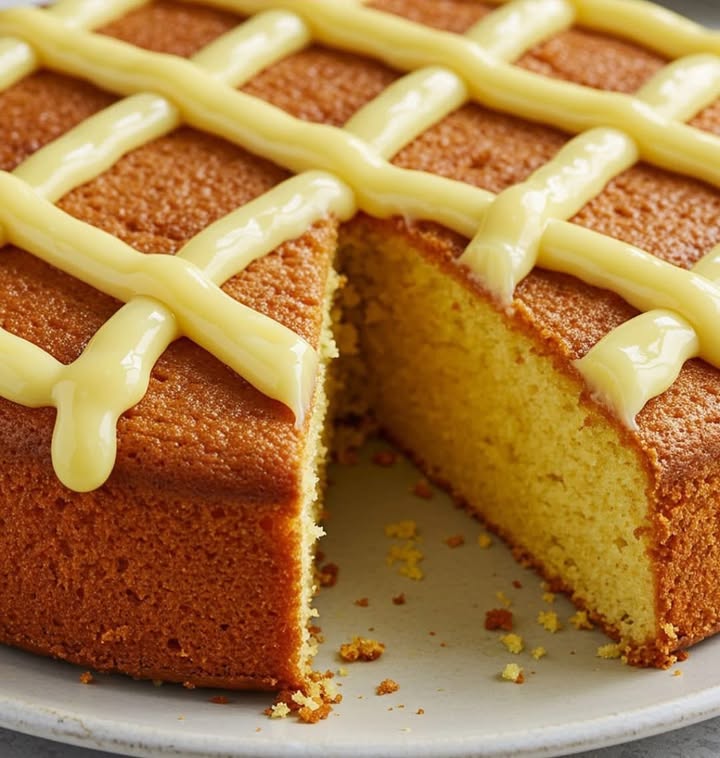
Laissez le gâteau refroidir dans le moule pendant environ 10 minutes, puis démoulez-le sur une grille pour qu’il refroidisse complètement. Cette patience est importante : si vous essayez de napper un gâteau encore chaud avec la crème, elle va fondre ! Une fois complètement refroidi, transférez votre gâteau sur une assiette de service. Fouettez bien votre crème pâtissière refroidie pour la rendre lisse et faciliter la décoration. Vous pouvez la déposer à la cuillère sur le dessus, l’étaler avec un couteau, ou, pour une jolie touche, la mettre dans une poche à douille munie d’une douille étoilée. Faites des lignes, des rosaces ou un simple bord. Il n’y a pas de mauvaise façon de faire : personnalisez-le !
Le Secret du Chef : La Magie de la Température
Ma règle d’or ? Les ingrédients à température ambiante. Sortir les œufs et le beurre du réfrigérateur une heure avant la cuisson fait une énorme différence. Cela permet au beurre d’emprisonner plus d’air lorsqu’on le travaille avec le sucre, ce qui donne un gâteau plus léger et à la texture plus uniforme. C’est un petit geste avec une grande récompense.
Timing pour la Création de Votre Gâteau Matera
- Temps de préparation : 25 minutes
- Temps de cuisson : 40 minutes (gâteau) + 10 minutes (crème)
- Temps de refroidissement : 1 heure (minimum)
- Temps total : Environ 2 heures 15 minutes
- Nombre de parts : 8 généreuses parts
Un Petit Plus
Saviez-vous que la « crème pâtissière » est la base de la pâtisserie française ? Des éclairs aux tartes aux fruits, cette crème polyvalente est un vrai pilier. La maîtriser avec cette recette simple ouvre la porte à tant d’autres desserts. C’est une compétence fondamentale qui donne une impression de professionnalisme.
Ce Dont Vous Aurez Besoin pour le Réaliser
- Casserole moyenne
- Saladiers (2 à 3)
- Fouet et cuillère en bois
- Batteur électrique ou robot pâtissier (optionnel mais utile)
- Moule à cake ou moule rond de 20 cm
- Grille de refroidissement
- Poche à douille et douille (optionnel)
Conserver Votre Délicieuse Création
En raison de la crème à base de lait, ce gâteau doit être conservé au réfrigérateur. Couvrez-le avec un dôme à gâteau ou placez-le dans un contenant hermétique. Il restera frais et délicieux jusqu’à 3 jours. Le gâteau peut devenir un peu plus ferme au froid. Pour une texture et une saveur optimales, laissez les parts individuelles revenir à température ambiante pendant 15 à 20 minutes avant de servir. Le froid s’estompera et les arômes de vanille s’épanouiront à nouveau.
Je ne recommande pas de congeler le gâteau assemblé, car la crème pâtissière peut devenir aqueuse et se séparer à la décongélation. Cependant, vous pouvez congeler le gâteau nature, sans crème : enveloppez-le bien dans du film alimentaire, puis du papier aluminium, pour jusqu’à un mois. Décongelez-le une nuit au frigo avant d’ajouter de la crème pâtissière fraîche. Une bonne conservation au réfrigérateur est essentielle pour maintenir la qualité et la sécurité de votre dessert.
Astuces pour un Gâteau Matera Impeccable
- Mesurez votre farine correctement. Versez-la dans la tasse à mesurer avec une cuillère, puis nivelez. Une farine tassée donne un gâteau dense.
- Lorsque vous faites la crème pâtissière, un remuage constant est non négociable. Cela évite les grumeaux et assure une texture soyeuse.
- Si votre gâteau dore trop vite, posez une feuille de papier aluminium en « tente » sur le dessus pour les 10-15 dernières minutes de cuisson.
- Soyez créatif avec la garniture ! Ajoutez des fruits rouges frais, une pincée de sucre glace ou un peu de zeste de citron dans la crème.
Présenter Votre Chef-d’œuvre
La présentation fait partie du plaisir. Saupoudrez le gâteau fini d’un peu de sucre glace pour un effet neigeux. Disposez une poignée de framboises ou de fraises fraîches sur les bords. Pour un look festif, parsemez de paillettes dorées comestibles ou de délicates fleurs comestibles. Servez-le sur un beau présentoir à gâteau pour rendre même un dessert familial simple, spécial.
Des Variations Inspirées à Essayer
Une fois le classique maîtrisé, pourquoi ne pas expérimenter ? Voici quelques idées pour éveiller votre créativité :
- Marbré au chocolat : Ajoutez deux cuillères à soupe de cacao en poudre à la moitié de la pâte à gâteau et marbrez-la avec la pâte à la vanille avant cuisson.
- Zeste d’agrumes : Ajoutez le zeste d’un citron ou d’une orange à la pâte, et une cuillère à soupe de son jus à la crème pâtissière.
- Infusé au café : Dissolvez une cuillère à soupe de café instantané dans le lait de la pâte pour une touche délicieuse moka.
- Bonheur fruité : Après avoir étalé la crème, recouvrez d’une couche de fraises ou de myrtilles fraîches légèrement sucrées.
- Craquant aux noix : Incorporez 50 g de noisettes ou d’amandes finement hachées et toastées à la pâte à gâteau.
- Touche tropicale : Ajoutez 100 g d’ananas écrasé et bien égoutté à la pâte, et utilisez du lait de coco dans la crème pâtissière.
Si vous aimez les recettes de base qui mènent à des possibilités infinies, vous trouverez tant d’inspiration dans notre collection de gâteaux et pâtisseries. Vous pourriez aussi adorer le réconfort fondant des Dumplings aux Pommes Célestes et leur Sauce Cannelle Onctueuse, la joie festive d’un Gâteau Rêve Chocolat-Menthe avec la Magie des M&M’s, la décadence facile d’un Gâteau au Chocolat Fou au Blender, ou le rêve crémeux qu’est un Cheesecake Banane Pudding Céleste.
Erreurs Courantes à Éviter
Éviter ces simples écueils garantira un gâteau réussi à chaque fois.
Erreur 1 : Le beurre et les œufs froids
Utiliser des ingrédients froids sortis du frigo est l’une des principales causes d’un gâteau dense et lourd. Du beurre froid ne se crèmera pas correctement avec le sucre, ce qui incorpore moins d’air. Des œufs froids peuvent faire que le beurre crémeux prenne et paraisse caillé. Prévoyez toujours de laisser votre beurre et vos œufs sur le comptoir au moins 45 à 60 minutes avant de commencer.
Erreur 2 : Trop mélanger la pâte
Une fois que vous ajoutez la farine, il faut y aller en douceur. Trop mélanger développe le gluten de la farine, ce qui donne un gâteau caoutchouteux au lieu d’une texture moelleuse et fondante. Mélangez les ingrédients secs juste jusqu’à ce que vous ne voyiez plus de traînées de farine. Quelques petits grumeaux sont parfaitement acceptables et préférables à une pâte trop travaillée.
Erreur 3 : Ne pas laisser le gâteau refroidir
Je sais, c’est tentant d’étaler cette magnifique crème pâtissière tout de suite. Résistez ! Appliquer la crème sur un gâteau encore chaud est une catastrophe annoncée. La chaleur fera fondre la crème, la rendra liquide et la fera pénétrer dans le gâteau, créant un résultat détrempé. Soyez patient. Laissez le gâteau refroidir complètement sur une grille. Cela facilitera aussi sa manipulation et sa décoration.
Vos Questions sur le Gâteau Matera, Répondues
Puis-je préparer les composantes à l’avance ?
Absolument ! Vous pouvez cuire le gâteau un jour à l’avance. Laissez-le refroidir complètement, puis emballez-le bien dans du film alimentaire et gardez-le à température ambiante. La crème pâtissière peut aussi être préparée jusqu’à deux jours à l’avance. Conservez-la au réfrigérateur, couverte d’un film alimentaire directement en contact avec sa surface. Fouettez-la bien avant de l’utiliser pour retrouver sa texture lisse.
Pourquoi ma crème pâtissière est-elle devenue grumeleuse ?
Les grumeaux se forment généralement pour deux raisons. Premièrement, la maïzena n’a pas été complètement dissoute dans le mélange œufs-sucre avant d’ajouter le lait chaud. Fouettez vigoureusement jusqu’à obtenir un mélange parfaitement lisse. Deuxièmement, la chaleur était trop forte pendant la cuisson, faisant coaguler légèrement les œufs. Faites toujours cuire à feu moyen et remuez constamment avec une cuillère en bois, en raclant bien le fond et les coins de la casserole.
Mon gâteau dore trop vite sur le dessus. Que faire ?
Les fours peuvent avoir des points chauds. Si vous voyez le dessus brunir plus vite que le centre ne cuit, prenez simplement une feuille de papier aluminium et formez une « tente » lâche au-dessus du moule. Cela agit comme un petit bouclier, ralentissant le processus de coloration tout en permettant à l’intérieur de finir de cuire. Vérifiez la cuisson avec un pic comme d’habitude.
Puis-je utiliser un moule de taille ou de forme différente ?
Oui, mais le temps de cuisson changera. Cette recette fonctionne très bien dans un moule à cake standard, un moule rond de 20 cm, ou même répartie dans deux moules plus petits pour un gâteau à étages. Pour des gâteaux plus fins (comme dans deux moules), commencez à vérifier la cuisson vers 20 minutes. Pour un cake plus haut, il pourra nécessiter les 40 minutes complètes ou un peu plus.
La crème pâtissière est trop liquide. Comment la rattraper ?
Si votre crème semble coulante après refroidissement, elle a probablement besoin d’un peu plus de cuisson. Vous pouvez essayer de la sauver ! Reversez-la dans une casserole propre. Mélangez une cuillère à café de maïzena avec une cuillère à soupe de lait froid pour faire une pâte lisse. Incorporez ce mélange à la crème pâtissière tiède et portez à nouveau à ébullition pendant une minute, en remuant constamment. Elle devrait bien épaissir.
Puis-je aromatiser la crème pâtissière différemment ?
Bien sûr ! La vanille est classique, mais n’hésitez pas à expérimenter. Infusez le lait avec un bâton de cannelle, du zeste d’agrumes, ou un sachet de thé Earl Grey avant de faire la crème. Vous pouvez aussi incorporer une cuillère à soupe de liqueur comme de l’Amaretto ou du Grand Marnier une fois la crème hors du feu. Ajoutez-la progressivement pour contrôler la consistance.
Comment savoir si le gâteau est parfaitement cuit ?
Utilisez trois indices : la vue, le toucher et le test. Le gâteau doit être doré sur toute la surface et commencer à se décoller des bords du moule. Le dessus doit rebondir légèrement quand on appuie doucement dessus. Le plus fiable : insérez un pic ou un couteau fin au tout centre. Il doit ressortir parfaitement propre, sans pâte crue collante.
Existe-t-il une version sans lait pour cette recette ?
Vous pouvez faire des substitutions. Utilisez un beurre végétal et un lait végétal (comme de l’amande ou de l’avoine) à la fois pour le gâteau et la crème. Pour la crème pâtissière, assurez-vous que votre lait végétal est non sucré et non aromatisé. La texture et la saveur finale varieront légèrement, mais vous pouvez tout de même obtenir un délicieux résultat. Une crème à base de maïzena est assez indulgent.
Quelle est la meilleure façon de couper un gâteau avec de la crème sur le dessus ?
Utilisez un couteau tranchant à lame fine. Passez la lame sous l’eau très chaude et essuyez-la avec un torchon propre avant chaque tranche. La chaleur aide le couteau à glisser dans la crème pâtissière proprement sans la traîner ou l’étaler. Vous obtiendrez de belles parts nettes à chaque fois.
Puis-je en faire un gâteau à étages ?
Tout à fait ! Doublez la recette de crème pâtissière. Une fois votre gâteau complètement refroidi, utilisez un couteau-scie pour le couper horizontalement en deux, voire trois couches égales. Étalez une quantité généreuse de crème pâtissière entre chaque couche, puis sur le dessus. Il devient un dessert impressionnant et délicieux pour une occasion spéciale.
Prêt à Cuisiner Votre Propre Souvenir ?
La véritable beauté de cette recette de Gâteau Matera est sa capacité à créer un moment. Elle n’est ni compliquée ni chiante. C’est le processus pour créer le beurre et le sucre, la patience douce pour remuer la crème, et le plaisir partagé de la première bouchée. J’espère qu’elle deviendra une recette de confiance chez vous, tout comme elle l’est chez moi. Rassemblez vos ingrédients, préchauffez votre four, et cuisinez un petit morceau de réconfort aujourd’hui.
Equipment
- Casserole moyenne
- Moule à cake ou moule rond de 20 cm
- Bols à mélanger
- Fouet
- Grille de refroidissement
Ingrédients
- 250 g farine tout usage
- 200 g sucre granulé
- 100 g beurre ramolli
- 3 gros œufs à température ambiante
- 120 ml lait
- 1 c.s levure chimique
- 1 c.s extrait de vanille
- 250 ml lait
- 2 gros jaunes d'œufs
- 50 g sucre
- 20 g maïzena
- 1 c.s extrait de vanille
Instructions
- Commencez par la crème pâtissière pour qu'elle puisse refroidir.
- Dans une casserole, chauffez le lait et la vanille jusqu'à ce que de petites bulles de vapeur apparaissent.
- Dans un bol séparé, fouettez les jaunes d'œufs avec le sucre jusqu'à obtenir une couleur jaune pâle.
- Incorporez la maïzena en fouettant jusqu'à obtenir un mélange lisse.
- Versez lentement le lait chaud dans le mélange d'œufs en fouettant continuellement.
- Reversez tout dans la casserole et faites cuire à feu moyen en remuant avec une cuillère en bois jusqu'à épaississement.
- Retirez du feu, versez dans un bol propre et couvrez avec du film plastique pour éviter la formation d'une croûte. Laissez refroidir complètement.
- Préchauffez le four à 180°C.
- Graissez et farinez un moule à cake ou un moule rond.
- Dans un grand bol, crémez le beurre ramolli et le sucre jusqu'à obtenir un mélange léger et crémeux.
- Ajoutez les œufs un par un, en battant bien après chaque ajout.
- Incorporez la vanille.
- Dans un autre bol, mélangez la farine et la levure chimique.
- Ajoutez un tiers de ce mélange au premier mélange, puis la moitié du lait. Répétez, en terminant avec le reste de la farine.
- Mixez jusqu'à obtenir une pâte homogène.
- Versez la pâte dans le moule préparé et lissez le dessus.
- Faites cuire 35-40 minutes, jusqu'à ce que le dessus soit doré.
- Laissez refroidir le gâteau dans le moule pendant 10 minutes, puis transvasez-le sur une grille pour qu'il refroidisse complètement.
- Une fois refroidi, fouettez la crème pâtissière pour la rendre lisse et pipable.
- Décorez le gâteau avec la crème pâtissière.
Notes
Nutrition

Je suis Céline, une véritable passionnée d’ustensiles et de matériel de cuisine ! J’adore tester, comparer et découvrir les meilleurs équipements pour rendre la cuisine plus efficace et agréable. Que ce soit un bon couteau, un robot performant ou une poêle incontournable, je suis toujours à la recherche des outils qui feront la différence. Mon but est de vous guider dans vos choix pour que vous ayez le bon matériel adapté à vos besoins.