
Le Gâteau Crémeux au Lait Concentré au Blender : Mon Dessert Miracle Incontournable
Ça vous arrive, ces jours où il vous faut un gâteau, tout de suite ? Quand des invités surprises sonnent à la porte, ou que votre envie de sucré se transforme en rébellion. Je suis passée par là tellement souvent ! C’est exactement pourquoi ce Gâteau Crémeux au Lait Concentré, réalisé entièrement au blender, est mon super-héros de cuisine. C’est le tour de magie que je sors quand le temps est compté mais que l’amour doit être grand. Laissez-moi vous montrer comment quelques ingrédients basiques et un blender peuvent créer une pure magie, douce comme un nuage.
La Belle Simplicité du Gâteau au Blender
Cette recette ressemble à un joli secret partagé entre amies. Si les gâteaux à étages ont leur place pour les grandes occasions, ce gâteau au blender parle la langue des après-midi cosy et des joies spontanées. Je l’ai testé pour la première fois il y a des années, quand ma fille voulait « faire un gâteau » avec moi mais que nous étions à court de temps et de patience. Tout jeter dans le blender semblait presque de la triche, mais le gâteau doré et parfumé qui en est sorti fut une révélation. C’est la preuve du pouvoir d’ingrédients simples et sincères qui s’assemblent de la façon la plus facile qui soit. C’est la fusion parfaite entre le goût traditionnel du fait maison et la commodité moderne sans prise de tête.
Pourquoi Vous Allez Tomber Amoureux de ce Gâteau Crémeux au Blender
Franchement, par où commencer ? Premièrement, il est incroyablement facile. Le blender fait tout le travail de mélange, et vous n’avez qu’un récipient à laver. Deuxièmement, sa texture est un rêve. La combinaison du lait concentré et du lait classique crée une miette moelleuse et tendre qui reste souple pendant des jours. Il n’est pas trop sucré, juste parfaitement réconfortant. Et troisièmement, il est très indulgent. Aucune technique sophistiquée requise, ce qui en fait une recette brillante pour les débutants et un classique fiable pour les pâtissiers aguerris comme vous et moi.
Quand Préparer ce Gâteau Onctueux
C’est votre compagnon culinaire polyvalent. Je l’adore pour un petit-déjeuner weekend tranquille avec une tasse de café. C’est une star des goûters d’après-école qui parfument la cuisine. Besoin d’un dessert de dernière minute pour un repas partagé ? Ce Gâteau Crémeux au Blender est là pour vous. Il est assez simple pour un mardi et assez délicieux à partager n’importe quel jour de la semaine.
Rassemblez Vos Ingrédients pour un Gâteau au Blender Réussi
Faisons l’inventaire des placards ! Vous avez sûrement déjà tout.
- 1 boîte (environ 395g) de lait concentré sucré
- 1 boîte de lait (utilisez la boîte vide de lait concentré pour mesurer !)
- 3 gros œufs
- 1 tasse (environ 125g) de farine de blé tout usage
- Du beurre ou de la margarine pour beurrer le moule
- Un peu de farine supplémentaire pour fariner le moule
Faciles Alternatives et Substitutions
Il vous manque quelque chose ? Ne vous inquiétez pas !
- Lait Sans Laitier : Vous pouvez utiliser votre lait végétal préféré (comme l’amande ou l’avoine) pour mesurer la « boîte de lait ». Le gâteau sera un peu moins riche mais tout aussi délicieux.
- Farine Sans Gluten : Un mélange pour pâtisserie sans gluten 1:1 peut remplacer la farine de blé. Assurez-vous simplement qu’il contient de la gomme de xanthane ou un liant similaire.
- Pour un Goût Plus Riche : Utilisez la même quantité de crème liquide entière au lieu du lait pour une version ultra-décadente.
Comment Réaliser Votre Gâteau Crémeux au Blender : Étape par Étape
Préparez-vous pour la séance de pâtisserie la plus facile de votre vie. Préchauffez votre four à 180°C. Beurrez généreusement un moule à gâteau (comme un moule rond de 20cm ou un moule à bundt), puis farinez-le en tapotant pour enlever l’excédent. Cette petite danse du beurre et de la farine est votre ticket pour un démoulage parfait.
Étape 1 : Le Mélange Magique
Place à la partie amusante ! Cassez les œufs dans le pichet de votre blender. Versez la boîte entière de lait concentré sucré, suivie de votre mesure de lait frais. Fixez le couvercle et mixez à haute vitesse pendant 30 à 45 secondes. Regardez les ingrédients se transformer en un liquide lisse et jaune pâle. Ce son est la promesse du succès ! Ensuite, ajoutez la tasse de farine. Mixez à nouveau jusqu’à ce que le mélange soit parfaitement lisse, sans aucune trace de farine sèche. Vous obtiendrez une pâte onctueuse et coulante, presque comme une crème épaisse. Astuce de pro : Si vous souhaitez ajouter une saveur comme de la vanille ou du zeste de citron, incorporez-la avec la farine pour une répartition uniforme.
Étape 2 : Direction le Four
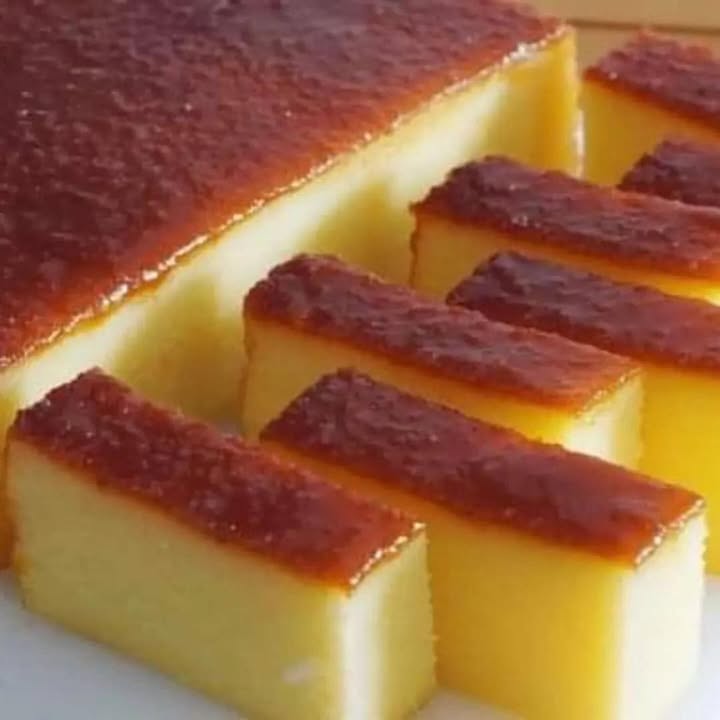
Versez délicatement la pâte dans votre moule préparé. Elle se répartira uniformément avec une petite secousse. Placez le moule au centre de votre four préchauffé. Maintenant, la partie la plus difficile : attendre ! Enfournez pour 40 à 50 minutes. Il est cuit lorsque le dessus est d’un joli brun doré, que les bords se décollent légèrement du moule, et surtout, lorsqu’un cure-dent inséré au centre en ressort propre. L’arôme qui envahit votre cuisine est un vrai paradis – sucré, lacté et réconfortant.
Étape 3 : Le Refroidissement Patient
Résistez à l’envie de démouler immédiatement ! Laissez le gâteau reposer dans son moule sur une grille pendant 10 à 15 minutes. Cela lui permet de se fixer et de raffermir juste assez pour ne pas se briser. Passez ensuite un couteau fin autour des bords pour le décoller. Placez une assiette ou une grille sur le dessus, et avec confiance (et peut-être un vœu murmuré), retournez-le. Soulevez le moule délicatement pour révéler votre magnifique gâteau crémeux doré. Laissez-le refroidir complètement avant de le découper pour des tranches bien nettes.
Astuce du Chef : Le Secret de la Texture
Pour une miette incroyablement moelleuse et fine, laissez le gâteau complètement refroidi reposer, emballé dans du film alimentaire ou dans un contenant hermétique, pendant quelques heures ou une nuit entière avant de servir. Cela permet aux saveurs de se marier et à la texture de devenir encore plus tendre et homogène. C’est un jeu de patience avec une récompense délicieuse !
Votre Guide de Temps Rapide
Cette recette est l’amie du cuisinier pressé.
- Temps de Préparation : 5 minutes
- Temps de Cuisson : 45 minutes
- Temps de Refroidissement : 1 heure (recommandé)
- Temps Total : Environ 1 heure 50 minutes
Un Petit Secret pour la Perfection
Utilisez toujours des œufs et du lait à température ambiante si possible ! Les ingrédients froids ne s’émulsionnent pas aussi bien dans le blender, ce qui peut affecter la levée et la texture du gâteau. Les sortir du frigo 30 minutes avant de commencer fait une différence notable pour créer cette pâte parfaitement lisse et crémeuse.
Une Douce Tranche d’Histoire
Les gâteaux au lait concentré ont une fière histoire dans la pâtisserie maison, surtout là où le lait frais ou le sucre raffiné n’étaient pas toujours disponibles. La boîte sucrée et stable était un trésor. Cette recette de gâteau au blender en est une belle évolution moderne, célébrant la commodité sans sacrifier l’âme fait maison du dessert.
Il Vous Faut Simplement : Un Équipement Basique
- Un blender de bonne qualité
- Un moule à gâteau (rond, carré ou à bundt)
- Une spatule en caoutchouc
- Une grille de refroidissement
- Des tasses à mesurer
Conserver Votre Délicieuse Création
Une fois complètement refroidi, ce gâteau se conserve très bien. Gardez-le dans un contenant hermétique ou bien emballé dans du film alimentaire à température ambiante jusqu’à 2 jours. Le lait concentré l’aide à retenir son humidité merveilleusement.
Si vous devez le garder plus longtemps, vous pouvez le conserver au réfrigérateur jusqu’à 5 jours. Le froid le rendra un peu plus dense, mais il restera délicieux. Laissez une tranche revenir à température ambiante pour la meilleure texture et saveur avant de servir.
Vous pouvez aussi congeler ce gâteau ! Enveloppez le gâteau entier ou des parts individuelles dans du film alimentaire, puis dans du papier aluminium. Il se conservera au congélateur jusqu’à 2 mois. Décongelez-le une nuit au réfrigérateur avant de servir.
Mes Meilleurs Conseils & Astuces pour Vous
- Parfumez-le : Ajoutez 1 c.à.c d’extrait de vanille pur ou le zeste d’un citron dans le blender avec la farine pour une délicieuse touche aromatique.
- Testez la Cuisson : Les fours varient. Commencez à vérifier à 40 minutes. Si le dessus dore trop vite mais le centre est encore humide, couvrez le gâteau légèrement d’une feuille d’aluminium.
- Soyez Créatif avec la Garniture : Une simple neige de sucre glace, un filet de dulce de leche, ou une poignée de baies fraîches au moment de servir l’élèvent instantanément.
Jolies Idées de Présentation
- Saupoudrez de sucre glace et garnissez d’une feuille de menthe pour un look classique.
- Servez avec une quenelle de crême fouettée légèrement sucrée et un coulis de fruits rouges.
- Pour une touche festive, nappez d’un glaçage simple fait de sucre glace et de jus de citron.
- Découpez en petits carrés et présentez sur un vieux présentoir à gâteau pour un goûter chic.
Variations Inspirantes à Essayer
Une fois que vous maîtrisez cette base crémeuse, un monde de saveurs vous attend ! Si vous aimez la coco, vous devez absolument essayer notre Gâteau Coco Chocolat Blanc Paradisiaque pour une touche tropicale. Pour des délices sans cuisson, notre rafraîchissant Gâteau Froid au Yaourt et aux Biscuits Maria est un sauveur d’été. Les fans de cheesecake adoreront un classique Cheesecake à la Fraise ou un irrésistible Cheesecake Oreo. Chacun est une nouvelle aventure sucrée à découvrir sur notre site.
Erreurs Courantes à Éviter pour un Gâteau Crémeux Parfait
Erreur 1 : Ne Pas Préchauffer le Four
Mettre le gâteau dans un four froid est une recette pour un désastre. La pâte va stagner et commencer à retomber avant que la chaleur n’active la levée. Cela donne une texture dense et caoutchouteuse au lieu d’une miette légère et aérienne. Laissez toujours à votre four un bon 15-20 minutes pour atteindre exactement 180°C avant d’y glisser le moule. Un thermomètre de four est un outil peu cher et inestimable pour en être sûr.
Erreur 2 : Trop ou Pas Assez Mixer
Oui, il y a un juste milieu même pour le mixage ! Ne pas assez mixer laisse des poches de farine sèche dans la pâte, qui cuiront en grumeaux désagréables. Trop mixer, surtout après avoir ajouté la farine, peut trop développer le gluten, menant à un gâteau caoutchouteux et dur. Mixez juste jusqu’à ce que le mélange soit parfaitement lisse et homogène après l’ajout de la farine. Cela prend généralement 30 à 45 secondes à grande vitesse. Arrêtez dès que vous voyez une pâte crémeuse et uniforme.
Erreur 3 : Négliger la Préparation du Moule
Beurrer le moule ne suffit pas pour ce gâteau très moelleux. La farine est votre police d’assurance. Après avoir beurré, ajoutez une cuillère à soupe de farine dans le moule et secouez, tapotez et inclinez-le jusqu’à ce que chaque surface beurrée ait un fin enrobage uniforme. Tapotez l’excédent. Cela crée une barrière anti-adhésive qui garantit que votre beau gâteau se démoulera en un seul morceau parfait, pas en tristes morceaux collés.
Erreur 4 : Ouvrir la Porte du Four Trop Tôt
Je sais, c’est tentant de jeter un œil pour voir comment va votre création ! Mais ouvrir la porte du four durant les 30 premières minutes de cuisson laisse s’échapper une énorme quantité de chaleur et peut faire tomber le centre du gâteau. Faites confiance au processus. Utilisez la lampe du four pour vérifier la couleur. N’ouvrez la porte que pour faire le test du cure-dent dans les 10 dernières minutes du temps de cuisson estimé.
Utiliser des ingrédients de qualité, comme des œufs frais et du bon lait concentré, est un moyen simple d’améliorer votre pâtisserie. Pour plus de conseils sur le choix d’aliments sains pour les repas de votre famille, des sites comme Énergie au Quotidien offrent des guides utiles sur la nutrition et la qualité des aliments.
Ce gâteau crémeux au blender n’est qu’une des nombreuses joies simples de la pâtisserie. Si vous cherchez plus d’inspiration, j’ai toute une collection de merveilleuses recettes de gâteaux et pâtisseries qui vous attendent.
Vos Questions, Répondues (FAQ)
Puis-je faire ce gâteau sans blender ?
Absolument ! Vous pouvez le faire tout aussi facilement avec un batteur électrique ou même un fouet vigoureux. La clé est de bien combiner les œufs, le lait concentré et le lait ordinaire avant d’incorporer la farine petit à petit. Le but est d’obtenir la même pâte lisse, sans grumeaux. Le blender rend juste le processus plus rapide et moins salissant, c’est son principal atout.
Pourquoi mon gâteau est-il trop dense ?
Un gâteau dense est souvent le signe d’un surplus de mélange après l’ajout de la farine, ou de l’utilisation d’ingrédients froids qui ne se sont pas bien émulsionnés. Un autre coupable courant est un four pas assez chaud ou pas assez puissant. Mesurez votre farine correctement en la versant dans la tasse à mesurer et en nivelant le dessus – ne plongez pas la tasse directement dans le paquet, car cela tasse trop la farine. Suivez les conseils pour les ingrédients à température ambiante et la bonne préparation du four pour une texture plus légère.
Puis-je ajouter du cacao pour une version chocolatée ?
Oui, vous pouvez créer un délicieux gâteau au chocolat au blender ! Remplacez ¼ de tasse de la farine de blé par de la poudre de cacao non sucrée. Tamisez la poudre de cacao avec le reste de la farine pour éviter les grumeaux avant de l’ajouter au blender. Vous voudrez peut-être ajouter 1 à 2 cuillères à soupe de lait supplémentaire à la pâte, car le cacao a tendance à absorber plus de liquide. Le résultat est un délicieux gâteau au chocolat moelleux avec la même méthode facile.
Comment savoir le moment exact où le gâteau est cuit ?
Utilisez tous les signes ensemble. D’abord, regardez : le gâteau doit être doré brun sur le dessus et commencer à se décoller légèrement des bords du moule. Ensuite, touchez : le dessus doit revenir légèrement quand vous appuyez doucement avec un doigt. Enfin, et le plus fiable, le test du cure-dent : insérez un cure-dent en bois ou une fine aiguille au tout centre du gâteau. S’il ressort propre, sans pâte crue collante (quelques miettes humides sont OK), votre gâteau est parfaitement cuit.
Mon gâteau a collé au moule. Que faire la prochaine fois ?
Ne vous inquiétez pas, cela arrive ! Pour la prochaine fois, soyez plus généreux avec le beurre pour beurrer, et assurez-vous que la couche de farine est uniforme. Vous pouvez aussi chemiser le fond du moule avec un cercle de papier sulfurisé après avoir beurré, pour un démoulage infaillible. S’il est déjà collé, réchauffez doucement le fond du moule sur une plaque de cuisson à feu doux pendant 10-15 secondes pour faire fondre légèrement le beurre, puis essayez à nouveau de passer un couteau mince et flexible ou une spatule offset autour des bords.
Puis-je utiliser cette pâte pour faire des muffins ?
Certainement ! Cette pâte fonctionne à merveille pour les muffins. Remplissez des caissettes à muffins aux ⅔. Le temps de cuisson sera beaucoup plus court – commencez à vérifier à 18-20 minutes. Ils font des treats parfaits pour les goûters ou les fêtes. La texture est merveilleusement moelleuse et ils se conservent bien.
Est-il normal que le centre s’affaisse un peu après la cuisson ?
Un léger creux au centre peut parfois arriver avec des gâteaux très moelleux et denses comme celui-ci, et ce n’est pas un problème. Cela indique généralement une extrême tendreté ! Cependant, un affaissement significatif signifie souvent que le gâteau n’était pas assez cuit, que la porte du four a été ouverte trop tôt, ou qu’il y avait trop d’agent levant (bien que cette recette n’en ait pas). Tant que votre cure-dent était propre, un petit creux est juste l’endroit parfait pour verser une délicieuse sauce aux fruits ou un peu plus de dulce de leche.
Quelle est la meilleure façon de découper ce gâteau nettement ?
Pour des tranches super nettes, utilisez un long couteau à lame fine. Passez le couteau sous l’eau très chaude, essuyez-le avec un torchon propre, puis découpez. La chaleur aide la lame à glisser dans la miette tendre sans déchirer ou coller. Essuyez et réchauffez le couteau entre chaque tranche pour une présentation parfaite.
Puis-je réduire le sucre dans cette recette ?
Le sucre provient du lait concentré sucré, qui est intégral à la structure, l’humidité et la saveur du gâteau. Je ne recommande pas de le réduire ou d’utiliser une version « allégée », car cela altérera dramatiquement la texture. Si le sucre vous inquiète, équilibrez-le en servant le gâteau avec de la crême fouettée non sucrée ou des fruits frais acidulés plutôt qu’en modifiant la recette de base.
Combien de temps puis-je laisser ce gâteau sur le plan de travail ?
Comme il contient des œufs et des produits laitiers, il est plus sûr de ne pas le laisser à température ambiante plus de 4-5 heures, surtout par temps chaud. Pour un stockage plus long, couvrez-le toujours et gardez-le au réfrigérateur. Ramenez les tranches à température ambiante avant de servir pour la meilleure expérience de saveur et de texture.
Un Dernier Mot de Ma Cuisine à la Vôtre
Et voilà – la magie d’un gâteau crémeux et onctueux qui demande si peu et donne tant. Ce Gâteau Crémeux au Blender est plus qu’une recette ; c’est un rappel que les meilleures choses dans la vie (et en pâtisserie) ne doivent pas être compliquées. C’est la joie de créer quelque chose de fait maison, avec amour et simplicité. Alors, la prochaine fois qu’une envie de sucré vous prend ou que des amis débarquent à l’improviste, souvenez-vous que votre blender est prêt à préparer une petite part de bonheur. Bon mixage, et encore meilleure dégustation !
Equipment
- Blender
- Moule à gâteau (rond, carré ou en couronne)
- Spatule en caoutchouc
- Grille de refroidissement
- Tasses à mesurer
Ingrédients
- 395 g lait concentré sucré
- 400 ml lait utilisez la boîte vide de lait concentré pour mesurer
- 3 grands œufs
- 125 g farine de blé tout usage
- Beurre ou margarine pour graisser le moule
- Farine supplémentaire pour fariner le moule
Instructions
- Préchauffez votre four à 180°C.
- Graissez un moule à gâteau avec du beurre et farinez-le.
- Dans le blender, cassez les œufs et ajoutez le lait concentré sucré et le lait.
- Mixez à haute vitesse pendant 30-45 secondes jusqu'à obtenir un mélange lisse.
- Ajoutez la farine et mixez jusqu'à ce qu'il n'y ait plus de traces de farine.
- Versez la pâte dans le moule préparé.
- Enfournez pour 40 à 50 minutes, jusqu'à ce que le dessus soit doré.
- Laissez le gâteau refroidir dans le moule pendant 10-15 minutes.
- Démoulez délicatement et laissez refroidir complètement avant de couper.
Notes
Nutrition

Je suis Céline, une véritable passionnée d’ustensiles et de matériel de cuisine ! J’adore tester, comparer et découvrir les meilleurs équipements pour rendre la cuisine plus efficace et agréable. Que ce soit un bon couteau, un robot performant ou une poêle incontournable, je suis toujours à la recherche des outils qui feront la différence. Mon but est de vous guider dans vos choix pour que vous ayez le bon matériel adapté à vos besoins.