
Cheesecake Oreo Gourmand : Une Tranche de Bonheur Sans Cuisson
Avez-vous déjà ouvert le frigo en espérant un peu de magie ? C’est exactement ce que promet ce cheesecake Oreo. C’est ma recette incontournable quand mes amis débarquent à l’improviste ou quand ma famille mérite une douceur après une longue semaine. Pas besoin de four, juste un peu de mélange, de réfrigération, et le pur plaisir de créer quelque chose de décadent. Préparons un dessert qui fait du bien comme un câlin !
Du Pot à Biscuits au Rêve de Cheesecake
L’humble biscuit Oreo est un incontournable de mon placard depuis mon enfance. Le transformer en cheesecake a semblé être une évolution naturelle et gourmande. Alors que les cheesecakes classiques ont une histoire riche, cette version sans cuisson est une touche moderne née d’un désir de simplicité et de rapidité. Elle mélange les saveurs adorées d’un biscuit avec le luxe crémeux du cheesecake, créant un dessert à la fois nostalgique et passionnément nouveau.
Pourquoi Vous Allez Adorer Cette Recette de Cheesecake Oreo
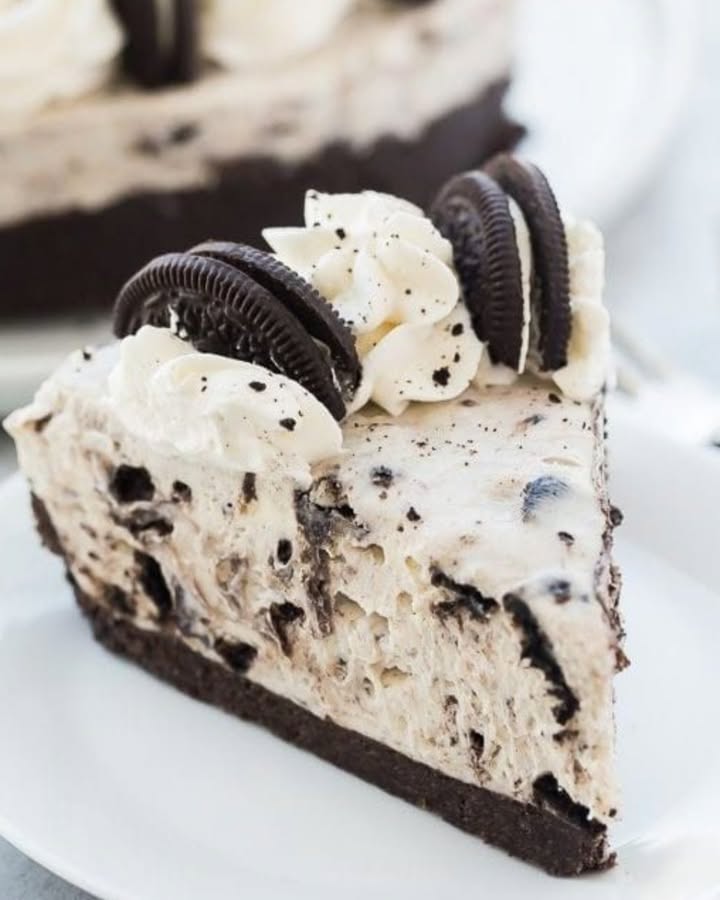
Cette recette est un rêve pour les gens pressés ! Elle ne nécessite aucune cuisson, donc pas de stress pour les dessus fissurés ou la surcuisson. La texture est incroyablement crémeuse et légère, mais riche à souhait. Le contraste entre la base croquante de biscuits, la garniture velouté parsemée de morceaux d’Oreo, et le glaçage chocolat brillant est un pur délice. C’est un dessert spectaculaire étonnamment simple à réaliser.
Les Occasions Parfaites pour Ce Dessert Gourmand
Ce cheesecake rayonne à n’importe quel rassemblement. Il est parfait pour les fêtes d’anniversaire où les enfants (et les adultes !) l’adorent. Apportez-le à un pique-nique ou un repas partagé — il voyage bien dans son moule. C’est un merveilleux dessert familial du week-end, ou une gâterie spéciale pour une soirée cinéma à la maison. Tout moment qui appelle une bouchée joyeuse à partager est la bonne occasion pour ce cheesecake Oreo.
Ingrédients pour Votre Cheesecake Oreo Gourmand
- Pour le Cheesecake : 2 tasses de biscuits Oreo (crème retirée), 1/3 de tasse de beurre fondu, 570g de fromage à la crème, 2 tasses de crème à fouetter, 1 tasse de lait concentré sucré, 1 c. à soupe de jus de citron, 1 c. à café d’essence de vanille, 14g de gélatine neutre.
- Pour le Glaçage Chocolat (Ganache) : 1 tasse de crème à fouetter, 250g de pépites de chocolat noir, 3 c. à soupe de beurre.
Options de Substitution d’Ingrédients
Ne stressez pas s’il vous manque quelque chose ! Voici des échanges faciles :
- Crème à Fouetter : De la crème de coco entière peut être utilisée pour une version sans lactose.
- Pépites de Chocolat Noir : Des pépites de chocolat au lait donneront une ganache plus douce et plus sucrée.
- Gélatine Neutre : L’agar-agar peut être utilisé comme alternative végétarienne. Suivez les instructions de l’emballage pour la quantité équivalente.
- Biscuits Oreo : Tout biscuit fourré à la crème similaire fonctionnera à merveille.
Préparation de Votre Cheesecake Oreo Gourmand
Étape 1 : Préparer la Croûte aux Biscuits
D’abord, construisons notre fondation. Tournez délicatement vos Oreos pour les séparer et grattez la crème blanche — gardez-la pour la garniture ! Réduisez les morceaux de biscuits chocolatés en miettes fines à l’aide d’un robot culinaire ou d’un sac et d’un rouleau à pâtisserie. Mélangez ces miettes avec le beurre fondu, doré, jusqu’à ce qu’elles ressemblent à du sable mouillé. Tassez fermement ce mélange au fond de votre moule à gâteau. Le frigo le raffermira, le transformant en une base croquante parfaite qui soutiendra notre rêve crémeux.
Étape 2 : Réaliser la Garniture Crémeuse aux Oreo
Passons maintenant à la star : la garniture. Dans un grand saladier, battez le fromage à la crème jusqu’à ce qu’il soit complètement lisse et pâle. Versez progressivement la crème à fouetter et le lait concentré sucré, regardant le mélange devenir luxueusement fluide. Ajoutez les crèmes d’Oreo réservées, le jus de citron acidulé et la vanille parfumée. Délayez votre gélatine selon les instructions de l’emballage, puis incorporez-la délicatement au mélange. Enfin, ajoutez une poignée de biscuits Oreo concassés supplémentaires pour créer de délicieuses poches de texture.
Astuce de pro : Assurez-vous que votre fromage à la crème est à température ambiante pour un mélange plus facile et une texture finale soyeuse.
Étape 3 : La Prise du Cheesecake
Versez votre belle garniture parsemée sur la base de biscuits qui l’attend. Utilisez une spatule pour l’étaler uniformément. Couvrez le moule et laissez reposer au réfrigérateur pendant au moins quatre heures. Cette patience est clé — la gélatine a besoin de temps pour faire sa magie, transformant le mélange liquide en un cheesecake parfaitement pris et facile à découper.
Étape 4 : Créer le Glaçage au Chocolat (Ganache)
Pendant que le cheesecake prend, préparez son couronnement. Faites chauffer la crème à fouetter dans une casserole jusqu’à ce qu’elle frémisse à peine. Retirez-la du feu et ajoutez immédiatement les pépites de chocolat noir et le beurre. Remuez doucement pendant que la chaleur fait fondre le chocolat, créant une rivière brillante et brun foncé de ganache. Laissez refroidir légèrement avant de la verser sur votre cheesecake réfrigéré, créant une couverture lisse et brillante.
Secret du chef : Une toute petite pincée de sel ajoutée à la ganache rehausse magnifiquement la saveur du chocolat.
Étape 5 : Dernier Refroidissement et Service
Remettez le cheesecake au frigo une dernière fois, le temps que la ganache durcisse en une élégante coque craquelante. Au moment de servir, découpez avec un couteau propre et légèrement tiède pour des parts parfaites. Décorez avec une pincée de miettes d’Oreo ou une touche de crème fouettée. Chaque tranche offre un voyage de la base croquante, à travers la crème moelleuse, jusqu’à la finale riche en chocolat.
Décomposition du Temps
Temps de Préparation : 25 minutes
Temps de Prise : 4 heures (minimum)
Temps de Prise de la Ganache : 30 minutes
Temps Total : Environ 5 heures
Le Secret du Chef pour la Texture Ultime
Le secret de cette garniture parfaite et sans grain réside dans la gélatine. Toujours saupoudrer la poudre de gélatine sur une petite quantité de liquide froid d’abord (comme indiqué) avant de la dissoudre avec de la chaleur. Cela empêche la formation de grumeaux et garantit une distribution uniforme, vous offrant un cheesecake constamment lisse qui garde parfaitement sa forme.
Une Anecdote Amusante sur les Oreo
Le biscuit Oreo a été lancé pour la première fois en 1912 et était vendu dans une boîte en fer. Aujourd’hui, c’est le biscuit le plus vendu au monde ! L’utiliser comme base et vedette aromatique dans un cheesecake est un délicieux hommage à son statut d’incontournable adoré.
Matériel Nécessaire
- Moule à gâteau rond de 23 cm (9 pouces) ou moule à fond amovible
- Robot culinaire ou sac congélation & rouleau à pâtisserie (pour écraser les biscuits)
- Grand saladier
- Fouet électrique ou fouet manuel robuste
- Casserole
- Spatule
Comment Conserver Votre Cheesecake Oreo
Conservez votre cheesecake couvert au réfrigérateur. Il restera frais et délicieux jusqu’à 4 jours. Le froid maintient la structure donnée par la gélatine et garde la crème fraîche.
Pour une conservation plus longue, vous pouvez congeler le cheesecake. Enveloppez le moule entier ou les parts individuelles hermétiquement dans du film alimentaire puis dans du papier alu. Il peut être congelé jusqu’à un mois. Décongelez toute une nuit au réfrigérateur avant de servir.
Conservez toujours le cheesecake à l’écart des aliments à forte odeur dans le frigo pour préserver sa saveur douce et pure.
Astuces et Conseils pour Réussir
- Pour une croûte plus nette, cheminez le fond de votre moule avec du papier sulfurisé avant d’ajouter les miettes de biscuits.
- Si votre ganache semble trop épaisse après refroidissement, réchauffez-la doucement quelques secondes pour retrouver une consistance coulante.
- Laissez le cheesecake reposer à température ambiante 10 minutes avant de découper pour des tranches plus nettes.
Idées de Présentation
- Servez chaque part sur une assiette noire pour faire ressortir les couches sombres.
- Déposez un mini biscuit Oreo entier sur le dessus pour une garniture amusante.
- Arrosez d’un filet de sauce au chocolat blanc pour un contraste visuel frappant.
- Ajoutez un accompagnement de baies fraîches pour équilibrer la richesse.
Recettes Alternatives Plus Légères
Si vous cherchez d’autres douceurs, notre site propose de nombreuses options merveilleuses. Pour un classique cuit au four, essayez ce Gâteau aux Carottes Irrésistible. Pour une touche tropicale, notre Gâteau Coco Chocolat Blanc Paradisiaque est fantastique. Si vous préférez un dessert frais à base de yaourt, ce Gâteau Froid au Yaourt et aux Biscuits Maria est rafraîchissant. Et pour un cheesecake traditionnel cuit, découvrez cette recette de Cheesecake aux Fraises Gourmand.
Erreurs Courantes à Éviter
Erreur 1 : Ne Pas Préparer Correctement la Gélatine
La gélatine nécessite une manipulation précise. Si vous l’ajoutez directement à un liquide chaud ou si vous ne la dissolvez pas complètement, elle peut créer des grumeaux caoutchouteux dans votre garniture crémeuse. Suivez toujours les instructions de l’emballage étape par étape : généralement, on la saupoudre sur de l’eau froide pour la « faire gonfler » avant de la réchauffer doucement pour la dissoudre. Cela assure une intégration en douceur et une prise parfaite.
Erreur 2 : Utiliser du Fromage à la Crème Froid
Le fromage à la crème froid est difficile à mélanger. Il peut conduire à une garniture grumeleuse et irrégulière au lieu de la texture veloutée désirée. Sortez votre fromage à la crème du frigo au moins une heure avant de commencer. Laissez-le ramollir sur le comptoir. Une fois battu, il se combinera parfaitement avec les autres ingrédients.
Erreur 3 : Sauter le Long Temps de Refroidissement
La patience est essentielle ! Les quatre heures de repos au froid ne sont pas optionnelles. La gélatine a besoin de ce temps pour structurer complètement le dessert. Si vous essayez de le découper plus tôt, la garniture sera coulante et les couches s’affaisseront. Prévoyez votre temps de préparation pour que le cheesecake puisse reposer au frigo sans être dérangé. Une nuit entière, c’est encore mieux.
Erreur 4 : Surchauffer la Ganache
Faire bouillir la crème pour la ganache peut la brûler ou faire « prendre » le chocolat, le rendant granuleux. Chauffez la crème seulement jusqu’à ce qu’elle frémisse doucement — de petites bulles juste sur les bords. Puis retirez-la du feu avant d’ajouter le chocolat. Remuez doucement jusqu’à ce que tout soit fondu et brillant.
FAQ sur le Cheesecake Oreo Gourmand
Puis-je faire ce cheesecake Oreo sans gélatine ?
Oui, vous pouvez utiliser une alternative comme l’agar-agar, un agent gélifiant végétal. Suivez les instructions de substitution sur l’emballage de l’agar-agar, car la quantité et la méthode peuvent différer de la gélatine. Le temps de prise peut aussi varier légèrement. La texture sera un peu plus ferme mais toujours délicieuse.
Comment empêcher la ganache de craquer quand je coupe le cheesecake ?
Un couteau légèrement tiède est votre meilleur outil. Passez votre couteau sous l’eau chaude et essuyez-le avant chaque tranche. La chaleur aide à trancher la ganache ferme sans la faire éclater ou la décoller de la couche crémeuse en dessous. Faites des coupes franches et rapides.
Puis-je utiliser un autre type de biscuit pour la base ?
Absolument ! Tout biscuit chocolaté similaire fonctionnera. Vous pourriez essayer d’autres biscuits chocolatés fourrés ou même des biscuits chocolat nature. La saveur changera légèrement, mais vous obtiendrez toujours une base croquante délicieuse. Assurez-vous simplement de les réduire en miettes fines pour la meilleure texture.
Est-il possible de réaliser cette recette sans lactose ?
C’est possible avec des substitutions. Utilisez des alternatives sans lactose pour le fromage à la crème et la crème à fouetter (comme celles à base de coco). Choisissez un beurre végétal. Le lait concentré sucré est plus délicat, mais vous pouvez trouver des versions sans lactose ou faire un sirop à partir de lait de coco et de sucre. Le résultat sera différent mais toujours agréable.
Pourquoi ma garniture de cheesecake n’a-t-elle pas bien pris ?
Cela pointe généralement vers un problème avec la gélatine. Vous n’en avez peut-être pas utilisé assez, ou elle n’était pas complètement dissoute avant le mélange. Une autre cause pourrait être un temps de réfrigération insuffisant. Mesurez toujours la gélatine précisément, dissolvez-la complètement, et respectez le temps complet de repos au réfrigérateur.
Puis-je ajouter d’autres saveurs à la garniture du cheesecake ?
Bien sûr ! Cette recette est une excellente toile. Vous pourriez ajouter une cuillère à soupe de café instantané pour une touche moka. Un tourbillon de beurre de cacahuète serait délicieux. Ou incorporez du chocolat à la menthe haché pour une note rafraîchissante. Ajoutez ces extras quand vous mélangez la base de fromage à la crème.
Combien de temps puis-je conserver le cheesecake au congélateur ?
Lorsqu’il est bien emballé (hermétiquement dans du film alimentaire puis du papier alu), ce cheesecake peut être congelé jusqu’à un mois. La texture peut s’adoucir légèrement à la décongélation, mais il restera très bon. Décongelez-le toujours lentement au réfrigérateur toute une nuit pour de meilleurs résultats.
Quelle est la meilleure façon de gratter la crème des Oreo ?
Un simple couteau à beurre ou une petite cuillère fonctionne bien. Ouvrez le biscuit en le tournant délicatement. Utilisez ensuite le bord du couteau ou de la cuillère pour gratter la garniture blanche de chaque moitié. Elle s’enlève facilement. Gardez toute cette garniture sucrée pour votre mélange de cheesecake — elle ajoute de la crémeux et de la saveur en plus.
Puis-je faire ce dessert en portions individuelles, par exemple dans des pots ?
Oui, c’est parfait pour des portions individuelles ! Utilisez de petits pots ou verres. Préparez la croûte et tassez-la au fond de chaque pot. Puis versez la garniture par-dessus. Le temps de réfrigération reste le même. Recouvrez de ganache. Cela fait une présentation charmante pour les fêtes ou les cadeaux.
Ma ganache est devenue trop épaisse. Que puis-je faire ?
Si votre ganache a refroidi et est devenue trop épaisse pour être versée facilement, vous pouvez la réchauffer légèrement. Remettez-la sur feu très doux ou au micro-ondes juste 10-15 secondes, en remuant constamment. Ajoutez une toute petite goutte de crème chaude supplémentaire pour la détendre si besoin. Attention à ne pas la surchauffer.
Conclusion
Ce Cheesecake Oreo Gourmand est plus qu’une recette — c’est un moment de bonheur garanti. Il apporte la joie des Oreo dans une forme luxueuse et à partager. Souvenez-vous, la grande cuisine implique souvent de comprendre comment les ingrédients travaillent ensemble. Pour plus d’informations sur la qualité des aliments et leur préparation, vous pouvez lire sur l’importance de la nutrition et du métabolisme dans la création de douceurs équilibrées. J’espère que cette recette deviendra un favori chez vous, comme elle l’est chez moi. Pour plus d’idées de desserts délicieux, explorez notre collection complète de recettes de gâteaux et pâtisseries. Maintenant, allez attraper ces Oreo et créez quelque chose de merveilleux !
Equipment
- Moule à gâteau rond de 9 pouces
- Mixeur électrique
- Grand bol
- Spatule
- Casserole
Ingrédients
- 2 tasses biscuits Oreo (sans garniture)
- 1/3 tasse beurre fondu
- 570 g fromage à crème
- 2 tasses crème fouettée
- 1 tasse lait concentré
- 1 cuillère à soupe jus de citron
- 1 cuillère à café essence de vanille
- 14 g gélatine non aromatisée
- 1 tasse crème fouettée (pour la ganache)
- 250 g pépites de chocolat noir
- 3 cuillères à soupe beurre (pour la ganache)
Instructions
- Séparez les Oreos et enlevez la garniture, puis émiettez les biscuits en miettes fines.
- Mélangez les miettes avec le beurre fondu et pressez le mélange dans le fond d'un moule à gâteau.
- Dans un grand bol, battez le fromage à crème jusqu'à l'obtention d'une consistance lisse.
- Ajoutez la crème fouettée, le lait concentré, les garnitures d'Oreo réservées, le jus de citron et l'essence de vanille, puis incorporez la gélatine dissoute.
- Versez la garniture sur la croûte des biscuits et laissez reposer au réfrigérateur pendant au moins 4 heures.
- Pour la ganache, chauffez la crème jusqu'à frémissement, ajoutez les pépites de chocolat et le beurre, puis mélangez jusqu'à ce que le tout soit lisse.
- Versez la ganache refroidie sur le cheesecake et laissez prendre au réfrigérateur une dernière fois.
- Servez le cheesecake bien frais, en garnissant avec des miettes d'Oreo ou de la crème fouettée.
Notes
Nutrition

Je suis Céline, une véritable passionnée d’ustensiles et de matériel de cuisine ! J’adore tester, comparer et découvrir les meilleurs équipements pour rendre la cuisine plus efficace et agréable. Que ce soit un bon couteau, un robot performant ou une poêle incontournable, je suis toujours à la recherche des outils qui feront la différence. Mon but est de vous guider dans vos choix pour que vous ayez le bon matériel adapté à vos besoins.