
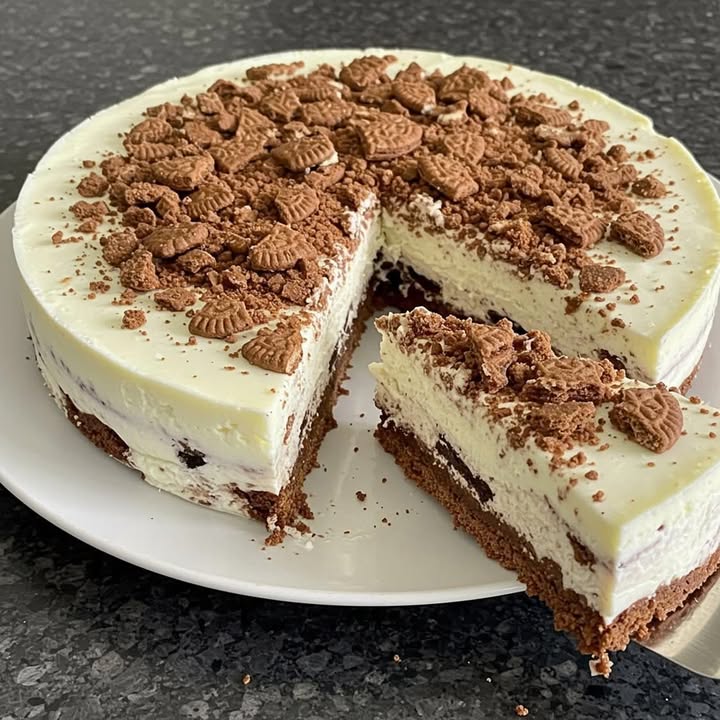
La Magie du Gâteau Yaourt Froid : Votre Sauveur de l’Été Sans Cuisson
Y a-t-il quelque chose de mieux qu’un dessert qui ressemble à un câlin frais par une journée chaude ? Je me souviens l’été dernier, mon frigo est tombé en panne juste avant un grand pique-nique en famille. Panique ! Mais je me suis alors rappelée cette planche de salut : mon Gâteau Yaourt Froid aux biscuits Maria. C’est le dessert qui ne vous laisse jamais tomber. Onctueux, léger et si simple que vous pouvez le faire les yeux à demi fermés. Pas de four, pas de transpiration, juste de la douce joie pure à chaque cuillerée.
Une Histoire de Simplicité Gourmande : De l’Inspiration Française à Ma Cuisine
L’idée de ce Gâteau Yaourt Froid vient du cœur de la pâtisserie maison française. Le classique « gâteau au yaourt » est souvent le premier projet de pâtisserie d’un enfant, mesuré avec un simple pot de yaourt. Je voulais cette même facilité, mais avec une touche rafraîchissante et crémeuse, parfaite pour nos jours plus chauds. En remplaçant le four par le frigo, en utilisant des biscuits Maria pour une base beurrée, et en incorporant de la crème fouettée aérée, il est devenu une nouvelle légende familiale. C’est une version moderne et fraîche d’une tradition bien-aimée.
Pourquoi Vous Allez Tomber Amoureux de Ce Gâteau Yaourt Sans Cuisson
Vous allez adorer cette recette parce que c’est votre arme secrète pour un dessert parfait. Premièrement, la texture est onirique—une crème au yaourt lisse rencontre des miettes de biscuits fondantes. Deuxièmement, il est impossible de le rater. Si vous savez remuer et fouetter, vous y arriverez. Et troisièmement, il plaît à tout le monde. Les enfants adorent sa douceur subtile, les adultes apprécient sa légèreté. C’est le dessert gagnant-gagnant que vous préparerez en boucle.
Quand Préparer Ce Facile Gâteau Yaourt Froid
Ce gâteau brille à toutes les occasions ! Il est parfait pour les barbecues d’été quand allumer le four semble être un crime. C’est une star des fêtes d’anniversaire pour ceux qui n’aiment pas les gâteaux trop sucrés. J’adore l’amener aux repas partagés—il voyage magnifiquement et les assiettes reviennent toujours vides. C’est aussi mon choix pour un petit plaisir du mardi « comme ça ». Il rend n’importe quel jour un peu plus spécial.
De Quoi Vous Aurez Besoin Pour Votre Gâteau Yaourt Froid
- 200 g de biscuits Maria – Le cœur simple et beurré de la base.
- 1 boîte de lait concentré sucré (environ 395 g) – Pour cette douceur irrésistible et ce corps crémeux.
- 20 cl de crème liquide entière froide (à fouetter) – Pour ajouter de la légèreté et une texture aérée.
- 4 Pots de Yaourt Nature – La star acidulée ! Utiliser les pots comme mesure garde l’authenticité.
- 8 feuilles de gélatine neutre – Notre ingrédient magique pour une prise parfaite et tranchable.
- Un peu d’huile pour le moule – Un petit coup de pinceau pour un démoulage propre plus tard.
Substitutions Astucieuses : Faites-le Vôtre !
Il vous manque un ingrédient ? Pas de problème ! Utilisez des biscuits type « petits-beurre » ou « digestive » à la place des Maria. Plus de feuilles de gélatine ? Deux sachets de gélatine en poudre (environ 14g) feront l’affaire—il suffit de les hydrater comme indiqué sur le paquet. Pour une version plus légère, vous pouvez utiliser moitié lait concentré, moitié fromage frais type St Môret. Le yaourt doit être nature et non sucré pour le bon équilibre.
Créer Votre Chef-d’œuvre Sans Cuisson : Étape par Étape
Étape 1 : Le Trempage de la Gélatine
Commencez par placer vos feuilles de gélatine dans un bol d’eau très froide. Laissez-les tremper pendant environ 5 à 7 minutes. Elles vont devenir molles, souples et translucides. Cette étape est cruciale—elle réveille la gélatine sans la laisser se dissoudre. Vous les verrez bien gonfler. Astuce de pro : Utilisez toujours de l’eau froide. L’eau tiède commencera à dissoudre la gélatine prématurément et peut affaiblir son pouvoir de prise.
Étape 2 : Créer la « Poussière » de Biscuits
Prenez ces délicieux biscuits Maria et écrasez-les en miettes fines. Vous pouvez utiliser un robot mixeur pour quelques pulsations, ou ma méthode préférée : mettez-les dans un sac fermé et passez un rouleau à pâtisserie dessus. C’est étrangement satisfaisant ! Vous voulez une texture comme du sable fin, sans gros morceaux. L’arôme de beurre et de vanille va commencer à emplir votre cuisine—une promesse de la gourmandise à venir.
Étape 3 : La Base Douce & Acidulée
Dans un grand saladier, versez vos quatre pots de yaourt nature. Ouvrez la boîte de lait concentré et savourez cette coulée épaisse et sucrée. Mélangez-les avec un fouet jusqu’à obtenir un mélange parfaitement lisse et pâle. L’acidité du yaourt et la douceur riche du lait sont déjà un mariage fait au paradis. La consistance doit être épaisse et onctueuse.
Étape 4 : Monter des Nuages Aérés
Dans un autre bol propre et froid, versez votre crème bien froide. À l’aide d’un batteur électrique ou d’un fouet, battez la crème jusqu’à ce qu’elle forme des pics mous. Cela signifie que quand vous soulevez les batteurs, la crème tient sa forme mais la pointe se courbe délicatement—n’allez pas jusqu’aux pics fermes d’une Chantilly. Nous la voulons molle pour l’incorporer facilement. Voyez ça comme créer de petits nuages aérés pour alléger tout le gâteau.
Étape 5 : Faire Fondre la Magie (Gélatine)
Égouttez vos feuilles de gélatine ramollies et pressez-les doucement pour enlever l’excès d’eau. Placez-les dans un bol allant au micro-ondes et chauffez pendant à peine 10-15 secondes, juste jusqu’à ce qu’elles soient liquides. Surveillez de près ! Sinon, faites-la fondre dans une petite casserole à feu très doux. Incorporez rapidement cette gélatine liquide à votre mélange de yaourt et de lait concentré. Mélangez bien et vite pour qu’elle se répartisse uniformément avant de commencer à prendre.
Étape 6 : La Grande Union
Maintenant, place à la partie amusante ! Prenez votre crème fouettée molle et ajoutez-la au mélange yaourt-gélatine. Utilisez une spatule et des mouvements doux et enveloppants pour l’incorporer délicatement. Vous voulez garder un maximum d’air. Ensuite, ajoutez presque toutes vos miettes de biscuits Maria (gardez une petite poignée pour la décoration). Incorporez à nouveau jusqu’à ce que ce soit juste combiné. Vous verrez de jolis tourbillons de blanc crémeux et de miettes de biscuits dorées.
Étape 7 : Préparer la Scène pour la Perfection
Graissez légèrement votre moule avec une huile neutre. Un moule à charnière (springform) fait des merveilles ici. Versez-y le délicieux mélange crémeux et granuleux. Utilisez votre spatule pour lisser le dessus. Maintenant, la patience est clé ! Placez-le au frigo pendant au moins 4 heures, mais honnêtement, toute une nuit c’est le mieux. Cela donne le temps à la gélatine de prendre fermement et à toutes les saveurs de se marier à la perfection. Ça vaut le coup d’attendre !
Étape 8 : Le Grand Final – Démoulage & Décoration
Une fois pris, passez un couteau fin sur les bords du moule. Détachez la charnière du moule à manqué. Pour plus de sécurité, vous pouvez tremper brièvement le fond du moule dans de l’eau tiède. Placez votre plat de service sur le dessus, retournez et soulevez le moule. Décorez le dessus avec des biscuits Maria entiers ou coupés en deux. Cette poussière de biscuits réservée peut être saupoudrée sur les bords. C’est beau, rustique et invitant. Astuce de chef : Pour une tranche nette, trempez votre couteau dans de l’eau chaude et essuyez-le entre chaque coupe.
Votre Investissement en Temps Pour Ce Gâteau Yaourt Sans Cuisson
- Temps de Préparation : 20 minutes (c’est vraiment rapide !)
- Temps de Prise : 4 heures minimum (Une nuit c’est idéal)
- Temps Total : 4 heures 20 minutes (principalement sans intervention)
- Parts : 8 à 10 personnes heureuses
Le Secret d’un Gâteau Yaourt Froid Impeccable
Mon arme secrète ? Égoutter le yaourt. Si vous avez un peu de temps en plus, placez votre yaourt nature dans une passoire fine tapissée d’un torchon propre au-dessus d’un bol pendant une heure ou deux au frigo. Vous enlèverez l’excédent de petit-lait, obtenant un yaourt plus épais, style grec. Cela rend le gâteau final encore plus riche et moins susceptible de rendre de l’eau, pour la texture la plus luxueuse qui soit.
Un Biscuit à la Lignée Royale
Saviez-vous que le biscuit Maria a une histoire digne d’une reine ? Il a été créé à Londres en 1874 pour célébrer le mariage du duc Alfred de Saxe-Cobourg et Gotha avec la grande-duchesse Maria Alexandrovna de Russie. Sa nature simple, durable et délicieuse en a fait un succès mondial. L’utiliser dans ce gâteau nous connecte à plus d’un siècle de tradition pâtissière de la manière la plus délicieuse et sans chichi.
Rassemblez Votre Équipement
- Grands saladiers (2)
- Fouet et spatule
- Batteur électrique ou robot (pour la crème)
- Robot mixeur ou sac fermé + rouleau à pâtisserie (pour les biscuits)
- Moule à charnière (springform) (environ 20-22 cm de diamètre)
- Petit bol pour la gélatine
Conserver Votre Gâteau Yaourt Froid
Ce gâteau est un rêve à conserver. Une fois pris, vous pouvez le garder couvert au réfrigérateur jusqu’à 4 jours. Les saveurs s’améliorent même après le premier jour. Assurez-vous qu’il soit couvert de film alimentaire ou dans un contenant hermétique pour qu’il ne prenne pas les odeurs du frigo.
Je ne recommande pas de congeler ce gâteau en particulier. Le yaourt et la crème fouettée peuvent se séparer et devenir granuleux à la décongélation, gâchant cette merveilleuse texture lisse. Il est meilleur dégusté frais du frigo.
Si vous devez le préparer à l’avance, vous pouvez préparer les miettes de biscuits et mélanger les ingrédients secs à l’avance. Mais pour les meilleurs résultats, assemblez le gâteau la veille du jour où vous prévoyez de le servir.
Astuces Utiles pour la Réussite du Gâteau Yaourt
- Assurez-vous que tous les ingrédients, surtout la crème et le yaourt, soient bien froids avant de commencer. Cela aide pour le montage et la prise.
- Quand vous incorporez délicatement, soyez doux mais complet. Vous voulez éviter de laisser des traces de crème ou de gélatine non incorporées.
- Si vous êtes pressé, vous pouvez placer le gâteau au congélateur pendant 1 à 1,5 heure pour qu’il prenne plus vite, puis le transférer au frigo. Mais le refroidissement toute une nuit reste roi.
- Pour une variante de saveur, ajoutez une cuillère à café d’extrait de vanille ou un peu de zeste de citron au mélange de yaourt.
Présenter Votre Création Onctueuse
- Servez sur un beau pied à gâteau et garnissez de fruits frais comme des framboises ou des myrtilles pour une touche de couleur.
- Nappez les assiettes individuelles avec un peu de miel ou de sauce caramel avant d’y déposer la tranche.
- Pour une touche festive, décorez avec des fleurs comestibles ou des feuilles de menthe à côté des biscuits Maria.
- Servez avec un coulis de fruits à part pour que les invités en ajoutent à leur guise.
Explorez Plus de Recettes de Gâteaux Délicieux
Si vous avez aimé cette douceur sans cuisson, notre collection de gâteaux a tant à explorer ! Pour une option aux fruits rouges vibrante, vous devez essayer ce superbe Gâteau aux Mûres avec sa purée généreuse et son buttercream. Les amateurs de chocolat vont craquer pour notre fameux Gâteau Mieux que Tout, Délicieusement Décadent imbibé de caramel. Quand vous avez envie d’un classique, ce Délice de Gâteau Carotte Irrésistible moelleux et épicé ne rate jamais. Et pour un goût des tropiques, notre élégant Gâteau Coco et Chocolat Blanc Céleste est un pur bonheur.
Erreurs Courantes à Éviter Avec Votre Gâteau Sans Cuisson
Erreur 1 : Utiliser des Ingrédients Tièdes
C’est l’écueil le plus courant. Si votre yaourt ou votre lait concentré est à température ambiante ou tiède quand vous ajoutez la gélatine fondue, elle peut commencer à prendre en grumeaux inégaux dès qu’elle touche le bol plus froid. Cela crée une texture grumeleuse et granuleuse dans votre gâteau final. Pour éviter cela, assurez-vous que tous vos ingrédients laitiers soient bien froids, sortis directement du frigo. Le contraste avec la gélatine tiède sera parfait pour un mélange lisse et uniforme.
Erreur 2 : Trop Fouetter la Crème
Nous voulons des pics mous, pas du beurre ! Fouetter la crème jusqu’à ce qu’elle soit très ferme la rend difficile à incorporer en douceur au mélange de yaourt. Vous finissez par trop mélanger pour l’incorporer, ce qui peut faire retomber la crème et rendre le gâteau dense. Arrêtez de fouetter quand la crème tient sa forme sur le fouet mais que la pointe retombe encore doucement. Elle doit être mousseuse et lisse, pas granuleuse ou grumeleuse.
Erreur 3 : Ne Pas Laisser le Gâteau Prendre Assez Longtemps
L’impatience est l’ennemi des desserts sans cuisson. Quatre heures c’est le strict minimum, mais le centre peut encore être un peu mou. Le couper trop tôt peut provoquer un effondrement. La gélatine a besoin de temps pour former un réseau ferme dans tout le gâteau. Pour une tranche parfaite et nette qui tient sur l’assiette, prévoir à l’avance et laisser prendre toute la nuit est la meilleure chose que vous puissiez faire. Faites confiance au processus !
Erreur 4 : Une Hydratation Incorrecte de la Gélatine
Ne jetez pas les feuilles de gélatine dans un fond d’eau. Elles doivent être complètement submergées dans beaucoup d’eau froide pour ramollir uniformément. Si elles sont entassées ou pas entièrement couvertes, certaines parties resteront dures et ne fondront pas bien plus tard. De plus, ne les laissez pas tremper trop longtemps (plus de 10-15 minutes), car elles peuvent commencer à se désintégrer et perdre de leur force. Visez une feuille flexible, totalement ramollie et prête à fondre.
Un Mot sur la Qualité des Ingrédients
Puisque ce Gâteau Yaourt Froid a si peu d’ingrédients, leur qualité ressort vraiment. Utiliser un bon yaourt nature entier fait toute la différence en goût et en texture. Si vous êtes curieux des aspects nutritionnels des produits laitiers dans votre alimentation, des ressources comme l’Agence nationale de sécurité sanitaire de l’alimentation, de l’environnement et du travail (ANSES) fournissent des informations précieuses sur la qualité et les bienfaits des aliments.
Cette recette fait partie de notre merveilleux monde de desserts ! Vous trouverez plus d’inspiration dans notre collection complète de recettes de gâteaux et pâtisseries où le facile rencontre le délicieux.
Vos Questions sur le Gâteau Yaourt Froid, Répondues
Puis-je utiliser du yaourt grec à la place du yaourt nature ?
Absolument, et cela vous donnera un résultat encore plus épais et crémeux. Le yaourt grec a plus de petit-lait égoutté, donc il est plus dense. Vous pourrez trouver que le mélange est un peu plus épais dès le départ, ce qui est bien. Assurez-vous simplement que c’est du yaourt grec nature, non sucré. L’incorporation délicate pourrait nécessiter un peu plus de soin pour garder de la légèreté, mais la texture finale sera riche et gourmande.
Mon gâteau n’a pas pris fermement. Qu’est-ce qui a mal tourné ?
Une prise molle pointe généralement vers la gélatine. L’avez-vous bien hydratée dans l’eau froide ? Était-elle complètement fondue avant mélange ? Peut-être que la gélatine était vieille et avait perdu de sa force. Un autre coupable pourrait être l’ajout de la gélatine à un mélange très froid, la faisant figer en grumeaux avant de pouvoir se répartir. La prochaine fois, assurez-vous que votre base de yaourt ne soit pas glaciale quand vous ajoutez la gélatine tiède et liquide, et mélangez-la rapidement et soigneusement.
Puis-je faire cette recette sans gélatine pour une version végétarienne ?
Oui, vous pouvez utiliser de l’agar-agar, un agent de prise végétal. Cependant, il se comporte différemment. Utilisez environ 1 cuillère à soupe de poudre d’agar-agar. Vous devez la dissoudre complètement dans un peu de liquide (comme de l’eau ou du lait) et l’amener à frémir pendant une minute ou deux pour l’activer, puis la mélanger immédiatement à votre base de yaourt. Notez que l’agar prend plus vite et plus ferme que la gélatine, et la texture sera légèrement différente.
Combien de Temps à l’Avance Puis-je Faire Ce Gâteau Yaourt Froid ?
C’est un dessert parfait à préparer à l’avance. Vous pouvez le préparer jusqu’à deux jours à l’avance. En fait, je recommande vivement de le faire la veille du jour où vous en avez besoin. Cela donne à toutes les saveurs le temps de se fondre parfaitement et à la texture de devenir uniformément prise. Gardez-le simplement couvert au réfrigérateur jusqu’à ce que vous soyez prêt à décorer et servir. Il se conserve très bien.
Puis-je utiliser un autre type de biscuit ?
Bien sûr ! Alors que les biscuits Maria sont classiques pour leur saveur douce et beurrée qui s’assouplit parfaitement, vous pouvez expérimenter. Les biscuits « petits-beurre », les « digestive » ou même des sablés nature fonctionnent bien. Évitez les biscuits aux saveurs fortes comme le chocolat ou les épices prononcées, sauf si vous voulez que ce soit le goût dominant. Le but est une base complémentaire qui ajoute de la texture sans écraser le yaourt crémeux.
Est-il possible de faire des portions individuelles ?
C’est une idée fantastique ! Les portions individuelles sont toujours charmantes. Vous pouvez superposer le mélange dans de petits verres ou pots pour un dessert façon parfait. Écrasez simplement les biscuits, puis créez des couches de miettes de biscuits et de crème au yaourt dans vos verres. Faites prendre comme d’habitude. Cela évite aussi complètement l’étape de démoulage et facilite le service. Ils sont très élégants aussi.
Mon lait concentré semble très épais. Est-ce normal ?
Oui, c’est parfaitement normal. Le lait concentré sucré est du lait dont environ 60% de l’eau a été évaporée, et qui est sucré. Il est censé être très épais, collant et sucré. Ne vous inquiétez pas s’il est difficile à verser—utilisez simplement une spatule pour tout racler. Son épaisseur est ce qui donne du corps au gâteau et sa saveur sucrée caractéristique sans le rendre liquide.
Puis-je ajouter des fruits à ce gâteau yaourt ?
Vous pouvez, mais soyez prudent avec les fruits frais à forte teneur en eau, comme les fraises ou la pastèque. L’eau peut s’échapper et rendre le gâteau détrempé ou l’empêcher de bien prendre. Si vous voulez des fruits, essayez d’utiliser une purée de fruit qui a été cuite pour enlever l’excès de liquide, ou utilisez des fruits en boîte bien égouttés. Les fruits secs, comme des abricots ou des raisins secs hachés, sont un choix plus sûr à mélanger.
Quelle est la meilleure façon de démouler le gâteau sans le casser ?
D’abord, utilisez toujours un moule à charnière (springform)—c’est révolutionnaire. Après réfrigération, passez un couteau fin et flexible ou une petite spatule coudée sous l’eau chaude, essuyez-le, et faites-le lentement glisser tout autour du bord du gâteau pour le détacher. Détachez la charnière du moule. Si ça colle encore, enveloppez le moule avec un torchon chaud et humide pendant 30 secondes pour réchauffer doucement les bords. Puis, soulevez soigneusement le cercle.
Puis-je parfumer le mélange au yaourt ?
Certainement ! C’est une merveilleuse base pour la créativité. Ajoutez une cuillère à café d’extrait de vanille pur, un peu de zeste de citron ou d’orange finement râpé, ou une cuillère à soupe de café instantané dissous dans une cuillère à café d’eau chaude. Pour une version chocolat, vous pourriez mélanger un peu de cacao en poudre tamisé. Ajoutez ces parfums quand vous mélangez le yaourt et le lait concentré pour qu’ils soient bien incorporés.
La Dernière Tranche
Voilà donc le secret du dessert le plus facile et le plus rafraîchissant de votre répertoire. Ce Gâteau Yaourt Froid aux Biscuits Maria est plus qu’une recette. C’est la promesse d’une douceur sans stress qui apporte des sourires. Il prouve qu’on n’a pas besoin d’équipement sophistiqué ou d’heures de travail pour créer quelque chose de vraiment délicieux. Alors attrapez votre bol, écrasez ces biscuits et préparez-vous aux compliments. Bonne pâtisserie sans cuisson !
Equipment
- Mixeur
- Moule à charnière de 20-22 cm
- Casserole
- Spatule
- Rouleau à pâtisserie
Ingrédients
- 200 g biscuits Maria
- 395 g lait concentré
- 6 g crème à fouetter
- 4 pots yaourt nature
- 8 feuilles gélatine inodore
- huile pour graisser le moule
Instructions
- Faites tremper les feuilles de gélatine dans un bol d'eau froide pendant 5-7 minutes.
- Écrasez les biscuits Maria en miettes fines, soit à l’aide d'un robot, soit en les mettant dans un sac fermé et en les roulant avec un rouleau à pâtisserie.
- Dans un grand bol, mélangez le yaourt et le lait concentré jusqu'à obtenir une consistance lisse.
- Battez la crème froide jusqu'à obtenir des pics mous.
- Chauffez légèrement les feuilles de gélatine égouttées au micro-ondes ou dans une casserole, puis incorporez-les au mélange de yaourt et de lait concentré.
- Incorporez délicatement la crème fouettée au mélange de yaourt et ajoutez la plupart des miettes de biscuits, en réservant une petite quantité pour la décoration.
- Graisser légèrement un moule et versez-y le mélange. Lissez le dessus et laissez au réfrigérateur pendant au moins 4 heures, de préférence toute une nuit.
- Une fois pris, dégraffez le moule, décorez avec les biscuits réservés et servez.
Notes
Nutrition

Je suis Céline, une véritable passionnée d’ustensiles et de matériel de cuisine ! J’adore tester, comparer et découvrir les meilleurs équipements pour rendre la cuisine plus efficace et agréable. Que ce soit un bon couteau, un robot performant ou une poêle incontournable, je suis toujours à la recherche des outils qui feront la différence. Mon but est de vous guider dans vos choix pour que vous ayez le bon matériel adapté à vos besoins.