
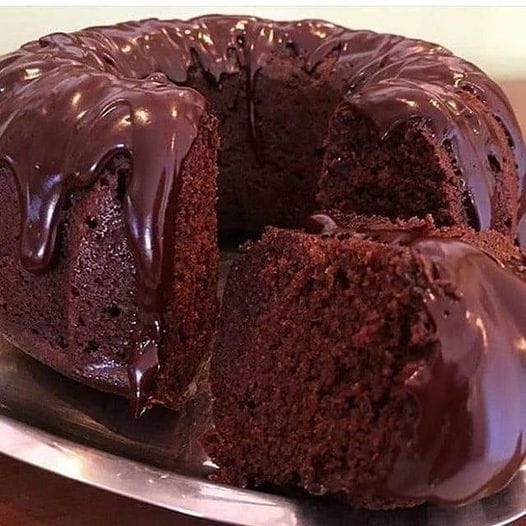
Un Morceau de Paradis Qui Impressionne à Tous les Coups
Vous connaissez ce sentiment lorsque la lumière de l’après-midi traverse la fenêtre de la cuisine et que vous avez juste besoin d’une tasse de thé et de quelque chose… de parfait ? Pour moi, ce quelque chose, c’est toujours ce gâteau au chocolat. C’est le gâteau que je sors un mercredi juste comme ça, et celui que mes amies espèrent secrètement que j’apporterai le dimanche. C’est mon Gâteau Chocolat Facile—simple, fiable et absolument délicieux. Le secret ? Il se prépare dans un seul saladier et remplit la maison d’un parfum chaleureux de chocolat qui promet un pur réconfort.
La Modeste Histoire d’un Plaisir Adoré
Alors qu’on pourrait imaginer un gâteau au chocolat décadent comme un luxe moderne, ses origines sont merveilleusement modestes. Les premières versions ressemblaient plus à des pains sucrés et denses. Ma version est un hommage à cette simplicité. C’est le genre de gâteau que les cuisinières à la maison françaises, les vraies expertes, préparent depuis des générations sans chichis. Pas besoin de techniques compliquées ou d’ustensiles coûteux. C’est un beau rappel que les meilleures choses, celles qui rassemblent les gens autour de la table, sont souvent les plus simples à réaliser.
Pourquoi Vous Allez Adorer Ce Gâteau au Chocolat Facile
Cette recette est une vraie amie en cuisine. Premièrement, elle est indulgente. Pas besoin de s’inquiéter de bien battre le beurre et le sucre jusqu’à la consistance parfaite. On mélange tout dans un seul saladier ! Deuxièmement, l’eau chaude fait un peu de magie, rendant la mie incroyablement moelleuse et renforçant la saveur du chocolat. Enfin, c’est une toile blanche. Vous pouvez le servir nature, saupoudré de sucre glace, ou généreusement nappé de ganache pour une occasion spéciale. C’est une recette qui évolue avec vous.
Quand Préparer Votre Chef-d’œuvre Chocolaté
Ce gâteau est votre valeur sûre pour presque toutes les occasions. Il est parfait pour un brunch familial décontracté le week-end. Il brille comme dessert principal pour un dîner, surtout accompagné d’une boule de glace à la vanille. C’est aussi le cadeau idéal pour souhaiter la bienvenue à un nouveau voisin ou une douceur à glisser dans une lunchbox. Franchement, tout jour qui se termine par une part de ce gâteau est un bon jour.
Ingrédients pour le Gâteau au Chocolat Facile Parfait
Voici ce dont vous aurez besoin. Tout vient du placard !
- 4 gros œufs
- 180 ml d’une huile neutre (comme tournesol ou colza)
- 200 ml d’eau chaude
- 2 tasses à thé (soit environ 400g) de sucre en poudre
- 1 tasse (environ 100g) de cacao en poudre non sucré
- 2 tasses (environ 250g) de farine de blé tout usage
- 1 cuillère à soupe d’extrait de vanille (facultatif, mais délicieux)
- 1 cuillère à soupe de levure chimique
- 1 cuillère à café de sel
Substitutions Astucieuses Selon Votre Placard
Il vous manque quelque chose ? Pas de panique ! Voici des échanges faciles.
- Huile : Vous pouvez utiliser du beurre fondu et refroidi pour une saveur plus riche.
- Cacao en poudre : Utilisez du cacao hollandisé pour un goût chocolaté plus profond et moins acide.
- Farine de blé : Pour une version sans gluten, utilisez un mélange de farine sans gluten 1:1.
- Sucre : La cassonade peut remplacer le sucre blanc pour une note caramélisée.
- Eau chaude : Le café chaud est un substitut fantastique. Il enrichit encore plus la saveur du chocolat sans donner un goût de café !
Préparons le Meilleur Gâteau Chocolat !
Retroussons nos manches et commençons. Je vous promets, c’est aussi amusant que facile.
Étape 1 : Le Mélange Sec
Prenez un grand saladier. Versez-y le sucre, le cacao en poudre brun profond et la farine blanche duveteuse. Prenez un fouet et mélangez le tout. Vous verrez les couleurs se fondre en une belle poudre parfumée. Faire cela en premier garantit qu’il n’y aura pas de grumeaux de cacao ou de farine plus tard. C’est le secret d’une pâte parfaitement lisse. Astuce de pro : Tamiser le cacao et la farine ensemble est une étape supplémentaire qui garantit une texture super fine, mais un bon fouet fait aussi des miracles !
Étape 2 : Tout Rassembler
Maintenant, faites un puits au centre de vos ingrédients secs. Cassez-y les œufs, versez l’huile, l’eau chaude, la vanille et saupoudrez le sel. Commencez à fouetter depuis le centre, en incorporant lentement le mélange sec sur les côtés. Observez la pâte se transformer d’éléments séparés en une glorieuse rivière brun foncé et brillante. Mélangez jusqu’à ce qu’elle soit complètement lisse et que vous ne voyiez plus de traces de farine. L’arôme est déjà divin.
Étape 3 : La Touche Finale
C’est la partie la plus importante ! Saupoudrez la levure chimique à la surface de la pâte. Utilisez votre fouet ou une spatule et incorporez-la délicatement. Vous voulez juste la répartir uniformément. Trop mélanger maintenant peut dégonfler la pâte et donner un gâteau dense. Voyez cela comme donner à la pâte quelques tours tendres et doux. Astuce du chef : Mélanger la levure chimique en dernier garantit que votre gâteau obtienne une levée maximale et une belle montée uniforme dans le four.
Étape 4 : Prêt pour le Four
Préchauffez votre four à 180°C (350°F). Prenez votre moule à gâteau préféré (un moule à bundt, rond ou carré, tout fonctionne) et beurrez-le bien ou huilez-le. Pour plus de sécurité, farinez-le légèrement ou saupoudrez-le d’un peu de cacao en poudre. Versez la pâte riche et foncée dans le moule préparé. Elle doit se répartir uniformément avec un ploc satisfaisant. Tapotez doucement le moule sur le plan de travail pour libérer les éventuelles bulles d’air cachées.
Étape 5 : La Magie de la Cuisson
Placez le moule au centre de votre four préchauffé. Maintenant, soyez patient ! L’odeur va tester votre volonté. Faites cuire pendant environ 45 minutes. Vous saurez qu’il est cuit lorsque le dessus revient légèrement sous votre toucher et qu’un cure-dent inséré au centre en ressort propre ou avec quelques miettes humides. Le dessus sera craquelé et glorieux. Astuce de pro : Évitez d’ouvrir la porte du four trop tôt, un courant d’air peut faire retomber le gâteau.
Étape 6 : Le Repos Crucial
Une fois cuit, sortez le gâteau du four. Laissez-le refroidir dans son moule pendant environ 15-20 minutes. Cela permet à la structure de se fixer. Passez ensuite un couteau autour des bords. Placez une grille de refroidissement sur le dessus, retournez-le avec confiance et retirez le moule. Laissez refroidir complètement avant de découper. Cette patience évite un émiettement et garantit des parts parfaites.
Votre Chronologie de Préparation
- Temps de préparation : 15 minutes
- Temps de cuisson : 45 minutes
- Temps de refroidissement : 1 heure
- Temps total : 2 heures
Le Secret du Chef pour un Maximum de Moelleux
Mon arme secrète ? Un simple sirop à badigeonner. Pendant que le gâteau est encore tiède sorti du four, mélangez une cuillère à soupe de sucre avec deux cuillères à soupe d’eau chaude. Badigeonnez doucement ce sirop sur toute la surface du gâteau. Il s’imbibe et crée une mie incroyablement moelleuse qui reste tendre pendant des jours.
Un Petit Fait Gourmand
Saviez-vous que le type de cacao en poudre fait une grande différence ? Le cacao naturel est acide et fonctionne avec le bicarbonate de soude. Le cacao hollandisé est alcalinisé et a une saveur plus douce. Cette recette utilise de la levure chimique (qui contient son propre acide), donc vous pouvez utiliser les deux types avec succès. Le cacao hollandisé donnera une couleur plus foncée et une saveur plus profonde.
Ustensiles Dont Vous Aurez Besoin
- Un grand saladier
- Un fouet robuste ou une spatule
- Des tasses et des cuillères à mesurer
- Un moule à gâteau rond de 22-24 cm (ou similaire)
- Une grille de refroidissement
Comment Garder Votre Gâteau Frais
Une fois complètement refroidi, votre Gâteau Chocolat Facile a besoin d’un abri douillet. La meilleure façon est de l’envelopper hermétiquement dans du film alimentaire ou de le placer dans un contenant hermétique. Il restera merveilleusement moelleux à température ambiante jusqu’à 3 jours.
Si vous souhaitez le garder plus longtemps, vous pouvez le congeler. Enveloppez le gâteau entier ou des parts individuelles dans une couche de film alimentaire, puis dans du papier aluminium. Il se conservera jusqu’à 3 mois. Décongelez-le à température ambiante pendant la nuit lorsque vous aurez envie d’un régal.
Ne le conservez pas au réfrigérateur, sauf si votre cuisine est très chaude et humide. Le frigo a tendance à assécher les pâtisseries. Un placard ou une armoire frais et sombre est son meilleur ami.
Astuces pour une Réussite Garantie
- Utilisez des œufs à température ambiante. Ils s’incorporent beaucoup plus facilement à la pâte.
- Assurez-vous que votre levure chimique est fraîche. Une vieille levure ne vous donnera pas cette jolie levée.
- Laissez l’eau chaude refroidir juste un peu après ébullition. Vous voulez qu’elle soit chaude, mais pas au point de cuire les œufs lors du mélange.
- Pesez votre farine si vous le pouvez. La mesurer avec une tasse peut en tasser trop. La méthode légère, où on la fait tomber en pluie, est la meilleure.
Idées de Présentation pour Épater Vos Invités
- Saupoudrez d’une couche neigeuse de sucre glace juste avant de servir.
- Servez chaque part avec une quenelle de crème fouettée maison et quelques fruits rouges.
- Nappez d’un simple glaçage ou d’une sauce caramel au beurre salé.
- Pour un anniversaire, décorez avec des copeaux de chocolat ou des vermicelles pour une touche festive.
6 Délicieuses Variantes à Essayer
Une fois que vous maîtrisez cette base, le monde est à vous ! Voici quelques variantes du classique.
- Gâteau Chocolat-Orange : Ajoutez le zeste de deux oranges dans la pâte. L’agrume illumine magnifiquement le chocolat.
- Gâteau Moka : Remplacez l’eau chaude par du café fort et chaud. C’est un classique pour une raison.
- Gâteau aux Pépites de Chocolat : Incorporez une tasse de pépites de chocolat noir dans la pâte avant la cuisson pour des poches fondantes de bonheur.
- Gâteau au Chocolat Épicé : Ajoutez une cuillère à café de cannelle et une pincée de piment de Cayenne pour un coup de pied chaud et complexe.
- Gâteau Marbré : Séparez un tiers de la pâte nature, mélangez-le avec une cuillère à soupe de cacao, et marbrez-le dans la pâte principale pour un effet magnifique.
- Gâteau au Chocolat Sans Gluten : Remplacez simplement la farine de blé par votre mélange sans gluten préféré. Le résultat est tout aussi fondant et délicieux.
Si vous cherchez d’autres valeurs sûres pour ravir vos convives, vous devez explorer ma collection de gâteaux et pâtisseries. Pour un délice différent aux noix, ces barres aux pacanes incroyables sont irrésistibles. Et quand vous avez besoin de la dose ultime de chocolat, ce gâteau au chocolat décadent est un pur paradis. Pour un clou du spectacle au petit-déjeuner ou au brunch, rien ne vaut l’odeur de roulés à la cannelle maison qui cuisent. Enfin, pour un goût de tradition portugaise, essayez de réaliser ces exquis pastéis de nata (tartelettes à la crème de Belem).
Erreurs Courantes à Éviter
Erreur 1 : Trop Mélanger Après l’Ajout de la Levure
C’est la principale cause d’un gâteau dense et dur. La levure chimique commence à agir dès qu’elle est mouillée. Si vous battez vigoureusement la pâte après l’avoir ajoutée, vous détruisez toutes les petites bulles d’air qui rendent le gâteau léger et aéré. Pour éviter cela, ajoutez la levure en dernier et incorporez-la avec juste quelques mouvements doux jusqu’à ce qu’elle soit à peine combinée. Quelques petites stries, ce n’est pas grave !
Erreur 2 : Utiliser des Ingrédients Froids
Les œufs et l’huile froids n’émulsionnent pas bien avec les ingrédients secs. Cela peut donner une pâte qui semble caillée et une texture inégale après cuisson. Sortez toujours vos œufs du réfrigérateur environ 30 minutes avant de commencer. L’huile convient telle quelle, mais les œufs à température ambiante font une différence énorme pour une pâte lisse et homogène.
Erreur 3 : Ouvrir la Porte du Four Trop Tôt
Nous avons tous été tentés de jeter un coup d’œil ! Mais ouvrir la porte du four pendant les 30 premières minutes de cuisson est une recette pour un désastre. La chute soudaine de température peut faire s’affaisser le gâteau en plein milieu. Faites confiance au processus et au minuteur. Utilisez la lumière du four pour vérifier si vous le devez. Ne faites le test du cure-dent que dans les 5-10 dernières minutes du temps de cuisson suggéré.
Erreur 4 : Sauter l’Étape du Beurre et de la Farine
Beurrer ou huiler le moule ne suffit pas pour un gâteau aussi moelleux. La farine ou le cacao en poudre crée une barrière antiadhésive. Si vous sautez cette étape, vous risquez de voir la moitié de votre beau gâteau coller obstinément au moule. Cela ne prend que 10 secondes supplémentaires. Une fine couche uniforme sur la surface graissée garantira un démoulage parfait à chaque fois.
N’oubliez pas, utiliser des ingrédients de qualité fait partie du plaisir de la pâtisserie. Choisir un bon cacao en poudre n’affecte pas seulement la saveur ; c’est un choix simple pour votre cuisine. Pour en savoir plus sur les choix positifs en cuisine, vous pouvez lire des informations générales sur la santé cardiovasculaire et la nutrition auprès de sources fiables.
Questions Fréquemment Posées
Puis-je faire ce gâteau sans œufs ?
Oui, vous pouvez ! Pour une version sans œufs, remplacez chaque œuf par ¼ de tasse de compote de pommes non sucrée ou de banane bien mûre écrasée. La texture sera légèrement plus dense et fondante, mais toujours délicieuse. Une autre excellente option est d’utiliser une poudre remplacement d’œuf du commerce mélangée à de l’eau, en suivant les instructions sur l’emballage. Le gâteau pourrait ne pas lever autant, mais la saveur du chocolat sera toujours merveilleuse.
Pourquoi mon gâteau s’est-il affaissé au milieu ?
Un gâteau qui s’affaisse est généralement le signe d’une cuisson insuffisante ou d’un excès d’agent levant. Assurez-vous que votre levure chimique est fraîche (vérifiez la date de péremption !). Assurez-vous également que la température de votre four est précise avec un thermomètre de four. Ne sortez pas le gâteau avant qu’un cure-dent inséré près du centre n’en ressorte propre. Ouvrir la porte du four trop tôt peut aussi provoquer un affaissement, car le changement soudain de température choque la structure délicate.
Puis-je utiliser du beurre fondu à la place de l’huile ?
Absolument ! Le beurre fondu et refroidi donnera au gâteau une saveur plus riche, plus classique de « beurre ». La texture sera légèrement plus dense et plus proche d’un cake, comparée à la mie ultra moelleuse et tendre que procure l’huile. C’est une question de préférence. Utilisez la même quantité en volume : 180 ml de beurre fondu. Laissez-le juste refroidir un peu pour qu’il ne cuise pas les œufs lors du mélange.
Comment savoir si le gâteau est cuit sans cure-dent ?
Pas de cure-dent ? Pas de problème. Appuyez doucement sur le dessus du gâteau avec votre doigt. S’il revient en place et ne laisse pas d’empreinte, il est cuit. Vous pouvez aussi regarder les bords ; ils commenceront à se détacher légèrement des parois du moule. Écoutez l’absence de grésillements (qui indiquent de la pâte encore humide en train de cuire). Une brochette ou même un brin de spaghetti sec peut aussi dépanner !
Mon cacao en poudre a des grumeaux. Que dois-je faire ?
Le cacao grumeleux est courant. La meilleure solution est de le tamiser avec votre farine et votre sucre au début. Si vous avez déjà mélangé et que vous voyez des grumeaux, ne paniquez pas. Vous pouvez passer la pâte finie à travers une passoire fine directement dans votre moule. Cela attrapera les grumeaux tenaces et vous donnera une pâte incroyablement lisse. C’est une étape supplémentaire, mais elle garantit des résultats professionnels.
Puis-je doubler cette recette ?
Oui, vous pouvez facilement doubler tous les ingrédients pour faire un gâteau plus gros ou deux gâteaux standard. Assurez-vous simplement de mélanger dans un très grand saladier, car le volume augmentera. Si vous cuisinez deux gâteaux, placez-les sur la même grille du four si possible, ou échangez leurs positions à mi-cuisson pour une cuisson uniforme. Le temps de cuisson pourrait nécessiter une légère augmentation, alors surveillez-les après la marque des 45 minutes.
Quelle est la meilleure façon de glacer ce gâteau ?
Ce gâteau se marie bien avec presque tous les glaçages ! Laissez-le refroidir complètement d’abord. Un simple saupoudrage de sucre glace est élégant. Un beurre au chocolat ou un glaçage ganache soyeux sont des choix classiques. Pour quelque chose de plus léger, essayez une crème fouettée stabilisée avec un peu de mascarpone. Si vous utilisez un glaçage liquide, versez-le sur le gâteau posé sur une grille de refroidissement au-dessus d’un plateau pour récupérer les gouttes.
Puis-je ajouter des ingrédients comme des noix ou des pépites de chocolat ?
Certainement ! Incorporez jusqu’à 1 tasse de vos garnitures préférées juste avant de verser la pâte dans le moule. Des noix, des pacanes ou des noisettes hachées ajoutent une belle texture. Des pépites de chocolat, des morceaux de chocolat blanc ou même des cerises séchées sont fantastiques. Enrobez-les d’une cuillerée de farine d’abord—cela les empêche de tomber au fond pendant la cuisson.
Pourquoi utilise-t-on de l’eau chaude dans la recette ?
L’eau chaude fait deux choses essentielles. Premièrement, elle « réveille » le cacao en poudre, un peu comme on réveille les épices dans de l’huile chaude. Ce processus aide à dissoudre les solides de cacao et libère toute sa saveur chocolatée profonde. Deuxièmement, le liquide chaud aide à créer une pâte plus fine qui donne une mie plus tendre et moelleuse. C’est une astuce simple qui fait une grande différence dans la texture finale.
Combien de temps puis-je conserver ce gâteau et comment ?
Conservé correctement dans un contenant hermétique à température ambiante, ce gâteau reste frais pendant 3-4 jours. Il est souvent même plus moelleux et savoureux le deuxième jour. Pour une conservation plus longue, emballez-le hermétiquement et congelez-le jusqu’à 3 mois. Ne le mettez pas au réfrigérateur, car l’air froid et sec du frigo le desséchera rapidement. Si vous l’avez glacé avec une crème périssable, la réfrigération est alors nécessaire, mais ramenez les parts à température ambiante avant de les manger.
La Dernière Part
Et voilà—mon Gâteau Chocolat Facile éprouvé et infaillible. C’est plus qu’une recette ; c’est un petit morceau de magie de cuisine que vous pouvez partager. Cela prouve que vous n’avez pas besoin d’être un pâtissier professionnel pour créer quelque chose de vraiment spécial. Alors, préchauffez ce four, rassemblez vos ingrédients simples et préparez-vous pour le meilleur moment : celui où vous coupez la première part et découvrez cette belle mie tendre. Bonne pâtisserie ! N’oubliez pas de parcourir toute mon archive d’idées sucrées dans la section gâteaux et pâtisseries pour votre prochaine aventure culinaire.
Equipment
- Grand bol de mélange
- Moule à gâteau rond de 22-24 cm
- Fouet robuste ou spatule
- Tasses et cuillères à mesurer
- Grille de refroidissement
Ingrédients
- 4 gros œufs
- 180 ml huile neutre comme l'huile de tournesol ou de canola
- 200 ml eau chaude
- 400 g sucre granulé
- 100 g cacao en poudre non sucré
- 250 g farine de blé tout usage
- 1 c.s essence de vanille optionnelle
- 1 c.s levure chimique
- 1 c.c sel
Instructions
- Dans un grand bol, mélangez le sucre, le cacao en poudre et la farine.
- Créez un puits au centre et ajoutez les œufs, l'huile, l'eau chaude, la vanille et le sel.
- Fouettez tous les ingrédients du centre tout en intégrant progressivement les secs.
- Incorporez délicatement la levure chimique.
- Préchauffez le four à 180°C.
- Graissez votre moule et versez-y la pâte.
- Faites cuire pendant environ 45 minutes.
- Laissez le gâteau refroidir dans le moule pendant 15-20 minutes.
- Déplacez-le sur une grille pour laisser refroidir complètement avant de trancher.
Notes
Nutrition

Je suis Céline, une véritable passionnée d’ustensiles et de matériel de cuisine ! J’adore tester, comparer et découvrir les meilleurs équipements pour rendre la cuisine plus efficace et agréable. Que ce soit un bon couteau, un robot performant ou une poêle incontournable, je suis toujours à la recherche des outils qui feront la différence. Mon but est de vous guider dans vos choix pour que vous ayez le bon matériel adapté à vos besoins.