
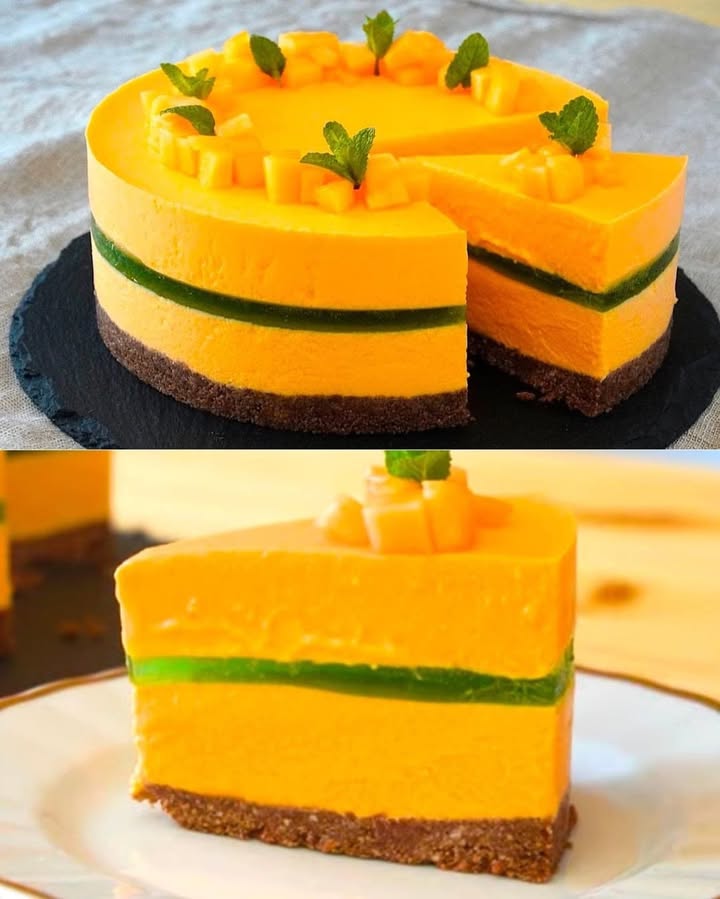
La Star de l’Été : Le Cheesecake Melon & Menthe Sans Cuisson
Il y a un moment en été où la chaleur réclame quelque chose de frais, et le marché déborde de melons mûrs et parfumés. Un après-midi comme ça, avec un melon qui semblait supplier pour être utilisé, j’ai eu une petite illumination. Pourquoi ne pas allier sa douceur sucrée avec l’onctuosité légèrement acidulée du cheesecake et une fraîche touche de menthe ? Le résultat, mes amis, est ce glorieux Cheesecake Melon Menthe sans cuisson. Ce n’est pas juste un dessert ; c’est une brise fraîche dans une assiette. Chaque fois que je le sers, que ce soit pour un BBQ familial tranquille ou une garden party chic, il disparaît en quelques minutes, tout le monde demandant : « Comment as-tu fait ça ? » Laissez-moi vous expliquer !
Une Part d’Été : D’où Vient Ce Cheesecake Melon Menthe
Les cheesecakes classiques sont généreux et riches. Je les adore, mais l’été réclame quelque chose de plus léger. J’ai toujours aimé jouer avec des garnitures à base de fruits, inspirée par les *dolci* italiens et la *pâtisserie* française. Cette recette est ma petite création, un mélange entre un cheesecake crémeux style New-York et une mousse aux fruits délicate. La base biscuit cacao apporte une profondeur surprenante, un petit secret qui contraste magnifiquement avec la fraîcheur du melon et de la menthe. C’est une version moderne et sans prise de tête qui célèbre les produits de saison. Voyez-le comme votre robe d’été préférée – d’une élégance naturelle et conçue pour le pur plaisir.
Pourquoi Ce Cheesecake Melon & Menthe Va Vous Conquérir
Vous allez tomber sous le charme de ce dessert pour tant de raisons ! D’abord, il n’y a aucune cuisson. On mélange, on laisse prendre au frais, et on regarde la magie opérer dans le frigo. La texture est incroyable – une crème onctueuse et aérée au melon, une couche gelée mentholée craquante, et cette base croustillante et chocolatée. C’est une symphonie de textures. Mais le vrai gagnant, c’est le goût. Ce n’est pas trop sucré. Le melon s’exprime pleinement, la menthe est rafraîchissante sans être envahissante, et le cream cheese apporte cette petite acidité parfaite. C’est un dessert qui semble sophistiqué mais est secrètement simple. Vos invités croiront que vous avez passé la journée dans une pâtisserie chic !
Quand Préparer Ce Chef-d’Œuvre Rafraîchissant
Ce cheesecake est votre arme secrète pour tant d’occasions ! Il est parfait pour un déjeuner dominical au jardin. Il fait sensation lors d’un brunch d’anniversaire ou d’une baby shower. Vous voulez faire chic pour un dîner en amoureux à la maison ? Il apporte l’ambiance restaurant directement sur votre table. J’adore le préparer la veille d’une fête, comme ça, une chose de moins à gérer le jour J. Il voyage bien dans une glacière aussi, ce qui en fait la star ultime des repas partagés. Tout événement qui mérite des « waouh » et des « ah » est le bon moment pour ce Cheesecake Melon & Menthe.
Rassembler Vos Trésors : La Liste des Ingrédients
Rassemblons l’équipe ! Utiliser des ingrédients frais et de qualité fait toute la différence ici.
Pour la Base du Cheesecake :
- 100g de biscuits pour le thé simples ou biscuits digestives
- 7g de cacao non sucré en poudre
- 40g de beurre fondu
Pour la Crème au Melon :
- 270g de cream cheese à tartiner (le plus gras est meilleur pour la texture)
- 100g de sucre semoule
- 270g de crème fleurette très froide
- 7g de feuilles de gélatine (environ 3-4 feuilles)
- 35g d’eau froide (pour hydrater la gélatine)
- 190g de pulpe de melon bien mûr (cantaloup ou melon miel, sans graines ni peau)
Pour la Couche Gelée à la Menthe :
- 50g d’eau
- 50g de sirop de menthe de bonne qualité
- 4g de feuilles de gélatine (environ 2 feuilles)
- 20g d’eau froide (pour hydrater la gélatine)
Pour la Décoration :
- Billes ou cubes de melon frais
- Feuilles de menthe fraîche
Substitutions d’Ingrédients : Faites-le Vôtre !
Pas de stress si il vous manque quelque chose ! Voici quelques substitutions faciles.
- Biscuits : Des graham crackers ou n’importe quel biscuit sucré nature fonctionnent.
- Melon : Essayez avec une pêche ou une mangue bien mûre pour une touche différente.
- Sirop de Menthe : Mélangez 50g de sirop simple avec 1/4 de c.à.c d’extrait pur de menthe poivrée.
- Feuilles de Gélatine : Utilisez de la gélatine en poudre. Pour la crème au melon, utilisez 1 sachet (environ 7g) hydraté dans 35g d’eau. Pour la couche menthe, utilisez environ un demi-sachet.
- Option Végétarienne : Utilisez de l’agar-agar, en suivant les instructions sur l’emballage pour la prise.
Étape par Étape : La Création de Votre Cheesecake Melon Menthe
Étape 1 : La Base Croustillante au Cacao
C’est ici que nous construisons les fondations ! Prenez vos biscuits et émiettez-les finement. Vous pouvez utiliser un robot mixeur ou simplement les placer dans un sac et les écraser avec un rouleau à pâtisserie – c’est excellent pour évacuer le stress ! Dans un bol, mélangez ces miettes sableuses avec le cacao en poudre. Ensuite, versez le beurre fondu doré. Mélangez jusqu’à obtenir une texture semblable à du sable mouillé. Tassez fermement ce mélange au fond de votre moule à charnière. Utilisez le dos d’une cuillère ou un verre pour bien le compacter. Placez-le au réfrigérateur. Ces 30 minutes de repos solidifient la base, pour qu’elle ne devienne pas détrempée quand on ajoutera nos couches crémeuses.
Astuce de pro : Pour une base ultra régulière, tassez légèrement les miettes sur les bords pour créer un petit bord.
Étape 2 : Préparer la Crème au Melon Onctueuse
Pendant que la base prend au frais, préparons la star. D’abord, faites tremper vos feuilles de gélatine dans leur bol d’eau froide. Elles vont devenir molles et branlantes. Maintenant, mixez votre pulpe de melon sucrée jusqu’à ce qu’elle soit parfaitement lisse. Dans un grand bol, battez le cream cheese et le sucre ensemble jusqu’à obtenir un mélange crémeux et sans grumeaux. Incorporez délicatement la purée de melon. Dans un autre bol, montez la crème fleurette très froide en pics souples – elle doit tenir sa forme mais rester soyeuse. Maintenant, essorez l’excès d’eau de votre gélatine ramollie et faites-la fondre doucement au bain-marie ou au micro-ondes par impulsions de 5 secondes. Mélangez une cuillerée du mélange melon-cheese dans la gélatine fondue, puis versez le tout dans le grand bol et incorporez-le. Enfin, incorporez délicatement la crème montée. Vous obtiendrez un beau nuage crémeux, duveteux et orange pâle.
Astuce de pro : Assurez-vous que votre cream cheese soit à température ambiante pour éviter les grumeaux dans votre préparation.
Étape 3 : Diviser pour Mieux Régner
C’est la partie astucieuse ! Divisez cette belle crème au melon en deux portions à peu près égales. Versez la première moitié sur votre base aux biscuits désormais prise et ferme. Lissez la surface avec une spatule. Placez maintenant le moule soigneusement au congélateur. Cette couche doit prendre juste assez pour que la gelée à la menthe ne s’enfonce pas. Environ 20-30 minutes devraient suffire. Elle doit être ferme au toucher léger.
Étape 4 : La Couche Rafraîchissante de Gelée à la Menthe
C’est le magnifique ruban vert dans notre gâteau ! Faites tremper la gélatine pour cette couche dans ses 20g d’eau froide. Dans une petite casserole, chauffez doucement les 50g d’eau avec le sirop de menthe juste jusqu’à ce qu’il soit tiède, pas bouillant. Essorez la gélatine ramollie et ajoutez-la au sirop de menthe tiède, en remuant jusqu’à dissolution complète. Laissez refroidir ce mélange pendant environ 5-10 minutes. S’il est trop chaud, il fera fondre la couche de crème en dessous. Une fois juste tiède, versez-le lentement et soigneusement sur la première couche de crème au melon bien prise. Inclinez légèrement le moule pour l’étaler uniformément. Retournez au congélateur pour une bonne prise d’au moins 30 minutes.
Étape 5 : La Dernière Couverture Crémeuse
On y est presque ! Après 30 minutes, la gelée à la menthe doit être bien prise – ce sera une couche ferme et brillante. Maintenant, prenez la moitié restante de votre crème au melon et remuez-la rapidement pour la rendre à nouveau aérée. Versez-la sur la couche de gelée à la menthe. Utilisez votre spatula pour créer de beaux tourbillons lisses sur le dessus. C’est la couche finale qui englobe magnifiquement le tout.
Étape 6 : Le Grand Refroidissement
La patience est clé ! Ce n’est pas un dessert ordinaire à prendre au frigo. Couvrez le moule de film alimentaire et laissez le cheesecake se figer au congélateur pendant 5 à 6 heures, ou idéalement toute la nuit. Ce long séjour au congélateur garantit que chaque couche prend parfaitement et rend la découpe en tranches nettes un jeu d’enfant.
Astuce du Chef : Quand il est temps de servir, transférez-le du congélateur au réfrigérateur environ 30-45 minutes avant de le découper. Cela l’adoucit pour obtenir la texture crémeuse et tranchable parfaite. Décorez avec des billes de melon frais et des feuilles de menthe juste avant de servir !
Le Timing, C’est Tout
Gérons les attentes. C’est une merveille à préparer à l’avance !
- Temps de Préparation : 30 minutes d’activité amusante en cuisine.
- Temps de Prise (Congélateur) : Les 5-6 heures cruciales (toute la nuit est mieux).
- Temps de Décongélation avant de servir : 30-45 minutes au frigo.
- Temps Total (du début à la fin) : Environ 6 à 7 heures, la plupart du temps sans intervention.
Le Secret pour une Tranche Parfaite
Mon atout secret absolu pour une tranche impeccable ? Un couteau fin et bien aiguisé trempé dans de l’eau chaude et essuyé entre chaque coupe. La chaleur glisse à travers la crème et la gelée surgelées comme par magie, vous donnant ces tranches nettes dignes d’une photo à chaque fois. C’est une astuce simple qui vous fait passer pour un pro !
Le Melon : Bien Plus Qu’une Simple Douceur
Saviez-vous que le melon est composé à plus de 90% d’eau ? C’est pourquoi il apporte une telle fraîcheur et légèreté à ce dessert. Au-delà de sa saveur, il est riche en vitamines A et C. Choisir un melon parfaitement mûr, parfumé et légèrement souple au niveau du pédoncule, est le vrai premier pas vers un Cheesecake Melon Menthe inoubliable. C’est une façon fantastique de déguster un fruit sous une forme nouvelle et décadente, tout en restant attentive à de bonnes habitudes alimentaires qui célèbrent les ingrédients frais.
Votre Boîte à Outils de Cuisine
Pas besoin de matériel sophistiqué !
- Un moule à charnière de 18-20cm (pour un démoulage facile !)
- Un robot mixeur ou un rouleau à pâtisserie et un sac pour écraser les biscuits
- Des bols de mélange (de différentes tailles)
- Un batteur électrique manuel ou un fouet
- Une spatule
- Une petite casserole
- Un blender ou un mixeur plongeant pour la pulpe de melon
Comment Prendre Soin de Votre Cheesecake
Ce cheesecake vit au congélateur, c’est certain. Une fois complètement pris après les 5-6 heures initiales, vous pouvez le conserver jusqu’à 2 semaines. Enveloppez-le bien dans du film alimentaire pour l’empêcher d’absorber les odeurs du congélateur.
Quand vous êtes prêt à servir, ne le laissez pas à température ambiante. Placez-le du congélateur au réfrigérateur 30-45 minutes avant de le découper. Cela lui permet de s’adoucir pour obtenir la texture mousseuse et crémeuse idéale.
Une fois décoré et servi, tout reste (s’il en reste !) doit retourner au congélateur. La décoration avec des fruits frais est mieux ajoutée juste avant de servir pour qu’elle reste fraîche et appétissante.
Mes Meilleurs Conseils pour une Réussite Garantie
- Préparation du Melon : Assurez-vous que votre purée de melon soit absolument lisse. Passez-la au tamis s’il reste des fibres pour une crème des plus soyeuses.
- Soin de la Gélatine : Ne faites jamais bouillir la gélatine directement ; elle perd son pouvoir gélifiant. Faites-la toujours fondre doucement.
- Montage de la Crème : Montez votre crème en pics souples. Trop la monter la rendra granuleuse et difficile à incorporer.
- Patience entre les Couches : Ne précipitez pas la congélation entre les couches. Une couche de gelée à la menthe bien prise est la clé d’une belle séparation.
- Démoulage : Passez un chiffon chaud et humide sur l’extérieur du moule à charnière avant de déclipser le bord pour un démoulage net.
Présenter Votre Chef-d’Œuvre
Faites-en un régal pour les yeux !
- Décorez avec des petites billes de melon et des brins de menthe fraîche.
- Ajoutez un léger filet de sirop de menthe sur l’assiette.
- Servez sur une assiette préalablement refroidie pour qu’il reste frais plus longtemps.
- Agrémentez de fleurs comestibles pour une occasion vraiment spéciale.
- Utilisez un présentoir à gâteau pour le mettre en valeur sur votre table.
Vous Aimez Cette Recette ? Essayez Ces Variations Sympas !
Si vous êtes tombé sous le charme de cette méthode sans cuisson, vous devez explorer plus loin ! Notre site est plein d’idées de desserts merveilleux tout aussi délicieux. Pour un autre succès sans cuisson qui plaît à tous, vous devez essayer ce classique et absolument délicieux gâteau cookies – c’est un favori de la famille. Les amateurs de chocolat, vous allez vous régaler avec ce dessert luxueux au chocolat et à la fraise avec meringue, un véritable péché mignon. Pour une idée de petit-déjeuner ou brunch fun, ces Roulés Pain Perdu à la Cannelle vont tout changer. Et si vous préférez les fruits rouges, ce magnifique gâteau fraise et cream cheese est une pièce maîtresse superbe pour toute réception.
Pour plus d’inspiration, parcourez toutes nos recettes de gâteaux et pâtisseries, où vous trouverez d’innombrables recettes pour sucrer votre journée.
Versions Plus Légères du Cheesecake Melon Menthe
Vous pouvez facilement alléger ce dessert sans perdre son charme ! Voici six idées :
- Version Moins Sucrée : Remplacez le sucre dans la crème au melon par un édulcorant naturel comme l’érythritol ou le fruit du moine. Utilisez un sirop de menthe sans sucre pour la couche gelée.
- Base Sans Gluten aux Noix : Remplacez les biscuits par 100g d’amandes moulues, mélangées à 1 c.à.s de cacao et liées avec un peu plus de beurre fondu ou d’huile de coco. Cela ajoute une texture et des protéines.
- Délices Végans : Utilisez un cream cheese vegan et montez de la crème de coco bien froide et pleine de matière grasse à la place de la crème laitière. Faites prendre les couches avec de l’agar-agar en suivant les instructions sur l’emballage.
- Crème Plus Légère à la Ricotta : Substituez la moitié du cream cheese par de la ricotta fraîche, bien égouttée, pour une texture légèrement plus granuleuse et riche en protéines.
- Infusion Herbacée : Infusez l’eau pour la gelée à la menthe avec du basilic frais ou de la citronnelle au lieu du sirop, en adoucissant légèrement avec du miel ou du sirop d’agave pour une note plus naturelle et herbacée.
- Douceur Uniquement par les Fruits : Utilisez un melon super mûr et très sucré et mixez-le avec des dattes dénoyautées et trempées pour sucrer la crème naturellement, en évitant le sucre ajouté.
Erreurs Courantes à Éviter
Erreur 1 : Ne Pas Laisser Prendre les Couches Correctement
C’est le piège le plus fréquent. Verser la gelée à la menthe sur une crème au melon encore molle fera se mélanger les couches et donnera un aspect trouble. La première couche de crème doit être suffisamment ferme pour supporter la gelée liquide. Respectez toujours le temps au congélateur. Un bon test est de toucher doucement la surface ; elle ne doit pas être collante ni céder. Cette patience garantit ces belles rayures distinctes dans votre tranche finale.
Erreur 2 : Utiliser un Melon Aqueux ou Pas Mûr
Le goût et la texture de votre crème dépendent entièrement du melon. Un melon pas mûr manque de sucre et de parfum, ce qui donne une crème fade. Un melon trop mûr ou aqueux rendra la crème trop liquide et l’empêchera de bien prendre, même avec de la gélatine. Choisissez un melon lourd pour sa taille, parfumé au niveau du pédoncule, et qui cède légèrement sous la pression. Cela garantit un goût maximal et la bonne consistance pour une garniture parfaite et tranchable.
Erreur 3 : Mal Manipuler la Gélatine
La gélatine est délicate. La faire tremper dans l’eau chaude ou faire bouillir le mélange après l’avoir ajoutée détruira son pouvoir gélifiant, vous laissant avec une soupe. Utilisez toujours de l’eau froide pour le trempage. Faites fondre la gélatine ramollie sur un feu doux (un bain-marie est plus sûr) ou au micro-ondes par très courtes impulsions, en remuant jusqu’à dissolution complète. De plus, toujours la tempérer en mélangeant une petite quantité de votre préparation tiède (pas chaude) dans la gélatine fondue avant de tout incorporer. Cela évite qu’elle ne forme des grumeaux.
Erreur 4 : Trop Monter la Crème
Nous voulons des pics souples et gonflants pour la crème au melon, pas du beurre ferme ! Monter la crème jusqu’à ce qu’elle soit très ferme la rend difficile à incorporer harmonieusement au mélange cheese-melon. La texture finale peut devenir granuleuse ou grumeleuse. Arrêtez de fouetter dès que la crème tient sa forme sur le fouet et a un aspect doux et soyeux. Elle doit encore avoir un léger mouvement. Cela s’incorpore parfaitement pour une mousse légère et aérée.
Erreur 5 : Sauter le Long Séjour Final au Congélateur
L’impatience est l’ennemi ici. Quelques heures au réfrigérateur ne suffisent pas pour que ce cheesecake prenne complètement et se tranche proprement. Le séjour prolongé au congélateur (minimum 5-6 heures) est non-négociable. Il solidifie toutes les couches de part en part, assurant que votre gâteau garde sa forme quand vous ouvrirez le moule et le découperez. Essayer de le couper trop tôt donnera un dessert brouillon et affaissé. Anticipez – toute la nuit est la méthode la meilleure et la moins stressante.
Vos Questions, Répondues !
Puis-je faire ce cheesecake totalement sans produits laitiers ?
Absolument ! Vous pouvez créer une délicieuse version vegan. Utilisez un substitut de cream cheese végétal de bonne qualité. Pour la crème, choisissez une crème de coco pleine de matière grasse qui a passé une nuit au frigo ; montez uniquement la partie solide. Assurez-vous que votre base de biscuits utilise une margarine végétale. La clé est d’utiliser de l’agar-agar à la place de la gélatine pour la prise, en suivant attentivement les instructions de conversion sur l’emballage, car il prend à température ambiante et se comporte différemment. Le goût sera tout aussi frais et délicieux.
Quel type de melon fonctionne le mieux pour cette recette ?
Le cantaloup (ou melon Charentais) est mon premier choix. Il a un arôme intense, sucré et légèrement musqué qui résiste magnifiquement au cream cheese et à la menthe. Les melons Galia ou honeydew sont d’excellentes alternatives, offrant une saveur légèrement plus douce et sucrée. Le plus important est la maturité. Un melon mûr doit sentir bon au niveau du pédoncule, sembler lourd pour sa taille, et céder légèrement à la pression. Évitez la pastèque, car sa texture et sa teneur en eau sont trop différentes.
Combien de temps à l’avance puis-je préparer le cheesecake ?
Ce dessert est fantastique à préparer à l’avance ! Une fois assemblé et bien pris (après les 5-6 heures initiales au congélateur), vous pouvez le conserver bien emballé au congélateur jusqu’à 2 semaines sans perte de qualité. Les saveurs se marient même mieux avec le temps. Le jour où vous prévoyez de le servir, transférez-le simplement du congélateur au réfrigérateur 30-45 minutes avant de vouloir le découper et le servir. Décorez avec du melon et de la menthe frais à la toute dernière minute pour qu’ils restent éclatants.
Pourquoi ma couche de gelée à la menthe n’a-t-elle pas pris fermement ?
Une couche de gelée trop liquide indique généralement un problème avec la gélatine. Les causes les plus fréquentes sont : ne pas mesurer correctement la gélatine, ne pas dissoudre complètement la gélatine fondue dans le mélange sirop de menthe, ou ajouter le mélange alors qu’il était encore trop chaud (ce qui peut affaiblir la gélatine). Une autre possibilité est de verser la gelée sur une couche de base qui n’était pas assez ferme, faisant légèrement mélanger les liquides. Assurez-vous de suivre chaque étape précisément, surtout les temps de congélation entre les couches, pour un résultat parfait.
Puis-je utiliser une autre saveur à la place de la menthe ?
Bien sûr ! La couche à la menthe apporte une note rafraîchissante, mais vous pouvez la personnaliser. Essayez avec un sirop de citron ou de citron vert avec un peu de zeste pour une touche acidulée. Un trait de purée de fruit de la passion mélangé à un peu de sirop serait tropical et acidulé. Même une fine couche de chocolat noir fondu ou un coulis de fruit comme la framboise fonctionnerait à merveille. Maintenez simplement le même ratio liquide/gélatine pour assurer une prise correcte sur la première couche de crème.
Mon mélange de cream cheese est grumeleux. Comment puis-je le rattraper ?
Un cream cheese grumeleux est presque toujours dû au fait qu’il est trop froid. Sortez toujours votre cream cheese du réfrigérateur au moins 30-60 minutes avant de commencer, pour qu’il atteigne la température ambiante. Si vous avez encore des petits grumeaux après mélange, vous pouvez passer toute la préparation au tamis fin. Pour le résultat le plus lisse, utilisez un batteur électrique manuel pour battre le cream cheese à température ambiante avec le sucre pendant une bonne minute ou deux jusqu’à ce qu’il soit complètement lisse et crémeux avant d’ajouter quoi que ce soit d’autre.
Dois-je absolument utiliser un moule à charnière ?
Bien qu’un moule à charnière soit fortement recommandé car il rend le démoulage de ce dessert délicat incroyablement facile, vous pouvez utiliser un moule à gâteau ordinaire avec un fond amovible. Si vous n’avez qu’un moule plein, tapissez le fond et les bords avec du papier sulfurisé en laissant dépasser, créant des « poignées » pour soulever le cheesecake entier une fois surgelé. Soyez très délicat, car cela peut être délicat. Le moule à charnière est vraiment l’outil idéal pour ce travail.
Comment obtenir un dessus de cheesecake ultra lisse ?
Pour une finition lisse comme un miroir, après avoir versé votre dernière couche de crème au melon, tapotez doucement le moule sur le plan de travail quelques fois pour faire remonter les bulles d’air. Ensuite, utilisez une spatule coudée ou le dos d’une cuillère trempée dans de l’eau chaude, essuyée, pour lisser la surface. Commencez au centre et glissez vers l’extérieur. La chaleur aide à créer un dessus uniforme et lisse comme du verre. Vous pouvez aussi passer un doigt propre ou un petit outil le long du bord intérieur pour séparer toute crème collée au moule pour un aspect plus net après congélation.
Est-il possible de faire ce cheesecake sans gélatine pour une version végétarienne ?
Oui, les amis végétariens peuvent en profiter aussi ! Remplacez les feuilles de gélatine par de la poudre ou des flocons d’agar-agar. L’agar-agar est un agent gélifiant d’origine végétale issu des algues. Il prend plus fermement que la gélatine et à température ambiante. La substitution n’est pas du 1:1, vous devez donc suivre attentivement les instructions de conversion sur votre emballage d’agar-agar. Typiquement, vous devrez porter le liquide (purée de melon pour la crème, mélange sirop de menthe pour la gelée) à frémissement avec l’agar-agar pour l’activer avant de l’incorporer à votre recette.
La base est trop dure/trop friable. Qu’est-ce qui n’a pas marché ?
Cela revient généralement au ratio beurre/miettes. Si elle est trop dure et compacte, vous avez probablement utilisé trop de beurre. Si elle est trop friable et ne tient pas, vous n’en avez pas utilisé assez. Le mélange doit ressembler à du sable mouillé et tenir quand vous le pressez entre vos doigts. S’il est trop sec, ajoutez du beurre fondu une cuillère à café à la fois. S’il est trop humide, ajoutez quelques miettes de biscuits supplémentaires. Aussi, tassez-le fermement et uniformément dans le moule ; une bonne couche compacte est la clé d’une base qui garde sa forme à la découpe.
Allez-y et Créez !
Et voilà – le guide complet pour créer un Cheesecake Melon Menthe éblouissant, rafraîchissant et inoubliable. Cette recette est plus qu’une simple liste d’étapes ; c’est une invitation à jouer en cuisine et à créer quelque chose de magique. C’est s’approprier les saveurs de l’été, savourer le processus et partager quelque chose fait avec amour. Ne soyez pas intimidé par les couches ou le temps de prise. Chaque étape est simple, et la récompense est un dessert qui a l’air de sortir de la vitrine d’une pâtisserie. Alors attrapez ce melon bien mûr, rassemblez vos ingrédients et préparez-vous à recevoir des compliments. Croyez-moi, cela deviendra votre gourmandise signature de l’été. Bonne pâtisserie sans cuisson !
Equipment
- Mixeur
- Moule à charnière de 18-20 cm
- Petite casserole
- Spatule
- Mixeur plongeant
Ingrédients
- 100 g biscuits simples ou digestifs
- 7 g poudre de cacao non sucrée
- 40 g beurre fondu
- 270 g fromage à tartiner préférablement entier
- 100 g sucre granulé
- 270 g crème fraîche épaisse froide
- 7 g feuilles de gélatine environ 3 à 4 feuilles
- 35 g eau froide pour faire tremper la gélatine
- 190 g pulpe de melon mûr melon cantaloup ou miel, sans graines ni peau
- 50 g eau
- 50 g sirop de menthe de bonne qualité
- 4 g feuilles de gélatine environ 2 feuilles
- 20 g eau froide pour faire tremper la gélatine
- 1 c.s. boules ou cubes de melon frais pour la décoration
- Quelques feuilles de menthe fraîche pour la décoration
Instructions
- Écrasez les biscuits en miettes fines et mélangez-les avec le cacao et le beurre fondu.
- Pressez ce mélange au fond d'un moule à charnière et mettez au réfrigérateur pendant 30 minutes.
- Faites tremper les feuilles de gélatine pour la crème de melon dans de l'eau froide.
- Purée de la pulpe de melon jusqu'à obtenir une texture lisse.
- Battez le fromage à tartiner et le sucre jusqu'à consistance crémeuse, puis incorporez la purée de melon.
- Fouettez la crème jusqu'à obtenir des pics souples et incorporez-la délicatement au mélange.
- Faites fondre la gélatine dans un peu d'eau chaude, puis mélangez une cuillère du mélange de melon avant de tout combiner.
- Répartissez la crème de melon sur la croûte et mettez au congélateur pendant 20-30 minutes.
- Préparez la couche de gelée de menthe en dissolvant la gélatine dans le mélange d'eau chaude et de sirop de menthe.
- Une fois le mélange refroidi, versez-le sur la couche de crème de melon et congelez pendant 30 minutes.
- Ajoutez le reste de la crème de melon sur la couche de menthe, lissez avec une spatule.
- Couvrez et laissez le cheesecake prendre au congélateur pendant 5-6 heures ou idéalement toute la nuit.
- Avant de servir, transférez au réfrigérateur pendant 30-45 minutes pour adoucir.
Notes
Nutrition

Je suis Céline, une véritable passionnée d’ustensiles et de matériel de cuisine ! J’adore tester, comparer et découvrir les meilleurs équipements pour rendre la cuisine plus efficace et agréable. Que ce soit un bon couteau, un robot performant ou une poêle incontournable, je suis toujours à la recherche des outils qui feront la différence. Mon but est de vous guider dans vos choix pour que vous ayez le bon matériel adapté à vos besoins.