
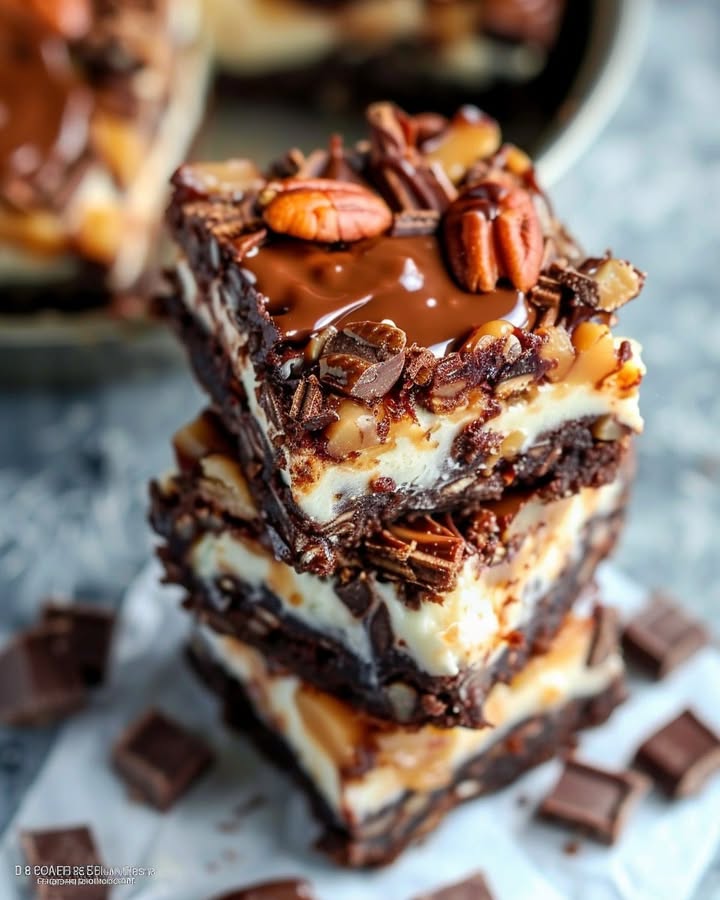
L’ultime dessert qui fait sensation : les Barres Brownie Cheesecake au Caramel et aux Noix
Avez-vous déjà vécu un de ces moments où vous prenez une bouchée de quelque chose de tellement décadent, d’un équilibre parfait entre sucré, salé et riche, que vous devez fermer les yeux une seconde ? C’est ma réaction officielle de dégustation à ces Barres Brownie Cheesecake façon « Turtle ». Imaginez le moelleux intense d’un brownie classique, marbré de la fraîcheur crémeuse et légèrement acidulée d’un cheesecake, le tout généreusement nappé d’une rivière de caramel coulant, de noix de pécan croquantes et de pépites de chocolat noir. Ce n’est pas juste un dessert ; c’est toute une ambiance. Je les ai préparées pour la première fois pour mon club de lecture, et disons simplement que la discussion sur le roman a été très, très courte. Tout le monde voulait juste connaître la recette !
Un peu d’histoire : quand les saveurs s’entrechoquent
Si le combo spécifique « turtle » – chocolat, caramel et pacanes – aurait été inventé par des confiseurs au début des années 1900, le génie de l’associer à un cheesecake et un brownie est une merveille moderne de la pâtisserie maison. C’est le beau résultat de notre amour collectif pour les desserts hybrides. Nous avons pris la satisfaction dense et chocolatée d’un brownie, nous l’avons mariée à la richesse élégante d’un cheesecake style New-York, et nous l’avons couronnée de la gloire sucrée et croquante des bonbons « turtle ». C’est un exemple classique d’évolution d’un dessert, où des saveurs traditionnelles reçoivent une mise à niveau luxueuse et multi-textures, à la fois familière et passionnément nouvelle.
Pourquoi vous allez tomber follement amoureux de cette recette
Premièrement, elle est incroyablement indulgente. Pas de bain-marie pour le cheesecake, pas de tempérage délicat du chocolat. Les couches sont simples et s’assemblent dans un seul moule. Deuxièmement, c’est un rêve de textures. Vous obtenez le bord légèrement croustillant du brownie, le cheesecake onctueux comme du velours, et le croquant fantastique des noix de pécan. Enfin, c’est le plaisir garanti pour tous. Que ce soit pour un buffet, un anniversaire ou juste un « je-le-mérite-ce-mercredi », ces barres font se sentir tout le monde spécial. Elles ont l’air d’être achetées dans une pâtisserie chic, mais le secret, c’est à quel point elles sont simples à réaliser.
Les occasions parfaites pour ces barres décadentes
C’est votre dessert-arme secrète. Apportez-le aux fêtes de fin d’année où il trônera fièrement à côté de la tarte à la citrouille. C’est un succès garanti aux ventes de pâtisseries (coupez-les petit, elles sont riches !). C’est le cadeau « merci » parfait pour un voisin ou la star de votre soirée entre copines. Honnêtement, toute occasion qui appelle à une petite célébration ou du réconfort est améliorée avec un moule de ces barres brownie cheesecake au caramel sur la table.
Rassembler vos ingrédients
Voici ce dont vous aurez besoin pour créer ce chef-d’œuvre. Je recommande d’avoir tous les ingrédients à température ambiante pour un mélange plus lisse, surtout le fromage à la crème et les œufs.
Pour la couche brownie :
- 115 g de beurre non salé, fondu (1/2 tasse)
- 200 g de sucre blanc (1 tasse)
- 2 gros œufs
- 1 cuillère à café d’extrait de vanille
- 35 g de cacao non sucré en poudre (1/3 tasse)
- 65 g de farine tout usage (1/2 tasse)
- 1/4 de cuillère à café de sel
- 1/4 de cuillère à café de levure chimique
Pour la couche cheesecake :
- 450 g de fromage à la crème (type Philadelphia), ramolli (2 blocs de 225g)
- 100 g de sucre blanc (1/2 tasse)
- 2 gros œufs
- 1 cuillère à café d’extrait de vanille
Pour la garniture :
- 175 g de pépites de chocolat mi-sucré (1 tasse)
- 100 g de noix de pécan concassées (1 tasse)
- Environ 300 g de sauce caramel (1 tasse) (du commerce ou maison)
Substitutions faciles d’ingrédients (Pas de panique !)
Il vous manque quelque chose ? Pas de souci ! Voici comment adapter :
Farine : Pour une version sans gluten, un mélange pour pâtisserie sans gluten 1:1 fonctionne parfaitement dans la couche brownie.
Noix : Vous n’aimez pas les pacanes ? Essayez les noix ou les amandes, ou même omettez-les pour une version sans noix.
Sauce caramel : Un doux de leche épais est un substitut fantastique à la sauce caramel.
Pépites de chocolat : Des pépites de chocolat au lait ou de chocolat noir peuvent être utilisées à la place du mi-sucré selon vos préférences.
Étape par étape : Construisez votre chef-d’œuvre « Turtle »
Mettons-nous à cuisiner ! Suivez ces étapes pour obtenir des barres parfaites et bien superposées à chaque fois.
Étape 1 : Préparation et base brownie
Commencez par préchauffer votre four à 180°C (350°F). C’est crucial pour une cuisson uniforme. Prenez un moule à gâteau de 22×33 cm (9×13 pouces) et tapissez-le de papier sulfurisé, en laissant dépasser un peu les bords. Cette « élingue » de papier sera votre meilleure amie plus tard pour soulever toute la dalle de barres et les couper facilement. Vaporisez rapidement le papier avec un peu de spray antiadhésif. Maintenant, pour la couche brownie : dans un grand saladier, fouettez ce magnifique beurre fondu avec le sucre jusqu’à ce que le mélange ressemble à du sable humide. Ajoutez les œufs et la vanille, et fouettez énergiquement jusqu’à ce que le mélange soit lisse et légèrement brillant. Tamisez directement dans le saladier la poudre de cacao, la farine, le sel et la levure chimique. Incorporez le tout délicatement avec une spatule jusqu’à ce que ce soit juste combiné – vous obtiendrez une pâte épaisse, foncée et invitante. Étalez ce mélange de manière uniforme dans votre moule préparé. L’odeur de cette pâte à brownie crue est déjà une victoire.
Étape 2 : La couche cheesecake luxueuse
Maintenant, attrapez votre robot pâtissier ou vos batteurs électriques et un nouveau saladier. Placez-y le fromage à la crème ramolli et battez à vitesse moyenne pendant une bonne minute jusqu’à ce qu’il soit parfaitement lisse et sans grumeaux. Astuce de pro : des grumeaux dans votre fromage à la crème maintenant signifient des grumeaux dans votre cheesecake cuit plus tard, alors prenez votre temps ici. Ajoutez le sucre et battez à nouveau jusqu’à ce que ce soit crémeux. Ajoutez les œufs, un par un, en laissant chacun s’incorporer complètement avant d’ajouter le suivant. Enfin, versez la vanille et mélangez juste jusqu’à ce que tout soit uniforme, pâle et crémeux comme un rêve. Versez ce mélange soigneusement sur votre couche de brownie. Utilisez une spatule coudée ou le dos d’une cuillère pour l’étaler doucement jusqu’aux bords, recouvrant complètement le brownie foncé en dessous.
Étape 3 : Cuisson à la perfection
Glissez votre moule dans le four préchauffé. Faites cuire pendant 35 à 40 minutes. Vous cherchez à ce que la couche cheesecake soit « prise » – elle doit trembler juste un tout petit peu au tout centre quand vous secouez doucement le moule, mais les bords seront légèrement dorés et gonflés. Un cure-dent inséré dans la partie brownie (si vous arrivez à la trouver !) doit ressortir avec des miettes humides, pas de la pâte liquide. Astuce du chef : Évitez la surcuisson ! La chaleur résiduelle continuera à cuire les barres pendant qu’elles refroidissent. Les retirer au bon moment garantit une texture de cheesecake crémeuse, et pas caoutchouteuse.
Étape 4 : Le refroidissement et l’extravagance de la garniture
C’est la partie la plus difficile : la patience. Laissez le moule refroidir complètement sur une grille. Une fois à température ambiante, placez-le au réfrigérateur pendant au moins 2 heures, voire toute la nuit. Cette étape de réfrigération est non négociable – elle raffermit le cheesecake et permet de découper de belles barres. Quand vous êtes prêt à servir, versez la sauce caramel sur la surface froide. Regardez-la cascader et s’étaler – c’est tellement satisfaisant ! Parsemez généreusement les noix de pécan concassées et les pépites de chocolat sur le caramel. La chaleur de vos mains fera légèrement fondre les pépites de chocolat lorsque vous les presserez, ce qui les aidera simplement à coller.
Comprendre votre investissement en temps
Le temps de préparation actif est d’environ 20 minutes de mélange et d’étalage. Le temps de cuisson est de 40 minutes. Le temps crucial de refroidissement et de réfrigération est d’un minimum de 2 heures. Donc, bien que le total actif soit d’environ 60 minutes, prévoyez à l’avance pour permettre la réfrigération. Je les prépare souvent la veille d’une fête – elles sont encore meilleures le lendemain !
Mon secret pour les tranches les plus nettes
Pour des barres dignes d’une photo, utilisez un couteau propre et chaud. Passez un couteau de chef bien aiguisé sous de l’eau très chaude, essuyez-le bien et faites votre coupe. Essuyez la lame et réchauffez-la entre chaque coupe. Cela traverse le caramel et le cheesecake proprement, vous donnant ces magnifiques bords nets qui semblent faits par un professionnel.
Un fait amusant sur les douceurs « Turtle »
Le nom « turtle » (tortue) pour cette combinaison chocolat-caramel-pacanes n’est pas aussi aléatoire qu’il y paraît ! Les bonbons « turtle » originaux étaient fabriqués en formant les pacanes en une forme qui ressemblait aux pattes et à la tête d’une tortue, puis en les recouvrant de caramel et de chocolat. Le produit final ressemblait soi-disant à une carapace de tortue. Nos barres déconstruisent cette idée et superposent toutes ces merveilleuses saveurs dans une forme pouvant être tranchée – beaucoup plus facile que de sculpter des tortues en bonbon !
L’équipement dont vous aurez besoin
- Moule à gâteau 22×33 cm (9×13 pouces)
- Papier sulfurisé
- Saladiers (2 grands)
- Fouet et spatule
- Batteur électrique ou robot pâtissier
- Tasses et cuillères à mesurer
- Grille de refroidissement
Comment conserver vos Barres Brownie Cheesecake façon Turtle
Une fois garnies et coupées, ces barres doivent être conservées au réfrigérateur. La couche crémeuse de cheesecake doit rester froide. Placez-les en une seule couche dans un contenant hermétique, ou si vous devez les empiler, séparez les couches avec des feuilles de papier sulfurisé pour éviter qu’elles ne collent.
Elles se conserveront parfaitement jusqu’à 4-5 jours au réfrigérateur. La base brownie peut devenir encore plus fondante en reposant, ce qui est un bonus délicieux. Les noix de pécan resteront croquantes pendant un jour ou deux, mais si vous savez que vous les conserverez plus longtemps, vous pouvez ajouter les noix juste avant de servir pour garantir un croquant maximum.
Vous pouvez également congeler ces barres pour un stockage plus long ! Congelez la dalle non garnie et bien refroidie sur une plaque à pâtisserie, puis emballez-la hermétiquement dans du film alimentaire et du papier aluminium. Elle se conservera jusqu’à 2 mois. Décongelez-la une nuit au réfrigérateur avant d’ajouter le caramel, les pacanes et les pépites de chocolat et de découper.
Conseils et astuces pour un succès garanti
- Utilisez du fromage à la crème en bloc, pas la version tartinable en pot. Il a des stabilisants et une teneur en humidité différents.
- Ne négligez pas le fait de tapisser le moule de papier sulfurisé. C’est le seul moyen infaillible de sortir les barres en un seul et beau morceau.
- Pour hacher facilement les pacanes, mixez-les quelques secondes dans un robot culinaire ou placez-les dans un sac de congélation et écrasez-les doucement avec un rouleau à pâtisserie.
- Si votre sauce caramel est trop épaisse pour napper, chauffez-la 5 à 10 secondes au micro-ondes pour la détendre.
Idées de présentation pour épater vos invités
- Coupez en petits carrés et servez sur un présentoir à gâteaux à étages pour une fête.
- Nappez un peu de caramel et de chocolat fondu supplémentaires sur des assiettes de service individuelles avant d’y déposer une barre.
- Ajoutez une toute petite pincée de fleur de sel sur la garniture au caramel pour une finition gourmande sucrée-salée.
- Servez avec une cuillerée de crème fouettée maison ou une boule de glace à la vanille à côté.
Délicieuses variations de la recette à essayer
Vous adorez cette combinaison mais vous voulez varier ? Voici six variations fantastiques sur le thème classique « turtle ».
- Barres Turtle au Caramel Salé : Utilisez une sauce caramel au beurre salé et terminez avec une pincée de fleur de sel pour un impact de saveur inoubliable.
- Barres Turtle au Bretzel : Ajoutez 60g de morceaux de bretzel écrasés à la pâte à brownie pour un croquant salé, et utilisez-en aussi dans la garniture à la place de toutes les pacanes.
- Barres Turtle au Chocolat Blanc et Noix de Macadamia : Remplacez les pépites de chocolat mi-sucré par des pépites de chocolat blanc et utilisez des noix de macadamia hachées à la place des pacanes pour une touche tropicale.
- Barres Turtle avec Tourbillon de Beurre de Cacahuète : Déposez 80g de beurre de cacahuète tiède en petits tas sur la couche cheesecake et marbrez avec un couteau avant la cuisson. Garnissez comme d’habitude.
- Barres Turtle Mocha : Ajoutez 1 cuillère à soupe de café instantané en poudre à la pâte à brownie pour une saveur café profonde qui se marie à merveille avec le chocolat et le caramel.
- Mini Cheesecakes Turtle : Pressez la pâte à brownie au fond de moules à muffins tapissés de caissettes, ajoutez la préparation au cheesecake, et faites cuire 18 à 22 minutes pour des portions individuelles adorables.
Si vous adorez la combinaison caramel et fromage à la crème, vous devez absolument essayer notre superbe Cheesecake Chocolat Caramel à étages pour un gâteau vraiment festif. Et pour une autre variation fantastique de cheesecake, notre Cheesecake Fraise Croquant sans cuisson est une option fruitée et rafraîchissante.
Erreurs courantes à éviter
Erreur 1 : Utiliser du fromage à la crème et des œufs froids
C’est la raison numéro un d’une couche cheesecake grumeleuse. Le fromage à la crème froid ne deviendra jamais parfaitement lisse, peu importe combien de temps vous le battez. Il y aura des petits morceaux partout. De même, des œufs froids peuvent faire cailler ou « casser » la préparation du cheesecake. Prenez toujours le temps de laisser votre fromage à la crème et vos œufs reposer sur le comptoir au moins 30 à 60 minutes avant de commencer. Le fromage à la crème doit être mou et souple quand vous appuyez dessus.
Erreur 2 : Trop mélanger la pâte à brownie
Une fois que vous avez ajouté les ingrédients secs aux ingrédients humides pour la couche brownie, vous devez mélanger juste jusqu’à ce qu’il ne reste plus de traînées de farine. Trop mélanger développe le gluten de la farine, ce qui peut donner un brownie dense et caoutchouteux au lieu de la texture dense et fondante que nous recherchons. Utilisez un mouvement de pliage avec une spatule au lieu de battre vigoureusement. Quelques petits grumeaux sont absolument acceptables – ils disparaîtront dans le four.
Erreur 3 : Sauter le temps de réfrigération
Je sais que c’est tentant d’y goûter tout de suite, mais si vous essayez de couper ces barres alors qu’elles sont encore un peu tièdes, vous obtiendrez un délicieux gâchis collant. Le cheesecake a besoin de temps pour prendre et se raffermir complètement au frigo. Ces 2 heures minimum de froid sont ce qui vous donne ces belles couches nettes quand vous les coupez. Prévoir à l’avance est la clé. Préparez-les le matin pour le dessert du soir, ou la veille.
Erreur 4 : Ajouter la garniture quand c’est encore tiède
Si vous versez la sauce caramel et saupoudrez la garniture pendant que les barres sont encore tièdes, le caramel va s’imbiber dans le cheesecake et les pépites de chocolat vont fondre en une flaque. Cela rend le produit final détrempé et moins défini. Attendez toujours que les barres soient complètement froides et fermes après la réfrigération avant d’ajouter la couche finale de garniture pour la meilleure texture et présentation.
Foire Aux Questions
Puis-je préparer ces barres à l’avance ?
Absolument ! En fait, c’est un excellent dessert à préparer à l’avance. Vous pouvez cuire et réfrigérer la base brownie et cheesecake (sans la garniture finale) jusqu’à deux jours à l’avance. Gardez-la bien couverte dans le moule au réfrigérateur. Ajoutez le caramel, les pacanes et les pépites de chocolat quelques heures avant de servir pour garder les noix croquantes et la présentation fraîche. Cela simplifie énormément l’organisation d’une fête.
Ma couche cheesecake a craquelé sur le dessus. Qu’ai-je fait de mal ?
Ne vous inquiétez pas ! Une petite fissure est courante et n’affecte en rien le goût. Les craquelures surviennent généralement d’un surplus d’air dans la pâte (en la battant trop) ou d’un changement soudain de température. Pour l’éviter, évitez de trop battre après avoir ajouté les œufs, n’ouvrez pas la porte du four pendant la cuisson, et laissez les barres refroidir graduellement dans le four éteint avec la porte entrouverte avant de les sortir sur le comptoir. Mais rappelez-vous, la glorieuse garniture au caramel et aux pacanes cachera parfaitement toute fissure !
Puis-je utiliser une préparation pour brownie en boîte pour la base ?
Bien sûr, pour une version encore plus rapide. Préparez la pâte à brownie selon les instructions « fondant » ou « moelleux » de la boîte (généralement en omettant un œuf). Étalez-la dans le moule tapissé de papier sulfurisé. Ensuite, poursuivez avec la couche cheesecake maison et les garnitures comme indiqué dans la recette. Ce sera toujours délicieux et vous fera gagner quelques minutes de mesure.
Quelle est la meilleure façon de couper ces barres bien nettes ?
Le secret est un couteau bien aiguisé et chaud. Passez votre couteau de chef sous de l’eau très chaude, essuyez-le complètement avec un torchon, et faites une coupe nette. Essuyez la lame de tout caramel ou cheesecake collant, réchauffez-la et séchez-la, et faites la coupe suivante. Répétez pour chaque coupe. Cela vous donne des tranches dignes d’un professionnel avec des bords nets. Bien refroidir les barres est l’autre moitié de l’équation.
Comment dois-je conserver les restes, et combien de temps se conservent-ils ?
Conservez les barres restantes dans un contenant hermétique au réfrigérateur. Elles se conservent bien pendant 4 à 5 jours. La base brownie peut devenir plus dense et plus fondante avec le temps, ce que beaucoup de gens adorent. Les pacanes peuvent ramollir légèrement après un jour ou deux au frigo, mais la saveur restera fantastique. Vous pouvez également congeler la dalle cuite non garnie jusqu’à 2 mois.
Est-il nécessaire d’utiliser du papier sulfurisé ?
C’est fortement, fortement recommandé. La garniture au caramel rend ces barres très collantes. Le « sling » de papier sulfurisé (avec des rebords qui dépassent) vous permet de soulever tout le bloc de barres hors du moule une fois refroidi. Cela vous permet de les couper facilement sur une planche à découper et d’obtenir des carrés parfaits sur tous les côtés, y compris les bords. Si vous le sautez, vous essaierez de décoller la première barre collante du coin du moule.
Puis-je congeler les Barres Brownie Cheesecake façon Turtle ?
Oui, mais avec une méthode spécifique. Congelez la dalle cuite et complètement refroidie avant d’ajouter la garniture au caramel et aux noix. Enveloppez toute la dalle hermétiquement dans du film alimentaire, puis dans du papier aluminium. Congelez jusqu’à 2 mois. Décongelez une nuit au réfrigérateur. Une fois décongelées, ajoutez le caramel, les pacanes et les pépites de chocolat juste avant de servir. Congeler avec la garniture déjà dessus rendra les noix molles et le caramel coulant.
Puis-je utiliser une sauce caramel maison ?
Bien sûr ! Une sauce caramel maison peut élever ces barres au niveau supérieur. Assurez-vous simplement qu’elle ait une consistance épaisse mais nappable une fois refroidie. Si elle est trop liquide, elle rendra les barres coulantes. Si elle est trop épaisse, vous pouvez la réchauffer doucement pour la détendre avant de napper. Une bonne sauce caramel en pot fonctionne à merveille pour la commodité et la constance.
Pourquoi mes brownies sont-ils secs et caoutchouteux ?
Cela signifie généralement que la couche brownie a été trop cuite ou trop mélangée. Rappelez-vous, vous recherchez des miettes humides, pas un cure-dent propre. De plus, faites attention à votre mesure de farine. Prendre la farine directement dans le sac peut la tasser, ce qui donne trop d’ingrédient sec. Pour plus de précision, aérez la farine dans son contenant, versez-la dans votre tasse à mesurer avec une cuillère, et nivelez-la avec le dos d’un couteau. Encore mieux, utilisez une balance de cuisine si vous en avez une.
Y a-t-il des alternatives sans noix pour la garniture ?
Absolument. Pour garder le délicieux profil de saveur « turtle » sans noix, vous pouvez remplacer les pacanes par d’autres éléments croquants. Essayez d’utiliser des copeaux de noix de coco toastés, des morceaux de bretzel écrasés, ou même une pincée de gros sel marin pour un contraste de saveur et de texture différent. Les barres seront toujours merveilleusement décadentes avec juste les pépites de chocolat et le caramel.
Créer des desserts spectaculaires comme celui-ci est ce que j’aime le plus, et vous pouvez trouver tellement d’autres idées inspirantes dans notre collection complète de recettes de gâteaux et pâtisseries. Des pâtisseries simples aux desserts qui font sensation, il y a toujours quelque chose de nouveau à essayer.
Voilà ! Ma recette ultime pour les Barres Brownie Cheesecake façon Turtle. C’est un dessert qui a vraiment tout : simplicité, apparence spectaculaire et une combinaison de saveurs qui fait tomber. Cette riche couche de brownie, le cheesecake crémeux et cette garniture « turtle » irrésistible créent une bouchée de pur bonheur. Que vous cuisiniez pour un événement spécial ou juste pour gâter votre famille, cette recette est un succès garanti. Alors préchauffez votre four, tapissez votre moule, et préparez-vous à recevoir des compliments. N’oubliez pas de me dire comment les vôtres se sont passées – j’adore entendre vos histoires de cuisine ! Bonne pâtisserie !
Equipment
- Plat de cuisson 23x33 cm
- Papier sulfurisé
- Fouet
- Spatule
- Mixeur électrique
Ingrédients
- 113 g beurre non salé fondu
- 200 g sucre granulé
- 2 œufs
- 1 c.s extrait de vanille
- 40 g cacao en poudre non sucré
- 65 g farine tout usage
- 1 g sel
- 1 c.c levure chimique
- 450 g fromage à la crème ramolli
- 100 g sucre granulé
- 2 œufs
- 1 c.s extrait de vanille
- 170 g pépites de chocolat semi-sucré
- 120 g noix de pécan hachées
- 240 ml sauce caramel achetée en magasin ou faite maison
Instructions
- Préchauffez votre four à 175 °C (350 °F) et tapissez un plat de cuisson de 23x33 cm (9x13 pouces) de papier sulfurisé.
- Dans un grand bol, mélangez le beurre fondu et le sucre jusqu'à obtenir une consistance sableuse.
- Ajoutez les œufs et la vanille, puis mélangez jusqu'à ce que le mélange soit lisse et brillant.
- Incorporez le cacao, la farine, le sel et la levure chimique jusqu'à ce que tout soit juste combiné.
- Étalez la pâte uniformément dans le plat préparé.
- Dans un autre bol, battez le fromage à la crème jusqu'à ce qu'il soit lisse et sans grumeaux.
- Ajoutez le sucre, puis mélangez jusqu'à obtenir une consistance crémeuse. Incorporez les œufs un à un, puis la vanille.
- Versez la préparation au fromage sur la couche de brownie et étalez délicatement.
- Enfournez pendant 35 à 40 minutes, jusqu'à ce que la couche de cheesecake soit prise.
- Laissez refroidir complètement sur une grille, puis réfrigérez pendant au moins 2 heures.
- Une fois refroidi, versez la sauce caramel sur le dessus, puis saupoudrez de noix de pécan et de pépites de chocolat.
Notes
Nutrition

Je suis Céline, une véritable passionnée d’ustensiles et de matériel de cuisine ! J’adore tester, comparer et découvrir les meilleurs équipements pour rendre la cuisine plus efficace et agréable. Que ce soit un bon couteau, un robot performant ou une poêle incontournable, je suis toujours à la recherche des outils qui feront la différence. Mon but est de vous guider dans vos choix pour que vous ayez le bon matériel adapté à vos besoins.