
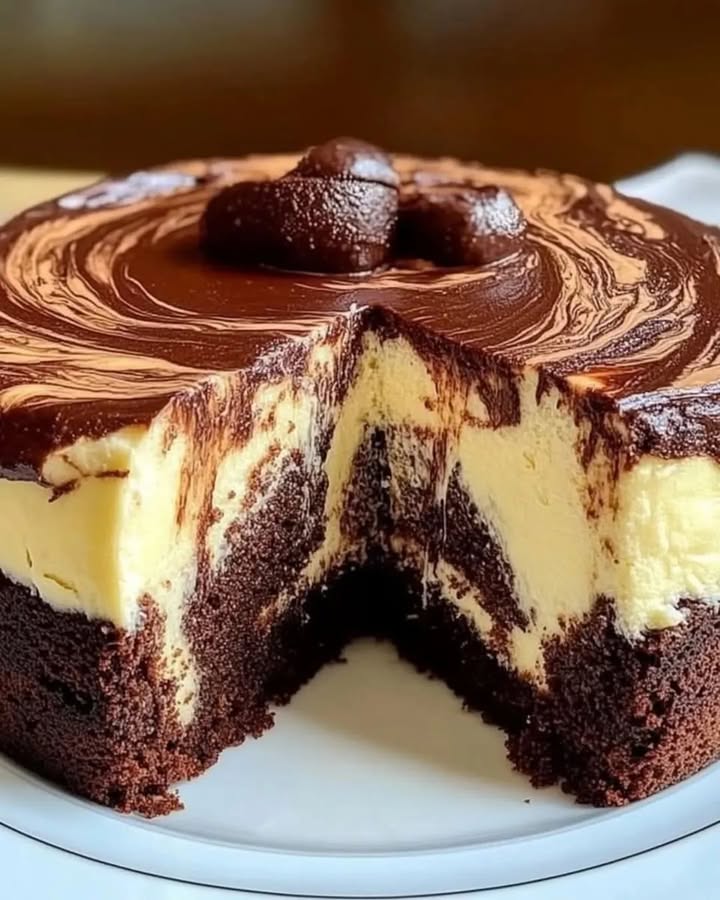
Gâteau Marbré Délicieux : La Joie de Pâtisser en Noir et Blanc
Il y a quelque chose de si réconfortant dans l’odeur d’un gâteau qui cuit. Elle remplit la maison de la promesse d’une douceur à venir. Mon préféré, c’est le classique Gâteau Marbré Délicieux. C’est comme deux gâteaux en un ! Le meilleur, c’est de créer ces magnifiques tourbillons. Il a l’air impressionnant mais est secrètement si simple. Chaque fois que je le prépare, cela me ramène dans la cuisine de ma grand-mère. Elle m’a appris que les meilleures pâtisseries viennent du cœur, pas seulement du livre de recettes.
Une Petite Histoire Derrière Notre Beau Gâteau Marbré
Le gâteau marbré a une histoire aussi mélangée que sa pâte ! Certains disent qu’il est né en Allemagne. D’autres pensent qu’il est devenu populaire en Amérique. Quelle que soit son origine, c’est une idée de génie. Quelqu’un a pensé : « Pourquoi choisir entre la vanille et le chocolat ? » Le résultat, c’est ce dessert superbe et tourbillonnant. Ma version est une recette familiale simple. C’est celle que je sors quand j’ai besoin d’un succès garanti. Son look intempéral fait sourire tout le monde.
Pourquoi Vous Allez Adorer Cette Recette de Gâteau Marbré
Vous allez adorer cette recette car elle est sans chichi et infaillible. La pâte se prépare dans un seul saladier avec juste une fourchette ou un fouet. L’effet marbré spectaculaire est plus facile à créer qu’on ne le pense. Il vous offre le meilleur des deux mondes. Vous obtenez la saveur riche et profonde du chocolat et le goût doux et beurré de la vanille. Il est moelleux, tendre et reste frais pendant des jours. C’est le gâteau parfait pour les débutants comme pour les pâtissiers confirmés. On ne peut pas se tromper avec ce délicieux gâteau marbré.
Les Occasions Parfaites pour Ce Superbe Gâteau
Ce gâteau va devenir votre valeur sûre pour tous les événements ! Il est assez simple pour un goûter du mardi après-midi avec le thé. Il est aussi assez élégant pour un anniversaire ou un repas entre amis le week-end. J’adore l’apporter aux buffets parce qu’il a l’air si spécial. C’est un gâteau fantastique pour les fêtes d’enfants — ils adorent le look bicolore. Une part de ce gâteau marbré transforme une simple pause-café en une jolie petite célébration. C’est vraiment un héros pour toutes les occasions.
Ce Dont Vous Avez Besoin pour Votre Délicieux Gâteau Marbré
- 250g de farine de blé (type T55)
- 4 gros œufs, à température ambiante
- 100g de beurre fondu, légèrement refroidi
- 1 sachet de levure chimique
- 200g de sucre en poudre
- 240ml de lait entier (environ 1 tasse)
- 50g de cacao en poudre non sucré
Des Substitutions Simples Selon Votre Placard
Pas besoin de courir au magasin ! Vous pouvez adapter cette recette avec ce que vous avez. Si vous n’avez plus de beurre, une huile neutre comme l’huile de tournesol fonctionne bien. Pas de cacao en poudre ? Faites fondre 50g de chocolat noir et laissez-le refroidir un peu avant de l’ajouter à la pâte. Pour une version sans lactose, utilisez un lait végétal et une alternative au beurre sans produits laitiers. La recette est très indulgente, c’est pourquoi j’ai tellement confiance en elle.
Créer Votre Gâteau Marbré Parfait : Étapes par Étapes
Étape 1 : Préparez-vous à Cuire
D’abord, préchauffez votre four à 180°C (th.6). Cela lui laisse le temps d’atteindre la température parfaite. Pendant ce temps, prenez votre moule à cake ou à bundt préféré. Beurrez-le généreusement avec du beurre ou un peu d’huile. Cela crée une barrière anti-adhésive. Cela garantit que votre beau gâteau se démoulera parfaitement plus tard. Il n’y a rien de pire qu’un gâteau qui colle ! Je saupoudre parfois un peu de farine sur le beurre pour plus de sécurité.
Étape 2 : Préparez la Pâte de Base
Prenez un grand saladier confortable. Cassez-y les quatre œufs et ajoutez tout le sucre. Maintenant, fouettez avec énergie ! Vous devez les battre pendant 3-4 bonnes minutes. Le mélange va devenir pâle, mousseux et légèrement épaissi. Il doit retomber du fouet en formant un ruban épais. Cette étape incorpore de l’air. C’est le secret d’une mie légère et aérienne. Ne précipitez pas cette étape — vos papilles futures sentiront la différence.
Étape 3 : Combinez les Ingrédients Liquides
Versez le beurre fondu et la tasse de lait. Le beurre doit être tiède, pas chaud, pour éviter de cuire les œufs. Utilisez votre fouet pour mélanger doucement le tout. Vous verrez le mélange devenir lisse et liquide. Le parfum du beurre doux est déjà merveilleux. Ce mélange assure que chaque bouchée de votre gâteau sera parfaitement moelleuse. Conseil pro : Laissez tous vos ingrédients reposer 30 minutes avant de commencer. Les ingrédients à température ambiante se mélangent bien plus facilement.
Étape 4 : Ajoutez les Ingrédients Secs
C’est le moment de la farine et de la levure. Je les tamise toujours ensemble directement dans le saladier. Cela évite les grumeaux et assure une distribution uniforme de la levure. Ensuite, incorporez doucement avec une spatule. Arrêtez-vous dès que vous ne voyez plus de traces de farine. Trop mélanger est l’ennemi d’un gâteau tendre. Vous devriez maintenant avoir une belle pâte lisse et coulante. C’est la toile parfaite pour notre tourbillon chocolaté.
Étape 5 : Créez la Partie Chocolatée
Versez environ la moitié de votre pâte à la vanille dans un autre saladier. Ajoutez les 50g de cacao en poudre à cette moitié. Remuez doucement jusqu’à ce que le cacao soit bien incorporé. Vous verrez la pâte se transformer en un riche brun foncé. Cela sent divinement bon ! Vous obtenez ainsi deux pâtes distinctes : une pure vanille et une profonde au chocolat. Le contraste est la clé de ce bel effet marbré. Astuce de chef : Si la pâte au chocolat semble trop épaisse, ajoutez une toute petite goutte de lait pour la détendre.
Étape 6 : L’Art du Marbrage
Voici la partie amusante et créative ! Alternez de grosses cuillerées des deux pâtes dans votre moule beurré. Commencez par la vanille, puis le chocolat, puis la vanille à nouveau. Ne lissez pas et n’essayez pas d’être trop précis. Ce sont les grosses cuillerées désordonnées qui créent le motif. Une fois toute la pâte dans le moule, prenez un couteau ou une fourchette. Enfoncez-le dans la pâte et faites quelques mouvements lents et nonchalants en forme de huit. N’en faites pas trop, sinon les couleurs vont se mélanger en une seule ! Vous voulez des tourbillons distincts.
Étape 7 : Cuisez à la Perfection
Placez soigneusement votre moule au centre du four préchauffé. Maintenant, la partie la plus difficile : soyez patient ! Faites cuire environ 40 minutes. Évitez d’ouvrir la porte du four trop tôt. À la 35e minute, vous pouvez vérifier. Le gâteau doit être doré sur le dessus et commencer à se décoller des bords du moule. Le meilleur test ? Enfoncez un cure-dent ou une brochette au centre. Il doit ressortir propre ou avec quelques miettes sèches. C’est le signe d’un gâteau parfaitement cuit.
Étape 8 : L’Étape Finale et Cruciale
Lorsque le gâteau est cuit, sortez-le du four. Laissez-le reposer dans son moule sur une grille pendant 10-15 minutes. Cela lui permet de se fixer et de raffermir légèrement. Passez ensuite un couteau autour des bords pour le décoller. Démoulez-le sur la grille et laissez-le refroidir complètement. Je sais qu’il est tentant de le couper tiède. Mais attendre assure des tranches nettes et permet aux saveurs de se fixer. Cela vaut la peine d’attendre, je vous le promets !
Votre Chronologie de Préparation
Temps de préparation : Un rapide 15 minutes de travail actif.
Temps de cuisson : 40 minutes de magie au four.
Temps de refroidissement : Environ 1 heure (soyez fort !).
Temps total : Du début à la première part, prévoyez environ 1 heure 55 minutes.
Mon Secret de Chef pour un Gâteau Marbré Parfait
Le secret, c’est la température de vos ingrédients. Utilisez toujours des œufs et du lait à température ambiante. Pourquoi ? Ils s’émulsionnent bien mieux avec le beurre. Cela crée une pâte plus lisse et plus homogène. Une pâte lisse cuit de manière plus uniforme. Elle lève aussi mieux, vous donnant cette belle mie régulière. Je sors les miens du frigo une heure avant de commencer. Cela fait toute la différence pour un gâteau de qualité professionnelle à la maison.
Un Fait Amusant sur le Marbrage
Saviez-vous que le terme « gâteau marbré » est apparu pour la première fois dans des livres de cuisine allemands au 19e siècle ? On l’appelait souvent « Marmorkuchen ». La technique était un moyen génial de donner à un simple gâteau une sensation de luxe et d’extravagance. Il est devenu un symbole de savoir-faire domestique. Créer ces tourbillons parfaits montrait que vous étiez un pâtissier qui faisait attention aux détails. Aujourd’hui, c’est encore un classique qui ne se démode jamais.
Les Outils Simples dont Vous Aurez Besoin
- Un grand saladier
- Un fouet et une spatule
- Un moule à cake ou un moule à bundt (environ 25cm de long)
- Des tasses à mesurer et une balance
- Un tamis pour tamiser la farine
- Un cure-dent ou un testeur de cuisson
- Une grille de refroidissement
Comment Conserver Votre Gâteau Frais et Délicieux
Une fois que votre gâteau marbré est complètement refroidi, il est temps de le conserver. La meilleure façon est de l’envelopper hermétiquement dans du film alimentaire ou de le placer dans un récipient hermétique. Cela emprisonne l’humidité et le garde moelleux pendant des jours.
Vous pouvez le conserver à température ambiante jusqu’à 3-4 jours. Si votre cuisine est très chaude, vous préférerez peut-être le garder au réfrigérateur. Laissez simplement une part revenir à température ambiante avant de la manger pour la meilleure texture et saveur.
Pour une conservation plus longue, ce gâteau se congèle magnifiquement. Enveloppez le gâteau entier ou des parts individuelles dans du film alimentaire, puis dans du papier aluminium. Il se conservera bien jusqu’à 2 mois. Décongelez à température ambiante pendant la nuit quand vous aurez envie d’une douceur.
Mes Meilleurs Conseils pour Réussir Votre Gâteau Marbré
- Ne pas trop mélanger la pâte après avoir ajouté la farine. Mélangez juste jusqu’à ce que ce soit combiné pour la garder légère.
- Utilisez une main légère pour le marbrage. Deux ou trois tours avec un couteau, c’est amplement suffisant !
- Assurez-vous que votre levure chimique est fraîche. Une vieille levure ne donnera pas une bonne levée.
- Laissez le gâteau refroidir dans le moule un moment avant de le démouler. Cela l’empêche de casser.
Comment le Rendre Encore Plus Spécial
Une légère neige de sucre glace est une finition simple et élégante. Pour une touche festive, versez un glaçage simple fait de sucre glace et de lait sur le dessus. Servez-le sur un joli présentoir à gâteau avec une tasse de café ou de thé. Pour une fête, ajoutez une quenotte de crème chantilly légèrement sucrée ou une boule de glace à la vanille. Vous pouvez même garnir avec quelques fruits rouges frais pour une touche de couleur.
Six Façons Délicieuses de Varier Votre Gâteau Marbré
Une fois que vous maîtrisez le classique, essayez ces variations amusantes !
- Gâteau Marbré Café : Ajoutez un shot d’espresso fort à la pâte au chocolat pour un coup de moccha.
- Gâteau Marbré Agrumes : Ajoutez le zeste d’un citron ou d’une orange à la pâte à la vanille pour une saveur fraîche et vive.
- Gâteau Marbré aux Noisettes : Incorporez des noisettes ou des noix finement hachées et toastées à la pâte à la vanille pour du croquant.
- Gâteau Bundt Marbré : Faites cuire la pâte dans un beau moule à bundt pour une forme superbe. Un simple glaçage fera des merveilles sur les tourbillons.
- Gâteau Marbré en Cupcakes : Répartissez la pâte dans des caissettes et marbrez. Parfait pour les pique-niques ou les fêtes.
- Gâteau Marbré aux Pépites : Ajoutez une poignée de pépites de chocolat dans les DEUX pâtes pour des poches chocolatées supplémentaires partout.
Si vous aimez mélanger les saveurs, vous allez adorer les couches profondes et riches de notre Cheesecake Chocolat Caramel. Pour une option plus fruitée, le Cheesecake Fraise Croquant fait toujours un tabac. Si vous êtes fan de noix et de caramel, vous devez absolument essayer les irrésistibles Barres Brownie Cheesecake Caramel. Et pour un dessert aux fruits plus simple, mes Pommes Frites à la Sudiste sont le comble du réconfort.
Erreurs Courantes à Éviter pour Un Gâteau Parfait
Erreur 1 : Trop Mélanger la Pâte
C’est l’erreur la plus courante. Une fois la farine ajoutée, trop mélanger développe le gluten du blé. Cela rend le gâteau dur, dense et caoutchouteux au lieu d’être doux et tendre. Vous devez mélanger juste jusqu’à ce que vous ne voyiez plus de traces de farine sèche. Ce n’est pas grave si la pâte a l’air un peu grumeleuse. Quelques incorporations douces avec une spatule suffisent après l’ajout de la farine.
Erreur 2 : Trop Tourbillonner les Pâtes
Nous voulons tous ces beaux tourbillons. Mais si vous vous laissez emporter avec le couteau, vous allez trop mélanger les deux pâtes. Au lieu d’une beauté marbrée, vous obtiendrez un gâteau brun, homogène et boueux. La clé, c’est la retenue. Faites juste quelques passes lentes et larges dans la pâte. Voyez cela comme encourager doucement le motif à sortir, pas comme le mélanger.
Erreur 3 : Utiliser des Ingrédients Froids
Prendre les œufs, le lait et le beurre directement du frigo est une erreur. Les ingrédients froids ne se mélangent pas de manière homogène. Cela peut entraîner une pâte qui a l’air caillée et une cuisson inégale. Le beurre peut aussi se resolidifier en petits morceaux. Prenez le temps de laisser vos ingrédients reposer sur le comptoir environ 30-45 minutes avant de commencer. Cela assure une pâte soyeuse et lisse qui cuit parfaitement.
Erreur 4 : Ouvrir la Porte du Four Trop Tôt
Nous sommes tous curieux ! Mais ouvrir la porte du four dans les 25-30 premières minutes de cuisson est risqué. La chute soudaine de température peut faire s’affaisser votre gâteau délicat au centre. Faites confiance au processus et utilisez la lumière du four pour vérifier. N’ouvrez la porte que vers la fin du temps de cuisson pour faire le test du cure-dent.
Une Note sur la Qualité des Aliments
Pour les meilleurs résultats, la qualité de vos ingrédients compte. Utiliser un cacao en poudre frais et de haute qualité fait une énorme différence dans la saveur de votre tourbillon chocolaté. Pour des informations plus détaillées sur la composition nutritionnelle des aliments et la qualité des ingrédients, des ressources fiables peuvent vous aider à faire des choix éclairés en cuisine.
Ce Gâteau Marbré Délicieux n’est qu’une des nombreuses pâtisseries réconfortantes que vous pouvez maîtriser. Pour plus d’inspiration sucrée, n’hésitez pas à explorer notre collection complète de recettes de gâteaux et pâtisseries où vous trouverez des classiques et de nouveaux favoris.
Vos Questions sur le Gâteau Marbré, Répondues
Puis-je faire ce gâteau marbré sans œufs ?
Oui, vous pouvez essayer un substitut d’œuf. Un remplacement courant est d’utiliser 60g de yaourt nature ou de compote de pommes par œuf. La texture sera légèrement plus dense mais toujours délicieuse. Une autre option est une poudre remplacement d’œuf du commerce mélangée à de l’eau. J’ai eu de bons résultats avec le yaourt, car il garde le gâteau moelleux. Souvenez-vous, toute substitution peut légèrement changer la levée et la mie finale.
Quel type de cacao en poudre est le meilleur pour cette recette ?
Utilisez du cacao en poudre non sucré, pas un mélange chocolaté pour boisson sucré. Le cacao en poudre donne une saveur chocolatée profonde et riche sans ajouter de sucre supplémentaire. Je préfère un cacao néerlandais pour une couleur plus foncée et un goût plus doux, mais le cacao naturel fonctionne parfaitement aussi. La clé est d’utiliser une poudre dont vous aimez le goût en lui-même.
Le dessus de mon gâteau brunit trop vite. Que dois-je faire ?
Si le dessus devient trop foncé avant que l’intérieur ne soit cuit, recouvrez-le simplement d’une feuille de papier aluminium. Placez-la délicatement sur le dessus du moule. Cela agit comme un bouclier et ralentit le brunissement. Vérifiez la température de votre four avec un thermomètre, car les fours sont souvent plus chauds que ne l’indique le cadran.
Puis-je utiliser une taille de moule différente ?
Absolument. Cette pâte fonctionne dans un moule à cake standard, un moule rond de 23cm (9 pouces), ou un petit moule à bundt. Ajustez simplement le temps de cuisson. Un gâteau plus mince dans un plus grand moule cuira plus vite. Un gâteau plus épais dans un moule plus petit prendra plus de temps. Comptez toujours sur le test du cure-dent au centre pour savoir quand il est cuit.
Comment être sûr que le gâteau est cuit ?
Le test du cure-dent est votre meilleur ami. Enfoncez un cure-dent, une brochette ou un couteau fin au tout centre du gâteau. Retirez-le. Il doit ressortir propre ou avec quelques miettes sèches et friables attachées. S’il ressort avec de la pâte crue, il a besoin de plus de temps. Regardez aussi si le gâteau commence à se décoller légèrement des bords du moule.
Pourquoi mon gâteau s’est-il affaissé au centre ?
Un gâteau qui s’affaisse est généralement dû à une sous-cuisson ou à un excès d’agent levant. Assurez-vous que votre levure chimique est fraîche et que vous l’avez mesurée correctement. N’ouvrez pas la porte du four trop tôt. Assurez-vous aussi que votre four est à la bonne température avant d’y mettre le gâteau. Un four trop peu chaud peut faire lever le gâteau puis s’effondrer.
Puis-je ajouter d’autres saveurs à la partie vanille de la pâte ?
Bien sûr ! C’est un excellent moyen de personnaliser votre gâteau. Essayez d’ajouter une cuillère à café d’extrait de vanille pur, le zeste d’un citron ou d’une orange, ou un filet d’extrait d’amande. Ajoutez simplement ces arômes quand vous mélangez les ingrédients liquides. C’est un moyen simple de rendre le gâteau unique.
Combien de temps ce gâteau marbré restera-t-il frais ?
Bien conservé dans un récipient hermétique à température ambiante, il reste merveilleusement moelleux pendant 3-4 jours. Après cela, il peut commencer à sécher un peu. Vous pouvez prolonger sa durée de vie en le conservant au réfrigérateur jusqu’à 5 jours. Pour une conservation plus longue, congelez-le comme décrit ci-dessus. Il se conserve vraiment bien.
Puis-je doubler cette recette ?
Oui, vous pouvez facilement doubler tous les ingrédients pour faire un plus gros gâteau ou deux cakes. Utilisez simplement un plus grand saladier. Si vous faites deux cakes, vous devrez peut-être inverser leurs positions dans le four à mi-cuisson pour une cuisson uniforme. Le temps de cuisson pourrait augmenter légèrement, alors gardez un œil dessus.
Est-il nécessaire de tamiser la farine ?
Je le recommande vivement, surtout si votre farine semble tassée. Tamiser la farine avec la levure fait deux choses. Cela aère la farine, rendant votre gâteau plus léger. Et cela distribue la levure uniformément, évitant une levée inégale. Cela prend une minute de plus mais contribue à une meilleure texture.
Bonne Pâtisserie !
Et voilà — ma recette éprouvée pour un Gâteau Marbré Délicieux parfait. C’est plus qu’un simple dessert. C’est un petit projet qui apporte de la joie, un beau résultat qui fait sourire, et une gourmandise qui rassemble tout le monde. J’espère que cette recette deviendra un incontournable chez vous, comme elle l’est chez moi. N’ayez pas peur d’être créatif avec les tourbillons. Chaque gâteau a son propre motif unique et magnifique. Maintenant, enfilez votre tablier, préchauffez ce four et préparez-vous à faire quelque chose de merveilleux. Bonne pâtisserie !
Equipment
- Grand bol de mélange
- Moule à cake ou à bundt (environ 25 cm de long)
- Tamis
- Fouet et spatule
- Cure-dent ou testeur de gâteau
Ingrédients
- 250 g farine de blé (toute usage)
- 4 grands œufs à température ambiante
- 100 g beurre fondu légèrement refroidi
- 1 c.s levure chimique
- 200 g sucre granulé
- 240 ml lait entier environ 1 tasse
- 50 g poudre de chocolat non sucrée comme la poudre de cacao
Instructions
- Préchauffez le four à 180°C (350°F) et graissez un moule à cake ou un moule à bundt.
- Dans un grand bol, cassez les œufs et ajoutez le sucre, puis fouettez énergiquement pendant 3-4 minutes.
- Incorporez le beurre fondu et le lait, puis mélangez jusqu'à obtenir une texture lisse.
- Tamisez ensemble la farine et la levure chimique, puis incorporez-les délicatement au mélange sans trop mélanger.
- Réservez la moitié de la pâte dans un autre bol, puis ajoutez la poudre de chocolat à l’autre moitié et mélangez délicatement.
- Dans le moule, alternez des cuillerées de pâte vanille et de pâte chocolat sans lisser.
- À l'aide d'un couteau ou d'une fourchette, réalisez des mouvements en forme de huit pour créer l'effet marbré.
- Enfournez pour environ 40 minutes, puis vérifiez la cuisson avec un cure-dent.
- Laissez refroidir le gâteau dans son moule sur une grille pendant 10-15 minutes avant de le démouler.
Notes
Nutrition

Je suis Céline, une véritable passionnée d’ustensiles et de matériel de cuisine ! J’adore tester, comparer et découvrir les meilleurs équipements pour rendre la cuisine plus efficace et agréable. Que ce soit un bon couteau, un robot performant ou une poêle incontournable, je suis toujours à la recherche des outils qui feront la différence. Mon but est de vous guider dans vos choix pour que vous ayez le bon matériel adapté à vos besoins.