Biscuits Boules Sucrées Faciles : La Meilleure Recette

Biscuits Boules Sucrées

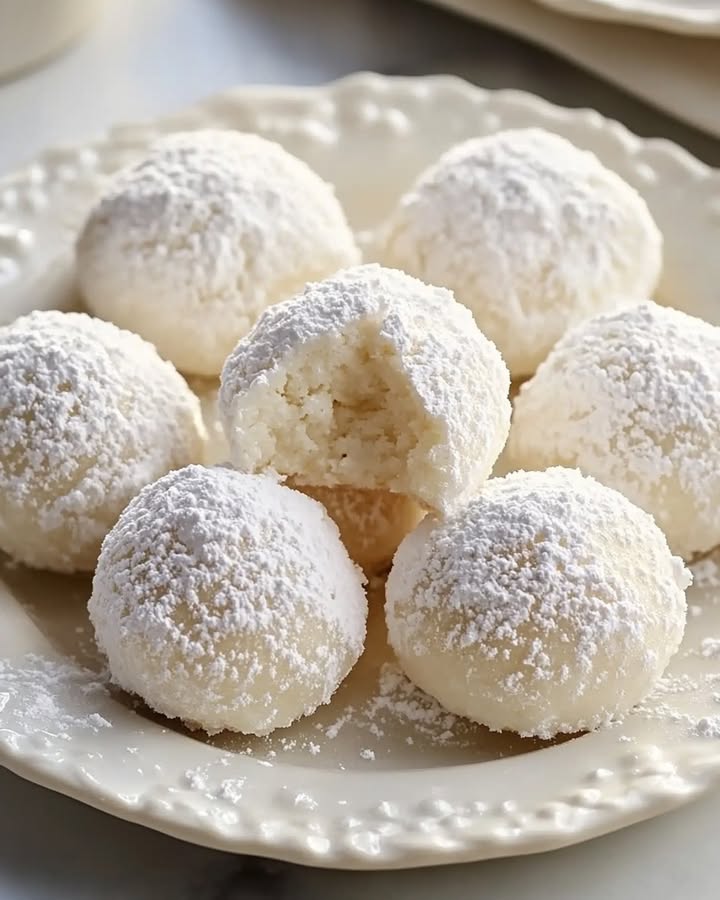
Sweetened Condensed Milk Snowball Cookies: A Little Cloud of Joy

There’s something magic about that first bite of a snowball cookie. You know the one. It dissolves on your tongue in a sweet, buttery cloud, leaving a faint dusting of powdered sugar on your fingertips and a silly, satisfied smile on your face. My grandma called them « Mexican Wedding Cookies, » but in my kitchen, they’re simply « happy bites. » Today, I’m sharing my foolproof version, made extra tender and rich with a secret weapon: a glorious half-cup of sweetened condensed milk. Let’s make some edible snow!

The Story Behind the Sweetened Condensed Milk Snowball Cookie

These little powdered sugar-dusted gems have roots all over the world. You might know them as Russian Tea Cakes, Italian Butterballs, or Polvorones. Their charm lies in their simplicity: butter, flour, nuts, and sugar. My twist came from a happy accident. I was out of regular milk one holiday season and, in a pinch, reached for a can of sweetened condensed milk. The result was pure magic! The cookies were even more melt-in-your-mouth tender, with a subtle caramel-like sweetness that’s hard to place but impossible to resist. It’s now the only way I make them.

Why You’ll Fall in Love With This Cookie Recipe

If you need reasons beyond « they taste like heaven, » I have a few! First, they are incredibly easy. No fancy mixer skills are required. Second, they are the ultimate make-ahead treat. They freeze beautifully, both as dough and baked. Third, that double roll in powdered sugar is just so much fun—it’s the kind of simple kitchen joy we all need. And finally, that sweetened condensed milk creates a texture that’s unbelievably soft and crumbly, setting these snowball cookies apart from all the rest.

The Perfect Moments for These Sweet Snowballs

Honestly, any day that ends in « y » is a good day for these cookies. But they truly shine during the holidays, piled high on a vintage plate for cookie exchanges. They’re perfect with a cup of afternoon tea or coffee, as a sweet farewell gift for guests, or as a quick project to bake with kids. Their elegant, snowy look makes them ideal for winter celebrations, but their deliciousness knows no season.

Gathering Your Ingredients

Let’s take a peek in the pantry. You’ll need:

  • 1 cup (2 sticks) unsalted butter, softened
  • 1/2 cup sweetened condensed milk
  • 1/4 cup powdered sugar
  • 2 cups all-purpose flour
  • 1/2 cup finely chopped nuts (like pecans or walnuts), optional but lovely
  • 1 teaspoon pure vanilla extract
  • 1/4 teaspoon salt
  • Additional powdered sugar, for rolling (about 1 cup)

Simple Swaps: Your Cookie, Your Rules

Out of something? No worries! Here are some easy substitutions:

  • For the nuts: Leave them out entirely for a classic texture, or swap for an equal amount of toasted coconut flakes.
  • For the vanilla: Try almond extract for a subtle marzipan flavor. Start with 1/2 teaspoon, as it’s stronger.
  • For a gluten-free version: Use a good 1-to-1 gluten-free all-purpose flour blend. The texture will be very similar.

Crafting Your Cloud-Like Sweetened Condensed Milk Snowball Cookies

Ready to get your hands a little dusty with powdered sugar? Follow these simple steps for perfect cookies every time.

Step 1: Prep and Preheat

First, get your oven cozy and warm by preheating it to 350°F (175°C). This ensures it’s ready for our little dough balls. Line a baking sheet with parchment paper. This isn’t just for easy cleanup; it prevents the bottoms from browning too much, keeping them pale and perfect like real snowballs. While the oven heats, take a moment to measure all your ingredients. This « mise en place » makes the process feel like a calm, joyful ritual.

Step 2: Cream the Butter and Sugar

In a large bowl, take your softened butter and powdered sugar. Use a hand mixer or a sturdy spoon to beat them together. You’re not just mixing; you’re incorporating tiny air bubbles that will give the cookies lift. Aim for a mixture that is light, fluffy, and almost pale in color. This should take about 2-3 minutes of beating. You’ll smell the sweet, creamy fragrance of the butter as you work. Pro tip: Your butter should be soft enough to leave an indent when pressed, but not melted or greasy.

Step 3: Add the Liquid Gold

Now for the star! Pour in the sweetened condensed milk, that thick, sticky liquid gold, along with the vanilla extract and salt. The salt is crucial—it balances all the sweetness and makes the flavors pop. Mix everything together until it’s completely smooth and homogenous. The mixture will look glossy and rich, like a thick cake batter. At this stage, you could almost eat it with a spoon (and I won’t tell if you do).

Step 4: Bring in the Flour and Nuts

Here’s where we add structure. Gradually add the all-purpose flour to the wet ingredients. Mix on low speed or by hand just until the flour disappears and a soft dough forms. Overmixing can lead to tough cookies, so stop as soon as you no longer see dry flour streaks. If you’re using nuts, now is the time to gently fold them in with a spatula. The dough will be soft and slightly sticky, but it should hold together when you pinch it. Chef’s tip: If the dough feels too soft to handle, pop it in the refrigerator for 15-20 minutes to firm up slightly.

Step 5: Roll and Place

Time to make snowballs! Scoop up about a tablespoon of dough and roll it between your palms into a smooth, 1-inch ball. The warmth of your hands will help create a perfect sphere. Place each ball on your prepared baking sheet, leaving about an inch of space between them. They don’t spread much, but they do need a little room for the heat to circulate. You’ll see rows of neat, pale dough balls ready for their transformation.

Step 6: The Gentle Bake

Carefully slide the baking sheet into the center of your preheated oven. Bake for 12 to 15 minutes. The key here is patience. We are not looking for golden brown. We want the cookies to be just « set. » They should feel firm to a light touch on top and may have the faintest hint of color on the bottom. Baking them just until done is what preserves that delicate, melt-in-your-mouth texture. Overbaking will make them dry and crumbly.

Step 7: The First Snowy Coat

Once out of the oven, let the cookies cool on the sheet for just 5 minutes. They need to be firm enough to handle but still very warm. Pour a generous amount of powdered sugar into a shallow bowl. One by one, gently roll each warm cookie in the sugar until fully coated. The residual heat will cause the sugar to adhere in a lovely, slightly sticky first layer. Place them on a wire rack to cool completely. Admire your first batch of sweetened condensed milk snowball cookies—they’re already gorgeous!

Step 8: The Final Winter Blizzard

This is the secret to that iconic, snowy look. Once the cookies are completely cool to the touch, give them a second roll in the powdered sugar. This second coat will stick to the now-set first layer, creating a thick, pristine, snowy finish that won’t melt away. It’s a satisfying final touch that makes these sweet bites look as magical as they taste.

Timing is Everything

This recipe is wonderfully quick. From start to finish, you’re looking at about 30 minutes of active time. Prep takes about 15 minutes of measuring and mixing, and each batch bakes for 12-15 minutes. Since the recipe makes about 24 cookies, you might have two batches to bake. Just remember to let the baking sheet cool down between batches, or your second round of dough will start melting before it hits the oven!

My Chef’s Secret for the Best Snowball Cookies

For an extra flavor dimension that will have people asking, « What *is* that? », replace 1/4 cup of the all-purpose flour with the same amount of cake flour. Cake flour has a lower protein content, which results in an even more tender, delicate crumb. It’s the difference between a great cookie and an « oh-my-goodness-what-is-this » sublime cookie.

A Sweet Bit of Extra Info

Did you know sweetened condensed milk was invented as a shelf-stable dairy product in the 19th century before refrigeration was common? Its thick, sweet consistency comes from removing about 60% of the water from cow’s milk and adding sugar. This process not only preserves it but also gives it that unique, caramelized flavor that makes our snowball cookies so special. It’s a little piece of food history in every bite!

Kitchen Tools You’ll Need

No fancy equipment required! Here’s your simple list:

  • Large mixing bowl
  • Hand mixer or wooden spoon
  • Measuring cups and spoons
  • Baking sheet
  • Parchment paper
  • Wire cooling rack
  • Small shallow bowl (for the powdered sugar)

Storing Your Sweetened Condensed Milk Snowball Cookies

To keep that powdery finish looking pristine, store the completely cooled cookies in a single layer in an airtight container. If you need to stack them, place a sheet of parchment paper between the layers to prevent them from sticking together and marring their snowy coats.

They will stay fresh and delicious at room temperature for up to one week. The sweetened condensed milk helps keep them moist, so they won’t dry out quickly. You can also store them in the refrigerator if your kitchen is very warm, but let them come to room temperature before serving for the best texture.

For longer storage, these cookies freeze beautifully. Place them in a freezer-safe container or bag, again with parchment between layers. They can be frozen for up to 3 months. Thaw at room temperature, and if needed, give them a light fresh roll in powdered sugar to brighten them up before serving.

My Best Tips and Advice for Success

  • Butter Temperature is Key: Truly softened butter blends seamlessly, creating a uniform dough. Take it out of the fridge at least an hour ahead.
  • Chop Nuts Finely: If using nuts, chop them very fine. Large pieces can make the dough hard to roll and cause cookies to crack while baking.
  • Don’t Skip the Double Roll: The first roll on the warm cookie creates a foundation. The second roll on the cool cookie gives the iconic, thick snowy look.
  • Use a Sifter: For the most even, beautiful final coat of powdered sugar, sift it over the cooled cookies instead of just rolling. It creates a perfect « fresh snowfall » effect.

Pretty Presentation Ideas

These cookies are a decoration themselves! Pile them high on a cake stand or a rustic wooden board. For the holidays, tuck a few sprigs of fresh rosemary or mint around them for a pop of green. Serve them in individual mini paper cupcake liners for a cute, party-ready look. Or, package them in a clear cellophane bag tied with a ribbon for the sweetest homemade gift.

6 Delicious Variations to Try

Once you’ve mastered the classic, the sky’s the limit! Here are six fun twists on the sweetened condensed milk snowball cookie.

  1. Lemon Zest Snowballs: Add the zest of one lemon to the dough with the vanilla. The bright citrus cuts through the sweetness beautifully.
  2. Chocolate-Dipped Snowballs: Dip half of a cooled cookie in melted dark chocolate and let it set. It’s a stunning and decadent contrast.
  3. Matcha Green Tea Snowballs: Replace 2 tablespoons of flour with high-quality matcha powder, and roll the finished cookies in a mix of powdered sugar and a pinch of matcha for a gorgeous green hue.
  4. Espresso Snowballs: Dissolve 1 tablespoon of instant espresso powder in the vanilla extract before adding it. Roll in powdered sugar mixed with a little cocoa powder for a mocha effect.
  5. Peppermint Snowballs: Add 1/2 teaspoon of peppermint extract (not mint!) with the vanilla. Crush some candy canes and mix them with the powdered sugar for the final roll.
  6. Almond Joy Snowballs: Use chopped toasted almonds and add 1/2 cup of shredded coconut to the dough. You’ll get all the flavors of the beloved candy bar.

If you love no-bake, creamy desserts, you must try my super easy Lemon Carlota recipe. It’s the perfect chilled counterpart to these warm-from-the-oven cookies. For another filled treat that’s impossible to resist, my gooey Nutella Bombs are always a hit. And if you’re in a cake mood, this quick Chocolate Vanilla Marble Cake or this stunning Blueberry Sour Cream Coffee Cake will satisfy any sweet tooth.

Common Mistakes to Avoid With Snowball Cookies

Mistake 1: Using Butter That’s Too Cold or Melted

This is the number one culprit for texture problems. Rock-hard butter won’t cream properly with the sugar, leading to dense cookies. Melted butter will make the dough greasy and cause the cookies to spread too much and lose their round shape. The sweet spot is butter that yields to gentle pressure but still holds its shape. If you forget to take it out, you can soften it quickly by cutting it into cubes and leaving it on the counter for 15-20 minutes.

Mistake 2: Overmixing the Dough After Adding Flour

Once you add the flour, you need a gentle touch. Overmixing develops the gluten in the flour, which makes cookies tough and chewy instead of tender and crumbly. Mix just until you no longer see dry streaks of flour, then stop immediately. It’s okay if the dough looks a little shaggy—it will come together as you roll it.

Mistake 3: Baking Until Golden Brown

We bake cookies for color, right? Not these! Sweetened condensed milk snowball cookies should remain pale. Baking them until they are golden brown means they are overbaked and will be dry and hard once cooled. They are done when the tops feel set to a light touch and the bottoms have just the slightest hint of color. They will continue to firm up as they cool on the sheet.

Mistake 4: Rolling in Powdered Sugar Only Once

Skipping the second roll in powdered sugar is a missed opportunity for presentation and texture. The first roll on the warm cookie creates a thin, sticky layer that seals in moisture. The second roll on the completely cool cookie gives that thick, snowy, picture-perfect coating that defines the cookie. The double roll ensures the sugar doesn’t just absorb into the cookie.

Mistake 5: Not Letting the Cookies Cool Before the Final Sugar Coat

If you try to do the second sugar coating while the cookies are still even slightly warm, the powdered sugar will melt and become pasty and wet instead of light and dry. It can create a gummy, sticky mess. Patience is key. Let them cool completely on a wire rack so they are at room temperature for that perfect final blizzard of sugar.

Your Sweetened Condensed Milk Snowball Cookie Questions, Answered

Can I make the dough ahead of time?

Absolutely! This is a fantastic time-saver. You can prepare the dough, cover it tightly with plastic wrap, and refrigerate it for up to 3 days. You can also freeze the shaped dough balls on a tray, then transfer them to a freezer bag for up to 2 months. When ready to bake, place the frozen balls on a baking sheet—you may need to add 1-2 minutes to the baking time. Having cookie dough ready to go in the freezer is like having a secret stash of happiness!

My dough is really sticky. What did I do wrong?

Don’t worry, you likely did nothing wrong! Dough stickiness can vary based on the brand of flour, the temperature of your butter, and even the humidity in your kitchen. The sweetened condensed milk also adds moisture. The fix is simple: just chill the dough. Cover the bowl and pop it in the refrigerator for 20-30 minutes. The butter will firm up, making the dough much easier to handle and roll into perfect little balls.

What’s the best nut to use in these cookies?

Pecans and walnuts are the classic, most popular choices because they have a rich, buttery flavor that pairs perfectly with the sweet dough. I personally love pecans. For a different twist, try finely ground almonds or hazelnuts. Whichever nut you choose, make sure to toast them first! Toasting nuts in a dry pan or the oven for a few minutes brings out their natural oils and deepens their flavor immensely, adding a whole new layer of taste to your cookies.

Can I use salted butter instead of unsalted?

You can, but you’ll need to adjust. The recipe calls for 1/4 teaspoon of salt with unsalted butter. If you use salted butter, simply omit the added salt in the recipe. Using unsalted butter is generally preferred in baking because it gives you complete control over the salt level. Salt enhances flavor, but too much can make your sweet treats taste oddly savory.

Why do my cookies have cracks on top after baking?

Small, fine cracks are normal and part of the charm of these rustic cookies. However, large, deep cracks can happen if the dough was too cold when it went into the oven (causing a dramatic expansion) or if the nuts were too large. To minimize cracking, ensure your dough balls are smooth and without seams before baking, and let refrigerated dough sit at room temperature for 10 minutes before rolling and baking.

How can I prevent the powdered sugar from melting or disappearing?

The double-coating method is specifically designed to prevent this! The first layer on the warm cookie acts like a primer. The second layer on the cool cookie is the main event. Also, make sure the cookies are stored correctly in a single layer in a cool, dry place. Storing them while still warm or in a humid environment will cause the sugar to dissolve. If the sugar does seem to absorb after a day, a light re-roll or a dusting of fresh powdered sugar before serving will fix it.

Are these the same as Mexican Wedding Cookies or Russian Tea Cakes?

They are very close cousins! The basic formula of butter, flour, nuts, and powdered sugar is shared across many cultures. The main difference in this recipe is the use of sweetened condensed milk, which adds extra tenderness, moisture, and a hint of caramel flavor. Traditional versions often use just granulated sugar in the dough. So, you could say these are a particularly luscious and soft variation on that beloved global theme.

Can I add other mix-ins besides nuts?

Certainly! While nuts are traditional, feel free to get creative. Try mixing in 1/2 cup of mini chocolate chips, toffee bits, or even crushed pretzel pieces for a sweet-and-salty kick. For a fruity note, you could add 1/4 cup of very finely chopped dried cranberries or cherries. Just keep any add-ins small and dry; wet ingredients will alter the dough’s consistency.

How do I know exactly when they are done baking?

Look for visual and tactile clues. Visually, the cookies should not have taken on any golden color on top. They will look dry and matte, not shiny or wet. The edges may show a tiny hint of beige. The best test is a light touch: gently press the top of a cookie. It should feel set and firm, not soft or squishy. They will still be very soft inside, but they should not look raw. Remember, they firm up a lot as they cool.

Is sweetened condensed milk the same as evaporated milk?

No, and this is an important distinction! They are both canned, shelf-stable milks, but evaporated milk is unsweetened and has about 60% of the water removed. Sweetened condensed milk has water removed *and* a lot of sugar added, making it thick and syrupy. Using evaporated milk in this recipe would not provide the same sweetness, moisture, or texture. For reliable results, always double-check the label on the can.

If baking these has sparked a newfound love for desserts, I invite you to explore my entire collection of cakes and pastries for more inspiration. There’s always room for one more sweet recipe in life!

A Final Dusting of Sweetness

And there you have it—my beloved, foolproof recipe for sweetened condensed milk snowball cookies. I hope your kitchen is filled with the warm, buttery smell of baking and your counter is covered in a cheerful dusting of powdered sugar. These little cookies are more than just a treat; they’re a bite-sized hug, a moment of simple joy. I’d love to hear how yours turn out. Now, go put the kettle on, you’ve earned a cookie (or three)!

Biscuits Boules Sucrées

Biscuits Boules Sucrées

Biscuits boules sucrées fondants grâce au lait concentré sucré. Recette facile et rapide, parfaits pour les fêtes ou le goûter. Une dose de douceur.
Temps de préparation: 15 minutes
Temps de cuisson: 15 minutes
Temps de refroidissement: 5 minutes
Temps total: 35 minutes
Type de plat: Dessert
Cuisine: Italien
Keyword: Gourmand
Servings: 24 personnes
Calories: 110kcal
Cost: 8

Equipment

  • Grand bol mélangeur
  • Plaque de cuisson
  • Mélangeur à main ou cuillère en bois
  • Grille de refroidissement
  • Papier sulfurisé

Ingrédients

  • 226 g beurre non salé ramolli
  • 118 g lait concentré sucré
  • 30 g sucre en poudre
  • 250 g farine tout usage
  • 60 g noix finement hachées optionnel
  • 5 ml extrait de vanille pur
  • 1 g sel
  • 150 g sucre en poudre supplémentaire pour enrober

Instructions

  • Préchauffez votre four à 175°C et tapissez une plaque de cuisson de papier sulfurisé.
  • Dans un grand bol, crémez le beurre ramolli avec le sucre en poudre jusqu'à ce que le mélange soit léger et mousseux.
  • Ajoutez le lait concentré sucré, l'extrait de vanille et le sel, puis mélangez jusqu'à obtenir une préparation homogène.
  • Incorporez progressivement la farine jusqu'à ce qu'elle soit totalement mélangée.
  • Si vous utilisez des noix, ajoutez-les délicatement au mélange.
  • Roulez des cuillerées de pâte en boules d'environ 2,5 cm et placez-les sur la plaque de cuisson en laissant un espace entre elles.
  • Enfournez et faites cuire environ 12 à 15 minutes jusqu'à ce qu'ils soient à peine fermes.
  • Laissez refroidir les cookies pendant 5 minutes, puis roulez-les dans le sucre en poudre.
  • Une fois complètement refroidis, donnez-leur un second enrobage de sucre en poudre.

Notes

Pour réussir, assurez-vous que le beurre soit à température ambiante pour qu'il se mélange bien. Utilisez des noix hachées très finement pour éviter que les cookies ne se cassent. N'oubliez pas l'enrobage en deux temps dans le sucre pour obtenir un effet neigeux parfait. Ces cookies se conservent bien dans un contenant hermétique et peuvent être congelés pour une utilisation ultérieure.

Nutrition

Calories: 110kcal | Carbohydrates: 14g | Protéines: 1g | Fat: 6g | Lipides saturés: 3g | Choléstérol: 15mg | Sodium: 30mg | Potassium: 20mg | Sucre: 7g | Vitamine A: 80IU | Calcium: 10mg | Fer: 0.5mg
Tried this recipe?Let us know how it was!

Laisser un commentaire

Recipe Rating


Haut