
La Tarte aux Fraises Ultime : Un Rayon de Soleil dans Chaque Bouchée
Vous souvenez-vous du goût d’un jour d’été parfait ? Pour moi, c’est toujours une part de tarte aux fraises rubis, brillante. Pas celle qui triste dans son plat, mais celle qui chante la vraie saveur des baies fraîches. L’arme secrète de ma grand-mère n’était pas juste le sucre, mais une couche magique de chocolat blanc sur la croûte. Après d’innombrables ajustements dans ma cuisine, mêlant son savoir-faire à quelques astuces modernes, j’ai mis au point ce que ma famille appelle « la tarte qui disparaît ». Cette recette de tarte aux fraises classique est de la joie pure et simple dans une assiette. Créons ensemble de délicieux souvenirs.
Une Part d’Histoire : Le Conte de la Tarte aux Fraises
Ce dessert a une belle dualité. En Amérique, la « old-fashioned strawberry pie » est une icône chérie des buffets paroissiaux et des réunions de famille, avec souvent une garniture brillante de fraises cuites dans une croûte feuilletée. De l’autre côté de l’Atlantique, la tarte aux fraises française adopte souvent une forme plus élégante—une simple base de crème pâtissière garnie de fraises fraîches parfaitement disposées. Cette recette est mon délicieux compromis. Elle emprunte la stabilité et la saveur profonde d’une gelée cuite à sa cousine américaine, mais la fraîcheur des baies entières et la touche subtile et sophistiquée de chocolat blanc font un clin d’œil à la finesse française. C’est un mélange réussi entre réconfortant et chic.
Pourquoi Vous Allez Adorer Cette Recette de Tarte aux Fraises
Cette tarte est un succès pour tant de raisons. D’abord, elle célèbre la fraise dans sa forme la plus pure—pas de gelée artificielle ici, juste de la vraie magie fruitée. Cette couche secrète de chocolat blanc ? Elle crée une barrière qui garde le fond de croûte merveilleusement croustillant, même après une nuit au frigo. En plus, la garniture est brillamment versatile : sucrée, légèrement acidulée, et assez épaisse pour tenir une part parfaite. Elle est d’une simplicité trompeuse à réaliser, mais elle a l’air et le goût d’un dessert qui a pris toute la journée. Croyez-moi, les « oh » et les « ah » que vous déclencherez en valent largement la peine.
Les Occasions Parfaites pour Votre Tarte aux Fraises Maison
Cette tarte est votre arme secrète pour tout rassemblement où vous voulez apporter une touche de chaleur maison. Elle est incontournable pour les barbecues du 14 juillet ou les pique-niques du week-end de l’Ascension. Elle fait une magnifique pièce montrée vibrante pour un brunch de la Fête des Mères ou de Pâques. Honnêtement, c’est aussi le parfait dessert « sans raison » pour égayer un mardi ordinaire. Des amis à dîner ? Servez-la avec du café, et regardez tout le monde devenir instantanément plus heureux. C’est un dessert qui rend n’importe quel événement spécial, grand ou petit.
Rassembler Vos Ingrédients pour la Tarte aux Fraises
Des ingrédients frais et simples sont la clé. Voici ce dont vous aurez besoin :
- 1 rond de pâte à tarte de 23 cm (du commerce, c’est très bien, je vous le promets !)
- ¾ de tasse de pépites de chocolat blanc
- 6 tasses de fraises fraîches, lavées, équeutées et tranchées
- 1 tasse de sucre en poudre
- 1 cuillère à café d’extrait de vanille pur
- 3 cuillères à soupe de maïzena
- ¾ de tasse d’eau
- 1½ cuillère à soupe de jus de citron frais
Substitutions Astucieuses selon Votre Placard
Pas de panique s’il vous manque quelque chose ! Voici des échanges faciles. Pas de chocolat blanc ? Essayez une couche de chocolat noir ou mi-sucré fondu, ou même de fromage à la crème. Pour une garniture plus épaisse, vous pouvez utiliser de la gélifiant végétal transparent au lieu de maïzena. Si vous avez un citron, son zeste apporte une merveilleuse fraîcheur à la garniture. Et pour la pâte, n’hésitez pas à utiliser votre recette maison préférée ou une croûte pré-faite au biscuits pour une touche différente. Cuisiner, c’est s’adapter !
Créer Votre Chef-d’œuvre de Tarte aux Fraises
Mettons-nous aux fourneaux ! Suivez ces étapes pour une tarte impeccable et magnifique.
Étape 1 : La Fondation – Cuire la Croûte
Commencez par foncer délicatement votre pâte dans un moule à tarte de 23 cm. Crantez les bords avec vos doigts ou une fourchette pour créer une jolie bordure. Cuisez-la selon les instructions du paquet jusqu’à ce qu’elle soit dorée. Cette étape de cuisson à blanc est cruciale—elle évite un fond détrempé ! Une fois cuite, transférez la croûte sur une grille et laissez-la refroidir complètement. La patience ici fait toute la différence pour cette texture feuilletée parfaite.
Étape 2 : Créer la Glorieuse Nappage
Pendant que la croûte refroidit, préparons la colle magique de notre tarte. Prenez environ 2 tasses et demie de vos fraises et écrasez-les dans un bol à la fourchette. Vous voulez une consistance rustique, confiturée, avec des morceaux. Dans une casserole moyenne, combinez cette purée rouge vif avec le sucre, l’eau, le jus de citron et la maïzena. Fouettez bien pour dissoudre complètement la maïzena. Portez maintenant le mélange à ébullition douce à feu moyen, en remuant souvent. Vous allez le voir se transformer d’un liquide clair en un nappage épais, brillant et rouge foncé en 4-5 minutes environ. Astuce de pro : Continuez de remuer pour éviter les grumeaux. Retirez du feu et incorporez la vanille. Laissez ce glorieux nappage refroidir à température ambiante.
Étape 3 : La Couche Secrète
C’est l’astuce célèbre de ma grand-mère ! Placez les pépites de chocolat blanc dans un bol allant au micro-ondes. Faites fondre par impulsions de 20 secondes, en remuant après chaque, jusqu’à obtenir une texture lisse et fondue. À l’aide du dos d’une cuillère, étalez ce chocolat fondu en une couche fine et uniforme sur le fond de votre croûte de tarte complètement refroidie. Cela agit comme une barrière imperméable, gardant votre croûte croustillante face à la garniture juteuse. Laissez prendre quelques minutes.
Étape 4 : L’Assemblage Final
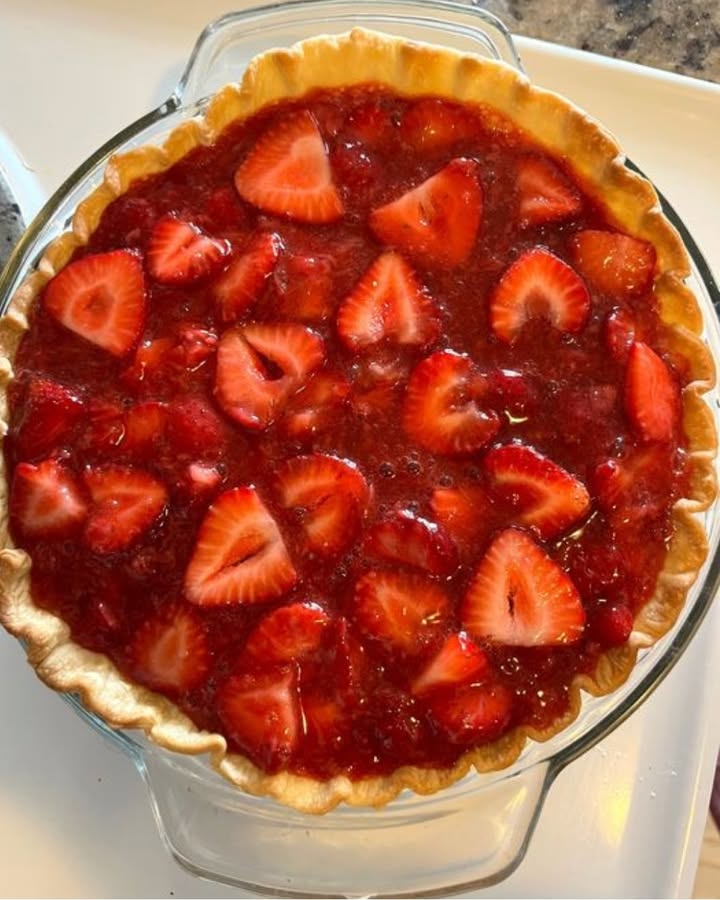
Une fois que votre nappage de fraises cuit a refroidi, place à l’assemblage ! Incorporez délicatement les 3 tasses et demie restantes de fraises fraîches tranchées dans le nappage épais et brillant. Vous verrez le beau contraste entre les baies cuites et les fraîches. Versez soigneusement cette magnifique garniture dans votre croûte préparée, par-dessus la couche de chocolat blanc figée, et étalez-la en un dôme régulier. Admirez ces couleurs de joyaux !
Étape 5 : L’Ultime Test de Patience
Je sais, c’est dur, mais cette étape est non-négociable. Placez soigneusement votre tarte au réfrigérateur, sans couvercle, et laissez-la prendre au moins 6 heures, ou mieux, toute une nuit. Cela permet à la garniture de se figer fermement pour que vous puissiez découper des parts nettes et belles. Astuce du chef : Pour les parts les plus nettes, utilisez un couteau bien aiguisé trempé dans l’eau chaude et essuyé entre chaque coupe.
Temps d’Investissement : Un Peu de Patience pour la Perfection
- Temps de préparation : 30 minutes
- Temps de cuisson : 10 minutes (plus la cuisson de la croûte)
- Temps de repos : 6 heures (minimum)
- Temps total : Environ 7 heures (surtout du repos au frais)
Le Secret N°1 pour la Meilleure Saveur de Fraise
Utilisez les fraises les plus mûres, les plus rouges, les plus parfumées que vous puissiez trouver. Sentez-les ! Si elles ne sentent pas la fraise sucrée, elles n’auront pas de goût dans la tarte. Leur douceur et leur saveur naturelles sont les stars du spectacle. Si elles sont un peu acidulées, vous pouvez ajouter une ou deux cuillères à soupe de sucre en plus dans la garniture.
Un Fait Intéressant sur les Baies
Saviez-vous que la fraise est le seul fruit qui porte ses graines à l’extérieur ? En moyenne, il y a 200 petites graines sur chaque fraise ! Ces graines ajoutent une délicieuse petite pop de texture à notre garniture, ce qui est une des raisons pour lesquelles utiliser des fruits frais est bien meilleur que n’importe quelle garniture toute prête.
Équipement dont Vous Aurez Besoin
- Moule à tarte de 23 cm
- Casserole moyenne
- Bol(s) de mélange
- Fouet et spatule en silicone
- Tasses et cuillères de mesure
- Fourchette pour écraser
Conservation de Votre Tarte aux Fraises
Cette tarte doit impérativement être conservée au réfrigérateur à cause des fruits frais et du produit laitier dans le chocolat blanc. Couvrez-la légèrement de film alimentaire ou placez-la sous un dôme à gâteau. Elle se gardera très bien pendant 2-3 jours. La croûte peut ramollir légèrement après le deuxième jour, mais la saveur ne fera que s’améliorer au fur et à mesure que les baies macèrent.
Note importante : Je ne recommande pas de congeler cette tarte assemblée. La congélation rendra les tranches de fraises fraîches molles et elles libéreront trop d’eau à la décongélation, détruisant la structure de la garniture et rendant la croûte détrempée.
Si vous avez du nappage ou de la garniture cuite en trop avant assemblage, vous pouvez les congeler séparément jusqu’à un mois. Décongelez au frigo et incorporez des baies fraîches quand vous êtes prêt à faire une nouvelle tarte.
Conseils et Astuces pour Réussir Votre Tarte
- Évitez un Fond Détrempé : Outre l’astuce du chocolat blanc, assurez-vous que votre croûte cuite est refroidie à 100 % avant d’ajouter la garniture.
- Épaisseur du Nappage : Laissez le nappage mijoter le temps indiqué. Il doit recouvrir épais le dos d’une cuillère. S’il semble trop liquide, cuisez-le une minute de plus.
- Tranches Uniformes : Essayez de couper vos fraises en tranches d’épaisseur similaire pour une répartition et une présentation parfaites.
- Contrôle de la Douceur : Goûtez une fraise avant de commencer ! Ajustez le sucre dans le nappage de quelques cuillères à soupe selon la douceur naturelle de vos fruits.
Idées de Présentation pour Épater Vos Invités
- Servez chaque part avec une généreuse quenelle de crème chantilly maison ou une boule de glace à la vanille.
- Décorer avec une fraise entière parfaite et une feuille de menthe fraîche sur le bord de l’assiette.
- Pour une touche chic, saupoudrez l’assiette d’un peu de sucre glace ou d’un filet de réduction de vinaigre balsamique.
- Coupez la tarte en parts plus petites et servez-la dans un trio de desserts avec le café.
6 Délicieuses Variations de Votre Tarte aux Fraises
Vous aimez cette recette ? Voici quelques façons amusantes de la customiser !
- Tarte aux Fruits Rouges : Remplacez la moitié des fraises par des framboises, myrtilles et mûres pour une touche patriotique ou aux saveurs plus profondes.
- Tournure Citron-Basilic : Ajoutez le zeste d’un citron à la garniture et chiffonnez quelques feuilles de basilic frais dans les fraises avant de les incorporer.
- Croûte aux Biscuits : Utilisez une croûte faite ou achetée de biscuits type « petit beurre » pour un profil de saveur différent qui se marie à merveille avec les baies.
- Le Rêve des Chocovores : Remplacez la couche de chocolat blanc par du chocolat noir ou mi-sucré fondu pour une base riche et décadente.
- Fusion Cheesecake : Étalez une fine couche de fromage à la crème ou de mascarpone sucré sur la croûte cuite avant d’ajouter le chocolat blanc et la garniture.
- Option Sans Gluten : Utilisez votre recette de pâte à tarte sans gluten préférée ou une croûte faite de biscuits sans gluten émiettés et de beurre.
Expérimenter avec les saveurs fait partie du plaisir de la pâtisserie ! Si vous cherchez d’autres desserts à couper le souffle, vous pourriez adorer cet incroyable Gâteau au Chocolat Ultra-Moelleux pour une gourmandise intense, ou un classique Gâteau aux Fruits Facile pour les fêtes. Les amateurs de café doivent absolument essayer ce Gâteau Mocha Fondant, et pour une vraie célébration, rien ne vaut un sublime Gâteau Red Velvet au Cheesecake et Noix.
Erreurs Courantes à Éviter Quand Vous Faites une Tarte aux Fraises
Erreur 1 : Sauter le Temps de Repos Complet
C’est le plus gros piège ! Couper une tarte qui n’a pas pris au moins 6 heures donne lieu à un désordre liquide et mal tenu qui ne tiendra pas sur l’assiette. La maïzena a besoin de ce temps de refroidissement prolongé pour atteindre son plein pouvoir épaississant. Prévoyez et faites votre tarte la veille. Votre patience sera récompensée par des parts propres et parfaites.
Erreur 2 : Ne Pas Cuire Assez Longtemps le Nappage
Si vous retirez le nappage du feu dès qu’il commence à bouillonner, il ne sera pas assez épais. La maïzena doit atteindre une pleine ébullition pour s’activer correctement. Laissez-le frémir activement pendant les 4-5 minutes complètes jusqu’à ce qu’il soit très épais et nappe votre cuillère. Un nappage bien cuit sera presque comme un pudding en refroidissant, exactement ce qu’il faut pour soutenir ces belles baies.
Erreur 3 : Ajouter la Garniture sur une Croûte Tiède
Même une croûte légèrement tiède fera fondre votre barrière de chocolat blanc et commencera à cuire à la vapeur le fond de la pâte, la rendant molle et caoutchouteuse au lieu de feuilletée. Cela peut aussi faire « pleurer » la garniture délicate. Laissez toujours, toujours votre croûte cuite refroidir complètement sur une grille avant même de penser à ajouter la couche suivante. C’est une étape non-négociable pour la texture parfaite.
Erreur 4 : Utiliser des Baies Pas Mûres ou Surgelées (Sans Ajuster)
Les fraises pas mûres manquent de douceur et de saveur, laissant votre tarte fade. À l’inverse, utiliser des baies surgelées directement dans la garniture sans les décongeler et les égoutter ajoutera trop d’eau excédentaire, empêchant votre nappage de prendre. Si vous devez utiliser des surgelées, décongelez-les complètement dans une passoire au-dessus d’un bol, récupérez le jus, et utilisez ce jus comme partie de l’eau dans le nappage, en réduisant un peu le sucre si le jus est déjà sucré.
Un Mot sur les Bons Ingrédients
Commencer avec des ingrédients de haute qualité et frais, comme des fraises mûres, n’est pas qu’une question de goût—c’est une pierre angulaire pour construire de bonnes habitudes alimentaires. Cuisiner maison vous permet de contrôler le sucre et d’apprécier les vraies saveurs des aliments, une pratique délicieuse et gratifiante pour toute la famille.
Si cette Tarte aux Fraises vous a donné envie de pâtisser, je vous invite à explorer toute ma collection de douceurs dans la section Gâteaux & Pâtisseries, où vous trouverez tout, des biscuits simples aux gâteaux à étages élaborés.
Vos Questions sur la Tarte aux Fraises, Répondue
Puis-je utiliser une pâte à tarte du commerce ?
Absolument, et je le fais souvent ! Une pâte à tarte surgelée de bonne qualité, au beurre, fonctionne merveilleusement bien et fait gagner beaucoup de temps. Assurez-vous juste de suivre les instructions pour la cuisson à blanc (généralement piquer la pâte et utiliser des billes ou des haricots secs) pour éviter qu’elle ne gonfle. La clé est de la laisser refroidir complètement avant de continuer, qu’elle soit maison ou du commerce.
Pourquoi faut-il écraser une partie des fraises ?
Écraser une portion des baies crée une base concentrée, confiturée pour votre nappage. Cela apporte une saveur intense de fraise et de la pectine naturelle, ce qui aide la garniture à prendre. Si vous n’utilisiez que des baies entières ou tranchées, la garniture serait beaucoup plus liquide et coulante. Les fraises écrasées créent cette belle sauce épaisse et brillante qui lie le tout.
Ma garniture est trop liquide après le repos. Que s’est-il passé ?
Cela signifie généralement que le nappage à la maïzena n’a pas été cuit assez longtemps. La maïzena doit atteindre une ébullition franche et la maintenir une minute ou deux pour activer ses propriétés épaississantes. Une autre possibilité est que la tarte n’a pas reposé assez longtemps. Si vous êtes pressé, vous pouvez remettre la garniture dans une casserole, la porter à ébullition avec une cuillère à café supplémentaire de maïzena mélangée à de l’eau, puis la refroidir à nouveau et ré-assembler.
Puis-je préparer cette tarte à l’avance ?
Oui, et je le recommande vivement ! Cette tarte est même meilleure préparée la veille. Le repos prolongé assure une prise parfaite et permet aux saveurs de se mélanger magnifiquement. Gardez-la simplement couverte au réfrigérateur. Ajoutez la crème chantilly ou les garnitures fraîches juste avant de servir pour la meilleure présentation et texture.
Par quoi remplacer le chocolat blanc ?
Si vous n’êtes pas fan de chocolat blanc, vous avez plusieurs options. Une fine couche de chocolat noir ou mi-sucré fondu serait délicieuse. Sinon, vous pouvez badigeonner la croûte refroidie avec un blanc d’œuf légèrement battu et la cuire 2 minutes de plus pour créer un sceau. Certains pâtissiers utilisent aussi un mélange de fromage à la crème et d’un peu de sucre ramolli et étalé finement.
Comment obtenir des parts nettes sans gâchis ?
Utilisez un couteau bien aiguisé à lame fine. Trempez-le dans un verre d’eau très chaude et essuyez-le avec un torchon propre avant chaque coupe. La chaleur aide la lame à glisser proprement dans la garniture et la couche de chocolat, évitant qu’elle ne traîne et n’écrase. Essuyer assure que chaque part est impeccable.
Puis-je utiliser d’autres fruits ?
Cette méthode fonctionne à merveille avec d’autres fruits tendres. Essayez avec des framboises, des mûres, des pêches, ou un mélange ! Gardez à l’esprit que les fruits très juteux comme les pêches peuvent nécessiter une cuillère à soupe supplémentaire de maïzena. Goûtez toujours votre fruit d’abord et ajustez le sucre dans le nappage en conséquence, car les niveaux d’acidité varient.
Est-il nécessaire d’utiliser du jus de citron ?
Le jus de citron est important pour deux raisons. D’abord, il ajoute une note de fraîcheur qui équilibre la douceur et rehausse la saveur de la fraise, la rendant plus « fruitée ». Ensuite, l’acidité aide à l’activation de la maïzena et peut aider à maintenir la couleur rouge vif des baies. Ne le zappez pas !
Puis-je congeler les restes de tarte aux fraises ?
Je ne recommande pas de congeler la tarte entièrement assemblée, car la texture des tranches de fraises fraîches en souffrirait beaucoup, devenant molle et aqueuse à la décongélation. Cependant, vous pouvez congeler le nappage cuit et refroidi (sans les fraises fraîches incorporées) jusqu’à un mois. Décongelez-le au frigo toute la nuit, puis incorporez des fraises fraîches tranchées et assemblez dans une nouvelle croûte.
Combien de temps se conserve la tarte au frigo ?
Votre tarte aux fraises se conservera bien, couverte, au réfrigérateur pendant 2 à 3 jours. La croûte ramollira progressivement à cause de l’humidité de la garniture, mais le goût restera délicieux. Pour la meilleure texture, dégustez-la dans les 48 premières heures. Gardez-la toujours au frais.
Une Douce Réflexion pour Finir
Voilà—la recette de mon cœur pour la Tarte aux Fraises Classique Parfaite. C’est plus qu’un dessert ; c’est un vaisseau pour le soleil, la nostalgie et les sourires partagés autour de la table. Le simple fait de transformer des baies fraîches en une tarte brillante et bien prise a toujours quelque chose de magique. Alors attrapez ces fraises bien mûres, faites confiance au processus (surtout pour le repos au frais !), et préparez-vous à illuminer la journée de quelqu’un avec une part d’été pur et simple. Bonne pâtisserie !
Equipment
- Moule à tarte de 9 pouces
- Casserole moyenne
- Bols de mélange
- Fouet et spatule en silicone
- Tasses et cuillères à mesurer
Ingrédients
- 1 pâte à tarte prête ou achetée en magasin
- ¾ tasse pépites de chocolat blanc
- 6 tasses fraises fraîches lavées, équeutées et tranchées
- 1 tasse sucre granulé
- 1 cuillère à café extrait de vanille pure
- 3 cuillères à soupe fécule de maïs
- ¾ tasse eau
- 1½ cuillères à soupe jus de citron frais
Instructions
- Préchauffez votre four et foncez la pâte à tarte dans un moule de 9 pouces.
- Faites cuire la pâte selon les instructions jusqu'à obtenir une belle couleur dorée, puis laissez refroidir complètement.
- Pendant que la croûte refroidit, écrasez 2 ½ tasses de fraises pour former une purée rustique.
- Dans une casserole, mélangez la purée de fraises, le sucre, l'eau, le jus de citron et la fécule de maïs.
- Faites bouillir le mélange à feu moyen en remuant souvent jusqu'à obtenir un glaçage épais en 4-5 minutes.
- Retirez du feu et incorporez la vanille, puis laissez refroidir à température ambiante.
- Faites fondre les pépites de chocolat blanc au micro-ondes et étalez-les en une couche uniforme sur le fond de la croûte refroidie.
- Incorporez délicatement les 3 ½ tasses restantes de fraises tranchées dans le glaçage préparé.
- Versez ce mélange dans la croûte sur la couche de chocolat blanc et égalisez la surface.
- Réfrigérez la tarte pendant au moins 6 heures ou toute la nuit avant de servir.
Notes
Nutrition

Je suis Céline, une véritable passionnée d’ustensiles et de matériel de cuisine ! J’adore tester, comparer et découvrir les meilleurs équipements pour rendre la cuisine plus efficace et agréable. Que ce soit un bon couteau, un robot performant ou une poêle incontournable, je suis toujours à la recherche des outils qui feront la différence. Mon but est de vous guider dans vos choix pour que vous ayez le bon matériel adapté à vos besoins.