
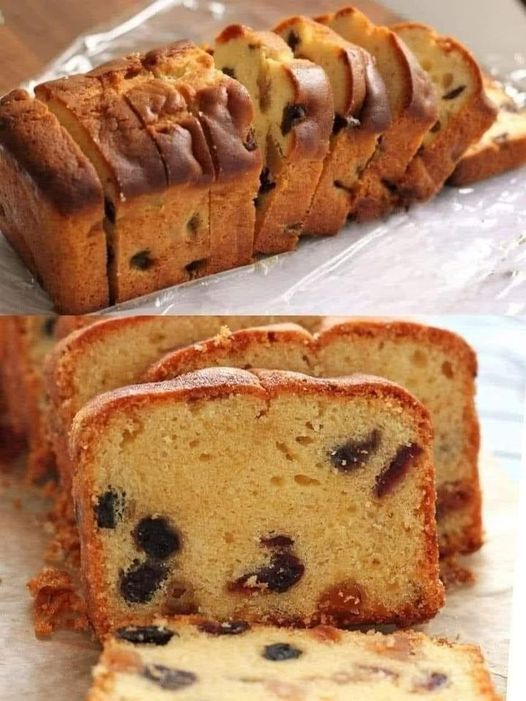
Recette Facile de Gâteau aux Fruits : Votre Nouvelle Tradition de Fêtes
Soyons honnêtes. Le mot « fruitcake » a souvent mauvaise réputation. On imagine des briques sèches et lourdes venues d’un parent éloigné. Et si je vous disais que j’ai une recette qui va tout changer ? Cette recette facile de gâteau aux fruits est celle qui a finalement conquis ma famille sceptique. Il est moelleux, truffé de fruits juteux et de noix croquantes, et parfumé aux épices chaudes. C’est le gâteau qui disparaît en premier de mon plateau de fêtes. Laissez-moi vous montrer à quel point un véritable Gâteau Fruité Facile maison peut être simple et gratifiant !
L’Histoire de Ce Gâteau Fruité Facile
Le gâteau aux fruits a des racines anciennes, qui remontent à l’époque romaine. Ils conservaient les fruits et les noix dans une pâte d’orge. Au fil des siècles, il est devenu un mets de fêtes précieux car ses ingrédients se conservaient bien. Ma version simplifie le processus souvent long. J’ai zappé les semaines de « nourrissage » du gâteau avec de l’alcool. Au lieu de cela, je me suis concentrée sur une pâte rapide qui offre une saveur et un moelleux incroyables dès la sortie du four. C’est la recette moderne de gâteau aux fruits qui honore la tradition sans les tracas. Parfait pour les pâtissiers d’aujourd’hui, pressés mais qui veulent un goût de nostalgie.
Pourquoi Vous Allez Adorer Ce Gâteau aux Fruits
Ce n’est pas n’importe quel gâteau. C’est une célébration dans un moule à cake ! Premièrement, c’est incroyablement simple. Pas besoin de compétences particulières, juste d’un bol et d’une cuillère. Deuxièmement, le mélange de fruits secs sucrés, de noix toastées et de cannelle réconfortante est un pur bonheur. Il parfume votre maison d’une odeur de fêtes merveilleuse. Troisièmement, il s’améliore avec le temps. Un jour ou deux emballé laisse les saveurs se mélanger et s’intensifier. Vous l’aimerez pour son goût, sa simplicité et les heureux souvenirs qu’il crée.
Quand Préparer Ce Gâteau Fruité Festif
Ce gâteau est merveilleusement polyvalent ! Bien sûr, c’est une star pendant Noël et Thanksgiving. Mais ne le réservez pas seulement pour l’hiver. Il est fantastique pour un goûter entre amis, comme cadeau maison attentionné, ou emballé pour un pique-nique. J’adore en trancher une part pour un petit-déjeuner copieux avec une tasse de café. Toute occasion qui appelle un peu de douceur et beaucoup d’amour est parfaite pour ce gâteau aux fruits.
Votre Liste de Courses : Ingrédients du Gâteau aux Fruits
Voici tout ce dont vous avez besoin. Je parie que vous avez déjà la plupart des choses !
- 2 tasses de fruits secs mélangés (raisins secs, raisins de Corinthe, dattes hachées, cerises confites, écorces d’agrumes confites)
- 1 tasse de noix hachées (noix ou noix de pécan)
- 1 tasse de farine tout usage
- 1/2 tasse de beurre non salé, ramolli
- 1/2 tasse de sucre cristallisé
- 2 gros œufs
- 1 cuillère à café d’extrait de vanille
- 1/2 cuillère à café de levure chimique
- 1/2 cuillère à café de cannelle moulue
- 1/4 cuillère à café de noix de muscade moulue
- 1/4 cuillère à café de sel
Pas de Problème ! Idées de Substitutions Pratiques
Ne stressez pas s’il vous manque quelque chose. La pâtisserie, c’est la créativité !
- Fruits Secs : Utilisez ceux que vous aimez ! Abricots, canneberges, figues, ou même mangue séchée fonctionnent à merveille.
- Noix : Amandes, noisettes ou pistaches sont d’excellents substituts. Pour une version sans noix, utilisez des graines de tournesol ou de courge.
- Beurre : Vous pouvez utiliser du beurre salé ; omettez simplement le 1/4 de cuillère à café de sel ajouté dans la recette.
- Épices : Essayez d’ajouter une pincée de gingembre, de quatre-épices ou de cardamome pour une touche différente.
À Nos Fourneaux ! Instructions Étape par Étape
Enfilez votre tablier préféré, et faisons un peu de magie. Je vous guide à chaque étape.
Étape 1 : Préchauffer et Préparer
Commencez par préchauffer votre four à 160°C (325°F). Cette chaleur douce est parfaite pour cuire le gâteau uniformément sans le sécher. Prenez votre moule à cake et beurrez-le généreusement ou vaporisez-le avec un antiadhésif. Farinez-le légèrement en tapant l’excédent. Ou, pour un nettoyage ultra facile, chemisez-le avec du papier sulfurisé en laissant dépasser les bords. Cette simple préparation permet à votre magnifique gâteau aux fruits facile de sortir sans problème.
Étape 2 : Enrober les Fruits et les Noix
Dans un bol moyen, mélangez votre assortiment coloré de fruits secs et de noix hachées. Les noix ajoutent un croquant merveilleux. Saupoudrez environ 2 cuillères à soupe de la farine mesurée dessus. Mélangez avec les mains ou une cuillère jusqu’à ce que tout soit légèrement enrobé. Cette petite astuce est un truc de pro ! Elle empêche tous les fruits et noix de tomber au fond pendant la cuisson. Ils resteront joliment suspendus dans chaque tranche.
Étape 3 : Crémer le Beurre et le Sucre
Dans un grand bol à mélanger, mettez votre beurre ramolli et le sucre cristallisé. À l’aide d’un batteur électrique ou d’une cuillère robuste, fouettez-les ensemble. Vous devez mélanger jusqu’à ce que le mélange blanchisse, devienne léger, mousseux et presque crémeux. Ce processus, appelé « crémage », emprisonne de l’air. C’est le secret d’une texture légère pour votre gâteau aux fruits moelleux. Vous saurez que c’est prêt quand la couleur sera nettement plus claire.
Étape 4 : Ajouter les Œufs et la Vanille
Maintenant, cassez un œuf. Battez-le bien dans le mélange beurre-sucre jusqu’à ce qu’il soit entièrement incorporé. Puis ajoutez le deuxième œuf et battez à nouveau. Les ajouter un par un aide la pâte à rester lisse et émulsionnée. Enfin, incorporez cette cuillère à café d’extrait de vanille. Ce parfum chaud et sucré commence à se répandre, promettant une délicieuse gourmandise.
Étape 5 : Mélanger les Ingrédients Secs
Dans un autre bol, fouettez ensemble le reste de la farine, la levure, la cannelle, la muscade et le sel. Fouetter assure une répartition uniforme de la levure et des épices. Ainsi, chaque bouchée de votre Gâteau Fruité Facile aura la parfaite légèreté et épices. Pas de morceaux fades ici !
Étape 6 : Tout Assembler
Ajoutez progressivement le mélange de farine sec à votre mélange de beurre humide. Mélangez doucement après chaque ajout, juste jusqu’à ce que la farine disparaisse. Ne mélangez pas trop ! Maintenant, place à la partie amusante. Ajoutez votre mélange de fruits et noix enrobés de farine. Utilisez une spatule pour les incorporer délicatement. Regardez la pâte se transformer en une mosaïque de cerises rouges, raisins secs foncés et morceaux de noix.
Étape 7 : Cuire jusqu’à la Perfection Dorée
Versez l’appareil épais et parfumé dans votre moule préparé. Lissez le dessus avec votre spatule. Placez-le au centre de votre four préchauffé. Maintenant, la partie la plus difficile : la patience ! Enfournez pour 60 à 70 minutes. Votre cuisine sentira extraordinairement bon. Le gâteau est cuit quand le dessus est d’un brun doré profond et qu’un cure-dent planté au centre en ressort propre ou avec juste quelques miettes humides.
Étape 8 : Refroidir et Conserver pour la Saveur
Une fois cuit, laissez le gâteau refroidir dans le moule sur une grille pendant environ 10 minutes. Cela lui permet de se raffermir un peu. Puis, passez un couteau sur les bords et retournez-le soigneusement sur la grille pour le laisser refroidir complètement. Astuce du chef : Pour la meilleure saveur, enveloppez le gâteau complètement refroidi dans du film alimentique ou du papier d’aluminium. Laissez-le reposer à température ambiante pendant un jour ou deux. Ce temps de « maturation » permet aux saveurs de se fondre et de devenir vraiment magiques.
Votre Chronologie de Préparation
- Temps de Préparation : 20 minutes
- Temps de Cuisson : 65 minutes
- Temps de Refroidissement : 1 heure
- Développement des Saveurs (optionnel) : 1-2 jours (de repos emballé)
- Temps Total (avant dégustation) : Environ 1 heure 45 minutes
Un Secret pour un Gâteau aux Fruits Super-Moelleux
Mon secret ? Je badigeonne toujours le gâteau complètement refroidi avec une ou deux cuillères à soupe de jus d’orange, de jus de pomme, ou même d’un sirop simple avant de l’emballer. Cela ajoute une couche supplémentaire d’humidité qui garde chaque tranche tendre pendant des jours. C’est une petite étape avec une grande récompense.
Un Fait Amusant sur le Gâteau aux Fruits
Saviez-vous que certains gâteaux aux fruits sont faits pour durer des années, voire des décennies ? Il existe une tradition de conserver un morceau du gâteau de mariage ou de Noël d’une année pour le manger l’année suivante pour porter bonheur. Bien que je ne recommande pas de garder le mien *aussi* longtemps, la bonne conservation de ce gâteau est un clin d’œil à cette riche histoire de préservation et de célébration.
Ce Dont Vous Aurez Besoin pour le Réaliser
- 1 grand bol à mélanger
- 2 bols moyens
- Batteur électrique ou cuillère en bois
- Fouet
- Spatule
- Moule à cake standard de 23 x 13 cm (9×5 pouces)
- Papier sulfurisé (optionnel mais utile)
- Grille de refroidissement
Comment Conserver Votre Chef-d’Œuvre
Une fois votre gâteau aux fruits complètement refroidi, enveloppez-le hermétiquement dans du film alimentique. Vous pouvez ensuite l’envelopper à nouveau dans du papier d’aluminium. Cette double couche le garde moelleux et empêche les transferts d’odeurs du frigo.
Conservez votre gâteau emballé à température ambiante fraîche pendant une semaine. En réalité, son goût est meilleur après 2-3 jours, car les saveurs se développent. Les fruits agissent comme un conservateur naturel.
Pour une conservation plus longue, vous pouvez le congeler. Enveloppez le gâteau hermétiquement, puis placez-le dans un sac de congélation. Il se conservera bien jusqu’à 3 mois. Décongelez-le une nuit à température ambiante lorsque vous souhaitez le déguster à nouveau.
Mes Meilleurs Conseils pour Réussir
- Ramolir Correctement le Beurre : Sortez votre beurre du réfrigérateur au moins une heure avant de commencer. Un beurre ramolli se créme parfaitement avec le sucre.
- Tailler de Taille Régulière : Coupez vos gros fruits secs et noix en morceaux de taille similaire. Cela assure une répartition équilibrée dans chaque bouchée.
- Ne Lésinez pas sur le Refroidissement : Laissez le gâteau refroidir complètement dans le moule avant de le démouler. Un gâteau encore chaud est fragile et peut se casser.
- Tester la Cuisson : Les fours varient. Commencez à vérifier avec un cure-dent à 60 minutes. S’il ressort propre, c’est cuit !
Le Rendre aussi Beau que Bon
- Saupoudrez le dessus de sucre glace juste avant de servir pour un look élégant et neigeux.
- Servez les tranches sur une assiette festive avec une quenelle de crème fouettée légèrement sucrée ou une boule de glace à la vanille.
- Pour une fête, coupez-le en petits carrés et servez-le comme finger food.
- Décorez votre plateau de service avec des cranberries fraîches, des branches de romarin ou des tranches d’orange.
Plus d’Inspirations de Desserts Délicieux
Si vous avez aimé cette recette facile de gâteau aux fruits, vous allez adorer les autres douceurs de ma cuisine ! Pour un délice crémeux et fruité, essayez mon Cheesecake Tropical aux Fruits Frais, qui explose de saveurs ensoleillées. Les amateurs de chocolat doivent absolument tester mon incroyablement simple Gâteau Chocolat Ultra-Moelleux prêt en un rien de temps. Pour un classique revisité, mon Délice Cerise-Fromage fait toujours fureur. Et si vous cherchez un gâteau plein de légumes, ne manquez pas mon décadent Gâteau Carotte-Chocolat.
Erreurs Courantes à Éviter
Erreur 1 : Utiliser du Beurre Froid et Dur
C’est une grosse erreur ! Si votre beurre n’est pas correctement ramolli, il ne se crémera pas bien avec le sucre. Vous obtiendrez un gâteau dense et lourd au lieu d’un gâteau léger et moelleux. Le beurre doit céder sous une légère pression du doigt mais ne doit pas être fondu ou huileux. Anticipez et sortez-le du frigo environ une heure avant de commencer.
Erreur 2 : Ne Pas Enrober les Fruits de Farine
Cela peut sembler être une étape supplémentaire et inutile, mais ne la zappez pas ! Enrober les fruits et noix d’un peu de farine crée une barrière légère. Ça les empêche d’absorber trop d’humidité de la pâte et de tomber directement au fond pendant la cuisson. Cela garantit une belle répartition uniforme des trésors dans chaque tranche.
Erreur 3 : Trop Mélanger la Pâte
Une fois que vous ajoutez la farine, mélangez seulement jusqu’à ce que les ingrédients soient juste combinés. Trop mélanger développe le gluten de la farine. Cela peut rendre votre gâteau aux fruits caoutchouteux et élastique au lieu de tendre et aéré. Une main légère pour incorporer les ingrédients secs et les fruits est la clé d’une texture parfaite.
Erreur 4 : Cuire à une Température Trop Élevée
Le gâteau aux fruits est dense et nécessite une cuisson longue et lente. Si votre four est trop chaud, l’extérieur brûlera avant que l’intérieur ne soit cuit. C’est pourquoi nous utilisons une température modérée de 160°C (325°F). Faites confiance au processus et au temps de cuisson. Utilisez un thermomètre de four si possible pour vous assurer de la température exacte.
Questions Fréquemment Posées
Puis-je utiliser des fruits frais au lieu de fruits secs ?
Je ne recommande pas d’utiliser des fruits frais dans cette recette particulière. Les fruits frais contiennent beaucoup d’eau, qui sera libérée pendant la cuisson. Cette humidité supplémentaire peut rendre le gâteau détrempé, l’empêcher de bien prendre et réduire sa durée de conservation. Les fruits secs apportent une saveur concentrée et la texture idéale pour un gâteau aux fruits traditionnel, moelleux et qui se conserve bien.
Puis-je ajouter de l’alcool comme du rhum ou du cognac ?
Absolument ! Ajouter de l’alcool est un classique pour rehausser la saveur. Vous avez deux excellentes options. Vous pouvez faire tremper vos fruits secs dans 60 à 120 ml de votre spiritueux préféré (rhum, cognac, whisky) toute la nuit avant la cuisson. Ou, vous pouvez badigeonner le gâteau cuit et refroidi avec quelques cuillères à soupe d’alcool avant de l’emballer. L’alcool ajoutera une note profonde et délicieuse au profil aromatique.
Mon gâteau aux fruits est très foncé sur le dessus mais pas cuit à l’intérieur. Que s’est-il passé ?
Cela signifie généralement que votre four était trop chaud, ou que la grille était placée trop haut. Les températures des fours peuvent être inexactes. Investissez dans un thermomètre de four peu coûteux pour vérifier. La prochaine fois, essayez de baisser légèrement la température à 155°C (310°F) et placez le moule dans le tiers inférieur du four. Vous pouvez aussi couvrir légèrement le dessus avec une feuille d’aluminium pour les 15-20 dernières minutes de cuisson pour éviter qu’il ne brunisse trop.
Combien de temps se conserve ce gâteau aux fruits ?
Bien conservé (emballé hermétiquement à température ambiante fraîche), ce gâteau aux fruits restera frais et délicieux environ 1 à 2 semaines. Le sucre et les fruits secs agissent comme des conservateurs naturels. Pour une conservation encore plus longue, vous pouvez le congeler jusqu’à 3 mois. Beaucoup de gens pensent d’ailleurs que la saveur est meilleure après 2-3 jours, car tous les ingrédients ont eu le temps de parfaitement se mélanger.
Puis-je réaliser cette recette sans gluten ?
Oui, vous pouvez expérimenter avec un mélange de farine tout usage sans gluten 1 pour 1. Assurez-vous que le mélange contient un liant comme la gomme xanthane. La texture pourrait être un peu plus friable, mais cela devrait fonctionner. N’oubliez pas d’utiliser des flocons d’avoine certifiés sans gluten si votre mélange en contient, et vérifiez que votre levure chimique est sans gluten.
Que puis-je utiliser à la place des noix en cas d’allergie ?
Pour une version sans noix, omettez-les simplement. Vous pouvez les remplacer par une tasse supplémentaire de fruits secs, par des graines comme des graines de tournesol ou de courge, ou même par des flocons d’avoine pour une texture différente. Le gâteau sera toujours merveilleusement savoureux et moelleux.
Pourquoi mon gâteau aux fruits est-il devenu sec ?
Les raisons les plus courantes pour un gâteau aux fruits sec sont une surcuisson ou un mélange excessif de la pâte. Vérifiez toujours la cuisson quelques minutes avant la fin du temps indiqué. Assurez-vous aussi que vos mesures sont exactes, surtout pour la farine. Versez la farine dans votre tasse à mesurer et nivelez-la ; ne plongez pas directement la tasse dans le sac, ce qui la tasse.
Puis-je faire des mini gâteaux aux fruits ou des muffins ?
Certainement ! Cette pâte fonctionne à merveille pour des mini cakes ou des muffins. Graissez simplement vos mini moules ou vos moules à muffins, remplissez-les aux 2/3, et réduisez le temps de cuisson. Commencez à vérifier à 25-30 minutes. Ils sont adorables en tant que cadeaux individuels ou amuse-bouches de fête.
Est-il nécessaire de laisser le gâteau aux fruits « reposer » avant de le manger ?
Ce n’est pas strictement nécessaire, mais c’est fortement recommandé. La période de repos (1-2 jours emballé) permet à l’humidité des fruits de se redistribuer uniformément dans tout le gâteau. Cela le rend plus moelleux et permet aux saveurs complexes des épices et des fruits de se mélanger et de s’intensifier. Ça vaut l’attente !
Puis-je réduire le sucre dans cette recette ?
Vous pouvez essayer de réduire légèrement le sucre, mais gardez à l’esprit que le sucre n’apporte pas seulement de la douceur. Il contribue aussi à l’humidité, à la tendreté, à la coloration et à la durée de conservation des produits de boulangerie. Une réduction modérée de quelques cuillères à soupe pourrait fonctionner, mais en réduire de moitié donnerait probablement un gâteau dense, sec et à la texture médiocre. Pour plus de conseils sur l’équilibre des saveurs en cuisine, des ressources comme le Programme National Nutrition Santé français offrent de bons conseils pour une alimentation équilibrée.
J’espère que cette recette facile de gâteau aux fruits deviendra un nouveau favori dans votre maison, comme elle l’est dans la mienne. Elle prouve qu’un Gâteau Fruité Facile peut être simple, moelleux et absolument délicieux. Pour plus d’inspirations en pâtisserie et d’idées de desserts délicieux, n’oubliez pas d’explorer toute ma collection de recettes de gâteaux et pâtisseries. Bonne pâtisserie, et savourez chaque douce tranche !
Equipment
- Moule à pain
- Bols à mélanger
- Spatule
- Batteur électrique
- Grille de refroidissement
Ingrédients
- 240 g fruits secs mélangés
- 120 g noix hachées
- 125 g farine tout usage
- 115 g beurre non salé, ramolli
- 100 g sucre granulé
- 2 œufs moyens
- 1 c.à.c extrait de vanille
- 2 c.à.c poudre à lever
- 1 c.à.c cannelle moulue
- 1 c.à.c muscade moulue
- 1 c.à.c sel
Instructions
- Préchauffez votre four à 165°C (325°F) et préparez votre moule à pain.
- Dans un bol moyen, mélangez les fruits secs et les noix avec 2 cuillères à soupe de farine.
- Dans un grand bol, battez le beurre ramolli et le sucre jusqu'à obtenir un mélange mousseux.
- Ajoutez les œufs un à un en battant bien après chaque ajout, puis l'extrait de vanille.
- Dans un autre bol, mélangez la farine restante, la poudre à lever, la cannelle, la muscade et le sel.
- Incorporez progressivement le mélange de farine au mélange de beurre en mélangeant doucement.
- Ajoutez les fruits et les noix enrobés de farine à la pâte et mélangez délicatement.
- Versez la pâte dans le moule préparé et lissez le dessus.
- Enfournez au centre du four et faites cuire pendant 60-70 minutes jusqu'à ce qu'un cure-dent en ressorte propre.
- Laissez refroidir le gâteau dans le moule pendant 10 minutes, puis démoulez-le pour qu'il refroidisse complètement.
Notes
Nutrition

Je suis Céline, une véritable passionnée d’ustensiles et de matériel de cuisine ! J’adore tester, comparer et découvrir les meilleurs équipements pour rendre la cuisine plus efficace et agréable. Que ce soit un bon couteau, un robot performant ou une poêle incontournable, je suis toujours à la recherche des outils qui feront la différence. Mon but est de vous guider dans vos choix pour que vous ayez le bon matériel adapté à vos besoins.