
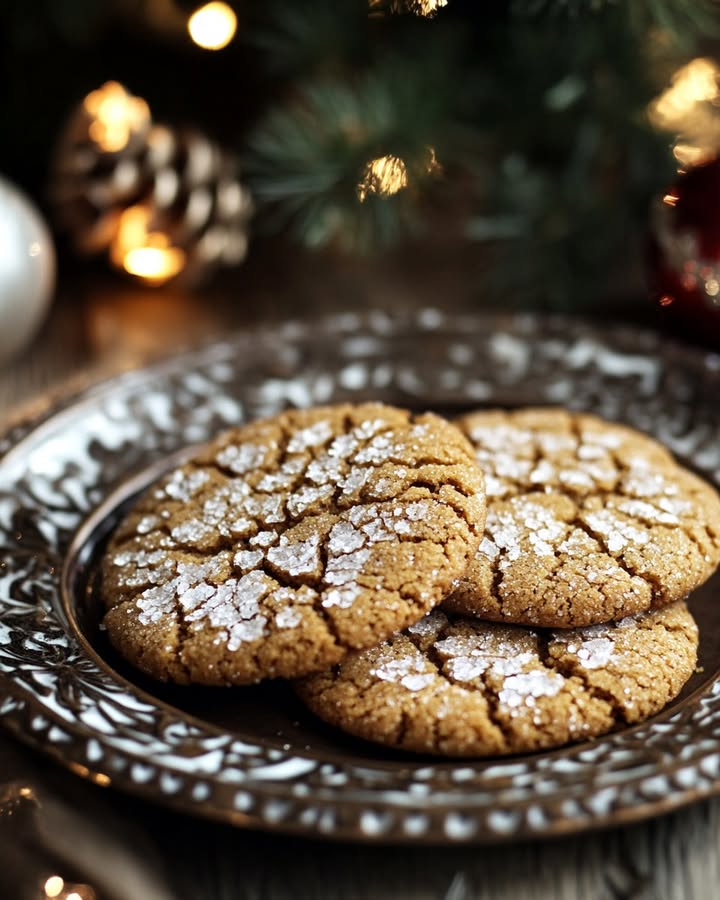
Cookies Craquelés de Noël : la gourmandise sucrée-salée ultime pour les fêtes
Vous connaissez ce moment pendant les fêtes où vous avez juste besoin d’un cookie qui coche toutes les cases ? J’étais là, à fixer une boîte pleine de biscuits bien intentionnés mais ennuyeux. Je voulais quelque chose de magique, quelque chose qui raconte une histoire à chaque bouchée. C’est comme ça que je suis tombée sur ces Cookies Craquelés de Noël. Ils commencent par une couche de toffee maison aux crackers salés (oui, vous avez bien lu !) qui est hachée *et* incorporée à une pâte à cookies au beurre noisette. La première fois que je les ai testés, l’odeur a suffi à faire accourir toute ma famille dans la cuisine. Ils sont désormais incontournables sur notre liste de pâtisseries de fêtes.
L’histoire d’une double texture : les origines de cette recette
Le « Christmas Crack » original est une célèbre et addictive écorce de toffee aux crackers salés. C’est une merveille sans cuisson, adorée pour son croquant sucré-salé parfait. Un après-midi neigeux, je me suis dit : « Et si on prenait la *meilleure partie* de ce crack et qu’on la cuisait *dans* un cookie ? » Un peu de folie culinaire s’en est suivie, mais le résultat a été une pure joie. Cette recette est une belle fusion entre une confiserie de fête américaine classique et un cookie moelleux et riche. C’est une version moderne qui honore la tradition tout en créant quelque chose de totalement nouveau. Chaque fois que je les fais, je me rappelle que les meilleures recettes naissent souvent d’un peu d’expérimentation ludique.
Pourquoi vous allez adorer ces Cookies de Noël Craquants
Soyons honnêtes, un bon cookie de fêtes a besoin de caractère. Et ceux-ci en ont à revendre ! D’abord, il y a ce toffee maison incroyable. C’est plus simple qu’on ne le pense et cela fait toute la différence. Ensuite, il y a la profondeur de saveur du beurre noisette – il ajoute une note chaude et grillée tout simplement divine. La texture est un rêve : un cœur moelleux, des bords croquants et de petites explosions de chocolat et de toffee à chaque bouchée. Ils sont assez impressionnants pour un échange de cookies, mais assez faciles à faire avec vos enfants. Ils sont vraiment la gourmandise sucrée-salée parfaite.
Ces cookies sont comme la petite robe noire de votre pâtisserie de fêtes – ils conviennent à absolument tout ! Bien sûr, ils sont les stars de la table des desserts de Noël. Empaquetez-les dans de jolies boîtes comme cadeaux maison sincères pour les voisins et les enseignants. Apportez un plateau à votre repas partagé des fêtes et regardez-les disparaître en premier. Ils sont aussi le compagnon parfait pour une soirée cinéma cosy avec un chocolat chaud. Franchement, tout jour qui a besoin d’une dose de joie est un bon jour pour ces Cookies de Noël Craquants.
Rassembler vos ingrédients
Voici ce dont vous aurez besoin pour créer cette magie. Je vous promets que la plupart se trouve probablement déjà dans votre placard !
- Pour la base de toffee : Crackers salés type ‘saltine’, beurre doux, sucre roux cassonade, et pépites de chocolat noir.
- Pour la pâte à cookies : Plus de beurre doux (pour le noisetter), farine tout usage, bicarbonate de soude, sel, encore du sucre roux cassonade, sucre blanc, gros œufs (à température ambiante !), et extrait de vanille pur.
Idées de substitutions pratiques
Il vous manque quelque chose ? Pas de panique ! Voici quelques échanges faciles.
- Crackers : Des crackers type ‘graham’ ou des biscuits Ritz fonctionnent très bien pour une saveur légèrement différente.
- Pépites de chocolat : Utilisez du chocolat au lait pour une touche plus douce, ou du chocolat noir pour un goût plus intense. Même des tablettes de chocolat hachées font l’affaire !
- Sucre roux : En cas de besoin, vous pouvez utiliser uniquement du sucre blanc, mais vous perdrez cette riche saveur de mélasse et cette texture moelleuse.
- Extrait de vanille : Un peu de bourbon ou d’extrait d’amande peut apporter une touche originale.
Prêt(e) à cuisiner ? C’est parti ! Dégagez un peu de plan de travail et mettez de la musique de fêtes.
Étape 1 : Préparer la couche de toffee maison
C’est là que commence la magie du « crack ». Tapissez votre plat de cuisson 22×33 cm (9×13 pouces) de papier sulfurisé – c’est un sauveur pour le nettoyage. Disposez les crackers en une seule couche régulière, en en cassant quelques-uns pour combler les trous. Maintenant, dans une casserole, faites fondre le beurre avec le sucre roux. Portez à ébullition vive, en remuant de temps en temps avec une cuillère en bois. Une fois à ébullition, réduisez légèrement le feu et laissez bouillonner pendant 3-4 bonnes minutes. Vous verrez le mélange légèrement épaissir et prendre une superbe couleur caramel. Versez délicatement ce toffee magnifique sur vos crackers, en l’étalant rapidement. Enfournez à 220°C (425°F) pendant seulement 4-5 minutes, jusqu’à ce que ça bouillonne comme un paysage volcanique. Sortez-le et saupoudrez immédiatement les pépites de chocolat sur le dessus. En une minute, elles seront molles et fondantes. Étalez ce chocolat en une couche uniforme avec une spatule coudée. Maintenant, patience ! Glissez le plat entier au congélateur pour qu’il durcisse. Cela crée la base croquante et chocolatée que nous hacherons plus tard.
Étape 2 : Faire blondir le beurre pour une profondeur de saveur
Pendant que le toffee durcit, préparons la saveur pour la pâte à cookies. Dans une casserole propre, faites fondre le reste du beurre à feu moyen. Il va mousser, crépiter, et puis la magie opère. Continuez à remuer ! Après environ 5 minutes, vous verrez des petits morceaux brun doré se former au fond et le beurre dégagera une merveilleuse odeur grillée et de noisette. C’est le beurre noisette, et c’est l’arme secrète pour des cookies incroyables. Versez-le immédiatement dans un grand bol résistant à la chaleur pour arrêter la cuisson. Laissez refroidir environ 15 minutes. Vous voulez qu’il soit tiède, pas chaud, pour ne pas cuire les œufs à l’étape suivante.
Étape 3 : Mélanger la pâte à cookies
Dans un bol moyen, fouettez ensemble vos ingrédients secs : farine, bicarbonate de soude et sel. Cela assure une distribution uniforme. Au beurre blondi légèrement refroidi, ajoutez les deux sucres. Fouettez vigoureusement – vous verrez le mélange devenir lisse et brillant. Maintenant, fouettez les œufs, un par un, puis la vanille. L’arôme à ce stade est tout simplement divin. Versez les ingrédients secs dans les ingrédients humides. Utilisez une spatule robuste pour incorporer le tout jusqu’à ce que ce soit juste combiné. Ne sur-mélangez pas ! Maintenant, sortez votre toffee durci du congélateur. Utilisez un couteau (pas vos mains – le chocolat fondrait !) pour le hacher en petits morceaux irréguliers. Incorporez délicatement la plupart de ces précieux morceaux de toffee à votre pâte, en en réservant une poignée pour décorer les cookies cuits.
Étape 4 : Le temps de repos crucial
Je sais, je sais. Attendre, c’est dur. Mais faites-moi confiance, cette étape est incontournable pour le cookie parfait. Couvrez le bol de film alimentaire et mettez la pâte au réfrigérateur pendant au moins 2 heures, ou jusqu’à 3 jours. Cela permet aux saveurs de se mélanger et à la farine de bien s’hydrater. Cela raffermit aussi la pâte, empêchant les cookies de trop s’étaler dans le four. Une pâte reposée cuit avec cette combinaison idéale d’intérieur moelleux et de bord croustillant. Considérez que c’est votre chance de faire un peu d’emballage de cadeaux !
Étape 5 : Cuire vos Cookies de Noël Craquants
Préchauffez votre four à 180°C (350°F). Tapissez vos plaques de cuisson de papier sulfurisé. À l’aide d’une cuillère à cookie ou de deux cuillères, formez des boules de pâte en les espaçant d’environ 5 cm. Elles vont un peu s’étaler. Enfournez pour 8 à 10 minutes. Vous cherchez des bords dorés tandis que les centres paraissent encore légèrement mous. Ils vont se raffermir en refroidissant. L’odeur dans votre cuisine sera absolument enivrante. Laissez les cookies refroidir sur la plaque de cuisson pendant 5 minutes avant de les transférer sur une grille. Ce temps d’attente les aide à prendre parfaitement.
Étape 6 : La grande finale : un peu plus de toffee !
Pendant que les cookies sont encore légèrement tièdes, appuyez délicatement quelques-uns des morceaux de toffee réservés sur le dessus de chacun. Ce n’est pas juste pour la beauté (même s’ils sont superbes). Cela ajoute une couche de texture supplémentaire et crie « fait maison avec amour ». Le cookie tiède ramollit juste assez le toffee pour qu’il colle. Laissez-les refroidir complètement. Ensuite, versez-vous un verre de lait et faites votre dégustation officielle. Vous l’avez mérité !
Planifier votre aventure culinaire
Planifions votre temps. Le toffee prend environ 15 minutes du début au congélateur. Faire blondir le beurre et préparer la pâte prend 20 minutes de plus. N’oubliez pas le repos obligatoire de 2 heures. La cuisson est rapide – environ 10 minutes par fournée. Au total, du premier ingrédient à la première bouchée, prévoyez environ 3 heures, dont la majeure partie est du repos sans intervention. Parfait pour un après-midi festif en cuisine.
Mon plus gros conseil ? Utilisez une balance de cuisine pour la farine. Mesurer la farine avec une tasse peut la tasser, ce qui donne des cookies secs. La peser (180g par tasse de farine tout usage) garantit une texture parfaite à chaque fois. C’est une petite habitude qui fait une énorme différence.
Un peu d’info en plus : la douce science du sel
Vous êtes-vous déjà demandé pourquoi les crackers salés fonctionnent si bien ? Tout est question de contraste ! Le sel des crackers atténue la douceur intense du toffee et du chocolat. Cet équilibre fait ressortir les saveurs et vous donne envie de revenir pour « encore un ». C’est un brillant exemple de la façon dont un élément salé peut élever un dessert au statut de légende.
L’équipement nécessaire
Pas besoin d’ustensiles sophistiqués ! Un moule rectangulaire 22×33 cm (9×13 pouces), du papier sulfurisé, deux casseroles (ou une que vous laverez entre les deux), un grand saladier, un fouet, une spatule et des plaques de cuisson feront l’affaire. Une spatule coudée est pratique pour étaler le chocolat, et une cuillère à cookie assure une cuisson uniforme, mais une cuillère ordinaire fonctionne très bien.
Conserver vos chefs-d’œuvre de fêtes
Pour que vos cookies aient un goût de fraîcheur, conservez-les dans un contenant hermétique à température ambiante. Ils resteront parfaits jusqu’à 5 jours. Si votre cuisine est chaude, vous pouvez les conserver au réfrigérateur jusqu’à 10 jours. Le froid rend le toffee encore plus croquant !
Ces cookies se congèlent à merveille pour un stockage à long terme. Placez les cookies refroidis en une seule couche dans un contenant allant au congélateur, en les séparant par du papier sulfurisé. Ils garderont leur saveur et leur texture jusqu’à 6 mois. Décongelez-les une nuit au réfrigérateur ou quelques heures sur le comptoir.
Vous pouvez aussi congeler la pâte crue ! Façonnez la pâte reposée en boules, congelez-les sur une plaque pendant 30 minutes, puis transférez-les dans un sac de congélation. Cuisez directement congelés, en ajoutant juste 1 à 2 minutes de cuisson en plus. Avoir de la pâte à cookies prête à cuire au congélateur est un cadeau des fêtes à vous faire à vous-même.
Conseils et astuces pour réussir
- Utilisez des œufs à température ambiante. Ils s’incorporeront au beurre et aux sucres de façon beaucoup plus homogène, créant une meilleure émulsion pour un cookie plus moelleux.
- Ne zappez pas le papier sulfurisé pour le toffee. C’est le seul moyen infaillible de sortir cette couche durcie du moule en un seul morceau pour la hacher.
- Laissez le beurre noisette refroidir un peu. Ajouter des œufs dans du beurre chaud les brouillerait, et nous faisons des cookies, pas le petit-déjeuner !
- Sous-cuisez légèrement. Les cookies continuent de cuire sur la plaque chaude. Les sortir lorsque les bords sont fermes et dorés mais que le centre paraît encore légèrement mou garantit un cœur moelleux.
Idées de présentation pour impressionner
Faites briller ces cookies ! Empilez-les sur un présentoir à gâteau vintage pour une tour de cookies. Attachez des paquets de trois ou quatre avec un ruban et de la ficelle décorative pour des cadeaux adorables. Pour une fête, disposez-les sur un plateau et saupoudrez-les d’une légère neige de sucre glace. Servez-les aux côtés d’autres classiques des fêtes, comme un riche dessert chocolat et fraise ou de délicieux petits roulés pain d’épices à la cannelle, pour un buffet de desserts vraiment spectaculaire.
6 délicieuses variantes à essayer
Vous aimez la recette de base ? Voici quelques façons amusantes de la varier pour votre prochaine fournée !
- Note mentholée : Ajoutez 1/2 cuillère à café d’extrait de menthe poivrée à la pâte à cookies et utilisez des pépites de chocolat noir. Concassez des cannes de bonbon et saupoudrez-les sur le dessus avec le surplus de toffee pour un combo de fêtes classique.
- Délice croquant : Incorporez 1/2 tasse de noix de pécan ou de noix grillées et hachées avec les morceaux de toffee. Le goût de noisette s’accorde parfaitement avec le beurre noisette.
- Sophistication au sel marin : Après avoir décoré les cookies cuits avec du toffee, donnez-leur une très légère pincée de gros sel marin. Cela rehausse toutes les saveurs sucrées-salées.
- Double chocolat : Remplacez 1/4 de tasse de farine par de la poudre de cacao non sucrée pour une pâte à cookies chocolatée. Utilisez des pépites de chocolat au lait sur le toffee pour une expérience ultra-chocolatée.
- Puissance bretzel : Remplacez la moitié des crackers salés dans la base de toffee par des mini bretzels pour un croquant salé encore plus prononcé. C’est addictif !
- La fraîcheur du zeste d’orange : Ajoutez le zeste d’une orange à la pâte à cookies. La note d’agrume atténue magnifiquement la richesse et ajoute un arôme festif.
Erreurs courantes à éviter
Erreur 1 : Ne pas faire bouillir le toffee assez longtemps
C’est l’écueil le plus courant. Si vous ne laissez pas le mélange beurre-sucre bouillir pendant les 3-4 minutes complètes, le toffee ne prendra pas correctement. Vous vous retrouverez avec une couche molle et collante, difficile à hacher et qui peut rendre votre pâte à cookies grasse. Le mélange a besoin de temps pour que l’eau s’évapore et que le sucre atteigne le stade de cassant mou. Astuce pro : Utilisez un minuteur ! Surveillez jusqu’à ce que le mélange épaississe légèrement et nappe le dos de votre cuillère avant de le verser sur les crackers.
Erreur 2 : Ajouter les œufs dans du beurre noisette trop chaud
L’excitation du beurre noisette peut mener à l’impatience. Si vous versez vos œufs dans du beurre trop chaud, ils commenceront à cuire au contact. Cela crée de petits morceaux d’œuf brouillé dans votre pâte et peut briser l’émulsion, donnant un cookie gras et plat. Transférez toujours le beurre noisette dans un bol froid et laissez-le reposer jusqu’à ce qu’il soit tiède au toucher, pas brûlant. Vous devez pouvoir y tremper votre doigt confortablement.
Erreur 3 : Zapper le temps de repos de la pâte
Je comprends, vous voulez des cookies maintenant ! Mais reposer la pâte, c’est ce qui donne à ces cookies leur structure. Si vous cuisinez une pâte tiède, le beurre fond trop vite dans le four. Cela fait que les cookies s’étalent en flaques fines et grasses au lieu d’être des délices dodus et moelleux. Le repos solidifie le beurre, de sorte qu’il fond au bon rythme pendant la cuisson. Cela permet aussi à la farine d’absorber complètement les ingrédients humides. Si vous êtes pressé, même 30 minutes au congélateur peuvent aider.
Erreur 4 : Trop cuire les cookies
A cause des morceaux de toffee foncé et du beurre noisette, ces cookies peuvent paraître cuits avant qu’ils ne le soient vraiment. Les cuire pendant tout le temps indiqué alors qu’ils sont déjà dorés peut donner un cookie sec et friable. Rappelez-vous, ils continuent de cuire sur la plaque chaude. Astuce du chef : Sortez-les lorsque les bords sont fermes et dorés mais que les centres paraissent encore légèrement pas assez cuits et bombés. Ils prendront parfaitement en refroidissant.
Erreur 5 : Hacher le toffee avec les mains
Le toffee donne envie d’être cassé avec les doigts, mais la chaleur de vos mains fera fondre l’enrobage de chocolat, créant une situation désordonnée et collante. Cela peut aussi faire éclater le toffee de manière inégale. Utilisez toujours un couteau sur une planche à découper. Vous obtiendrez des morceaux nets et réguliers, faciles à incorporer à votre pâte et à saupoudrer sur le dessus.
Questions fréquemment posées
Puis-je utiliser du toffee du commerce ou des morceaux de type ‘Heath’ à la place ?
Vous pouvez absolument en cas de besoin ! Cela vous épargnera une étape. Cependant, la saveur ne sera pas tout à fait la même. Le toffee maison aux crackers salés a une profondeur beurrée unique et une texture spécifique qui se fond parfaitement dans le cookie. Les morceaux du commerce sont souvent plus durs et plus uniformes. Si vous les utilisez, je recommande d’ajouter une petite pincée de sel marin à votre pâte pour imiter cet équilibre sucré-salé. Mais pour la vraie expérience du Cookie Craquelé de Noël, faire le toffee en vaut la peine.
Pourquoi mon toffee est-il devenu granuleux ou sableux ?
Cela arrive généralement si le sucre n’était pas complètement dissous avant que le mélange n’arrive à ébullition, ou si vous l’avez remué trop vigoureusement pendant l’ébullition. Pour éviter cela, remuez doucement mais régulièrement lorsque le beurre et le sucre fondent ensemble. Une fois à ébullition, limitez vos remous à un léger tour de casserole occasionnel. Cela permet au sucre de cuire uniformément sans cristalliser. Utiliser une casserole de couleur claire peut aussi vous aider à mieux voir le changement de couleur.
Comment savoir quand le beurre noisette est prêt ?
Faire blondir le beurre est une expérience sensorielle. D’abord, vous entendrez les crépitements et les claquements lorsque l’eau s’évapore. Ensuite, vous verrez les matières solides du lait au fond de la casserole passer du jaune au brun doré toasté. L’arôme passera du beurré au profondément grillé, comme des noisettes toastées. Dès que vous voyez ces petits morceaux bruns et sentez ce parfum de noisette, retirez du feu et versez dans votre bol. Il peut passer de parfait à brûlé en quelques secondes, alors restez près !
Ma pâte est très friable après le repos. Ai-je fait quelque chose de mal ?
C’est normal ! Le beurre noisette a moins de teneur en eau que le beurre fondu normal, et le repos durcit le tout. Lorsque vous formez les boules de pâte reposée, elle peut sembler un peu sèche ou friable au début. Utilisez simplement vos mains ou la cuillère à cookie pour presser fermement la pâte ensemble en une boule. La chaleur de vos mains ramollira légèrement la couche extérieure, l’aidant à garder sa forme. Une fois cuits, la matière grasse fondra et les cookies seront parfaitement moelleux, pas secs.
Puis-je faire ces cookies sans gluten ?
Oui, avec quelques ajustements. Utilisez vos crackers salés sans gluten préférés pour la base de toffee. Pour la pâte à cookies, remplacez la farine tout usage par un mélange sans gluten pour pâtisserie 1:1 qui contient de la gomme de xanthane (cela aide à lier). La texture pourrait être légèrement plus délicate, mais la saveur sera toujours fantastique. Vérifiez toujours que votre bicarbonate de soude et autres ingrédients sont certifiés sans gluten si nécessaire.
Quelle est la meilleure façon de les emballer pour l’envoi postal ou les cadeaux ?
Ces cookies se transportent étonnamment bien car les morceaux de toffee sont cuits dedans, ce qui les rend robustes. Laissez les cookies refroidir complètement. Placez-les en une seule couche dans une boîte en fer hermétique, avec du papier sulfurisé entre les couches si vous les empilez. Calfeutrez la boîte dans un carton d’expédition avec du papier bulle ou des chips de calage. Pour les cadeaux locaux, un sac cellophane noué avec un ruban dans une jolie boîte cadeau est charmant. Ajoutez une note précisant qu’ils contiennent du toffee et des noix (si vous en avez utilisé).
Est-il nécessaire d’utiliser à la fois du sucre roux et du sucre blanc ?
Chaque sucre joue un rôle spécifique. Le sucre roux, avec sa mélasse, ajoute de l’humidité, une saveur riche et cette texture moelleuse caractéristique. Le sucre blanc aide à créer un bord légèrement croustillant et contribue à l’étalement. Vous pourriez utiliser uniquement l’un des deux en cas d’urgence, mais vous perdrez l’équilibre complexe de texture et de saveur. Pour les meilleurs Cookies de Noël Craquants, utilisez les deux comme indiqué.
Puis-je doubler cette recette ?
Absolument ! C’est une recette fantastique à doubler, surtout pendant les fêtes. Assurez-vous simplement d’avoir un très grand saladier pour la pâte, ou mélangez-la en deux lots séparés. Vous devrez aussi cuire le toffee dans deux moules 22×33 cm séparés ou travailler en plusieurs fois. Le temps de repos de la pâte reste le même. Doubler la recette est un excellent moyen de préparer des stocks pour les fêtes, les cadeaux et le congélateur.
Pourquoi les appelle-t-on cookies « Craquelés » (« Crack ») ?
Le nom vient de la confiserie originale « Christmas Crack », célèbre pour être tellement addictive que les gens plaisantent en disant que c’est comme du crack. C’est une métaphore amusante, bien que forte, pour dire à quel point la combinaison sucrée-salée est irrésistible. Évidemment, ces cookies parlent d’indulgence pure et saine (si décadente) ! Le nom est resté car une fois que vous en essayez un, il est très difficile de s’arrêter.
Comment obtenir une forme de cookie parfaitement ronde ?
Pour des cookies ronds comme en pâtisserie, dès qu’ils sortent du four, prenez un emporte-pièce rond large ou le bord d’un verre légèrement plus grand que votre cookie. Tournez-le doucement autour du bord du cookie encore tiède, en poussant les bords irréguliers vers l’intérieur pour former un cercle parfait. Faites cela pendant qu’ils sont encore mous et malléables sur la plaque de cuisson. C’est une petite astuce qui donne à votre plateau un look incroyablement professionnel.
Ces cookies sont un merveilleux exemple de la façon dont équilibrer l’indulgence avec une préparation réfléchie donne les meilleurs résultats. Pour plus d’inspiration sur la création de desserts beaux et équilibrés, des ressources sur l’équilibre nutritionnel peuvent offrir de précieux conseils pour apprécier tous les aliments en pleine conscience.
J’espère que cette recette deviendra une tradition joyeuse chez vous, comme elle l’est chez moi. Le processus est aussi amusant que le résultat. Pour plus d’idées de pâtisseries délicieuses qui impressionneront votre famille, explorez notre collection complète de gâteaux et autres pâtisseries. Que vous ayez envie d’un cheesecake rafraîchissant au melon et à la menthe ou d’un classique gâteau fraise mascarpone, il y a toujours une nouvelle aventure sucrée qui vous attend.
Alors, préchauffez ce four et préparez-vous à ce que votre cuisine sente la magie des fêtes. Bonne pâtisserie, mes amis ! Puisse votre saison être remplie de douceur, de croquant et de beaucoup de biscuits partagés.
Equipment
- Plat de cuisson de 9x13 pouces
- Papier sulfurisé
- Deux casseroles
- Grand bol mélangeur
- Spatule
- Plaques à pâtisserie
Ingrédients
- 200 g crackers salés (Saltine)
- 100 g beurre non salé pour le toffee
- 150 g sucre brun tassé
- 200 g pépites de chocolat semi-sucré
- 100 g beurre non salé pour le brunissement
- 300 g farine tout usage
- 5 g bicarbonate de soude
- 5 g sel
- 200 g sucre granulé
- 2 œufs (grands, à température ambiante)
- 5 ml extrait de vanille pur
Instructions
- Préchauffez votre four à 220°C (425°F) et chemisez un plat de cuisson de 9x13 pouces avec du papier sulfurisé.
- Disposez les crackers salés en une seule couche.
- Dans une casserole, faites fondre le beurre et le sucre brun, puis faites bouillir pendant 3-4 minutes jusqu'à obtenir une couleur caramel.
- Versez le toffee sur les crackers et faites cuire au four pendant 4-5 minutes jusqu'à ce qu'il bouillonne.
- Ajoutez les pépites de chocolat sur le toffee chaud et étalez avec une spatule.
- Placez le plat au congélateur pour que le chocolat durcisse.
- Dans une autre casserole, faites brunir le reste du beurre pendant environ 5 minutes, puis laissez refroidir.
- Dans un bol, mélangez farine, bicarbonate de soude et sel.
- Ajoutez les sucres dans le beurre brun refroidi, puis incorporez les œufs et la vanille.
- Incorporez les ingrédients secs au mélange humide jusqu'à juste combiné.
- Coupez le toffee en petits morceaux et incorporez la plupart des morceaux dans la pâte à biscuits.
- Réfrigérez la pâte pendant au moins 2 heures.
- Formez des boules de pâte et déposez-les sur une plaque à pâtisserie, puis faites cuire de 8 à 10 minutes.
- Ajoutez des morceaux de toffee réservés sur chaque biscuit encore chaud.
- Enfin, laissez refroidir sur une grille.
Notes
Nutrition

Je suis Céline, une véritable passionnée d’ustensiles et de matériel de cuisine ! J’adore tester, comparer et découvrir les meilleurs équipements pour rendre la cuisine plus efficace et agréable. Que ce soit un bon couteau, un robot performant ou une poêle incontournable, je suis toujours à la recherche des outils qui feront la différence. Mon but est de vous guider dans vos choix pour que vous ayez le bon matériel adapté à vos besoins.