
Roulé Prestige : Un Rêve de Chocolat et de Coco
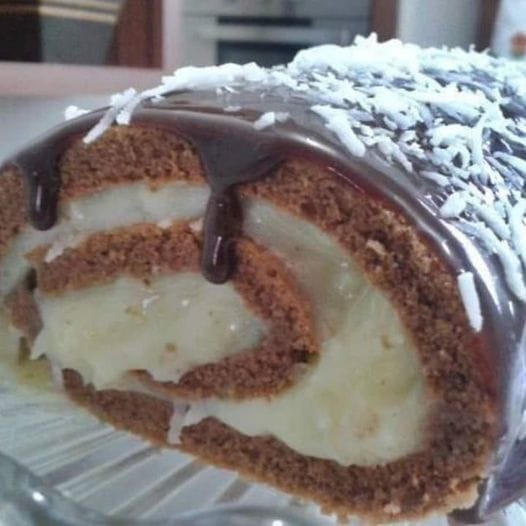
Vous connaissez ces moments où vous avez besoin d’un dessert à la fois un peu sophistiqué et réconfortant ? Celui qui fait faire « ohhh » à toute la tablée, suivi d’un chœur de « c’est toi qui l’as fait ? ». C’est ça, la magie du Roulé Prestige, ou comme je l’appelle avec affection, mon Roulé Chocolat Coco. Il a l’air tout droit sorti d’une vitrine de pâtisserie, mais je vous promets que les étapes sont plus simples qu’il n’y paraît. C’est une belle spirale de génoise au cacao, garnie d’un fondant brigadeiro coco et nappée d’un glaçage chocolat soyeux. Je l’ai fait pour la première fois pour l’anniversaire de ma fille, et depuis, c’est la star de toutes nos réunions de famille.
Une Petite Histoire derrière ce Roulé Chocolat Coco
Si le roulé classique a ses racines en Europe centrale, cette version particulière avec sa garniture au lait concentré et à la noix de coco ressemble à une belle fusion – un soupçon de brigadeiro brésilien rencontre une roulade à la française. Dans ma cuisine, il est devenu un symbole de célébration. Je me souviens des essais et des erreurs : le premier a un peu craqué, mais on l’a généreusement recouvert de glaçage, et devinez quoi ? Personne n’y a fait attention car il était divin. Cela m’a appris qu’un dessert, c’est d’abord de la joie, pas de la perfection. Aujourd’hui, je vais vous montrer comment obtenir ce roulé impeccable et impressionnant.
Pourquoi Vous Allez Tomber Amoureux de ce Roulé Chocolat Coco
Cette recette est une gagnante pour trois grandes raisons. Premièrement, l’association de saveurs est imbattable – le chocolat profond, le coco onctueux et la douceur crémeuse sont un mariage fait au paradis. Deuxièmement, il est étonnamment économique ; vous avez probablement déjà la plupart des ingrédients dans votre placard. Troisièmement, l’effet « waouh » est énorme ! Présenter cette beauté roulée et glacée apporte une immense satisfaction. C’est la preuve qu’on n’a pas besoin d’ustensiles sophistiqués pour créer quelque chose d’extraordinaire.
Quand Préparer ce Dessert Spectaculaire
Ce Roulé Prestige est votre arme secrète pour les occasions spéciales. Il est parfait pour les anniversaires (un joli changement par rapport au gâteau classique), les déjeuners familiaux du dimanche, les réunions de Noël, ou même comme projet de pâtisserie spectaculaire pour le week-end. L’apporter à un repas-partage fait de vous instantanément la personne la plus populaire !
Rassemblez Vos Ingrédients
Mettons tout sur le plan de travail. Cette recette est merveilleusement simple.
Pour la Génoise au Chocolat (Pâte) :
- 4 blancs d’œufs
- 4 jaunes d’œufs
- 2 cuillères à soupe de sucre
- 4 cuillères à soupe de farine de blé
- 3 cuillères à soupe de poudre de cacao
Pour la Garniture Coco :
- 1 boîte de lait concentré sucré (environ 397g)
- 2 cuillères à soupe de margarine (ou beurre)
- 100 g de noix de coco râpée
Pour le Glaçage Chocolat (Toit) :
- 3 cuillères à soupe de margarine (ou beurre)
- 5 cuillères à soupe de poudre de cacao
- 5 cuillères à soupe de sucre
- 200 ml de lait
Substitutions Simples d’Ingrédients
Il vous manque quelque chose ? Pas d’inquiétude, voici quelques échanges simples :
- Poudre de Cacao : Vous pouvez utiliser du cacao en poudre de qualité supérieure pour une saveur plus intense.
- Margarine : Du beurre non salé est un substitut fantastique et plus riche, à la fois dans la garniture et le glaçage.
- Noix de Coco Râpée : Utilisez de la noix de coco desséchée si c’est ce que vous avez, ou faites-la légèrement griller pour un goût plus noisette.
- Farine de Blé : Pour une version sans gluten, un bon mélange de farine sans gluten tout usage fonctionne généralement bien.
Votre Guide Étape par Étape pour un Roulé Chocolat Coco Parfait
Suivez ces étapes calmement, et vous aurez un chef-d’œuvre. Commençons !
Étape 1 : Créer la Génoise Aérienne Parfaite
Commencez par préchauffer votre four à 180°C. D’abord, battez les blancs d’œufs en neige ferme ; cela crée la structure aérienne de votre génoise. Maintenant, ajoutez les jaunes d’œufs un par un, en battant bien après chaque ajout. Vous verrez le mélange prendre une belle couleur jaune pâle. Ensuite, incorporez délicatement le sucre, suivi de la farine et de la poudre de cacao. Astuce de pro : Tamisez la farine et le cacao ensemble pour éviter les grumeaux et obtenir une pâte parfaitement lisse, crémeuse et homogène. L’odeur du cacao cru est tout simplement divine !
Étape 2 : Cuisson de la Base du Biscuit
Prenez une plaque de cuisson large ou un moule à génoise (environ 30×40 cm), beurrez-la légèrement, puis farinez-la en tapotant l’excédent. Versez votre jolie pâte foncée dans le moule et étalez-la uniformément en une fine couche. Enfournez pour environ 15-20 minutes. Vous saurez qu’il est prêt quand le dessus rebondit légèrement sous le doigt et que les bords se détachent un peu du moule. La cuisine sentira merveilleusement bon le chocolat qui cuit.
Étape 3 : Préparation de la Garniture Coco Onctueuse
Pendant que le biscuit cuit, préparez votre garniture. Dans une casserole, faites fondre les deux cuillères à soupe de margarine à feu moyen. Versez la boîte entière de lait concentré et ajoutez la noix de coco râpée. Remuez constamment avec une cuillère en bois. Le mélange va bouillonner et épaissir magnifiquement. Continuez à remuer jusqu’à ce qu’il atteigne une consistance fondante, type brigadeiro, qui se détache du fond de la casserole. Réservez pour qu’il refroidisse un peu. Cette garniture est irrésistiblement douce et parfumée.
Étape 4 : Réalisation du Glaçage Chocolat Soyeux
Pour le nappage brillant, mélangez le lait, la poudre de cacao, le sucre et la margarine dans une autre casserole. Portez à ébullition douce, puis réduisez immédiatement le feu à doux. Laissez mijoter environ 10-15 minutes, en remuant de temps en temps, jusqu’à ce que le mélange épaississe suffisamment pour napper le dos d’une cuillère. Il va foncer et devenir magnifiquement brillant. Retirez du feu et laissez refroidir un peu ; il continuera à épaissir en refroidissant. Ce glaçage est la touche finale glorieuse !
Étape 5 : Le Grand Assemblage de Votre Roulé
C’est la partie amusante ! Dès que le biscuit sort du four, passez soigneusement un couteau sur les bords et retournez-le sur une feuille de papier cuisson propre. Retirez délicatement le papier sur lequel il a cuit. Pendant qu’il est encore tiède et souple, étalez la garniture coco tiède uniformément sur toute la surface. Maintenant, en vous aidant du papier cuisson en dessous, commencez à enrouler le gâteau fermement sur lui-même, du côté le plus long. Ne vous inquiétez pas des petites fissures ; le glaçage couvrira tout. Enveloppez le roulé dans du film alimentaire et laissez-le prendre au réfrigérateur pendant au moins une heure. Astuce du chef : Le rouler pendant qu’il est encore tiède est la clé pour éviter les cassures.
Étape 6 : La Touche Finale et Glorieuse
Une fois que votre roulé est bien frais et ferme, retirez le film et placez-le sur une assiette de service. Versez le glaçage chocolat légèrement refroidi, mais encore fluide, sur le dessus, en le laissant couler joliment sur les côtés. Vous pouvez utiliser une spatule pour l’étaler uniformément. Pour une touche finale, décorez avec un saupoudrage de noix de coco râpée, des copeaux de chocolat, ou même une légère neige de sucre glace. Votre superbe Roulé Prestige est prêt à faire sensation !
Timing pour Réussir Votre Pâtisserie
Voici un récapitulatif rapide pour que vous puissiez vous organiser :
- Temps de préparation : 30 minutes
- Temps de cuisson : 40 minutes (20 pour le biscuit, 20 pour les garnitures/glaçage)
- Temps de repos/prise au frais : 1 heure minimum
- Temps total : Environ 2 heures 10 minutes
Le Secret du Chef pour un Roulé Impeccable
La meilleure astuce absolue est de rouler le biscuit tiède sans la garniture d’abord, juste dans le papier cuisson. Laissez-le refroidir complètement enroulé. Ensuite, déroulez-le, étalez votre garniture, et reroulez-le. Cette étape de « pré-roulage » habitue le biscuit et minimise tout risque de cassure lorsque vous ajoutez la garniture.
Un Petit Savoir Gourmand sur l’Ingrédient Star
La noix de coco, un acteur clé de notre garniture, n’est pas seulement délicieuse mais aussi fascinante. La noix de coco râpée que nous utilisons provient de la chair blanche séchée du fruit. Dans de nombreuses cultures tropicales, chaque partie de la noix de coco est utilisée – de l’eau à l’intérieur jusqu’à la cosse – montrant comment la nature fournit des ingrédients complets et sains.
Les Ustensiles dont Vous Aurez Besoin dans Votre Cuisine
- Deux saladiers
- Fouet électrique ou robot pâtissier
- Deux casseroles
- Cuillère en bois ou spatule
- Plaque de cuisson large / moule à génoise (approx. 30×40 cm)
- Papier cuisson
- Film alimentaire
Comment Conserver Votre Roulé Prestige
En raison de la garniture et du glaçage à base de produits laitiers, ce roulé doit être conservé au réfrigérateur. Couvrez-le légèrement de papier d’aluminium ou placez-le dans une grande boîte à gâteau. Il restera frais et délicieux jusqu’à 3-4 jours.
Pour une conservation plus longue, vous pouvez très bien congeler le roulé de biscuit non garni et non glacé. Une fois complètement refroidi après cuisson, enveloppez-le bien serré dans plusieurs couches de film alimentaire et congelez-le jusqu’à un mois. Décongelez à température ambiante avant de le garnir et de le glacer.
Le roulé garni et glacé peut aussi être congelé, bien que la texture du glaçage puisse légèrement changer à la décongélation. Si vous prévoyez de congeler le produit fini, faites-le sans décoration, emballez-le extrêmement bien, et décongelez-le toute une nuit au réfrigérateur.
Mes Meilleurs Conseils pour une Réussite Garantie
- Œufs à Température Ambiante : Vous utilisez des œufs sortis du frigo ? Placez-les dans un bol d’eau tiède pendant 5 minutes. Les œufs à température ambiante montent beaucoup plus haut, donnant une génoise plus légère.
- Ne Pas Trop Mélanger : Une fois que vous ajoutez la farine et le cacao aux œufs, incorporez délicatement. Trop mélanger fait retomber les bulles d’air que vous avez travaillé si dur à créer.
- Garniture Froide : Assurez-vous que votre garniture coco a refroidi avant de l’étaler sur le biscuit. Une garniture chaude fera fondre le gâteau et le rendra détrempé.
- Couteau Bien Aiguisé : Pour de belles tranches nettes, faites chauffer votre couteau sous l’eau chaude et séchez-le entre chaque coupe.
Idées de Présentation pour Impressionner Vos Invités
- Servez chaque tranche sur une assiette blanche avec un filet de caramel ou une quenelle de crème chantilly.
- Décorez le dessus avec de longs copeaux de chocolat élégants et quelques flocons de coco toastés.
- Pour une fête, coupez-le en petits roulés individuels et disposez-les sur un présentoir à gâteau étagé.
- Ajoutez quelques fruits rouges frais comme des framboises sur le côté pour une touche de couleur et d’acidité.
Explorez Ces Délicieuses Variations plus Légères
Vous aimez l’idée mais vous voulez essayer une saveur différente ? Voici six variations fantastiques sur le thème du roulé. Vous pouvez trouver beaucoup d’autres idées inspirantes pour les gâteaux et desserts sur notre page principale gateaux et patisseries.
- Roulé Féerie Fruité : Remplacez la génoise chocolat par une génoise vanille et garnissez-la d’une crème fouettée légère et de fruits rouges frais. Une alternative estivale et fraîche.
- Roulé Zesté d’Agrumes : Ajoutez le zeste d’un citron ou d’une orange à la génoise. Garnissez d’un mélange de crème au citron et de mascarpone. Vif, acidulé et totalement rafraîchissant.
- Roulé Moka Déca : Ajoutez une cuillère à café de café instantané à la pâte de génoise chocolat. Garnissez d’une crème fouettée au café. Parfait pour les amateurs de café.
- Roulé Praliné Croustillant : Incorporez des noisettes toastées finement hachées à la génoise. Garnissez d’un mélange de pâte de praliné et de crème. Offre une texture croquante merveilleuse.
- Délice Sans Lait : Utilisez du lait végétal et de la margarine, et assurez-vous que votre poudre de cacao est sans lactose. Garnissez d’une préparation à base de crème de coco. Une excellente option pour ceux qui ont des restrictions alimentaires.
- Mini Bouchées Roulées : Faites cuire la génoise dans un moule carré. Une fois garnie et roulée, coupez-la en tronçons de 5 cm pour créer d’adorables bouchées individuelles parfaites pour les fêtes.
Si vous adorez les desserts riches au chocolat, vous devez absolument essayer ce gâteau au chocolat incroyablement juteux à la crème fraîche. Pour une petite gourmandise de fête, ces billes cheesecake velvet font toujours un tabac. Les fans de chocolat et d’orange adoreront les saveurs vibrantes de ce gâteau simple à l’orange et au chocolat. Et pour l’expérience ultime, on ne peut pas battre les couches d’un gâteau spectaculaire Kinder Bueno.
Erreurs Courantes à Éviter
Erreur 1 : Trop Cuire le Biscuit
C’est la raison numéro un d’un roulé qui craque. Un biscuit trop cuit devient sec et cassant, perdant la flexibilité nécessaire pour rouler en douceur. Cela arrive parce qu’on a souvent peur d’un gâteau « pas cuit » et qu’on le laisse au four quelques minutes de trop. Pour éviter cela, mettez un minuteur pour le temps de cuisson minimal (15 minutes) et commencez à vérifier. Le gâteau est cuit quand le dessus est élastique au toucher et que les bords se détachent du moule.
Erreur 2 : Rouler le Gâteau Quand il est Froid
Tenter de rouler un biscuit complètement refroidi est une recette pour un désastre – il va presque certainement se fissurer. Les protéines des œufs se figent en refroidissant, rendant le gâteau rigide. L’astuce est de le rouler pendant qu’il est encore tiède et souple. Dès qu’il est assez cool pour être manipulé, retournez-le sur du papier cuisson et roulez-le immédiatement (même sans la garniture, comme dans le secret du chef). Cela « entraîne » le biscuit à prendre sa forme roulée.
Erreur 3 : Une Garniture Trop Liquide ou Trop Froide
Si votre garniture coco au lait concentré n’a pas été assez cuite, elle sera trop molle et va s’échapper quand vous tenterez de rouler, créant un désordre et un gâteau détrempé. À l’inverse, si elle sort du frigo, elle sera trop ferme pour être étalée uniformément et peut déchirer le biscuit délicat. Visez une consistance de fondant tiède et tartinable quand vous la retirez du feu, et laissez-la refroidir juste jusqu’à ce qu’elle soit confortable au toucher avant de l’étaler.
Erreur 4 : Étaler la Garniture Jusqu’au Bords
On est tenté d’utiliser toute la garniture jusqu’au tout bord du biscuit, mais cela la fait déborder lors du roulage. Laissez une marge propre d’environ un demi-centimètre sur tous les côtés. Cela donne à la garniture de l’espace pour se tasser vers l’intérieur lorsque vous roulez, créant une spirale nette et contenue sans fuites désordonnées.
Erreur 5 : Appliquer un Glaçage Trop Chaud
Verser un glaçage brûlant sur votre roulé assemblé peut être tragique. Il peut faire fondre la garniture, la faisant suinter, et peut même faire s’affaisser ou devenir détrempé le biscuit délicat. Laissez le glaçage refroidir et épaissir légèrement dans la casserole jusqu’à ce qu’il soit tiède mais non brûlant. Il doit être assez épais pour napper le dos d’une cuillère. Cela assure une belle couche uniforme qui prend parfaitement.
Questions Fréquemment Posées
Puis-je utiliser du beurre à la place de la margarine ?
Absolument ! Le beurre non salé est un substitut fantastique à la margarine, à la fois dans la garniture et le glaçage. Il donnera un goût plus riche et plus savoureux. Utilisez simplement les mêmes quantités. Si vous n’avez que du beurre salé, vous pouvez l’utiliser, mais vous voudrez peut-être omettre toute pincée de sel supplémentaire que la recette pourrait demander ailleurs.
Pourquoi mon gâteau s’est-il fissuré quand je l’ai roulé ?
Les fissures sont généralement dues à l’une de ces deux choses : le biscuit a été trop cuit et est devenu trop sec, ou il a été roulé alors qu’il était déjà trop froid. N’oubliez pas de cuire juste jusqu’à ce qu’il soit cuit et de le rouler pendant qu’il est encore tiède et souple. Utiliser la technique du « pré-roulage » (rouler le biscuit vide d’abord) est la meilleure assurance contre les fissures.
Puis-je préparer le roulé la veille ?
Oui, c’est un excellent dessert à préparer à l’avance. Vous pouvez assembler le roulé entier, le couvrir bien, et le garder au réfrigérateur jusqu’à un jour avant de le servir. En fait, le laisser reposer une nuit permet aux saveurs de se mélanger magnifiquement. Ajoutez simplement le glaçage final et les décorations quelques heures avant de servir.
Mon glaçage est trop liquide/épais. Que puis-je faire ?
Si votre glaçage est trop liquide, laissez-le mijoter encore quelques minutes jusqu’à ce qu’il réduise et épaississe. S’il est trop épais et ne coule pas, ajoutez simplement une cuillère à café de lait tiède à la fois et fouettez jusqu’à obtenir la consistance souhaitée. Le glaçage idéal doit être épais mais encore coulant, comme une crème épaisse.
Puis-je congeler le Roulé Prestige ?
Vous pouvez le congeler avec succès, mais avec quelques astuces. Il est préférable de le congeler sans le glaçage. Enveloppez le gâteau garni et roulé très serré dans du film alimentaire, puis dans du papier d’aluminium. Décongelez toute une nuit au réfrigérateur et préparez le glaçage frais le jour où vous prévoyez de le servir pour la meilleure texture et apparence.
Que puis-je utiliser à la place de la noix de coco râpée ?
Si vous n’aimez pas la texture de la noix de coco, vous pouvez la remplacer par une quantité égale de noix finement hachées et toastées (comme des noisettes ou des amandes) ou même par des pépites de chocolat pour un roulé double chocolat. Vous pouvez aussi simplement l’omettre et avoir une garniture brigadeiro chocolat simple et délicieuse.
Mes blancs d’œufs ne montent pas. Pourquoi ?
Assurez-vous que votre bol et vos fouets sont parfaitement propres et exempts de toute trace de graisse, car même un tout petit peu de gras peut empêcher les blancs de monter. Également, assurez-vous qu’aucun jaune ne tombe dans les blancs. Utiliser des œufs à température ambiante les aide à atteindre un plus grand volume. Une pincée de crème de tartre ou quelques gouttes de jus de citron ajoutées pendant le battage peuvent aussi les stabiliser.
Puis-je faire des mini roulés individuels ?
C’est une merveilleuse idée pour les fêtes ! Divisez simplement la pâte entre deux plus petites plaques à génoise pour créer des biscuits plus fins. Ajustez le temps de cuisson à la baisse (vérifiez vers 10-12 minutes). Vous obtiendrez deux roulés plus petits, plus faciles à trancher en portions individuelles.
Le lait concentré sucré est-il le même que le lait évaporé ?
Non, ils sont différents. Le lait concentré est sucré et très épais, tandis que le lait évaporé n’est pas sucré et est plus liquide. Pour cette garniture, vous devez utiliser du lait concentré sucré pour obtenir la texture fondante et la douceur correctes. Le lait évaporé ne fonctionnera pas.
Comment savoir si la garniture est assez cuite ?
Faites cuire le mélange de lait concentré et de coco à feu moyen, en remuant constamment. C’est prêt quand vous pouvez passer votre cuillère au fond de la casserole et que le sillon reste visible une ou deux secondes avant que le mélange ne revienne lentement. Il aura considérablement épaissi et se détachera des parois de la casserole pour former une masse cohésive.
Prêt(e) à Créer de Beaux Souvenirs en Cuisine ?
Voilà ! Tous les conseils et astuces dont vous avez besoin pour créer ce superbe Roulé Prestige. N’oubliez pas, la pâtisserie, c’est l’amour qu’on y met, pas seulement la perfection. Même s’il craque un peu, recouvrez-le de ce magnifique glaçage chocolat, décorez-le avec fierté, et servez-le avec le sourire. L’association de cette génoise chocolat moelleuse, du cœur doux coco et du nappage chocolat brillant est tout simplement inoubliable. Alors, attachez votre tablier, rassemblez vos ingrédients, et préparez-vous à impressionner vos proches avec ce spectaculaire Roulé Chocolat Coco. Bonne pâtisserie !
Equipment
- Deux bols à mélanger
- Mixeur électrique ou robot pâtissier
- Deux casseroles
- Cuillère en bois ou spatule
- Plaque de cuisson large (environ 30x40 cm)
- Papier sulfurisé
- Film plastique
Ingrédients
- 4 blancs d'œufs blancs d'œufs
- 4 jaunes d'œufs jaunes d'œufs
- 2 cuillères à soupe sucre
- 4 cuillères à soupe farine de blé
- 3 cuillères à soupe cacao en poudre
- 397 g lait concentré environ 397g
- 30 g margarine ou de beurre
- 100 g noix de coco râpée
- 3 cuillères à soupe margarine ou beurre pour le glaçage
- 5 cuillères à soupe cacao en poudre pour le glaçage
- 5 cuillères à soupe sucre pour le glaçage
- 200 ml lait pour le glaçage
Instructions
- Préchauffez le four à 180°C.
- Battez les blancs d'œufs jusqu'à obtenir des pics souples.
- Ajoutez les jaunes d'œufs un par un en battant bien après chaque addition.
- Incorporez le sucre, puis la farine et le cacao tamisés.
- Graissez et farinez une plaque de cuisson (30x40 cm).
- Versez la pâte dans la plaque et étalez-la en une fine couche.
- Faites cuire au four pendant 15-20 minutes.
- Pendant que le biscuit cuit, faites fondre la margarine à feu moyen.
- Ajoutez le lait concentré et la noix de coco, puis remuez jusqu'à obtenir une consistance épaisse.
- Dans une autre casserole, mélangez le lait, le cacao, le sucre et la margarine pour le glaçage, et portez à ébullition.
- Réduisez le feu et laissez mijoter 10-15 minutes jusqu'à épaississement.
- Une fois le biscuit cuit, démoulez-le sur du papier sulfurisé.
- Étalez la garniture au coco sur le biscuit chaud.
- Roulez le biscuit en utilisant le papier pour vous aider.
- Enveloppez le rouleau dans du film plastique et réfrigérez pendant au moins une heure.
- Nappez le roulé de glaçage au chocolat refroidi.
- Décorez avec de la noix de coco râpée ou des copeaux de chocolat avant de servir.
Notes
Nutrition

Je suis Céline, une véritable passionnée d’ustensiles et de matériel de cuisine ! J’adore tester, comparer et découvrir les meilleurs équipements pour rendre la cuisine plus efficace et agréable. Que ce soit un bon couteau, un robot performant ou une poêle incontournable, je suis toujours à la recherche des outils qui feront la différence. Mon but est de vous guider dans vos choix pour que vous ayez le bon matériel adapté à vos besoins.