
Ce Gâteau Kinder Bueno Dont Vous Ne Pouvez Plus Vous Passer
Vous connaissez cette sensation, n’est-ce pas ? Vous scrollz tranquillement, et BAM. Une photo d’un gâteau au chocolat apparaît. Mais pas n’importe quel gâteau. Une tour crémeuse, noisetée, un chef-d’œuvre Kinder Bueno. C’est ce qui m’est arrivé le mois dernier. Je l’ai vu, je l’ai désiré, et j’ai su que je devais le faire. Laissez-moi vous dire, mes amis, ce gâteau Kinder Bueno n’est pas juste un dessert ; c’est une fête dans l’assiette. Il a l’air de sortir d’une pâtisserie chic, mais je vous promets, il est trompeusement simple à réaliser à la maison.
L’histoire de mon Obsession pour le Gâteau Kinder Bueno
Tout a commencé par une demande d’anniversaire de mon neveu, Léo. « Tata, fais-moi un gâteau avec mon chocolat préféré ! » a-t-il dit en agitant une barre Kinder Bueno. Le défi était lancé. J’adore pâtisser, mais je ne suis pas chef pâtissière professionnelle. Je voulais quelque chose d’impressionnant mais infaillible. Après quelques « essais » délicieux (mes voisins ont été des volontaires très heureux), j’ai perfectionné cette version. Elle mélange la génoise française classique et aérienne avec l’onctuosité irrésistible du mascarpone italien, le tout enveloppé de cette saveur iconique allemande chocolat-noisette. C’est un délicieux petit morceau d’Europe dans chaque part ! Ce Gâteau Kinder Bueno est devenu mon arme secrète pour faire sourire les gens.
Pourquoi Vous Allez Absolument Adorer Cette Recette
Premièrement, elle est incroyablement indulgente. La génoise est basique et fonctionne toujours. Deuxièmement, le facteur « waouh » est au maximum. Quand vous apportez ce gâteau à table, vous aurez des soupirs d’admiration. Troisièmement, et le plus important, le goût. C’est une harmonie parfaite : pas trop sucré, merveilleusement chocolaté, avec des morceaux croquants fantastiques et une crème aérienne comme un nuage. C’est le genre de dessert qui fait que tout le monde demande la recette avant même d’avoir fini leur part.
Quand Préparer Ce Dessert Kinder Qui Fait Son Effet
Ce gâteau est votre meilleur ami pour toute occasion spéciale. C’est une superstar d’anniversaire, un succès assuré lors des réunions de famille, et la pièce maîtresse parfaite pour un dîner entre amis. Vous voulez être la personne la plus populaire du repas partagé ? Apportez ceci. Il fonctionne même comme une gourmandise « juste parce que c’est mercredi ». La vie est courte, mangez le gâteau Kinder Bueno.
Rassembler Vos Ingrédients pour Réussir
Voici tout ce dont vous aurez besoin pour créer ce chef-d’œuvre. Assurez-vous que tous les ingrédients soient à température ambiante pour de meilleurs résultats (surtout les œufs et les produits laitiers pour la crème).
Pour la Génoise au Chocolat :
- 6 œufs moyens
- 150 g de sucre en poudre
- 140 g de farine tout usage (type T45)
- 2 cuillères à soupe de cacao en poudre non sucré
- 1 sachet de levure chimique (environ 2 cuil. à café)
Pour la Crème Kinder Céleste :
- 200 g de chocolat Kinder (barres ou morceaux cassés)
- 200 ml de crème liquide entière froide (très froide)
- 200 g de cream cheese (type Philadelphia)
- 500 g de mascarpone
- 3 cuillères à soupe de cacao en poudre non sucré
- 3 cuillères à soupe de sucre glace
Pour la Décoration & le Croquant :
- 100 g de couverture chocolat noir (pour le nappage)
- 100 g de noisettes concassées, toastées
- 250 g de barres de chocolat Kinder Bueno (pour les couches et le dessus)
Pas de Problème pour Remplacer un Ingrédient
Il vous manque quelque chose ? Pas de panique ! Voici des substitutions faciles. Vous ne trouvez pas de chocolat Kinder ? Utilisez n’importe quelle barre de chocolat au lait de qualité. Pour une version sans noix, omettez les noisettes et utilisez des biscuits gaufrettes écrasés pour le croquant. Si le mascarpone est trop riche, vous pouvez utiliser plus de cream cheese, mais la texture sera plus ferme. Le gâteau sera toujours délicieux !
C’est Parti pour Pâtisser ! Votre Guide Étape par Étape vers le Gâteau Kinder Bueno Parfait
Étape 1 : Cuire la Génoise au Chocolat Moelleuse
Préchauffez votre four à 180°C (th.6). Chemisez deux moules à charnière de 20 cm de diamètre avec du papier sulfurisé. Maintenant, rendons-la aérienne ! Séparez les blancs des jaunes d’œufs. Fouettez les jaunes avec le sucre jusqu’à ce qu’ils blanchissent, épaississent et deviennent crémeux—c’est votre base. Dans un autre bol parfaitement propre et sans trace de gras, battez les blancs d’œufs en neige ferme et brillante. Tamisez délicatement la farine, le cacao et la levure dans le mélange de jaunes. Incorporez avec précaution. Ensuite, avec une main légère, incorporez les magnifiques blancs en neige. Le but est de garder tout cet air précieux à l’intérieur. Répartissez la belle pâte mousseuse entre les deux moules et lissez les surfaces. Enfournez pour 20-25 minutes. Vous saurez que c’est cuit quand le dessus revient légèrement lorsqu’on le touche doucement.
Astuce de pro : Un bol propre et sans gras est non-négociable pour des blancs d’œufs parfaits. Une pincée de sel les aide à se stabiliser.
Étape 2 : Préparer la Crème Kinder Rêvée
Cette crème est l’âme du gâteau. Commencez par hacher finement le chocolat Kinder. Faites-le fondre doucement au bain-marie ou par courtes impulsions au micro-ondes. Remuez jusqu’à ce qu’il soit soyeux, puis laissez-le refroidir un peu. Dans un grand bol, fouettez la crème liquide bien froide en peaks mous (quand les pics se courbent légèrement). Dans un autre bol, fouettez le cream cheese, le mascarpone, le cacao en poudre et le sucre glace jusqu’à ce que le mélange soit parfaitement lisse et sans grumeaux. Maintenant, versez le chocolat fondu refroidi et mélangez bien. L’arôme est divin ! Enfin, incorporez délicatement la crème fouettée au mélange chocolat-mascarpone. Utilisez un mouvement de « folding » léger pour garder la crème aérienne. Vous venez de créer de la magie dans un bol.
Étape 3 : Assembler Votre Chef-d’œuvre
Une fois vos disques de génoise complètement refroidis, place à la partie amusante. S’ils ont un dôme, vous pouvez les égaliser avec un couteau-scie pour plus de stabilité. Placez le premier disque de génoise sur votre plat de service. Étalez-y une couche généreuse de crème Kinder. Maintenant, prenez quelques barres Kinder Bueno, cassez-les en morceaux, et parsemez-en la crème pour cette couche croquante essentielle. Posez le deuxième disque de génoise par-dessus. Maintenant, recouvrez tout le gâteau—dessus et côtés—avec le reste de la crème. Utilisez une spatule ou une raclette à gâteau pour le rendre aussi lisse ou artistiquement désordonné que vous le souhaitez !
Étape 4 : Les Touches Finales et Irrésistibles
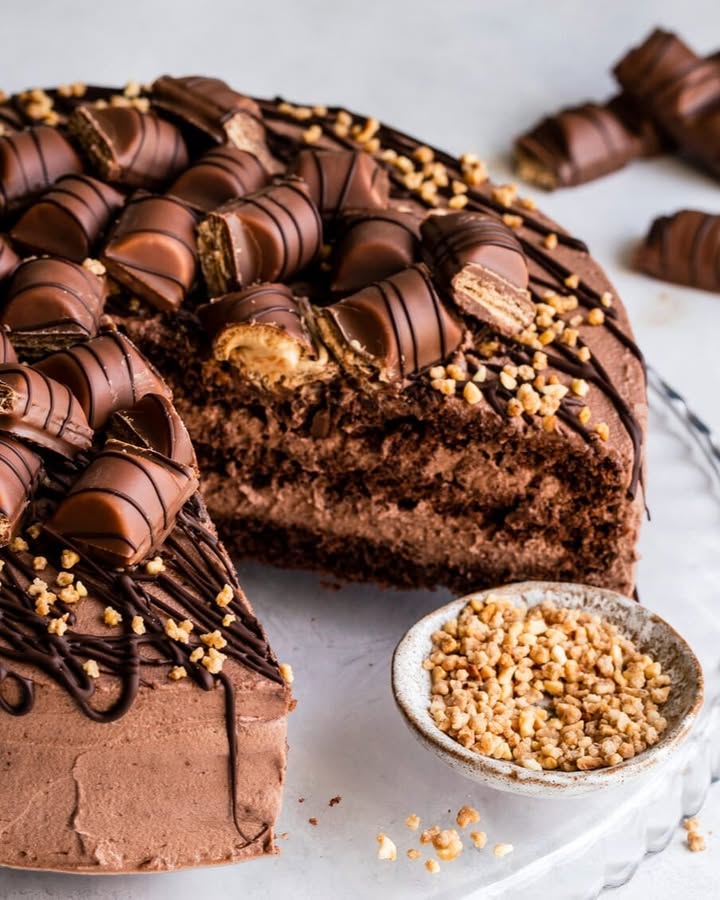
C’est là que votre gâteau se transforme en pièce montée. Faites fondre la couverture chocolat noir et versez-la en filets artistiques sur le dessus du gâteau. Pressez immédiatement les noisettes toastées concassées sur les côtés du gâteau—elles colleront à la crème fraîche. Enfin, disposez artistiquement des barres Kinder Bueno entières et brisées sur le dessus. Soyez généreux ! Le contraste des textures et des chocolats est ce qui rend chaque bouchée aventureuse.
Astuce du chef : Pour les parts les plus nettes, placez le gâteau entièrement décoré au réfrigérateur pendant au moins 4 heures, ou idéalement toute une nuit. Cela permet aux saveurs de se mélanger et à la crème de bien prendre, facilitant la découpe.
Votre Timeline pour le Gâteau Kinder Bueno
Planifions votre session de pâtisserie.
- Temps de Préparation : 40 minutes (c’est relaxant, promis !)
- Temps de Cuisson : 25 minutes
- Temps de Refroidissement & Assemblage : 30 minutes
- Temps de Réfrigération (Crucial !) : Minimum 4 heures, mieux toute une nuit
- Temps Total : Environ 5h30 (surtout du temps de repos)
Le Secret Qui Fait Toute la Différence
Mon secret absolu est la patience. Ne vous précipitez pas pour assembler le gâteau avec des génoises tièdes, et ne sautez pas l’étape du long réfrigérateur. Laisser le Gâteau Kinder Bueno assemblé reposer toute une nuit permet à la génoise d’absorber un peu d’humidité de la crème, devenant incroyablement tendre, et laisse toutes les saveurs—chocolat, noisette, mascarpone crémeux—devenir les meilleures amies. Le résultat est une expérience parfaitement tranchable et fondante en bouche.
Une Petite Anecdote Chocolatée pour Vous
Saviez-vous que le mot « Bueno » signifie « bon » en espagnol et en italien ? C’est un nom approprié ! La structure unique de gaufrette à l’intérieur de la barre a été conçue pour créer un croquant délicat et aéré qui contraste avec la crème lisse et le chocolat. Nous recréons essentiellement ce jeu de textures merveilleux à l’échelle d’un gâteau entier. C’est un dessert qui engage vraiment tous vos sens.
Votre Boîte à Outils de Cuisine
Pas besoin d’équipement sophistiqué ! Deux moules à charnière de 20 cm, des bols, un batteur électrique ou un robot (un fouet et des bras solides feront l’affaire aussi !), une spatule, un tamis pour les ingrédients secs, et un couteau-scie pour égaliser les gâteaux. Un tourne-gâteau facilite la décoration, mais ce n’est pas essentiel.
Comment Bien Conserver Votre Gâteau Kinder Bueno
À cause des produits laitiers frais dans la crème, ce gâteau doit être conservé au réfrigérateur. Couvrez-le légèrement avec un dôme à gâteau ou du film alimentaire pour le protéger des odeurs du frigo.
Il se conservera parfaitement jusqu’à 3 jours. En fait, beaucoup pensent qu’il est encore meilleur le lendemain, les saveurs continuant à se développer.
Vous pouvez congeler les disques de génoise non décorés, bien emballés dans du film, jusqu’à un mois. Cependant, je ne recommande pas de congeler le gâteau entièrement assemblé avec la crème, car la texture du mascarpone peut changer à la décongélation.
Mes Meilleurs Conseils pour un Gâteau Sans Faute
- Utilisez toujours des produits entiers pour la crème. Les alternatives allégées peuvent ne pas bien monter et rendre la crème liquide.
- Faites toaster les noisettes pour la décoration à sec dans une poêle quelques minutes. Cela libère une saveur plus profonde et riche qui s’accorde merveilleusement avec le chocolat.
- Si votre crème semble un peu molle après avoir été fouettée, placez simplement le bol au frigo 20 minutes avant l’assemblage. Le froid est votre ami !
- Quand vous incorporez, utilisez un mouvement léger en « 8 » avec votre spatule pour garder le plus d’air possible dans le mélange.
Comment Présenter Votre Gâteau Comme un Pro
- Saupoudrez le dessus d’un peu de poudre dorée comestible pour un look vraiment festif.
- Servez chaque part avec une petite quenelle de crème fouettée supplémentaire et un bâtonnet Kinder Bueno à côté.
- Utilisez un couteau propre et chaud pour couper chaque part et obtenir des bords nets. Essuyez le couteau entre chaque tranche.
- Placez le gâteau sur un beau porte-gâteau. La présentation, c’est la moitié du plaisir !
Envie d’Explorer D’autres Desserts ?
Si vous avez adoré faire ce gâteau Kinder Bueno, vous avez tout un monde de desserts incroyables à découvrir ! Pour un autre projet amusant et pratique, essayez ces rêves sucrés maison mignons et délicieux, qui sont des beignets moelleux fourrés à la crème pâtissière. Si vous avez envie de quelque chose de léger comme l’air, le Gâteau Nuage de mon arrière-grand-mère est un classique intemporel. Pour un goût rustique et réconfortant, cette tarte normande au crumble irrésistible est une pure joie. Et si vous êtes fan de desserts sans cuisson, vous ne croirez pas à quel point ce cheesecake aux cookies Oreo est facile et décadent.
Les Erreurs Courantes à Éviter Avec Votre Gâteau Kinder Bueno
Erreur 1 : Utiliser des Génoises Tièdes
C’est la plus grande cause d’un gâteau détrempé qui s’affaisse. Assembler avec un gâteau tiède fait fondre la crème délicate au contact. Les disques peuvent aussi se déchirer facilement. Laissez toujours, toujours vos génoises refroidir complètement sur une grille. Cela permet à la structure de se fixer et garantit une base stable pour votre belle crème.
Erreur 2 : Trop ou Pas Assez Fouetter la Crème
Obtenir la bonne texture de crème est essentiel. Si vous ne fouettez pas assez la crème liquide, elle ne tiendra pas sa forme et rendra toute la garniture liquide. Si vous la fouettez trop, vous obtiendrez du beurre granuleux et grumeleux. Le point parfait est entre les peaks mous et fermes—quand vous soulevez les fouets, la crème doit former un pic qui se courbe légèrement au bout. Elle doit paraître lisse et onctueuse.
Erreur 3 : Sauter le Long Temps de Réfrigération
Je sais qu’il est tentant d’y goûter tout de suite ! Mais couper un gâteau qui n’a pas pris est une recette pour un dessert écrasé et en désordre. Le temps de réfrigération n’est pas optionnel ; c’est une étape cruciale. Il permet à la crème de durcir, aux couches de se stabiliser et aux saveurs de se marier parfaitement. Prévoir ce repos nocturne à l’avance garantit une tranche nette et professionnelle à chaque fois.
Erreur 4 : Ne pas Incorporer Doucement
Quand vous mélangez les blancs en neige à la pâte ou incorporez la crème fouettée au mascarpone, soyez délicat ! Un mélange vigoureux fait retomber toutes les précieuses bulles d’air que vous avez créées avec effort. Cela mène à une génoise dense et une crème lourde et plate. Utilisez une large spatule et incorporez avec précaution, en tournant le bol, jusqu’à ce que ce soit juste combiné.
En parlant de bien faire les choses, utiliser des ingrédients de qualité n’améliore pas seulement le goût ; cela peut aussi affecter la sensation de satisfaction qu’apporte un dessert. Les aliments avec une bonne valeur nutritive, comme les noix et les produits laitiers dans ce gâteau, peuvent contribuer à un plus grand sentiment de satiété, ce qui signifie que vous vous sentez agréablement rassasié et heureux avec juste une part glorieuse.
Questions Fréquentes sur le Gâteau Kinder Bueno
Puis-je préparer ce gâteau à l’avance ?
Absolument, et je le recommande vivement ! Vous pouvez cuire les disques de génoise un jour à l’avance, les laisser refroidir complètement, les emballer hermétiquement dans du film alimentaire et les conserver à température ambiante. Vous pouvez aussi préparer la crème la veille et la garder couverte au frigo. Assemblez le gâteau la veille du service pour la meilleure saveur et texture. Le long repos au frigo est votre arme secrète pour un gâteau parfait.
Puis-je utiliser un autre chocolat à la place du Kinder ?
Vous pouvez, mais le profil de saveur changera. Le chocolat Kinder a un goût spécifique, crémeux, laiteux et noisetté. Pour un substitut proche, cherchez un chocolat au lait de qualité avec des morceaux de noisette. Un chocolat au lait classique sera toujours délicieux, mais vous voudrez peut-être ajouter un peu plus de noisettes concassées à la crème pour imiter cette saveur Bueno classique.
Ma crème est trop liquide. Que puis-je faire ?
Ne vous inquiétez pas, on peut arranger ça ! Premièrement, assurez-vous que votre crème liquide était bien froide quand vous l’avez fouettée. Si la crème assemblée est trop molle, placez le bol entier au réfrigérateur pendant 30-45 minutes pour qu’elle durcisse avant de continuer l’assemblage. Vous pouvez aussi ajouter un peu plus de sucre glace tamisé ou une cuillère à soupe de maïzena pour aider à la stabiliser, mais la réfrigération est généralement la meilleure première étape.
Comment obtenir des tranches de gâteau parfaitement nettes ?
L’astuce est un couteau chaud et sec. Passez une lame tranchante sous l’eau très chaude, essuyez-la complètement avec un torchon propre, puis faites votre coupe. La chaleur aide le couteau à glisser en douceur à travers la crème froide et les couches de chocolat. Essuyez le couteau et réchauffez-le pour chaque tranche. Cela vous donne des parts belles et professionnelles.
Puis-je faire ce gâteau sans noix pour une allergie ?
Oui, vous pouvez facilement faire une version sans noix. Omettez simplement les noisettes concassées de la décoration. Les barres Kinder Bueno elles-mêmes contiennent des noisettes, donc pour le rendre totalement sûr, il faudrait trouver une alternative de barre chocolatée à la gaufrette sans noix, à la fois pour les couches intérieures et la décoration.
Que puis-je utiliser à la place du mascarpone ?
Le mascarpone donne une texture riche et crémeuse unique. Le substitut le plus proche serait une quantité égale de cream cheese entier. Sachez que le cream cheese a une saveur plus acidulée et une texture plus dense, donc la crème finale sera moins aérienne et aura un goût légèrement différent. Ce sera toujours très bon, juste différent.
Puis-je congeler le gâteau Kinder Bueno fini ?
Je ne recommande pas de congeler le gâteau entièrement assemblé. La teneur élevée en produits laitiers de la crème, surtout le mascarpone, peut se séparer et devenir granuleuse à la décongélation, ruinant la texture lisse. Cependant, vous pouvez congeler avec succès les disques de génoise cuits et non garnis jusqu’à un mois. Décongelez-les à température ambiante avant assemblage.
Pourquoi ma génoise n’a-t-elle pas bien monté ?
Cela vient généralement de trois choses : de la levure périmée (vérifiez la date !), du sur-mélange de la pâte après avoir ajouté la farine (ce qui développe le gluten et la rend caoutchouteuse), ou du fait de ne pas incorporer les blancs en neige assez délicatement et de les faire retomber. Assurez-vous que votre levure est fraîche et mélangez avec délicatesse.
Combien de temps les restes se conservent-ils au frigo ?
Votre gâteau Kinder Bueno restera frais et délicieux au réfrigérateur, bien couvert, jusqu’à 3 jours. Après cela, la génoise peut commencer à sécher un peu, et la crème peut perdre sa texture parfaite. Il est si bon, cependant, que je doute que vous en ayez encore après le deuxième jour !
Est-ce très difficile pour un pâtissier débutant ?
Pas du tout ! Cette recette est parfaite pour prendre confiance. La génoise est un processus classique de mélange et cuisson, et la crème est principalement du mélange. La partie la plus difficile est d’attendre qu’il refroidisse ! Prenez votre temps, suivez les étapes, et vous serez étonné de ce que vous pouvez créer. C’est beaucoup plus simple qu’il n’y paraît.
Si ce gâteau Kinder Bueno a déclenché l’amour de la pâtisserie de desserts sublimes, vous trouverez beaucoup d’autres idées inspirantes dans notre collection de gâteaux et pâtisseries.
À Votre Tour de Créer un Peu de Magie
Alors, le voici—ma recette préférée absolue pour un gâteau Kinder Bueno vraiment tentant. C’est une recette bâtie sur la joie, partagée avec amour, et qui garantit de faire sourire. Souvenez-vous, la pâtisserie, c’est le plaisir, la cuisine en désordre, et le moment de fierté quand vous présentez votre création. Ne stressez pas pour qu’il soit parfait. Le fait que vous l’ayez fait maison le rend plus spécial qu’aucun gâteau acheté en magasin pourrait jamais l’être. Maintenant, allez préchauffer ce four, mettez de la musique, et préparez-vous à faire le bonheur de quelqu’un (probablement le vôtre !) avec une part de bonheur chocolaté pur. Bonne pâtisserie !
Equipment
- Deux moules à charnières de 20 cm
- Bols à mélanger
- Mixeur à main ou batteur sur socle
- Spatule
- Passoire pour les ingrédients secs
Ingrédients
- 6 unit œufs moyens
- 150 g sucre granulé
- 140 g farine tout usage (type 405)
- 2 c.s cacao en poudre non sucré
- 1 sachet levure chimique (environ 2 cuil. à café)
- 200 g chocolat Kinder (barres ou morceaux cassés)
- 200 ml crème fleurette (très froide)
- 200 g fromage à la crème entier
- 500 g fromage mascarpone
- 3 c.s cacao en poudre non sucré
- 3 c.s sucre glace
- 100 g chocolat noir couverture (pour enrober)
- 100 g noisettes hachées grillées
- 250 g barres de chocolat Kinder Bueno (pour les couches et le dessus)
Instructions
- Préchauffez votre four à 180°C.
- Chemisez deux moules à charnières de 20 cm avec du papier sulfurisé.
- Séparez les blancs des jaunes d'œufs.
- Fouettez les jaunes avec le sucre jusqu'à obtenir une consistance crémeuse.
- Battez les blancs en neige.
- Tamisez la farine, le cacao et la levure dans le mélange de jaunes.
- Incorporez délicatement les blancs en neige.
- Répartissez le mélange dans les moules et lissez le dessus.
- Faites cuire pendant 20-25 minutes, jusqu'à ce que le gâteau rebondisse au toucher.
- Mélangez le chocolat Kinder et faites-le fondre au bain-marie ou au micro-ondes.
- Fouettez la crème fleurette en pics souples.
- Dans un autre bol, mélangez le fromage à la crème, le mascarpone, le cacao et le sucre glace.
- Incorporez le chocolat fondu au mélange crémeux.
- Incorporez délicatement la crème fouettée.
- Une fois le gâteau refroidi, découpez le dôme si nécessaire.
- Disposez le premier gâteau sur un plat, étalez une couche de crème et ajoutez des morceaux de Kinder Bueno.
- Ajoutez le deuxième gâteau et recouvrez-le entièrement de crème.
- Faites fondre le chocolat noir et nappez le gâteau.
- Pressez les noisettes sur les côtés du gâteau et décorez avec les barres de Kinder Bueno.
Notes
Nutrition

Je suis Céline, une véritable passionnée d’ustensiles et de matériel de cuisine ! J’adore tester, comparer et découvrir les meilleurs équipements pour rendre la cuisine plus efficace et agréable. Que ce soit un bon couteau, un robot performant ou une poêle incontournable, je suis toujours à la recherche des outils qui feront la différence. Mon but est de vous guider dans vos choix pour que vous ayez le bon matériel adapté à vos besoins.