
Un morceau de bonheur pur : Ma recette incontournable du Mississippi Mud Pie
Vous connaissez cette sensation de bonheur chocolaté pur et intense ? Celle qui vous fait fermer les yeux une seconde rien que pour la savourer ? C’est exactement ce que cette recette de Mississippi Mud Pie vous offre. Ce n’est pas juste un dessert ; c’est une expérience. Je l’ai préparée pour la première fois pour l’anniversaire de mon mari, et croyez-moi, le silence qui est tombé sur la table était le plus beau des compliments—tout le monde était trop occupé à déguster chaque bouchée décadente !
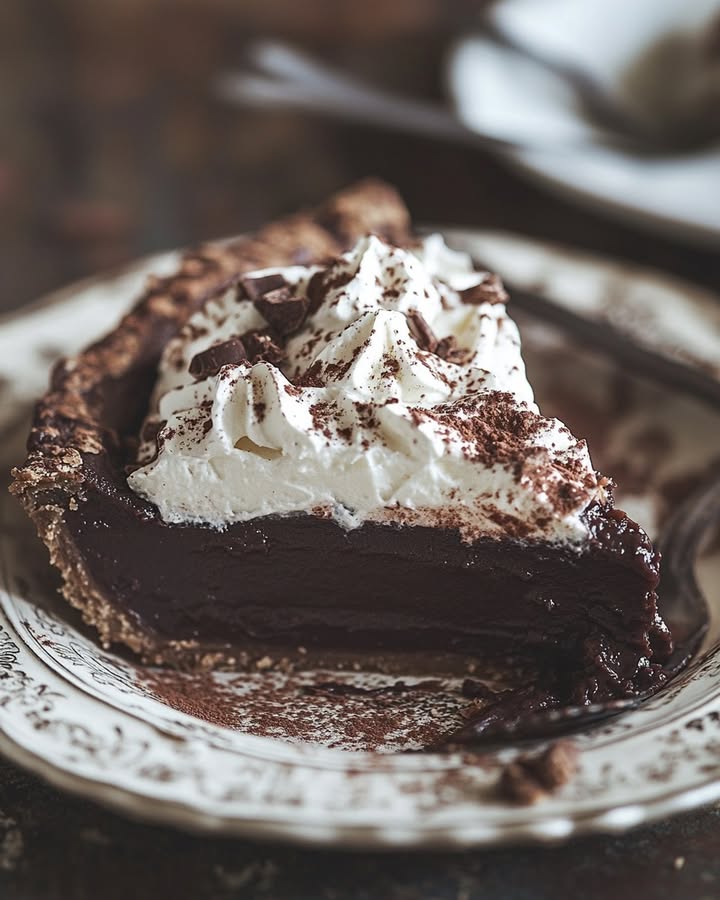
Cette tarte est ma grande séductrice. Avec ses couches de croûte aux Oreo, de brownie au chocolat noir, de mousse au chocolat crémeuse et de topping croquant aux biscuits, c’est le rêve absolu des amateurs de chocolat. Elle peut sembler ambitieuse, mais chaque étape est simple et tellement gratifiante. Allons cuisiner du bonheur !
L’histoire d’un classique : la Mud Pie
Ce dessert a des racines modestes et sudistes. Le Mississippi Mud Pie original était une simple tarte chocolatée fondante qui rappelait les berges boueuses du fleuve Mississippi. Avec le temps, il a évolué en quelque chose d’encore plus spectaculaire. Les pâtissiers ont commencé à ajouter des couches—brownie, mousse, café, liqueurs—pour en faire la pièce maîtresse que nous connaissons aujourd’hui.
Ma version salue cette tradition mais avec une touche moderne et amusante : les cookies Oreo ! La croûte aux Oreo apporte un croquant profondément chocolaté qui s’accorde parfaitement avec les couches tendres et riches au-dessus. C’est un beau mélange de réconfort classique et d’indulgence ludique, une tarte chocolat Oreo qui rendrait n’importe quelle grand-mère du Sud fière (et peut-être un peu jalouse !).
Pourquoi vous allez tomber amoureux de cette recette
Ce Mississippi Mud Pie n’est pas juste délicieux ; c’est un chef-d’œuvre qui vous facilite la vie. Voici pourquoi il a une place permanente dans mon cahier de recettes :
- Un jeu de textures incroyable : Chaque bouchée est une fête. Vous avez le croquant de la croûte Oreo, le moelleux fondant du brownie, la mousse aérienne et le croustillant des miettes de cookies. C’est magique !
- L’allié « préparé à l’avance » : Vous devez faire cette tarte à l’avance. La mousse a besoin de temps pour prendre au frigo, ce qui signifie zéro stress le jour J. Elle est même meilleure après une nuit.
- La surcharge chocolatée pure : Nous utilisons trois types de chocolat ici (chocolat noir, au lait et cacao en poudre). Ce n’est pas un dessert à note unique. C’est une symphonie profonde et complexe de saveurs chocolatées.
Quand servir cette tarte spectaculaire
Cette tarte se prête à toutes les occasions. Elle est parfaite pour :
- Les célébrations spéciales : Anniversaires, fêtes ou « j’ai-survécu-au-lundi ». Elle a un côté luxueux.
- Les buffets et rassemblements : Elle voyage bien (gardez-la au frais !) et nourrit une assemblée. Soyez prêt à distribuer la recette.
- Une soirée cocooning : Parfois, un mardi soir mérite une superbe tarte chocolat. Couper une petite part avec une tasse de café, c’est mon genre de self-care.
Ce dont vous aurez besoin : la liste des ingrédients
Rassembler vos ingrédients est la première étape vers le succès. Voici tout ce qu’il vous faut pour votre liste de courses du Mississippi Mud Pie :
Pour la croûte aux Oreo :
- 25 cookies Oreo
- 6 cuillères à soupe de beurre salé, fondu
Pour la couche brownie :
- 115 g de chocolat noir, haché
- 3 cuillères à soupe de beurre salé, fondu
- 3 cuillères à soupe d’huile végétale
- 2 cuillères à soupe de cacao en poudre non sucré
- 135 g de cassonade
- 2 gros œufs
- 2 cuillères à café d’extrait de vanille
- 1/4 de cuillère à café de sel
- 3 cuillères à soupe de farine tout usage
Pour le topping aux cookies :
- 8 cookies Oreo
- 2 cuillères à soupe de sucre glace
- 1 cuillère à soupe de cacao en poudre hollandais
- Une pincée de sel
- 2 cuillères à soupe de beurre salé, fondu
Pour la couche mousse :
- 170 g de chocolat au lait, haché
- 240 ml de crème liquide froide entière
- 2 cuillères à soupe de cacao en poudre hollandais
- 2 cuillères à soupe de sucre glace
- Une pincée de sel
Pour la crème chantilly au chocolat :
- 240 ml de crème liquide entière
- 50 g de sucre en poudre
- 3 cuillères à soupe de cacao en poudre non sucré
Substitutions d’ingrédients : pas de stress
Il vous manque quelque chose ? Pas de souci ! Voici des échanges faciles :
- Oreo : N’importe quel biscuit sandwich au chocolat convient.
- Cacao hollandais : Vous pouvez utiliser du cacao naturel non sucré, mais la saveur sera plus vive et acide. Le cacao hollandais est plus doux.
- Beurre salé : Si vous utilisez du beurre doux, ajoutez simplement une pincée de sel supplémentaire à chaque préparation.
- Crème liquide entière : Pour la mousse et la chantilly, il faut impérativement de la crème entière ou de la double crème pour qu’elle monte bien. Ne remplacez pas par un liquide plus léger.
Créer votre Mississippi Mud Pie : étape par étape
Allez, mettons-nous à l’ouvrage (dans le bon sens du terme !). Suivez ces étapes pour réussir une parfaite tarte chocolat Oreo.
Étape 1 : Préchauffage et préparation
Commencez par préchauffer votre four à 160°C. Cette température plus basse est clé pour cuire la couche brownie uniformément sans craqueler le dessus. Pendant qu’il chauffe, sortez votre moule à tarte de 23 cm. Il n’y a rien de pire que d’avoir son beurre fondu et de réaliser qu’on n’est pas prêt !
Étape 2 : Préparer la croûte aux Oreo
Mixez les 25 Oreo au robot culinaire jusqu’à obtenir une poudre fine et sombre. Si vous n’avez pas de robot, placez-les dans un sac de congélation solide et écrasez-les avec un rouleau à pâtisserie—parfait pour évacuer un peu de stress ! Versez les miettes dans un bol et ajoutez le beurre fondu en filet. Mélangez jusqu’à ce que chaque miette soit enrobée et que le mélange tienne lorsqu’on le presse. Tassez fermement et uniformément cette préparation au fond et sur les bords de votre moule. Enfournez 12 à 15 minutes, puis laissez refroidir sur une grille. L’odeur à elle seule est divine !
Astuce de pro : Utilisez le fond d’un verre plat ou d’une tasse à mesurer pour tasser la croûte. Ça crée une base super lisse et compacte.
Étape 3 : Créer la couche brownie
Dans un bol allant au micro-ondes, mélangez le chocolat noir haché, le beurre fondu, l’huile et le cacao en poudre. Chauffez par impulsions de 20 secondes, en mélangeant vigoureusement après chaque fois, jusqu’à obtenir un mélange lisse et soyeux. Laissez refroidir une minute pour ne pas cuire les œufs. Puis, fouettez-y la cassonade, puis les œufs, la vanille et le sel. Enfin, incorporez délicatement la farine jusqu’à ce qu’elle soit juste combinée—vous obtiendrez une pâte épaisse et brillante. Versez-la dans votre croûte qui attend et enfournez 25 à 30 minutes. Le centre doit être pris mais encore un peu mou. Laissez refroidir complètement. Cette patience est cruciale !
Étape 4 : Préparer la mousse au chocolat
Faites fondre le chocolat au lait et laissez-le refroidir jusqu’à ce qu’il soit à peine tiède. Dans un autre bol bien froid, battez la crème froide, le cacao en poudre, le sucre glace et le sel. Battez jusqu’à obtenir des pics mous—la crème doit tenir sa forme quand vous soulevez le fouet. Maintenant, le secret d’une mousse légère : incorporez délicatement environ un tiers de la crème chantilly dans le chocolat fondu. Cela détend le chocolat. Ensuite, incorporez délicatement ce mélange chocolaté dans le reste de la crème chantilly. Soyez doux pour garder tout cet air précieux. Étalez ce nuage de mousse sur le brownie refroidi et lissez la surface. Réfrigérez au moins 3 heures, ou toute une nuit.
Étape 5 : Cuire le topping aux cookies
Cette étape ajoute un contraste de texture génial. Concassez grossièrement les 8 Oreo—vous voulez des morceaux, pas de la poussière. Mélangez-les avec le sucre glace, le cacao et le sel. Arrosez de beurre fondu et mélangez à nouveau. Étalez cela sur une plaque de cuisson tapissée de papier sulfurisé et enfournez à 160°C pendant environ 10 minutes. Laissez refroidir complètement. Cela va durcir en refroidissant, formant de petits amas chocolatés et croustillants.
Étape 6 : Terminer avec la crème chantilly au chocolat
Pour la touche finale, préparez la crème chantilly au chocolat. Dans un bol froid, battez ensemble la crème, le sucre en poudre et le cacao en poudre. Commencez à basse vitesse pour éviter un nuage de cacao, puis augmentez. Battez jusqu’à obtenir des pics fermes. Étalez ou pochez cette crème sur la couche de mousse bien prise. Maintenant, saupoudrez généreusement les miettes de cookies refroidies sur le dessus. Soyez généreux—c’est la gloire suprême de votre tarte au chocolat américaine !
Astuce du chef
Pour les parts les plus nettes, trempez votre couteau dans de l’eau chaude et essuyez-le entre chaque coupe. Cela tranchera les couches froides sans accrocher la mousse et la crème.
Votre calendrier de préparation
Bien planifier, c’est la clé ! Voici une répartition du temps à prévoir :
- Temps de préparation : 45 minutes (assemblage actif)
- Temps de cuisson : 55 minutes (croûte + brownie + topping)
- Temps de repos : Au moins 3 heures (indispensable pour la prise)
- Temps total : Environ 4 heures 40 minutes (dont beaucoup de repos au frais)
Je recommande vivement de préparer cette tarte la veille du jour où vous en avez besoin. Les saveurs se marient et la texture devient encore meilleure.
Le secret du chef : le pouvoir du froid
Mon secret numéro un pour cette tarte ? Gardez tout froid. La crème froide monte mieux. Un bol froid fait monter la crème plus vite. Et laisser le chocolat fondu refroidir avant de l’incorporer à la crème l’empêche de la faire fondre et de faire retomber votre mousse. Le contrôle de la température est l’ingrédient invisible qui garantit une couche de mousse légère et aérienne plutôt que dense et lourde.
Une anecdote amusante sur le chocolat
Saviez-vous qu’utiliser différents types de chocolat dans un dessert, comme nous le faisons ici, s’appele construire un « profil chocolaté » ? C’est comme une dégustation de vin ! Le chocolat noir donne de la profondeur, le chocolat au lait ajoute une douceur crémeuse, et le cacao en poudre offre une note pure et intense de chocolat. Vous ne faites pas que cuisiner ; vous créez un voyage sensoriel !
Le matériel dont vous aurez besoin
Pas besoin d’ustensiles sophistiqués, mais ces outils aident :
- Moule à tarte de 23 cm
- Robot culinaire ou sac de congélation + rouleau à pâtisserie
- Bols de mélange (plusieurs tailles)
- Batteur électrique ou robot pâtissier (un fouet et un peu de muscle peuvent aussi faire l’affaire !)
- Bols allant au micro-ondes pour la fonte
- Spatule en caoutchouc pour incorporer
- Plaque de cuisson
Conserver votre chef-d’œuvre
Cette tarte se conserve merveilleusement bien. Couvrez-la légèrement de film alimentaire ou rangez-la dans une boîte à gâteau au réfrigérateur. Elle restera fraîche et délicieuse pendant 4 à 5 jours. Les saveurs continuent de se développer, ce qui la rend peut-être encore meilleure le deuxième ou troisième jour !
Vous pouvez aussi congeler la tarte entière ou des parts individuelles pour une conservation plus longue. Enveloppez-la bien dans du film alimentaire, puis dans du papier aluminium. Elle peut se congeler jusqu’à 2 mois.
Pour servir une tarte congelée, décongelez-la simplement toute une nuit au réfrigérateur. La texture sera parfaitement préservée, ce qui en fait un dessert préparé à l’avance idéal pour toute célébration impromptue.
Mes meilleurs conseils pour réussir
- Lisez toute la recette avant de commencer. Connaître les étapes aide à tout faire couler de source.
- Mesurez votre farine correctement. Versez-la dans la tasse à mesurer à l’aide d’une cuillère et nivelez. Ne plongez pas la tasse directement dans le paquet, car cela tasse trop.
- Quand vous incorporez la mousse, utilisez un mouvement délicat et enveloppant avec une spatule en caoutchouc. Ce n’est pas grave s’il reste quelques stries ; le véritable ennemi, c’est de trop mélanger.
- Laissez la couche brownie refroidir COMPLÈTEMENT avant d’ajouter la mousse. Un brownie tiède fera fondre la mousse et créera une couche désordonnée.
Présentation pour impressionner
Transformez votre tarte de jolie à superbe avec ces idées faciles :
- Pochez la crème chantilly au chocolat avec une douille étoile pour une finition digne d’une pâtisserie.
- Râpez un peu de chocolat supplémentaire ou ajoutez quelques framboises fraîches sur le dessus pour une touche de couleur.
- Servez chaque part sur une assiette froide avec un filet de caramel ou de coulis de framboise.
- Un léger saupoudrage de sucre glace ou de cacao juste avant de servir a l’air élégant et professionnel.
Vous aimez ça ? Essayez ces autres desserts incroyables !
Si vous avez apprécié la magie gourmande et en couches de ce Mississippi Mud Pie, je sais que vous allez adorer explorer d’autres gourmandises. Pour un superbe cookie bar avec un charme fondant caramelo-chocolat similaire, vous devez absolument essayer mes Barres milliardaires au caramel salé et pâte à cookies. C’est de la pure joie en carré ! Si vous cherchez quelque chose d’un peu plus léger mais tout aussi réconfortant, mon Délicieux gâteau à l’avoine et à la carotte est un succès garanti. Pour le summum du charme rustique et simple, ma Tarte paysanne (Tarte du pauvre) est étonnamment facile et délicieuse. Et pour un petit-déjeuner ou brunch qui sort de l’ordinaire, ces Roulés à la myrtille et à la cannelle sont une perfection fruitée et douce.
Erreurs courantes à éviter
Évitez ces écueils pour une tarte parfaite à chaque fois.
Erreur 1 : Utiliser du chocolat chaud dans la mousse
C’est la façon la plus courante de faire retomber votre belle mousse. Si le chocolat fondu est trop chaud quand vous l’incorporez à la crème chantilly, il va faire fondre la crème. Vous vous retrouverez avec une couche liquide et dense au lieu d’un nuage léger et aérien. Laissez toujours le chocolat fondu refroidir jusqu’à ce qu’il soit à peine tiède au toucher. Un bon test est d’en mettre un peu sur votre lèvre—ça ne doit pas être chaud.
Erreur 2 : Ne pas battre la crème au bon stade
Pour la mousse et la couche de chantilly finale, le stade de battage est crucial. Une crème pas assez battue ne tiendra pas et rendra votre mousse liquide. Une crème trop battue devient granuleuse et peut se transformer en beurre. Vous voulez des « pics mous » pour la mousse (le pic se plie quand vous soulevez le fouet) et des « pics fermes » pour le topping final (le pic tient droit). Utilisez un bol et des accessoires froids pour aider la crème à monter plus vite et plus stablement.
Erreur 3 : Passer les étapes de refroidissement
L’impatience est l’ennemie des desserts en couches. Ajouter la mousse sur une couche brownie encore tiède est une recette pour un désordre fondu. La chaleur résiduelle empêchera la mousse de prendre correctement. De même, ajouter le mélange de cookies cuit encore chaud sur la crème chantilly froide la fera pleurer et ramollir. Suivez toujours les instructions pour laisser les composants refroidir complètement. Cela assure que chaque couche distincte reste parfaite.
Erreur 4 : Tasser la croûte trop légèrement
Cette croûte aux Oreo doit être une fondation solide pour toutes ces couches lourdes. Si vous la saupoudrez juste et la tassez à peine, elle peut s’effriter et s’écrouler quand vous coupez la tarte. Tassez-la fermement et uniformément, surtout là où le fond rejoint les bords. Une bonne croûte solide rend le service de cette belle tarte chocolat Oreo très facile.
Un mot sur la qualité des ingrédients
Puisque ce dessert célèbre le chocolat, utiliser la meilleure qualité que vous pouvez vous offrir fait vraiment la différence. La saveur d’un bon chocolat ressort. Pour plus d’informations sur le choix d’ingrédients à la fois délicieux et bons pour votre bien-être, vous pouvez trouver de bons conseils sur la prévention nutritionnelle et la qualité des aliments auprès de sources fiables. Il s’agit de profiter de gourmandises faites avec soin et de bons produits !
Cette magnifique tarte n’est qu’un exemple du genre de projets de pâtisserie délicieux que nous adorons. Si cette tarte au chocolat américaine a conquis votre cœur, je vous invite à explorer bien d’autres inspirations sucrées dans ma collection complète de recettes de gâteaux et pâtisseries.
Vos questions sur le Mississippi Mud Pie, répondues
Puis-je rendre cette tarte sans gluten ?
Absolument ! La principale source de gluten ici provient des Oreo et de la farine dans la couche brownie. Utilisez vos cookies sandwich au chocolat sans gluten préférés pour la croûte et le topping. Pour la couche brownie, vous pouvez remplacer les 3 cuillères à soupe de farine tout usage par la même quantité d’un mélange de farine sans gluten type 1:1. Le résultat sera tout aussi délicieux et fondant.
Pourquoi ma couche de mousse est-elle devenue granuleuse ou séparée ?
Une mousse granuleuse arrive généralement si le chocolat fondu était trop chaud et a « figé » au contact de la crème froide, ou si la crème a été trop battue. Pour l’éviter, assurez-vous que votre chocolat est juste tiède, pas chaud, avant de l’incorporer. Si votre crème a l’air caillée, vous pouvez parfois la rattraper en fouettant délicatement une ou deux cuillères à soupe supplémentaires de crème froide pour la lisser. La prévention est toutefois préférable—l’incorporation lente et douce est la clé.
Comment savoir quand la couche brownie est cuite ?
Le brownie doit avoir l’air pris sur le dessus, et les bords peuvent commencer à se détacher légèrement de la croûte. Si vous secouez doucement le moule, le centre doit avoir un léger tremblement mais ne pas sembler liquide. Un cure-dent inséré près du bord doit ressortir avec des miettes humides, pas de la pâte crue. Souvenez-vous, il continuera à prendre en refroidissant, donc mieux vaut légèrement le sous-cuire que le surcuire pour une texture fondante.
Puis-je utiliser une croûte du commerce pour gagner du temps ?
Vous pouvez, mais je recommande vivement de prendre les 10 minutes pour faire la croûte aux Oreo. Une croûte type « biscuit » achetée n’aura pas la même saveur chocolatée profonde, et elle est souvent plus fine et fragile. La croûte aux Oreo maison est une composante majeure de la saveur et fournit la base solide nécessaire pour les couches lourdes. C’est simple et ça vaut vraiment le coup !
Ma crème chantilly est liquide. Qu’est-ce qui s’est passé ?
Une crème chantilly liquide est souvent causée par trois choses : une crème qui n’était pas assez froide, un bol qui n’était pas froid, ou une cuisine humide. La matière grasse de la crème doit être très froide pour emprisonner l’air et épaissir. Commencez toujours avec de la crème sortie directement du frigo et placez votre bol et vos accessoires au congélateur 10-15 minutes avant de commencer. Assurez-vous aussi d’utiliser de la crème liquide entière ou de la double crème, qui contient suffisamment de matière grasse (au moins 35%) pour monter correctement.
Puis-je ajouter du café ou de la liqueur à cette recette ?
Oui, et c’est une excellente idée pour une version pour adultes ! Pour un effet café, ajoutez 1 à 2 cuillères à café de poudre de café expresso instantané à la pâte à brownie. Pour une touche de liqueur, vous pouvez ajouter 1 à 2 cuillères à soupe de Kahlúa, Bailey’s ou Grand Marnier à la pâte à brownie ou incorporer une cuillère à soupe dans la mousse après le chocolat. Faites juste attention à ne pas ajouter trop de liquide à la pâte à brownie, car cela pourrait affecter la texture.
Combien de temps à l’avance puis-je assembler la tarte entière ?
Cette tarte est un dessert préparé à l’avance parfait. Vous pouvez assembler la tarte entière (y compris la crème chantilly finale et le topping aux cookies) jusqu’à 24 heures avant de servir. Gardez-la couverte au réfrigérateur. En fait, les saveurs s’améliorent après une nuit à se mêler. Vous pouvez même la congeler jusqu’à 2 mois pour une gourmandise à plus long terme.
Quelle est la différence entre le cacao hollandais et le cacao naturel ?
Le cacao hollandais est traité avec un alcali pour neutraliser son acidité naturelle. Il a une couleur plus foncée, une saveur plus douce et se dissout plus facilement. Le cacao naturel est plus vif et acide. Dans cette recette, utiliser du cacao hollandais dans la mousse et le topping aux cookies donne une saveur chocolatée plus riche et moins amère. En cas de besoin, vous pouvez les substituer à dose égale, mais le profil aromatique changera légèrement.
Le topping aux cookies a ramolli après l’avoir mis sur la tarte. Comment l’éviter ?
Pour un croquant maximum, conservez le mélange de biscuits cuit et refroidi dans un contenant hermétique à température ambiante. Ne le saupoudrez sur la crème chantilly au chocolat qu’au moment de servir la tarte. Cela le garde merveilleusement croustillant contre les couches crémeuses.
Dois-je utiliser à la fois du chocolat noir et du chocolat au lait ?
Utiliser les deux crée une saveur plus complexe, mais vous pouvez simplifier. Vous pourriez n’utiliser que du chocolat noir pour une tarte plus profonde et moins sucrée, ou que du chocolat au lait pour un résultat plus doux et crémeux. Je ne recommande pas d’utiliser uniquement du chocolat mi-sucré, car la saveur peut être monotone. Le contraste entre le brownie profond et la mousse crémeuse fait partie de ce qui rend cette tarte chocolat si spéciale.
Dernières pensées
Voilà—la recette de ce que mes amis appellent désormais « La Légendaire Mud Pie ». C’est un travail d’amour, mais chaque minute en vaut la peine quand on voit les sourires qu’elle provoque. Ce Mississippi Mud Pie est plus qu’un dessert ; c’est un moment de joie pure et partagée. Alors rassemblez vos ingrédients, mettez de la musique et cuisinez quelque chose d’extraordinaire. Vous en êtes capable ! Maintenant, allez savorer une part bien méritée de votre incroyable création.
Equipment
- Robot culinaire
- Moule à tarte de 9 pouces
- Bols à mélanger
- Spatule en caoutchouc
- Plaque de cuisson
Ingrédients
- 25 biscuits Oreo
- 6 c.s. beurre salé fondu
- 4 onces chocolat noir haché
- 3 c.s. beurre salé fondu
- 3 c.s. huile végétale
- 2 c.s. cacao en poudre non sucré
- 2/3 tasse sucre brun clair
- 2 c.t. extrait de vanille
- 1/4 c.t. sel
- 3 c.s. farine tout usage
- 8 biscuits Oreo pour le topping
- 2 c.s. sucre en poudre
- 1 c.s. cacao en poudre traité alcalin
- 2 c.s. beurre salé fondu
- 6 onces chocolat au lait haché
- 1 tasse crème épaisse froide
- 2 c.s. cacao en poudre traité alcalin
- 2 c.s. sucre en poudre
- 1 tasse crème épaisse
- 1/4 tasse sucre granulé
- 3 c.s. cacao en poudre non sucré
Instructions
- Préchauffez le four à 163°C (325°F) et préparez un moule à tarte de 9 inches.
- Mixez les 25 Oreos dans un robot culinaire jusqu'à obtenir une texture de sable fin, puis mélangez avec le beurre fondu.
- Pressez le mélange d'Oreo au fond du moule à tarte et faites cuire pendant 12-15 minutes. Laissez refroidir.
- Faites fondre le chocolat noir, le beurre fondu, l'huile et le cacao au micro-ondes en mélangeant toutes les 20 secondes jusqu'à obtenir un mélange lisse; laissez refroidir.
- Incorporez le sucre brun, les œufs, la vanille et le sel au mélange de chocolat, puis ajoutez la farine et mélangez jusqu'à juste combiné.
- Versez le mélange sur la croûte refroidie et faites cuire pendant 25-30 minutes; laissez refroidir complètement.
- Préparez la mousse au chocolat en faisant fondre le chocolat au lait, puis en battant la crème avec le cacao, le sucre en poudre et le sel jusqu'à obtenir des pics mous.
- Incorporez un tiers de la crème dans le chocolat fondu, puis incorporez délicatement le mélange au reste de la crème; étalez sur la couche de brownie.
- Ecrasez les 8 Oreos pour le topping, mélangez avec le sucre en poudre, le cacao et le sel, puis mélangez avec le beurre fondu et étalez sur une plaque de cuisson; faites cuire 10 minutes et laissez refroidir.
- Préparez la crème fouettée en battant la crème épaisse, le sucre et le cacao jusqu'à obtenir des pics fermes; étalez sur la mousse et ajoutez le crumble de biscuit par-dessus.
Notes
Nutrition

Je suis Céline, une véritable passionnée d’ustensiles et de matériel de cuisine ! J’adore tester, comparer et découvrir les meilleurs équipements pour rendre la cuisine plus efficace et agréable. Que ce soit un bon couteau, un robot performant ou une poêle incontournable, je suis toujours à la recherche des outils qui feront la différence. Mon but est de vous guider dans vos choix pour que vous ayez le bon matériel adapté à vos besoins.