
Le Flan Chocolat Biscuits : La Merveille Sans Cuisson Préférée de Ma Famille
Vous connaissez cette petite danse de joie qu’on fait en goûtant la première bouchée d’un dessert vraiment, *vraiment* bon ? C’est exactement ce que représente ce Flan Chocolat Biscuits. J’ai créé cette recette sur un coup de tête, un après-midi d’été caniculaire où allumer le four était impensable. Je voulais quelque chose de frais, de crémeux et de décadent. Le résultat ? Un dessert magique, sans cuisson, à étages, qui disparaît plus vite que les biscuits dans la boîte ! Il est devenu mon arme secrète pour chaque buffet, chaque anniversaire et chaque occasion « juste comme ça ».
Une Douce Histoire : De la Crème Caramel Classique au Rêve à Étages
Le flan, ou crème caramel, est un classique adoré, dont les racines remontent à l’époque romaine. Le gâteau au chocolat ? C’est un langage d’amour universel. Cette recette est ma fusion ludique—une rencontre entre le réconfort traditionnel et la commodité moderne. En utilisant de la poudre de flan toute simple et en la superposant avec des biscuits grillés, on crée quelque chose de merveilleusement nouveau. C’est la preuve que la cuisine maison évolue, mêlant tradition et ingrédients du placard. Cela me rappelle le flan de ma grand-mère, mais avec une twist chocolatée et croquante qu’elle aurait absolument adorée.
Pourquoi Vous Allez Tomber Amoureux de Cette Recette de Flan Chocolat Biscuits
Laissez-moi vous compter les raisons ! D’abord, zéro cuisson au four. Un vrai sauveur par temps chaud ou quand on manque de temps. Ensuite, la texture est divine : une crème soyeuse, un chocolat riche et le craquant moelleux des biscuits qui absorbent toutes les saveurs. Troisièmement, c’est incroyablement indulgent. Vous pouvez ajuster le sucre, changer les biscuits ou vous lâcher sur la décoration. C’est un dessert qui impressionne mais qui est secrètement d’une simplicité enfantine. Croyez-moi, vos invités penseront que vous y avez passé des heures !
Les Occasions Parfaites pour Ce Dessert Spectaculaire
Ce gâteau est votre nouvel meilleur ami pour toutes les occasions. Il est parfait pour les fêtes d’anniversaire (les enfants comme les adultes en raffolent). Il est assez élégant pour un dîner et assez simple pour un plaisir familial du week-end. Apportez-le à un buffet et regardez-le devenir le centre de toutes les conversations. J’en ai même fait des versions individuelles dans des verres pour un baby shower. C’est le héros versatile et universel de votre répertoire de desserts.
Rassemblez Vos Ingrédients pour le Flan Chocolat Biscuits
La simplicité est la clé ! Vous avez sûrement déjà la plupart de ces ingrédients dans votre cuisine :
- 1 litre de lait (divisé en deux portions de 1/2 litre)
- 1 sachet de poudre pour flan pour la couche crème
- 1 sachet de poudre pour flan + 2-3 cuillères à soupe de cacao en poudre pour la couche chocolat
- 4 cuillères à soupe bien bombées de sucre (à ajuster selon votre goût)
- 200 g de biscuits grillés (comme des Petit Beurre ou similaires)
- Pour la décoration : Cerises, copeaux de chocolat, pépites de chocolat, éclats d’amandes, ou ce que vous voulez !
Substitutions Faciles : Pour s’Approprier la Recette
Ne stressez pas si il vous manque quelque chose ! Lait : Le lait entier donne le résultat le plus crémeux, mais le demi-écrémé convient très bien. Biscuits : Tout biscuit nature, légèrement sucré, est parfait. Des biscuits type Graham ou Digestive fonctionnent bien. Cacao en poudre : Utilisez du cacao non sucré pour un goût plus profond ou un mélange chocolaté pour plus de douceur. Sucre : N’hésitez pas à en mettre moins, surtout si vos biscuits sont déjà très sucrés. Décoration : C’est là que vous pouvez briller ! Utilisez des fruits de saison, des noix concassées ou une simple pincée de cacao.
Créez Votre Flan Chocolat Biscuits : Un Pas-à-Pas Joyeux
Étape 1 : Préparer la Couche de Flan Nature
Commencez par verser environ 100 ml de lait froid dans un verre ou un bol. Saupoudrez-y le sachet de poudre pour flan réservé à la couche crème. Fouettez énergiquement jusqu’à obtenir une pâte parfaitement lisse, sans grumeaux. La couleur sera un jaune pâle doux. Maintenant, versez le reste du lait pour cette couche dans une casserole et portez à ébullition douce. Dès les premiers bouillons, baissez le feu. C’est le moment ! Versez lentement le mélange froid du verre dans la casserole, en fouettant constamment. Vous sentirez la magie opérer : le mélange épaissit en une magnifique crème brillante en quelques minutes. Retirez du feu et incorporez le sucre jusqu’à ce qu’il soit dissous. Réservez cette belle crème vanillée avec le sourire.
Astuce de pro : Remuer constamment est le secret pour éviter les grumeaux et obtenir cette texture veloutée.
Étape 2 : Préparer la Couche de Flan au Chocolat
Prenez un autre verre et répétez le processus pour votre couche chocolatée. Mélangez le deuxième sachet de poudre pour flan avec le cacao dans un peu de lait froid. Voyez comme le cacao riche et foncé transforme le mélange ? Portez la deuxième portion de lait à ébullition. Comme tout à l’heure, incorporez lentement le mélanger chocolaté en fouettant. Regardez-le se transformer en une crème épaisse et décadente, comme un pudding. L’arôme est absolument paradisiaque ! Sucrez selon votre goût, en gardant à l’esprit que les biscuits ajouteront aussi du sucre. Réservez-la à côté de votre crème nature. Vous avez maintenant deux casseroles de bonheur potentiel.
Étape 3 : L’Art du Montage en Couches
Légèrement huilez votre moule (un moule à cake rectangulaire ou un moule rond fonctionne très bien) et tapissez-le de film alimentaire. Ce film est votre meilleur ami—il rendra le démoulage d’une simplicité enfantine ! Maintenant, place à la partie amusante. Versez une fine couche uniforme de la crème chocolatée encore tiède au fond du moule. C’est votre fondation. Prenez rapidement vos biscuits grillés et disposez-en une seule couche sur le chocolat, en les cassant si besoin pour les faire tenir. Ensuite, étalez une couche de crème nature sur les biscuits, en les recouvrant complètement. Puis, une nouvelle couche de biscuits, suivie de crème chocolatée. Alternez ainsi jusqu’à épuisement des préparations, en terminant par une dernière couche de biscuits sur le dessus.
Astuce de pro : Travaillez pendant que les crèmes sont encore tièdes. Elles vont légèrement imbiber les biscuits, rendant chaque bouchée moelleuse et pleine de saveur.
Étape 4 : La Prise et la Grande Révélation
Une fois votre chef-d’œuvre assemblé, couvrez délicatement le dessus avec du film alimentaire. Appuyez-le directement sur la surface de la dernière couche de biscuits. Cela empêche la formation d’une peau. Maintenant, la patience est la clé ! Laissez refroidir complètement à température ambiante, puis transférez au réfrigérateur. Laissez prendre au moins 4 heures, mais une nuit entière est encore mieux. Ce temps de repos permet à toutes les couches de prendre et aux saveurs de se marier parfaitement. Lorsque vous êtes prêt à servir, retirez le film du dessus, placez une assiette de service sur le moule et retournez-le avec confiance. Soulevez doucement le moule et retirez le film alimentaire pour révéler votre magnifique gâteau rayé.
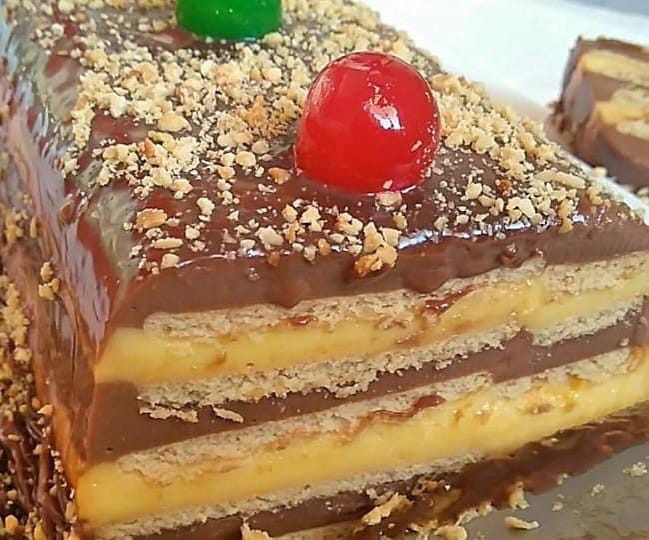
Étape 5 : La Touche Finale : La Décoration
C’est là que vous devenez un artiste. Décorer votre Flan Chocolat Biscuits est un pur bonheur. J’adore une cascade de cerises brillantes et une neige d’amandes effilées. Pour les amoureux du chocolat, une généreuse poignée de pépites ou de jolis copeaux est parfaite. Laissez-vous guider par la saison ou votre humeur. Une simple pincée de sucre glace ou de cacao peut être incroyablement élégante. Il n’y a pas de mauvais choix ici !
Astuce du chef : Pour un aspect brillant et professionnel, badigeonnez le dessus avec un peu de nappage à l’abricot avant d’ajouter les fruits. Cela fait tout briller !
Votre Délai pour la Réussite du Dessert
Cette recette est merveilleusement gérable. Temps de Préparation Actif : Environ 20-25 minutes. Temps de « Cuisson » : Environ 10-15 minutes (juste pour chauffer le lait et épaissir les flans). Temps de Prise au Froid : Un minimum de 4 heures, idéalement toute la nuit. Temps Total : De A à Z, prévoyez environ 5 heures, dont la majorité est un temps de repos sans intervention.
Mon Secret pour une Texture Ultra-Crémeuse
Ma meilleure astuce absolue ? Utiliser du lait froid pour mélanger la poudre de flan en une pâte lisse avant de l’ajouter au lait chaud. Ce premier mélange à froid empêche complètement la formation de grumeaux, garantissant une crème parfaitement soyeuse à chaque fois. C’est une petite étape qui fait toute la différence !
Une Info Amusante sur Votre Ingrédient Clé
Saviez-vous que le mot « flan » vient du vieux français « flaon » ? C’est un dessert chéri à travers l’Europe depuis des siècles, chaque région y apportant sa touche. Notre version, avec ses couches de chocolat et de biscuits, est un délicieux chapitre moderne de cette longue et douce histoire. C’est un excellent exemple de comment un dessert maison de qualité peut transformer des ingrédients simples en quelque chose de vraiment spécial pour votre métabolisme et votre moral.
De Quoi Aurez-Vous Besoin dans Votre Cuisine
Aucun équipement sophistiqué nécessaire ! Une casserole moyenne, un bon fouet, deux bols ou verres, un moule à cake rectangulaire ou rond (environ 20-22 cm), du film alimentaire et une cuillère doseuse. C’est tout ! Une spatule est utile pour racler le dernier peu de crème de la casserole.
Conservation de Votre Flan Chocolat Biscuits
Ce gâteau est un rêve à conserver. Gardez-le couvert au réfrigérateur, et il restera frais et délicieux pendant 3 à 4 jours. Les saveurs s’améliorent même après une journée ! Le film alimentaire est crucial pour l’empêcher d’absorber les odeurs du frigo et de sécher.
Je ne recommande pas de le congeler. Les couches de flan peuvent devenir aqueuses et perdre leur texture crémeuse parfaite à la décongélation. Il est meilleur dégusté frais du frigo.
Si vous devez le préparer à l’avance, l’assembler une journée complète avant l’événement est idéal. Cela donne à tous les composants le temps de bien prendre et aux biscuits de ramollir juste ce qu’il faut.
Mes Meilleurs Conseils pour un Flan Chocolat Biscuits Impeccable
- Goûtez en sucrant : Les poudres pour flan varient en douceur. Goûtez toujours votre crème après avoir ajouté le sucre et ajustez avant le montage.
- Le choix des biscuits compte : Des biscuits grillés nature et robustes gardent mieux leur forme que des cookies très moelleux ou beurrés, qui peuvent devenir pâteux.
- La magie du démoulage : Si le gâteau semble coller après le froid, trempez brièvement le fond du moule dans de l’eau chaude avant de le retourner sur l’assiette.
- Soyez créatif avec les saveurs : Ajoutez une cuillère à café de café instantané à la couche chocolat pour une touche moka, ou un peu de cannelle à la crème nature.
La Présentation de Votre Chef-d’Œuvre
La présentation est la moitié du plaisir ! Découpez-le proprement avec un couteau trempé dans l’eau chaude pour des tranches nettes. Servez sur une assiette blanche simple pour laisser les couches briller. Pour un dîner, placez une feuille de menthe fraîche et une framboise à côté de chaque part. Pour une fête d’enfants, lâchez-vous avec des sprinkles colorés et des zigzags de sauce chocolat. Vous pouvez aussi préparer des portions individuelles dans de jolis verres, en superposant les crèmes et des biscuits émiettés pour une version déconstruite.
Vous Aimez Cette Recette ? Essayez Ces Autres Desserts Irrésistibles !
Si la magie des desserts sans cuisson à étages de ce Flan Chocolat Biscuits vous plaît, mon site est plein d’idées similaires délicieuses. Pour une autre option sans cuisson éblouissante et pleine de saveurs tropicales, vous devez absolument essayer ma Mousse à la Passion soyeuse. Elle est incroyablement rafraîchissante ! Si vous avez envie de pâtisserie, le dessert réconfort ultime est sûrement mes Beignets à la Crème – plus légers que l’air et absolument délicieux. Pour les amateurs de chocolat en quête de richesse suprême, ma Tarte au Chocolat Crémeuse est un must absolu. Et si vous adorez la combinaison d’une garniture crémeuse avec une touche épicée, mon spectaculaire Cheesecake Rouleaux à la Cannelle vous bluffera. Vous trouverez tous ces merveilleux desserts et plus encore dans ma collection de gâteaux et pâtisseries.
Erreurs Courantes à Éviter Avec Votre Flan Chocolat Biscuits
Erreur 1 : Ajouter la Poudre de Flan Directement dans le Lait Chaud
C’est la raison numéro un d’une crème grumeleuse et granuleuse. La poudre s’agglutine instantanément au contact de la chaleur. Mélangez toujours, toujours, d’abord dans un peu de lait ou d’eau froid(e) pour créer une pâte lisse. Cette pâte s’incorpore ensuite parfaitement au lait chaud, vous donnant cette texture soyeuse et onctueuse que nous voulons tous.
Erreur 2 : Bâcler le Temps de Prise au Froid
L’impatience ici mène au désastre ! Si le gâteau n’a pas complètement pris, les couches vont s’affaisser et se mélanger en essayant de le démouler. Le goût sera bon, mais vous n’aurez pas ces belles couches bien nettes. Respectez le temps au frigo. Quatre heures, c’est le minimum, mais le laisser prendre toute la nuit est le véritable secret pour des parts parfaites et fermes.
Erreur 3 : Utiliser le Mauvais Type de Biscuits
Des biscuits trop mous ou trop beurrés peuvent devenir une couche détrempée et pâteuse qui perd toute texture. Le but est une bouchée moelleuse, pas une pâte. Optez pour des « biscuits grillés » robustes et nature ou des biscuits à thé comme le Petit Beurre. Ils ramollissent juste assez pour être tendres tout en offrant un léger contraste de texture avec le flan crémeux.
Erreur 4 : Ne Pas Tapisser le Moule de Film Alimentaire
Passer cette étape rend le démoulage très incertain. Les couches crémeuses adorent coller aux parois du moule. Le tapisser de film alimentaire crée une surface anti-adhésive et vous donne de pratique « poignées » pour sortir le gâteau sans effort. C’est une astuce simple qui garantit une présentation sans stress et magnifique.
Vos Questions sur le Flan Chocolat Biscuits, Répondues !
Puis-je utiliser de la crème pâtissière maison au lieu de poudre de flan ?
Absolument ! Si vous préférez une crème pâtissière faite maison, vous pouvez utiliser une crème pâtissière vanille classique et une crème pâtissière au chocolat. La clé est d’obtenir une consistance épaisse, genre pudding, similaire au flan préparé. Cela vous donnera plus de contrôle sur les saveurs et les ingrédients. Assurez-vous qu’elles sont complètement refroidies avant le montage pour éviter de faire fondre les biscuits.
Mon mélange de flan est trop liquide. Qu’ai-je fait de travers ?
Un mélange trop liquide signifie généralement qu’il n’a pas assez bouilli après l’ajout de la pâte de flan. La poudre a besoin d’atteindre une pleine ébullition pour activer correctement son pouvoir épaississant. Remettez la casserole sur feu doux et continuez à remuer constamment une ou deux minutes de plus, jusqu’à ce qu’elle épaississe visiblement. Elle continuera à prendre en refroidissant, donc une consistance liquide mais qui nappe la cuillère est parfaite.
Puis-je réaliser cette recette sans gluten ?
Oui, facilement ! Les couches de flan sont naturellement sans gluten. La seule chose à changer, ce sont les biscuits. Utilisez vos biscuits nature ou à thé sans gluten préférés. La méthode et le résultat seront exactement les mêmes, ce qui en fait un dessert fantastique pour les invités avec des restrictions alimentaires.
Combien de temps à l’avance puis-je assembler ce gâteau ?
C’est un excellent dessert à préparer à l’avance. Vous pouvez l’assembler jusqu’à 24 heures avant. En fait, je le recommande vivement ! Le temps supplémentaire au frigo permet aux biscuits de ramollir parfaitement et aux saveurs de se mélanger magnifiquement. Gardez-le simplement bien emballé sous film alimentaire jusqu’au moment de décorer et servir.
La couche du fond colle à l’assiette. Comment réparer cela ?
Cela peut arriver, mais ne vous inquiétez pas ! Pour l’éviter, assurez-vous que votre assiette de service est complètement sèche. Si elle colle un peu, glissez doucement un long couteau mince (trempé dans l’eau chaude) entre le gâteau et l’assiette pour le décoller. Vous pouvez aussi soulever délicatement un coin et souffler un peu d’air dessous pour aider à le détacher.
Puis-je utiliser d’autres saveurs pour les couches ?
Bien sûr ! Cette recette est une toile merveilleuse. Pour la couche claire, essayez du zeste d’agrumes (citron ou orange), un trait de rhum ou une touche d’extrait d’amande. Pour la couche foncée, du café instantané, de l’extrait de menthe ou même un tourbillon de beurre de cacahuète seraient fantastiques. Maintenez simplement la même consistance crémeuse pour un bon empilage.
Est-il possible de faire des portions individuelles ?
Oui, et c’est trop mignon ! Au lieu d’un grand moule, utilisez des petits verres, pots ou ramequins. Superposez simplement les biscuits émiettés et les crèmes dans chaque verre. C’est infaillible pour le service et très élégant. Souvenez-vous qu’ils prendront peut-être un peu plus vite à cause du plus petit volume.
Mon gâteau n’a pas bien pris. Puis-je quand même le servir ?
S’il est trop mou pour être découpé proprement, ne paniquez pas. Vous avez deux délicieuses options. Premièrement, vous pouvez le servir comme un glorieux « parfait » de pudding déconstruit, dans des bols. Servez-le à la cuillère en couches généreuses. Deuxièmement, placez-le au congélateur pendant environ 45-60 minutes pour le raffermir rapidement, puis découpez-le et remettez-le au frigo avant de servir.
Quelle est la meilleure façon de découper des tranches nettes ?
Pour des tranches dignes d’une photo, utilisez un couteau tranchant à lame fine. Trempez la lame dans de l’eau très chaude et essuyez-la entre chaque découpe. La chaleur aide la lame à glisser en douceur à travers les couches crémeuses sans les tirer ou les étaler, vous laissant de belles bandes bien nettes dans chaque part.
Puis-je décorer le gâteau avant la prise au froid ?
Il est préférable d’ajouter les décorations fraîches comme de la crème chantilly, des fruits ou des copeaux de chocolat après la prise au froid et le démoulage. Si vous les ajoutez avant, elles peuvent s’enfoncer dans la crème molle ou devenir détrempées. La seule exception est une garniture destinée à être pressée sur la couche du dessus, comme des amandes effilées, qui peuvent être ajoutées juste avant la prise complète.
Prêt(e) à Créer un Peu de Magie ?
Voilà—mon Flan Chocolat Biscuits tant aimé, sans complication. C’est plus qu’une recette ; c’est une promesse de bonheur crémeux, chocolaté et croquant qui rassemble les gens. C’est la preuve que les choses les plus délicieuses viennent souvent des combinaisons les plus simples. Alors, rassemblez vos ingrédients, mettez de la bonne musique et offrez-vous, ainsi qu’à vos proches, cette merveille en couches. J’ai hâte que vous le réalisiez, le partagiez et que vous voyiez ces petites danses de joie par vous-même. Bonne cuisine !
Equipment
- Moyenne casserole
- Un moule à gâteau environ 20-22 cm
- Bon fouet
- Deux jugs ou verres de mélange
- Film plastique
Ingrédients
- 1000 ml lait divisé en deux portions de 500 ml
- 1 sachet poudre à flan (couche de crème)
- 1 enveloppe poudre à flan (couche de chocolat)
- 3 cuillère à soupe chocolat en poudre pour couche de chocolat
- 4 cuillères à soupe sucre ajuster au goût
- 200 g biscuits toastés comme les Petit Beurre ou similaires
- décorations cerises, copeaux de chocolat, pépites de chocolat, amandes ou autres
Instructions
- Verser environ 100 ml de lait froid dans un verre et y ajouter la poudre à flan pour la couche de crème en fouettant jusqu’à obtenir une pâte lisse.
- Porter le reste du lait à ébullition puis réduire le feu et incorporer le mélange de flan tout en fouettant jusqu’à épaississement. Ajouter le sucre et remuer.
- Répéter le processus pour la couche de chocolat avec la poudre à flan et le chocolat en poudre.
- Graisser légèrement le moule avec du film plastique, ajouter une couche de crème au chocolat au fond, puis disposer une couche de biscuits. Alterner avec la crème vanille et les biscuits.
- Couvrir le moule et laisser refroidir complètement avant de réfrigérer pendant au moins 4 heures ou toute la nuit.
- Dekorer le gâteau et le servir.
Notes
Nutrition

Je suis Céline, une véritable passionnée d’ustensiles et de matériel de cuisine ! J’adore tester, comparer et découvrir les meilleurs équipements pour rendre la cuisine plus efficace et agréable. Que ce soit un bon couteau, un robot performant ou une poêle incontournable, je suis toujours à la recherche des outils qui feront la différence. Mon but est de vous guider dans vos choix pour que vous ayez le bon matériel adapté à vos besoins.