
La Recette Ultime du Gâteau au Chocolat Décadent pour un Vrai Plaisir Gourmand
Avez-vous déjà ces journées où seule une part de gâteau au chocolat, le plus riche et le plus généreux qui soit, peut vous satisfaire ? Moi, oui. Ce Gâteau Chocolat Décadent est mon chef-d’œuvre incontournable. Il a sauvé des anniversaires, réparé des cœurs et été la star d’innombrables réunions de famille. C’est plus qu’un dessert ; c’est un câlin en forme de gâteau.
Un Voyage au Paradis du Chocolat : L’Histoire de ce Gâteau
Cette recette est ma version personnelle d’un classique. Je l’ai testée encore et encore, des dimanches après-midi tranquilles aux fêtes bondées. Mon objectif était de créer un gâteau au chocolat à la fois incroyablement moelleux et intensément parfumé—un gâteau digne d’être qualifié de « décadent ». En superposant une génoise au chocolat simple mais profonde, une mousse au chocolat aérienne comme un nuage et un glaçage ganache brillant et riche, j’ai trouvé le parfait équilibre. C’est une interprétation moderne d’un favori intemporel. Chaque bouchée raconte une histoire d’amour pour le bon chocolat et la joie de réaliser quelque chose de spectaculaire.
Pourquoi Vous Allez Absolument Adorer ce Gâteau au Chocolat Décadent
Voici pourquoi ce gâteau est si spécial :
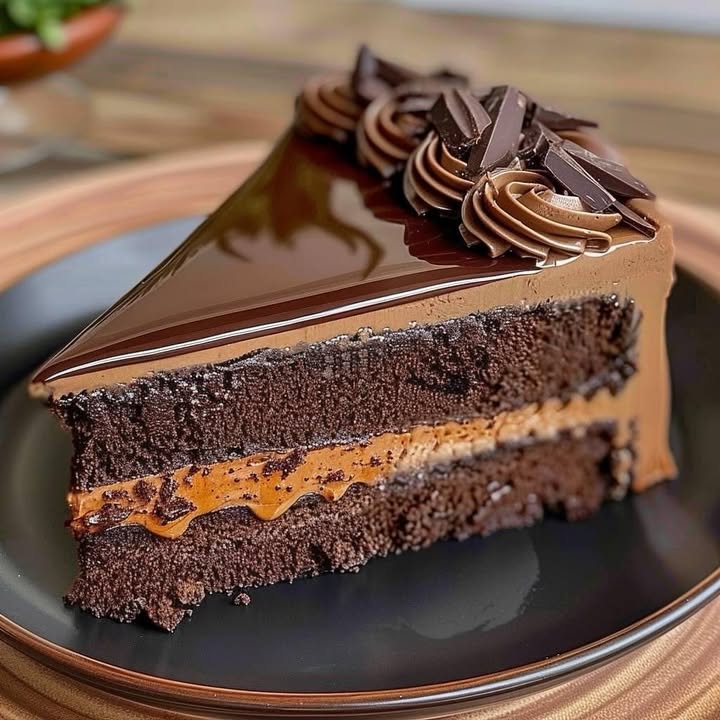
- Une Texture Imbattable : Le gâteau est doux et moelleux, la mousse est légère et aérienne, et la ganache est lisse et soyeuse. C’est la triple menace de la gourmandise !
- Une Saveur Profonde et Riche : Utiliser de la poudre de cacao et du chocolat noir dans trois couches crée un goût de chocolat complexe et adulte, sans être trop sucré.
- Impressionnant mais Abordable : Bien qu’il ait l’air de sortir d’une pâtisserie chic, chaque composant est étonnamment simple à réaliser.
- Un Vrai Plaisir Partagé : Ce Gâteau Décadent n’a jamais manqué de susciter des « waouh » et des demandes de recette. C’est un succès garanti.
Les Occasions Parfaites pour Votre Gâteau au Chocolat Décadent
Ce gâteau est votre arme secrète pour les célébrations. Il brille lors des anniversaires et des fêtes de famille. C’est la finale parfaite pour un repas de fête comme Noël ou le réveillon du Nouvel An. Besoin d’impressionner de nouveaux beaux-parents ou de remercier un hôte merveilleux ? Ce gâteau au chocolat parlera pour vous. Parfois, la meilleure occasion est simplement un mercredi soir qui a besoin d’une douceur mémorable. Aucune raison n’est nécessaire !
Ce dont Vous Avez Besoin : Votre Liste de Courses pour la Décadence
Rassembler vos ingrédients est la première étape vers le succès. Voici tout ce dont vous aurez besoin :
Pour le Gâteau au Chocolat :
- 250 g de farine tout usage
- 400 g de sucre en poudre
- 75 g de poudre de cacao non sucré (de bonne qualité !)
- 2 cuillères à café de levure chimique
- 1 cuillère à café et demie de bicarbonate de soude
- 1 cuillère à café de sel
- 240 ml de babeurre (ou lait ribot)
- 120 ml d’huile végétale
- 2 gros œufs
- 2 cuillères à café d’extrait de vanille pur
- 240 ml d’eau bouillante
Pour la Mousse au Chocolat :
- 225 g de chocolat noir, finement haché
- 480 ml de crème liquide entière froide
- 30 g de sucre glace
Pour la Ganache au Chocolat :
- 225 g de chocolat noir, finement haché
- 240 ml de crème liquide entière
Pour la Décoration :
- Frisettes ou copeaux de chocolat
Substitutions Pratiques : Pâtissez avec ce que Vous Avez
Pas de babeurre ? Pas de problème ! Mélangez 1 cuillère à soupe de jus de citron ou de vinaigre blanc avec du lait jusqu’à obtenir 240 ml. Laissez reposer 5 minutes jusqu’à ce qu’il caille. Vous pouvez utiliser du beurre fondu ou même de la compote de pommes à la place de l’huile végétale pour une richesse différente. Vous n’avez pas de chocolat noir ? Un bon chocolat à pâtisser (environ 60-70%) fonctionne à merveille pour la mousse et la ganache. La clé est d’utiliser un chocolat que vous aimez manger tel quel.
Guide Étape par Étape pour Votre Gâteau Chocolat Décadent Parfait
C’est parti pour la pâtisserie ! Suivez ces étapes pour un résultat sublime et délicieux.
Étape 1 : La Cuisson des Couches de Chocolat Parfaites
Préchauffez d’abord votre four à 180°C (th.6). Beurrez généreusement deux moules à gâteau ronds de 23 cm et tapissez le fond de papier sulfurisé. Cela garantira un démoulage propre plus tard. Dans un grand saladier, fouettez ensemble la farine, le sucre, la poudre de cacao, la levure, le bicarbonate et le sel. Le cacao formera un beau mélange poudreux brun foncé. Ajoutez le babeurre, l’huile végétale, les œufs et la vanille aux ingrédients secs. Mélangez avec un batteur à vitesse moyenne jusqu’à ce que tout soit juste combiné. La pâte sera épaisse et onctueuse. Maintenant, versez délicatement l’eau bouillante avec le batteur en vitesse basse. Une fois incorporée, battez à vitesse élevée pendant une minute entière. La pâte deviendra fine et brillante. Astuce de pro : Ne zappez pas l’eau bouillante ! Elle « active » le cacao, intensifiant la saveur du chocolat. Versez la pâte uniformément dans vos moules préparés et enfournez pour 30-35 minutes. Les gâteaux sont cuits quand un cure-dent inséré au centre en ressort avec quelques miettes humides. Laissez-les refroidir complètement dans les moules sur une grille.
Étape 2 : La Préparation de la Mousse au Chocolat Rêvée
Pendant que les gâteaux refroidissent, préparez votre mousse. Hachez finement votre chocolat noir et faites-le fondre doucement au bain-marie ou par courtes impulsions au micro-ondes, en remuant fréquemment jusqu’à consistance lisse. Laissez refroidir à température ambiante ; s’il est trop chaud, il fera retomber la crème. Dans un autre grand bol froid, versez la crème froide et ajoutez le sucre glace. À l’aide d’un fouet, battez la crème à vitesse moyenne-élevée jusqu’à l’obtention de pics fermes. La crème doit tenir sa forme quand vous soulevez le fouet. Prenez maintenant environ un tiers de la crème fouettée et incorporez-la délicatement au chocolat fondu refroidi. Cela allège le mélange au chocolat. Ensuite, incorporez ce mélange chocolaté au reste de la crème fouettée. Soyez doux et patient pour garder autant d’air que possible dans la mousse. Astuce du chef : Placez votre bol et vos fouets au congélateur 10 minutes avant de fouetter la crème. La crème montera plus vite et plus stablement.
Étape 3 : La Création de la Ganache au Chocolat Soyeuse
La ganache est la touche finale luxueuse. Placez votre chocolat finement haché dans un bol moyen résistant à la chaleur. Dans une petite casserole, faites chauffer la crème à feu moyen jusqu’à ce qu’elle commence tout juste à frémir—vous verrez de petites bulles sur les bords. Versez immédiatement la crème chaude sur le chocolat haché. Laissez reposer sans y toucher pendant 2-3 minutes. Cela permet à la chaleur de faire fondre le chocolat parfaitement. Ensuite, en commençant par le centre, remuez délicatement avec un fouet jusqu’à ce que le mélange devienne lisse, brillant et homogène. Vous avez maintenant une ganache parfaite à verser. Laissez reposer environ 10-15 minutes pour qu’elle épaississe légèrement et nappe magnifiquement le gâteau.
Étape 4 : L’Assemblage de Votre Chef-d’Œuvre
C’est la partie amusante ! Placez une couche de gâteau complètement refroidie sur votre assiette de service ou votre présentoir. Si le gâteau a un peu bombé, vous pouvez le niveler avec un couteau dentelé pour une surface plane. Déposez toute la mousse au chocolat préparée sur la première couche, en l’étalant uniformément jusqu’aux bords avec une spatule coudée. Placez délicatement la seconde couche de gâteau par-dessus, en appuyant légèrement. Maintenant, versez votre ganache légèrement épaissie sur le dessus du gâteau. Utilisez votre spatule pour l’encourager à couler joliment sur les côtés. Enfin, décorez le dessus avec vos frisettes ou copeaux de chocolat. Reculez et admirez votre magnifique Gâteau Décadent !
Votre Chronologie de Préparation
Voici un guide rapide pour gérer votre temps :
- Temps de préparation : 30 minutes
- Temps de cuisson : 35 minutes
- Temps de refroidissement : 1 heure 30 minutes
- Assemblage & Réfrigération : 20 minutes
- Temps total : Environ 2 heures 55 minutes
Le Secret du Chef pour un Moelleux Ultime
L’arme secrète de ce gâteau est l’eau bouillante. Verser un liquide chaud dans la pâte fait une chose magique. Elle « active » la poudre de cacao, libérant ses saveurs les plus profondes et complexes. Elle aide aussi à créer une mie unique tendre et moelleuse qui reste souple pendant des jours. N’ayez pas peur de la pâte liquide—elle cuit pour donner la texture de gâteau la plus parfaite.
Une Douce Petite Anecdote
Saviez-vous que le mot « décadent » dans le monde culinaire décrivait à l’origine des aliments d’une richesse et d’un indulgence coupables, souvent au-delà de ce qui était considéré comme nécessaire ? C’était un terme à la fois critique et désirable. Aujourd’hui, nous l’embrassons ! Un véritable gâteau au chocolat décadent, comme celui-ci, est une célébration du plaisir pur, un choix délibéré et joyeux de s’offrir quelque chose d’extraordinaire. C’est un treat qui se veut luxueux et spécial, exactement comme il se doit.
Le Matériel dont Vous Aurez Besoin
Vous avez probablement déjà la plupart de ces choses dans votre cuisine :
- Deux moules à gâteau ronds de 23 cm
- Papier sulfurisé
- Saladiers de tailles variées
- Batteur électrique à main ou robot pâtissier
- Fouet et spatules
- Bain-marie ou bol allant au micro-ondes
- Présentoir à gâteau ou assiette de service
- Spatule coudée pour lisser
Conservation de Votre Gâteau au Chocolat Décadent
À cause de la garniture à la mousse crémeuse, ce gâteau doit être conservé au réfrigérateur. Couvrez-le légèrement avec un dôme à gâteau ou du papier aluminium en tente pour le protéger des odeurs du frigo. La mousse et la ganache contiennent des produits laitiers, donc les garder au frais est essentiel pour la sécurité alimentaire et la texture.
Votre Gâteau Chocolat Décadent restera magnifiquement moelleux et délicieux jusqu’à 4 jours au réfrigérateur. Les saveurs se marient souvent et deviennent encore plus riches le lendemain ! Pour la meilleure texture et saveur, sortez le gâteau 20-30 minutes avant de servir. Cela enlèvera le froid et permettra au chocolat de se ramollir légèrement, retrouvant sa gloire crémeuse originelle.
Vous pouvez aussi congeler les couches de gâteau non garnies individuellement. Enveloppez-les bien dans du film alimentaire puis du papier aluminium. Elles se conserveront jusqu’à 3 mois. Décongelez-les une nuit au réfrigérateur avant d’assembler le gâteau avec de la mousse et de la ganache fraîches.
Astuces et Conseils pour une Pâtisserie Réussie
- Mesurez bien votre farine : Versez-la dans la tasse à mesurer et nivelez. Ne plongez pas directement dans le sac, car cela tasse trop la farine et donne un gâteau sec.
- La température ambiante est clé pour les œufs et le babeurre. Ils s’incorporeront plus facilement à la pâte, créant une mie plus lisse et uniforme.
- Quand vous incorporez le chocolat à la crème fouettée pour la mousse, utilisez une main légère et une spatule souple. Trop mélanger fera retomber la crème.
- Si votre ganache semble trop liquide après mélange, laissez-la simplement reposer à température ambiante un peu plus longtemps pour qu’elle épaississe. Vous pouvez aussi la mettre au frigo par intervalles de 5 minutes, en remuant à chaque fois, jusqu’à la consistance souhaitée.
Idées de Présentation pour Épater Vos Invités
- Ajoutez des framboises ou fraises fraîches autour de la base du gâteau pour une touche de couleur et un contraste acidulé.
- Saupoudrez légèrement le dessus de poudre d’or alimentaire ou de cacao avant d’ajouter les frisettes de chocolat pour plus de glamour.
- Servez chaque part avec une quenelle de crème fouettée légèrement sucrée ou une boule de glace à la vanille.
- Placez le gâteau sur un beau présentoir et garnissez de quelques brins de menthe fraîche.
Découvrez d’Autres Recettes de Gâteau Incroyables
Si vous avez aimé ce Gâteau au Chocolat Décadent, vous devez explorer d’autres recettes fantastiques. Pour un autre dessert à étages sublime, essayez ce Gâteau Marbré avec son Glaçage à la Vanille – c’est un beau mélange de saveurs. Quand vous voulez un dessert sans cuisson, mon Cheesecake Orange Creamsicle sans Cuisson est merveilleusement crémeux et rafraîchissant. Pour un classique qui ne déçoit jamais, ce Gâteau Vanille au Babeurre est incroyablement moelleux et polyvalent. Et si vous manquez de temps mais voulez quelque chose de fait maison et délicieux, mon Gâteau Génoise Maison fait au Mixeur est incroyablement facile et parfait à chaque fois.
Erreurs Courantes à Éviter
Erreur 1 : Trop Mélanger la Pâte à Gâteau
C’est une erreur très courante. Les gens mélangent souvent la pâte longtemps après que les ingrédients soient combinés. Trop mélanger développe le gluten de la farine. Cela rend le gâteau caoutchouteux et caoutchouteux au lieu d’être doux et tendre. Une fois les ingrédients secs ajoutés, mélangez juste jusqu’à ce que vous ne voyiez plus de traînées de farine. Quelques petits grumeaux, c’est bon ! Ils se lisseront pendant la cuisson. Souvenez-vous, l’incorporation délicate est votre amie.
Erreur 2 : Utiliser du Chocolat Chaud dans la Mousse
Si vous incorporez du chocolat fraîchement fondu et chaud à la crème fouettée, la chaleur fera instantanément fondre la matière grasse de la crème. Cela fait retomber la mousse et la rend granuleuse ou même la fait se séparer. Cela devient un triste gâchis liquide. Laissez toujours, toujours, votre chocolat fondu refroidir à température ambiante d’abord. Vous pouvez accélérer en l’étalant finement sur une assiette. Testez en touchant un peu sur votre lèvre—il doit sembler froid, pas chaud.
Erreur 3 : Ajouter de la Crème Chaude à du Chocolat Froid pour la Ganache
Si votre chocolat haché est froid sorti du frigo, verser de la crème chaude dessus peut le faire « figer ». Le chocolat devient une pâte raide et granuleuse impossible à rattraper. Commencez toujours avec du chocolat à température ambiante. Hachez-le finement pour qu’il fonde uniformément et rapidement grâce à la chaleur de la crème. La fusion douce et uniforme est ce qui crée cette finition lisse et brillante emblématique.
Erreur 4 : Assembler le Gâteau pendant que les Couches sont Tièdes
L’excitation de finir le gâteau est réelle ! Mais si vous étalez la mousse sur une couche de gâteau tiède, c’est la catastrophe. La mousse va fondre et glisser. La ganache va s’imbiber et rendre le gâteau détrempé. La patience est cruciale. Laissez vos couches de gâteau refroidir complètement dans les moules, puis sur une grille. Vous pouvez même les emballer et les réfrigérer une nuit. Un gâteau froid et ferme est beaucoup plus facile à travailler et garantit des couches propres et belles.
Choisir des ingrédients de qualité fait une différence notable dans un plat simple et festif comme ce Gâteau au Chocolat Décadent. Une bonne poudre de cacao et du bon chocolat élèvent vraiment la saveur, transformant un bon gâteau en un inoubliable.
Ce Gâteau Chocolat Décadent n’est qu’une parmi tant d’autres desserts spectaculaires que vous pouvez maîtriser. Pour plus d’inspiration et de recettes, parcourez notre collection complète de beaux gâteaux et pâtisseries.
Questions Fréquemment Posées
Puis-je préparer ce Gâteau au Chocolat Décadent à l’avance ?
Absolument, vous pouvez ! En fait, le préparer à l’avance améliore souvent la saveur. Vous pouvez cuire les couches de gâteau jusqu’à deux jours à l’avance. Laissez-les refroidir complètement, puis enveloppez-les bien dans du film alimentaire et conservez à température ambiante. Vous pouvez aussi préparer la mousse et la ganache un jour à l’avance. Gardez la mousse couverte au frigo et conservez la ganache dans un contenant hermétique à température ambiante si elle est coulante, ou au frigo si elle est épaisse (réchauffez-la doucement avant utilisation). Assemblez le gâteau le jour où vous prévoyez de le servir pour une texture plus fraîche. Le gâteau entièrement assemblé se conserve bien au frigo jusqu’à un jour avant de servir.
Pourquoi dois-je ajouter de l’eau bouillante à la pâte à gâteau ?
L’eau bouillante sert deux objectifs fantastiques. Premièrement, la chaleur « active » la poudre de cacao. Ce processus ouvre les particules de cacao, libérant leurs saveurs de chocolat les plus profondes et complexes. Deuxièmement, l’eau chaude aide à dissoudre le sucre plus complètement. Cela crée une pâte très fluide qui donne une mie de gâteau exceptionnellement moelleuse et tendre. Ne vous inquiétez pas, la pâte semblera très liquide. C’est exactement ce que vous voulez. Elle cuit pour donner un gâteau au chocolat riche et parfait.
Ma mousse est devenue trop liquide. Que s’est-il passé ?
Une mousse liquide pointe généralement vers l’un de deux problèmes. Premièrement, votre crème n’a peut-être pas été fouettée jusqu’à des pics fermes. Assurez-vous que votre crème, votre bol et vos fouets sont très froids. Fouettez jusqu’à ce que la crème forme un pic ferme quand vous soulevez le fouet. Deuxièmement, le chocolat fondu était peut-être encore trop chaud quand il a été incorporé à la crème. La chaleur peut faire fondre la crème, la faisant retomber. Laissez toujours le chocolat fondu refroidir à température ambiante avant d’incorporer. Si votre mousse est un peu molle, vous pouvez souvent la sauver en la mettant au frigo 30 minutes pour la raffermir avant utilisation.
Puis-je utiliser un autre type de chocolat pour la ganache ?
Oui, vous pouvez expérimenter avec différents chocolats, mais cela changera le résultat final. Utiliser du chocolat noir (70% de cacao) donnera une ganache moins sucrée, plus intense et légèrement plus épaisse. Utiliser du chocolat au lait donnera une ganache beaucoup plus sucrée et plus molle. Je vous recommande de rester sur un chocolat noir de bonne qualité pour le meilleur équilibre entre douceur et saveur riche de chocolat. Quel que soit votre choix, assurez-vous que c’est un chocolat que vous aimez manger tel quel, car sa saveur sera au premier plan.
Comment obtenir des parts nettes en coupant le gâteau ?
Des parts nettes, c’est une question du bon outil et de la bonne technique. Utilisez un long couteau à lame fine. Pour une astuce de pro, passez le couteau sous l’eau très chaude et essuyez-le avant chaque coupe. La chaleur aide à traverser la ganache et la mousse proprement. Essuyez la lame entre chaque part pour une belle présentation. Refroidir le gâteau environ 15 minutes avant de le couper peut aussi aider à raffermir les couches pour des coupes plus nettes.
Par quoi puis-je remplacer le babeurre ?
Si vous n’avez pas de babeurre, un substitut facile est à quelques minutes. Placez une cuillère à soupe de jus de citron ou de vinaigre blanc dans une tasse à mesurer. Ajoutez du lait entier (ou demi-écrémé) jusqu’à la marque des 240 ml. Remuez et laissez reposer 5-10 minutes. Il caillera et épaissira légèrement, créant un substitut parfait de babeurre qui fonctionne à merveille dans cette recette de gâteau. L’acidité aide à activer le bicarbonate pour une bonne levée.
Puis-je faire ce gâteau dans une taille de moule différente ?
Vous pouvez adapter cette recette, mais les temps de cuisson varieront. Pour un gâteau rectangulaire de 23×33 cm, cuisez environ 35-40 minutes. Pour trois moules ronds de 20 cm, réduisez le temps de cuisson à 25-30 minutes. Pour des cupcakes, remplissez les caissettes aux 2/3 et cuisez 18-22 minutes. Vérifiez toujours la cuisson avec un cure-dent—il doit ressortir avec quelques miettes humides, pas de la pâte crue. Le nombre de couches changera, mais la saveur délicieuse restera.
Est-il nécessaire d’utiliser à la fois de la levure et du bicarbonate ?
Oui, dans cette recette, les deux sont importants pour la texture parfaite. Le bicarbonate réagit avec le babeurre acide pour créer de la légèreté et une mie aérée. La levure fournit un supplément de levage pendant la cuisson. Ensemble, ils assurent que votre Gâteau Décadent est haut, moelleux et pas trop dense. N’en utiliser qu’un donnerait un gâteau plus plat ou moins tendre.
Puis-je congeler le gâteau assemblé ?
Je ne recommande pas de congeler le gâteau entièrement assemblé avec la garniture à la mousse, car la mousse peut se séparer et devenir aqueuse à la décongélation. Cependant, vous pouvez absolument congeler les couches de gâteau cuites et refroidies avec grand succès. Enveloppez chaque couche hermétiquement dans du film alimentaire, puis du papier aluminium. Elles se conserveront jusqu’à 3 mois. Décongelez une nuit au réfrigérateur, puis assemblez avec de la mousse et de la ganache fraîchement préparées pour la meilleure texture et saveur.
Ma ganache est trop épaisse/trop liquide. Comment puis-je la rattraper ?
La consistance de la ganache est facile à ajuster ! Si elle est trop épaisse pour verser, réchauffez-la doucement par courtes impulsions au micro-ondes ou au bain-marie, en remuant jusqu’à la fluidité désirée. Si elle est trop liquide et coulante, laissez-la reposer à température ambiante pour refroidir et épaissir naturellement. Vous pouvez aussi la placer au frigo par intervalles de 5 minutes, en remuant chaque fois, jusqu’à ce qu’elle épaississe. Pour une consistance plus épaisse, type glaçage à tartiner, laissez-la refroidir complètement, puis fouettez-la au batteur jusqu’à ce qu’elle soit légère et mousseuse.
Un Dernier Mot Doux
Créer ce Gâteau au Chocolat Décadent est un voyage d’amour. Du premier parfum de cacao à la dernière coulée de ganache, chaque étape est un plaisir. C’est une recette conçue pour le partage, pour célébrer, et pour ces moments où seul le treat le plus riche et chocolaté fera l’affaire. J’espère que ce Gâteau Chocolat Décadent deviendra un incontournable chéri dans votre cuisine, apportant autant de joie à votre table qu’à la mienne. Maintenant, allez préchauffer ce four et mettez-vous à pâtisser—votre part de paradis au chocolat vous attend !
Equipment
- Deux moules à gâteau ronds de 23 cm
- Papier sulfurisé
- Bols à mélanger de différentes tailles
- Mixeur électrique ou batteur sur socle
- Fouet et spatules
Ingrédients
- 250 g farine tout usage
- 400 g sucre granulé
- 75 g cacao en poudre non sucré utilisez de bonne qualité !
- 10 g levure chimique
- 7 g bicarbonate de soude
- 5 g sel
- 250 ml babeurre
- 125 ml huile végétale
- 2 g gros œufs
- 10 ml extrait de vanille pur
- 250 ml eau bouillante
Instructions
- Préchauffez votre four à 175°C (350°F) et graissez généreusement deux moules à gâteau ronds de 23 cm (9 pouces).
- Dans un grand bol, mélangez la farine, le sucre, le cacao, la levure, le bicarbonate et le sel.
- Ajoutez le babeurre, l'huile, les œufs et la vanille aux ingrédients secs. Battez à vitesse moyenne jusqu'à ce que tout soit combiné.
- Incorporez lentement l'eau bouillante, puis battez à haute vitesse pendant une minute.
- Versez la pâte uniformément dans les moules et faites cuire pendant 30 à 35 minutes. Laissez refroidir complètement.
- Pendant que les gâteaux refroidissent, préparez la mousse. Faites fondre le chocolat haché au bain-marie ou au micro-ondes, puis laissez-le refroidir.
- Dans un autre bol, fouettez la crème froide avec le sucre glace jusqu'à la formation de pics fermes.
- Mélangez environ un tiers de la crème fouettée dans le chocolat fondu avant d'incorporer le reste délicatement.
- Pour le ganache, faites chauffer la crème, puis versez-la sur le chocolat haché. Remuez jusqu'à obtenir une consistance lisse.
- Sur un plat de service, placez une couche de gâteau, étalez la mousse, puis ajoutez la deuxième couche de gâteau.
- Nappez le dessus de ganache et décorez avec des copeaux de chocolat.
Notes
Nutrition

Je suis Céline, une véritable passionnée d’ustensiles et de matériel de cuisine ! J’adore tester, comparer et découvrir les meilleurs équipements pour rendre la cuisine plus efficace et agréable. Que ce soit un bon couteau, un robot performant ou une poêle incontournable, je suis toujours à la recherche des outils qui feront la différence. Mon but est de vous guider dans vos choix pour que vous ayez le bon matériel adapté à vos besoins.