
Un rayon de soleil dans chaque bouchée : le rêve glacé d’une Orange Creamsicle sans cuisson
Vous souvenez-vous de cette sucette orange, crémeuse et douce que vous léchiez petit, essayant de battre le soleil d’été avant qu’elle ne fonde sur vos doigts ? Ce goût magique est désormais un cheesecake sans cuisson. Et je vous promets, c’est encore plus divin sous forme d’une crème onctueuse que l’on peut découper. Ce dessert est mon chouchou quand j’ai besoin d’un éclat de soleil dans l’assiette, et il ne manque jamais de faire dire à mes amis : « Mais comment as-tu fait ça ? ».
Une madeleine de Proust : de la glace à l’eau au dessert star
Le classique Creamsicle — cette glace vanille enrobée d’une coque orange acidulée — est un plaisir adulé depuis des générations. Ma version transforme ce duo joyeux en un Cheesecake Orange Creamsicle sans cuisson. On oublie le four pour le frigo, ce qui en fait un sauveur les jours de grande chaleur ou quand le temps presse. Là où l’original offre une gratification glacée instantanée, ce cheesecake laisse les notes d’agrumes éclatantes et de vanille douce se mêler pour créer quelque chose de plus riche et élégant, parfait pour le partage.
Pourquoi vous allez adorer ce cheesecake orange crémeux
Cette recette plaît à tous les coups, et pour de bonnes raisons ! D’abord, elle est incroyablement facile. Pas de bain-marie, pas de crainte de dessèchement. Ensuite, la saveur est un pur bonheur nostalgique — comme l’été en version dessert. La garniture crémeuse est légère mais gourmande, et le zeste d’orange vient parfaitement couper la richesse. C’est le genre de dessert qui donne l’impression d’avoir passé la journée en cuisine, mais votre secret restera bien gardé.
Les occasions parfaites pour une part de bonheur citronné
Ce cheesecake brille pour tant d’événements ! C’est une star des barbecues d’été, une fin de repas rafraîchissante après un menu copieux, ou la pièce maîtresse idéale pour un baby-shower ou un bridal shower avec sa couleur joyeuse. J’adore l’apporter aux repas partagés car il voyage bien dans son moule. Et honnêtement, il est aussi parfait pour un mardi « comme ça », quand on a besoin d’un petit remontant sucré.
Rassembler les ingrédients pour un Orange Creamsicle réussi
Voici ce dont vous aurez besoin pour créer ce rêve d’agrumes. Je recommande d’avoir tous les ingrédients à température ambiante (sauf la crème liquide) pour une garniture ultra-lisse.
Pour la croûte :
- 1 tasse et demi de chapelure de biscuits type petit beurre
- 50g de sucre en poudre
- 115g de beurre non salé, fondu
Pour la garniture au cheesecake :
- 450g de fromage à la crème (type Philadelphia), bien ramolli
- 240ml de crème liquide entière froide
- 60g de sucre glace
- 1 cuillère à café d’extrait de vanille pur
- 60ml de jus d’orange frais
- 1 cuillère à soupe de zeste d’orange frais
- 25g de poudre de gelatine à l’orange (type Jell-O)
- 1 cuillère à café d’extrait d’orange (pour un coup de boost !)
Substitutions pratiques pour une création personnalisée
Pas de panique si il vous manque quelque chose ! Voici quelques alternatives faciles :
- Biscuits pour la croûte : Des biscuits digestives ou des boudoirs fonctionnent très bien.
- Gélatine à l’orange : Elle ajoute de la saveur et aide à la prise. Si vous n’en trouvez pas, utilisez 2 cuillères à soupe supplémentaires de sucre glace et 1/2 cuillère à café d’extrait d’orange de plus, en sachant que la texture sera un peu plus souple.
- Crème liquide entière : Pour une option plus légère, de la crème de coco bien froide peut être fouettée à la place.
- Jus d’orange frais : Un jus du commerce de bonne qualité fait l’affaire en dépannage, mais le frais révèle vraiment la saveur.
Créer votre chef-d’œuvre Orange Creamsicle sans cuisson
C’est parti pour un peu de magie ! Faites de la place dans votre frigo et préparez-vous à l’assemblage de dessert le plus simple et le plus satisfaisant.
Étape 1 : Préparer la base de croûte biscuitée
Dans un saladier moyen, mélangez la chapelure de biscuits et le sucre en poudre. Versez-y le beurre fondu, cette merveille. Mélangez à la fourchette jusqu’à ce que chaque miette soit humide et que le mélange ressemble à du sable mouillé. Il doit tenir quand on le presse. Tassez fermement et uniformément cette préparation au fond d’un moule à charnière de 23 cm. J’utilise le fond d’une tasse à mesurer pour bien le compacter. Mettez-le au frais pour qu’il prenne pendant que vous préparez la garniture. Astuce de pro : une croûte bien tassée ne s’effritera pas à la découpe !
Étape 2 : Préparer la base luxueuse au fromage à la crème
Dans un grand saladier, battez le fromage à la crème ramolli avec un batteur électrique jusqu’à ce qu’il soit parfaitement lisse et sans grumeaux. Cela peut prendre une minute ou deux. Raclez les bords du bol. Ajoutez le sucre glace et l’extrait de vanille, et battez à nouveau jusqu’à ce que tout soit bien incorporé et soyeux. Vous verrez la préparation s’éclaircir légèrement. Cette base crémeuse est le cœur « glace vanille » de notre rêve Creamsicle.
Étape 3 : Maîtriser l’incorporation délicate de la crème fouettée
Maintenant, dans un autre saladier propre et sec, versez la crème liquide bien froide. Fouettez-la à vitesse moyenne-élevée jusqu’à ce qu’elle forme des pics fermes. Cela signifie que quand vous retirez les fouets, la crème forme des pointes droites et stables. Incorporez délicatement environ un tiers de cette crème fouettée dans le mélange au fromage. Utilisez une spatule pour souffler délicatement — c’est-à-dire couper au milieu et retourner la préparation sur elle-même. Cela allège le fromage à la crème, plus dense. Une fois incorporé, ajoutez le reste de la crème fouettée de la même manière jusqu’à ce qu’il ne reste plus de traces blanches. La garniture sera légère et aérienne.
Étape 4 : Infuser la saveur ensoleillée de l’orange
Voici la star du spectacle ! À votre garniture légère, ajoutez le jus d’orange frais, le zest d’orange bien brillant, la poudre de gélatine à l’orange et cette cuillère à café d’extrait d’orange. Le zest va parfumer l’air d’un incroyable parfum d’agrumes. Incorporez délicatement le tout jusqu’à ce que l’orange soit uniformément répartie dans la garniture blanche et crémeuse. Elle prendra une belle teinte jaune-orangé pâle. Astuce du chef : pour la meilleure saveur d’orange, zestez le fruit avant de le presser ! Et lavez toujours bien vos oranges.
Étape 5 : Assembler et laisser la magie opérer
Sortez votre croûte refroidie du frigo. Déposez la magnifique garniture orange creamsicle sur la croûte. Lissez le dessus avec la spatule, pour qu’il soit bien uniforme. Maintenant, la partie la plus difficile : la patience. Couvrez le moule de film alimentaire et réfrigérez pendant au moins 4 heures, mais une nuit entière est vraiment idéale. Cela permet à la gélatine de faire son travail de prise et laisse toutes les saveurs se lier d’amitié.
Bien calculer les temps pour votre dessert
Temps de préparation actif : 20-25 minutes
Temps de repos (croûte) : 30 minutes
Temps de prise (cheesecake) : Minimum 4 heures, idéalement toute une nuit
Temps total (du début à la dégustation) : Environ 5 heures
Pour : 10-12 personnes heureuses
Mon secret pour la texture ultime de l’orange crémeux
La clé absolue pour une part parfaite, c’est d’utiliser du fromage à la crème à température ambiante. Je sors le mien du frigo au moins une heure avant de commencer. S’il est encore froid, vous aurez des petits grumeaux dans votre garniture peu importe le temps de mixage. Un fromage vraiment ramolli se fond en une base veloutée et onctueuse qui rend ce cheesecake incroyablement lisse.
Un zeste d’anecdote
Saviez-vous que le Creamsicle a été inventé en 1905 par un garçon de 11 ans nommé Frank Epperson ? Il avait accidentellement laissé un mélange de soda en poudre et d’eau avec un bâtonnet dehors par une nuit froide. Le reste appartient à l’histoire glacée ! Notre cheesecake est un délicieux hommage adulte à ce joyeux accident.
Le matériel dont vous aurez besoin
- Moule à charnière de 23 cm (ou un moule à tarte profond)
- Saladiers (moyen et grand)
- Batteur électrique ou robot pâtissier
- Tasses et cuillères à mesurer
- Microplane ou râpe fine pour zester
- Spatule
- Presse-agrume (optionnel, mais pratique)
Conserver votre création crémeuse
Ce cheesecake est un dessert parfait à préparer à l’avance. Une fois pris, vous pouvez le garder couvert dans son moule à charnière ou sur un présentoir à gâteau couvert au réfrigérateur. Il restera frais et délicieux pendant 4 à 5 jours. Les saveurs s’améliorent même un peu le deuxième jour !
Pour une conservation plus longue, vous pouvez congeler des parts individuelles. Enveloppez chaque part hermétiquement dans du film alimentaire, puis placez-les dans un contenant ou un sac de congélation. Elles se conserveront jusqu’à 2 mois. Décongelez une part au frigo quelques heures avant de vouloir la déguster pour une expérience de glace transformée en cheesecake !
Pour découper des parts nettes, utilisez toujours un couteau bien chaud et propre. Passez-le sous l’eau très chaude, essuyez-le, et coupez. Répétez pour chaque part afin d’obtenir des présentations impeccables.
Astuces et conseils pour un cheesecake infaillible
- Zestez avec sagesse : Ne rapez que la peau orange vive de l’orange. Le ziste blanc en dessous est amer.
- La crème doit être froide : Pour des pics parfaits, assurez-vous que votre crème liquide et même votre saladier sont froids. Je mets parfois le bol au congélateur 10 minutes avant de fouetter.
- Ne brûlez pas l’étape du frigo : Ces 4 heures (ou plus) de repos au froid sont non négociables pour une découpe nette. Une nuit entière est le standard d’or.
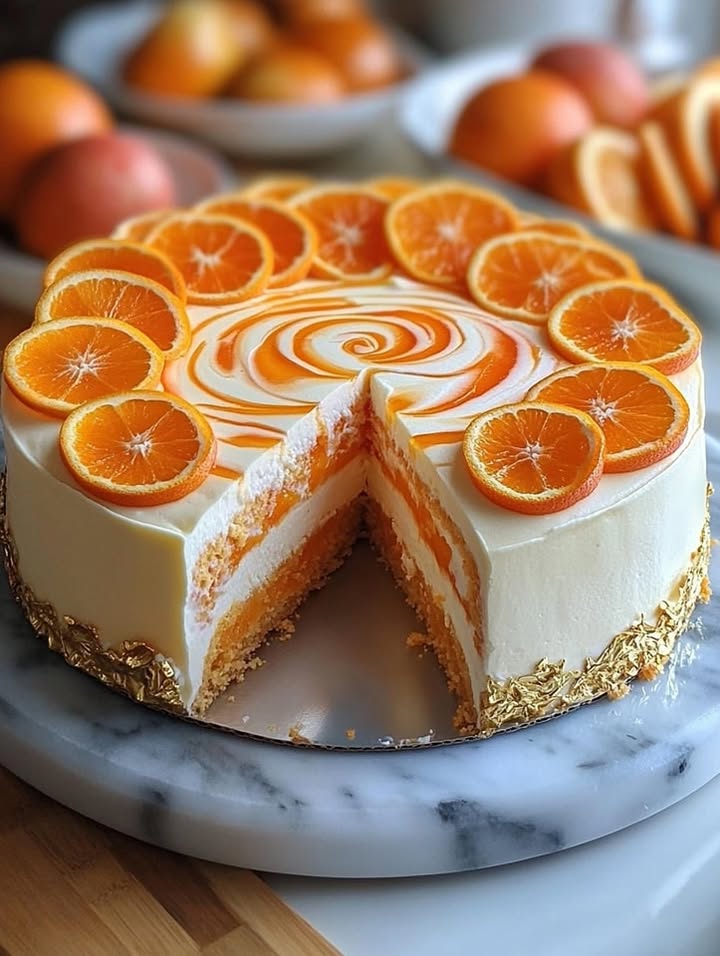
- Décorez au dernier moment : Ajoutez un peu de zest d’orange supplémentaire, des rosettes de crème chantilly, ou même de fines tranches d’orange juste avant de servir pour qu’elles soient parfaites.
Idées de présentation pour impressionner vos invités
- Servez chaque part avec une quenelle de crème fraîche fouettée et un zest d’orange.
- Créez un élégant coulis en faisant fondre un peu de confiture d’orange avec une cuillère à café d’eau et en dessinant des zigzags sur l’assiette.
- Pour une fête estivale, servez avec une petite boule de glace à la vanille à côté — un Creamsicle dans le Creamsicle !
- Décorez le dessus avec des fleurs comestibles ou des feuilles de menthe fraîche pour une touche de couleur.
Plus d’inspiration sucrée à explorer
Si vous avez aimé ce dessert sans cuisson, ma cuisine a d’autres délices pour vous ! Pour une version cuite classique, essayez mon Gâteau aux Fruits Humide et Céleste, garni de noix et de fruits secs. Quand vous avez besoin d’une merveille en 5 minutes, le Flan Citron Pirim-Doce n’attend qu’à être mixé et refroidi. Les amateurs de framboises adoreront mon simple Gâteau Fraises Rafraîchissant. Et si vous rêvez de quelque chose de vraiment spectaculaire, les couches de mon Gâteau Marbré à la Vanille impressionneront à coup sûr.
Erreurs courantes à éviter
Erreur 1 : Utiliser du fromage à la crème froid et dur
C’est la raison numéro un d’une garniture grumeleuse. Du fromage à la crème froid ne se mélangera jamais de façon homogène, laissant de petits morceaux désagréables dans votre rêve crémeux. Pour l’éviter, anticipez. Sortez les blocs de fromage du frigo au moins une heure avant de commencer. Ils doivent être mous et céder facilement sous une légère pression.
Erreur 2 : Ne pas fouetter la crème en pics fermes
Si votre crème fouettée est encore molle et coulante quand vous l’incorporez, votre garniture sera trop molle et risque de mal prendre. Il vous faut ces pics fermes et stables pour donner de la structure et de la légèreté aérienne au dessert. Fouettez la crème froide à vitesse moyenne-élevée jusqu’à ce que vous puissiez retourner le bol (brièvement !) sans qu’elle ne tombe. Elle doit être épaisse et former des pics bien droits sur les fouets.
Erreur 3 : Zapper le long temps de repos au frais
L’impatience peut gâcher la part parfaite. Sortir le cheesecake après seulement une ou deux heures signifie qu’il ne sera pas complètement pris. Ce sera délicieux, mais un peu soupe orange. La gélatine et le froid ont besoin de temps pour travailler ensemble et tout raffermir. Faites confiance au processus. Préparez-le avant de vous coucher pour un dessert magnifique le lendemain.
Erreur 4 : Trop mélanger après avoir ajouté la crème fouettée
Une fois la crème fouettée ajoutée, vous devez passer du battage au « soufflage » délicat. Si vous continuez avec le batteur, vous allez retirer tout l’air précieux que vous venez d’incorporer. Cela donne une garniture dense et lourde. Soyez délicat avec une spatule, en incorporant juste jusqu’à la disparition des dernières traces blanches. Un peu de soin ici garantit une texture légère et aérienne.
Une recette réussie commence par des ingrédients de qualité. Pour de bons conseils sur le choix des meilleurs fruits et produits laitiers pour la pâtisserie, pensez aux principes d’une alimentation variée et équilibrée qui prônent de choisir des produits de saison et de bonne qualité.
Cette merveille sans cuisson n’est qu’une des nombreuses douceurs faciles et impressionnantes que vous trouverez dans ma collection de gâteaux et pâtisseries. Il y a toujours quelque chose de nouveau à essayer !
Vos questions sur le cheesecake Orange Creamsicle, répondues
Puis-je faire ce cheesecake sans moule à charnière ?
Absolument ! Un moule à tarte profond de 23 cm fonctionne parfaitement. La seule différence est que vous ne pourrez pas retirer les bords, vous le servirez donc directement dans le plat. Assurez-vous simplement de bien tasser la croûte sur les bords pour une jolie bordure. La présentation reste belle et le goût est exactement le même.
Pourquoi ai-je besoin de poudre de gélatine à l’orange ?
La poudre de gélatine à l’orange a deux rôles merveilleux. Premièrement, elle intensifie cette vraie saveur de Creamsicle orange que nous recherchons. Deuxièmement, et c’est très important pour une recette sans cuisson, elle agit comme stabilisant. Elle aide la garniture à prendre fermement sans avoir besoin d’œufs ou de cuisson, garantissant une découpe nette qui tient bien sur l’assiette.
Puis-je utiliser du jus d’orange en bouteille au lieu du frais ?
Vous pouvez en dépannage, mais je recommande vivement le frais. Le jus d’orange fraîchement pressé a une saveur plus vive et vibrante, sans arrière-goût transformé. Le jus en bouteille peut parfois sembler un peu fade ou trop sucré. Le zest frais, en revanche, est non négociable — c’est là que résident les puissantes huiles aromatiques des agrumes.
Comment faire pour que ma croûte ne colle pas au moule ?
Pour un moule à charnière, il n’est pas forcément nécessaire de le beurrer, car la croûte bien beurrée se détache généralement bien. Si vous êtes inquiet, vous pouvez chemiser le fond avec un cercle de papier sulfurisé avant de tasser la croûte. Pour un moule à tarte, un très léger badigeon de beurre ou une pulvérisation d’anti-adhésif sur le fond peut aider, même si ce n’est souvent pas nécessaire grâce à la teneur en beurre des miettes.
Ma garniture est un peu molle. Que s’est-il passé ?
Une garniture molle pointe généralement vers l’une de ces trois choses : la crème n’a pas été assez fouettée en pics fermes, le cheesecake n’a pas assez reposé au frais, ou votre fromage à la crème était trop mou au départ. Assurez-vous que votre crème est bien froide avant de fouetter, et accordez au dessert une nuit complète dans la partie la plus froide de votre frigo. Cela corrige presque toujours un mauvais prise.
Puis-je faire cette recette en mini-cheesecakes individuels ?
Oui, et ils sont adorables ! Utilisez un moule à muffins avec des caissettes en papier. Tassez environ 2 cuillères à soupe du mélange de croûte dans chaque caissette. Ensuite, répartissez la garniture entre elles. Le temps de prise pourrait être légèrement réduit pour les minis, mais visez tout de même au moins 3 heures. Ils sont parfaits pour les fêtes où vous ne voulez pas découper un gros gâteau.
Est-il possible de préparer ce dessert à l’avance ?
Ce n’est pas seulement possible — c’est encouragé ! Ce cheesecake est un dessert idéal à préparer à l’avance. Les saveurs ont le temps de se développer et de se mélanger à merveille lorsqu’il est fait la veille. Préparez-le simplement, laissez-le prendre toute la nuit, et décorez juste avant de servir. Cela retire tout le stress des réceptions.
Quelle est la meilleure façon de zester une orange ?
Utilisez une microplane ou une râpe fine. Frottez doucement l’orange contre les petites lames, en la tournant au fur et à mesure. Vous ne voulez que le zest orange vif, pas le ziste blanc amer en dessous. Faites cela au-dessus d’une petite assiette ou d’un morceau de papier pour récupérer tout le zest parfumé. Zestez toujours vos agrumes avant de les presser — c’est presque impossible à faire après !
Puis-je congeler le cheesecake entier ?
Vous pouvez le congeler jusqu’à 2 mois. Enveloppez le cheesecake pris (dans son moule) hermétiquement dans deux couches de film alimentaire, puis dans une couche de papier aluminium. Décongelez-le toute une nuit au réfrigérateur avant de servir. Certaines personnes trouvent que la texture de la garniture décongelée est juste un tout petit peu moins crémeuse, mais il reste délicieux.
Par quoi puis-je remplacer l’extrait d’orange ?
Si vous n’avez pas d’extrait d’orange, vous pouvez simplement l’omettre. La saveur du jus frais, du zest et de la gélatine reste fantastique. Vous pourriez aussi ajouter une cuillère à café supplémentaire d’extrait de vanille pour booster le côté « glace vanille » du profil aromatique. L’extrait donne juste un coup de fouet supplémentaire et puissant d’orange que j’adore.
Pour conclure
Ce Cheesecake Orange Creamsicle sans cuisson est plus qu’une recette. C’est une bouchée de pur bonheur. Il fait revivre des souvenirs doux et en crée de nouveaux autour de la table. Il prouve qu’un dessert incroyable et impressionnant n’a pas besoin d’un four ou de compétences compliquées — juste de quelques bons ingrédients et d’un peu de patience. J’espère qu’il deviendra un rayon de soleil dans votre collection de recettes, apportant des sourires avec chaque part citronnée et crémeuse. Allez, c’est à vous de créer du soleil !
Equipment
- Moule à charnière de 9 pouces
- Bols à mélanger un moyen et un grand
- Mixeur à main ou batteur sur socle
- Spatule
- Râpe fine pour zester
Ingrédients
- 1.5 tasses miettes de biscuits Graham
- 0.25 tasse sucre granulé
- 0.5 tasse beurre non salé, fondu
- 16 oz fromage à la crème entier, ramolli
- 1 tasse crème épaisse, froide
- 0.5 tasse sucre glace
- 1 c. à café extrait de vanille pur
- 0.25 tasse jus d'orange frais
- 1 c. à soupe zeste d'orange frais
- 0.25 tasse poudre de gélatine à l'orange type Jell-O
- 1 c. à café extrait d'orange
Instructions
- Dans un bol moyen, mélanger les miettes de biscuits Graham et le sucre granulé. Ajouter le beurre fondu et bien mélanger.
- Presser le mélange au fond d'un moule à charnière de 9 pouces et réfrigérer.
- Dans un grand bol, battre le fromage à la crème jusqu'à ce qu'il soit lisse.
- Ajouter le sucre glace et l'extrait de vanille, puis battre jusqu'à incorporation.
- Dans un bol propre, fouetter la crème épaisse jusqu'à obtenir des pics fermes.
- Incorporer délicatement un tiers de la crème fouettée au mélange de fromage à la crème, puis le reste.
- Ajouter le jus d'orange, le zeste, la gélatine et l'extrait d'orange, puis mélanger délicatement.
- Verser la garniture dans la croûte réfrigérée, lisser le dessus et couvrir.
- Réfrigérer pendant au moins 4 heures, de préférence toute la nuit.
Notes
Nutrition

Je suis Céline, une véritable passionnée d’ustensiles et de matériel de cuisine ! J’adore tester, comparer et découvrir les meilleurs équipements pour rendre la cuisine plus efficace et agréable. Que ce soit un bon couteau, un robot performant ou une poêle incontournable, je suis toujours à la recherche des outils qui feront la différence. Mon but est de vous guider dans vos choix pour que vous ayez le bon matériel adapté à vos besoins.