
Une Pointe de Soleil dans Chaque Cuillerée
Vous connaissez ce sentiment quand une simple bouchée peut vous transporter sur une plage tropicale, même si vous êtes juste debout dans votre cuisine ? C’est la magie de cette recette de mousse au fruit de la passion pour moi. Tout a commencé l’été dernier quand ma voisine m’a apporté un panier de fruits de la passion tout ridés et violets. Je n’y connaissais rien ! Après quelques expérimentations (et quelques tentatives ratées que mon mari a courageusement mangées), j’ai abouti à ce dessert crémeux, acidulé et absolument divin. C’est maintenant mon incontournable quand j’ai besoin d’apporter un petit rayon de soleil à la table, et j’ai hâte de la partager avec vous.
L’Histoire derrière ce Goût Acidulé et Piquant
Le fruit de la passion, ou *maracujá*, a une histoire fascinante. Alors que sa saveur vibrante est un classique dans les pays tropicaux comme le Brésil ou la Thaïlande, son nom vient des missionnaires espagnols qui voyaient dans la structure complexe de sa fleur un symbole de la Passion du Christ. Traditionnellement, la pulpe est utilisée dans tout, des jus rafraîchissants aux crèmes riches. Cette recette de mousse est une belle interprétation moderne. Elle prend ce jus intense et aromatique pour le transformer en une crème aérienne, le tout reposant sur une croûte rapide de biscuits chocolatés. C’est une façon fantastique de découvrir un fruit exotique sous une forme familière et réconfortante, qui va impressionner à tous les coups.
Pourquoi Vous Allez Adorer Cette Mousse au Fruit de la Passion
Laissez-moi vous compter les raisons ! Premièrement, elle est incroyablement savoureuse—cet équilibre parfait entre douceur et acidité qui réveille vos papilles. Deuxièmement, elle est trompeusement simple. Avec un mixeur et quelques étapes faciles, vous créez un dessert qui a l’air de sortir d’une pâtisserie chic. Troisièmement, c’est une recette d’avance parfaite. Ces 4 heures au frigo sont votre meilleure amie, vous permettant de la préparer bien avant l’arrivée des invités pour pouvoir vous détendre et profiter de la soirée. C’est une recette infaillible qui garantit des étoiles dans les yeux à tous ceux qui la goûtent.
Quand Préparer Cette Merveille Tropicale
Cette mousse au fruit de la passion est votre arme secrète pour tant d’occasions ! Elle est légère et rafraîchissante pour un barbecue d’été, assez élégante pour un dîner, et une fin joyeuse pour un déjeuner dominical en famille. J’adore la servir pour les anniversaires à la place d’un gâteau lourd. C’est aussi un moyen génial de conclure un repas épicé, car son acidité coupe parfaitement les saveurs riches. En gros, chaque fois que vous voulez ajouter un effet « waouh » à votre table, c’est le dessert à faire.
Rassembler Vos Ingrédients
Voici ce dont vous aurez besoin pour cette création ensoleillée :
- 1 paquet (200 g) de biscuits chocolatés émiettés (type boudoir ou biscuits au cacao)
- 4 cuillères à soupe de beurre fondu
- 1 boîte de lait concentré sucré
- 20 cl de crème liquide entière froide
- 20 cl de jus de fruit de la passion concentré (ou pur jus)
- 1 sachet de gélatine en poudre neutre
- Des copeaux de chocolat blanc et au lait, pour la décoration
Substitutions Faciles d’Ingrédients
Pas de panique si il vous manque quelque chose ! Voici des substitutions simples :
- Biscuits : N’importe quel biscuit chocolaté simple ou biscuit type « petit beurre » fonctionne parfaitement.
- Jus concentré : Si vous avez des fruits de la passion frais, vous pouvez passer la pulpe d’environ 12-15 fruits au tamis pour obtenir votre tasse de jus. Sucrez-le légèrement pour équilibrer comme la version concentrée.
- Gélatine : Vous pouvez utiliser de l’agar-agar comme alternative végétarienne, en suivant les instructions du paquet pour la prise des liquides.
- Crème liquide entière : Pour une version plus légère, la crème de coco entière bien froide peut être montée, bien que la texture sera un peu moins ferme.
Réaliser Votre Mousse au Fruit de la Passion Parfaite
Prête à faire de la magie ? Suivez ces étapes simples.
Étape 1 : Créer la Croûte Chocolatée Croquante
Commencez par préchauffer votre four à haute température, environ 200°C. Prenez vos biscuits chocolatés émiettés et mélangez-les soigneusement avec le beurre fondu dans un bol. Vous devez obtenir une texture qui ressemble à du sable mouillé et qui se tient quand vous la pressez. Tassez fermement cette préparation au fond d’un moule à charnière de 22 cm de diamètre. Enfournez pour seulement 10 minutes. Cette cuisson rapide donne à la base une fermeté et une saveur toastée parfaite. Laissez-la refroidir complètement sur une grille avant d’ajouter la mousse—c’est crucial pour avoir des parts nettes plus tard !
Astuce de pro : Utilisez le fond d’un verre pour tasser les miettes uniformément pour une base parfaite.
Étape 2 : Le Moment Magique du Mixeur
Maintenant, place à la star du spectacle ! Préparez d’abord votre gélatine selon les instructions du paquet (généralement en la faisant dissoudre dans un peu d’eau chaude). Dans le bol de votre mixeur, versez le lait concentré sucré, la crème liquide entière froide, le verre de jus de fruit de la passion d’un beau jaune vif, et la gélatine dissoute. Mixez à puissance maximale pendant une bonne minute. Regardez la préparation se transformer en un mélange lisse, jaune pâle et merveilleusement crémeux. L’odeur est absolument divine—acidulée et douce à la fois.
Astuce de pro : Rabattez les parois du mixeur à mi-parcours pour vous assurer que tout est parfaitement combiné.
Étape 3 : Prise et Final Royal
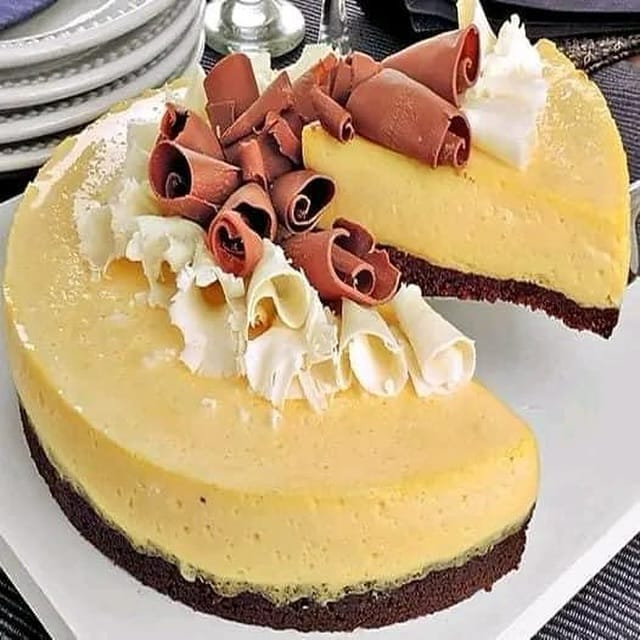
Versez délicatement cette crème onctueuse sur votre base chocolatée refroidie. Tapotez doucement le moule sur le plan de travail pour chasser les bulles d’air. Maintenant, un peu de patience ! Placez au réfrigérateur pour laisser prendre pendant au moins 4 heures, une nuit c’est encore mieux. Quand c’est l’heure de servir, passez la lame d’un couteau tiède sur les bords, ouvrez le moule à charnière, et contemplez votre création. Terminez par une génieuse pluie de copeaux de chocolat blanc et au lait pour un beau contraste et une touche de décadence supplémentaire.
Astuce du chef : Pour des parts très nettes, trempez votre couteau dans de l’eau chaude et essuyez-le entre chaque coupe.
Votre Investissement en Temps
Cette recette, c’est une question de timing malin, la plupart du temps étant de l’attente.
- Temps de préparation : 20 minutes
- Temps de cuisson : 10 minutes
- Temps de repos (frigo) : 4 heures (minimum)
- Temps total : 4 heures 30 minutes
Un Petit Secret de Chef
Pour une saveur de fruit de la passion encore plus intense et une surprise de texture délicieuse, incorporez délicatement 2 à 3 cuillères à soupe de pulpe de fruit de la passion fraîche (graines incluses) à la préparation de mousse mixée, juste avant de la verser sur la base. Les petites graines croquantes avec la mousse lisse, c’est divin !
Une Anecdote à Partager à Table
Saviez-vous que le fruit de la passion est naturellement riche en nutriments bénéfiques ? Ses graines sont une source de fibres alimentaires et contiennent des acides gras essentiels. Vous pouvez en apprendre plus sur le rôle de ces acides gras essentiels dans une alimentation équilibrée grâce à des ressources de santé fiables. Alors, même si c’est une gourmandise, vous offrez aussi quelque chose de bon à votre corps !
De Quoi Avez-vous Besoin pour la Réaliser
Vous avez probablement déjà la plupart de ces ustensiles :
- Un moule à charnière (ou à fond amovible) de 22 cm
- Des bols pour mélanger
- Un mixeur ou un robot culinaire
- Une tasse à mesurer et des cuillères doseuses
- Une spatule en caoutchouc
- Un rouleau à pâtisserie ou un robot (pour émietter les biscuits)
Conserver Votre Mousse à la Perfection
Cette mousse se conserve très bien. Gardez-la couverte au réfrigérateur jusqu’à 3 jours. La croûte peut ramollir légèrement le troisième jour, mais le goût sera toujours délicieux.
Je ne recommande pas de congeler cette mousse. La crème prise à la gélatine peut se séparer et devenir granuleuse à la décongélation, et la texture aérienne de la mousse sera perdue.
Pour une présentation optimale, ajoutez la décoration aux copeaux de chocolat juste avant de servir. Cela les garde croquants et beaux visuellement. Pour les restes, couvrez simplement les bords coupés avec un film alimentaire pressé directement sur la mousse.
Astuces pour une Mousse Impeccable
- Crème bien froide : Utiliser de la crème liquide entière très froide sortie du frigo aide la mousse à prendre plus vite et donne une texture plus légère.
- Dissoudre complètement la gélatine : Assurez-vous qu’il ne reste aucun grain avant de l’ajouter au mixeur, sinon vous risquez de trouver de petits morceaux caoutchouteux dans votre mousse.
- Goûtez le jus : La concentration en acidité du jus de fruit de la passion peut varier. Goûtez-le rapidement et, s’il est extrêmement acide, vous pouvez ajouter une cuillère à soupe supplémentaire de lait concentré sucré.
Idées de Présentation pour Impressionner
Faites briller votre table de desserts !
- Servez des portions individuelles dans de jolis verres, en superposant de la base émiettée, de la mousse et des fruits frais.
- Décorez avec un zeste de citron vert et une feuille de menthe pour une touche de couleur.
- Pour un dîner, placez la mousse entière sur un pied à gâteau entouré de fruits de la passion entiers et de fleurs comestibles.
Vous Aimez Cette Recette ? Essayez Ces Variantes !
La beauté d’une bonne mousse, c’est sa versatilité. Si vous avez aimé faire celle-ci, vous aimerez peut-être explorer d’autres desserts fabuleux sur le blog. Par exemple, si vous êtes un amoureux du chocolat, le côté décadent d’un Gâteau au Chocolat Décadent est imbattable. Pour une touche originale au petit-déjeuner, ces Roulés Pain Doré à la Cannelle font toujours un tabac avec les enfants. Si vous aimez les recettes de brunch à préparer à l’avance, ce Pain Perdu Crème Brûlée à Préparer la Veille change la donne. Et pour le dessert fusion ultime, un Cheesecake aux Roulés à la Cannelle est du pur génie. Voici d’autres idées pour jouer :
- Fusion Mangue-Passion : Remplacez la moitié du jus de fruit de la passion par de la purée de mangue pour une touche tropicale plus douce.
- Délice Végétalien : Utilisez du lait concentré coco, de la crème de coco entière bien froide et de l’agar-agar. Le résultat est onctueux et 100% végétal.
- Tourbillon d’Agrumes : Ajoutez une cuillère à soupe de zeste de citron vert ou d’orange à la préparation de mousse pour un coup de fouet supplémentaire.
- Note Alcoolisée : Pour les grands, une cuillère à soupe de rhum ou de vodka à la vanille mixée ajoute une belle note chaude.
- Couche de Fruits Rouges : Ajoutez une couche intermédiaire de purée de framboises ou de fraises légèrement sucrée entre la base et la mousse.
- Petits Pots de Mousse : Oubliez la base et laissez prendre la mousse dans des petits verres ou des pots individuels, parfaits pour les fêtes.
Erreurs Courantes à Éviter
Évitez ces pièges simples pour une mousse parfaite à chaque fois.
Erreur 1 : Ne Pas Laisser la Base Refroidir Complètement
Il est tentant de verser la mousse sur la croûte de biscuits encore tiède pour aller plus vite. Ne le faites pas ! Une base chaude va commencer à faire fondre la couche inférieure de votre mousse crémeuse, la rendant molle et l’empêchant de bien prendre. Laissez toujours la base refroidir à température ambiante sur une grille. Cela garantit une couche ferme et distincte qui tiendra bien à la découpe.
Erreur 2 : Ne Pas Mixer Assez Longtemps la Mousse
Si vous ne mixez que quelques secondes, la gélatine risque de ne pas être pleinement incorporée et la crème ne sera pas parfaitement aérée. Cela peut mener à une prise irrégulière ou une texture plus dense. Mixez à haute puissance pendant la minute complète indiquée. Vous devez obtenir un mélange uniforme, lisse et légèrement mousseux. Cela incorpore de l’air, donnant cette sensation en bouche légère et aérienne.
Erreur 3 : Briser le Temps de Repos au Froid
Quatre heures, c’est le temps de repos *minimum*. Si vous y allez trop tôt, la mousse sera molle, coulante et impossible à découper proprement. La patience est clé ! La gélatine a besoin de ce temps pour structurer pleinement la mousse. Pour un résultat optimal et l’esprit tranquille, je la fais toujours la veille et la laisse prendre toute la nuit au frigo.
Erreur 4 : Utiliser de la Crème à Température Ambiante
La crème liquide entière monte et tient bien sa structure quand elle est très froide. Si votre crème et votre lait concentré sont à température ambiante, le mélange risque d’être trop liquide et pourrait avoir du mal à prendre fermement, même avec la gélatine. Utilisez toujours des ingrédients sortis directement du réfrigérateur pour la partie mousse de la recette.
Questions Fréquemment Posées
Puis-je utiliser des fruits de la passion frais au lieu du jus concentré ?
Absolument ! Il vous faudra environ 12 à 15 fruits de la passion bien mûrs. Coupez-les en deux, récupérez la pulpe et passez-la au tamis fin pour obtenir le jus. Vous en obtiendrez peut-être moins qu’un verre, vous pouvez alors le compléter avec un peu de jus du commerce ou simplement ajuster les quantités. Goûtez et ajoutez un peu plus de lait concentré si le jus frais est très acide. Le goût sera incroyablement frais et vibrant.
Ma mousse n’a pas bien pris. Qu’est-ce qui s’est passé ?
Cela pointe généralement vers l’un des trois problèmes. Premièrement, avez-vous mesuré et dissous correctement la gélatine ? Des granules non dissoutes ne fonctionneront pas. Deuxièmement, la crème était-elle bien froide ? Des ingrédients tièdes empêchent la prise. Troisièmement, a-t-elle passé assez de temps au froid ? Donnez-lui plus de temps, les températures des frigos varient. Si elle est encore molle après 6 heures, vous pouvez essayer de la placer au congélateur 30 minutes pour la raffermir avant de servir.
Combien de temps à l’avance puis-je préparer cette mousse au fruit de la passion ?
C’est un dessert d’avance parfait ! Vous pouvez le préparer complètement jusqu’à 24 heures avant de servir. En fait, les saveurs ont souvent encore plus de caractère le lendemain. Gardez-le simplement couvert au réfrigérateur. Ajoutez la décoration aux copeaux de chocolat dans les deux heures précédant le service pour qu’ils restent beaux.
Puis-je faire cette recette sans gélatine ?
Oui, mais la texture sera différente. Pour une option végétarienne, utilisez une quantité équivalente de poudre d’agar-agar, en suivant attentivement les instructions du paquet car sa prise est différente. Sans agent gélifiant, la mousse sera plus un genre de parfait crémeux à servir dans des verres ; elle ne tiendra pas la forme d’un gâteau à découper.
Par quoi puis-je remplacer les biscuits chocolatés pour la base ?
Beaucoup de biscuits fonctionnent bien ! Des biscuits type « petits beurres » (nature ou chocolat), des graham crackers, ou même des bretzels émiettés pour une touche sucré-salé sont d’excellentes alternatives. Utilisez le même poids (200g) et la même quantité de beurre fondu. La méthode reste exactement la même.
Est-il possible de faire une version plus légère de cette mousse ?
Vous pouvez faire quelques ajustements pour un dessert plus léger. Utilisez du lait concentré « light » et une crème à fouetter légère. La texture sera un peu moins riche mais toujours délicieuse. Souvenez-vous, la saveur du fruit de la passion en elle-même est vive et pas trop lourde, donc même la version allégée fait son petit effet.
Puis-je congeler la mousse au fruit de la passion pour plus tard ?
Je ne recommande pas de congeler la mousse montée en gâteau. La texture de la crème prise à la gélatine peut devenir granuleuse et se séparer à la décongélation. La base deviendra aussi très détrempée. Elle est meilleure fraîche, sortie du frigo.
Mon jus de fruit de la passion est très acide. Que devrais-je faire ?
Aucun problème ! C’est courant avec le jus concentré. Ajoutez simplement une ou deux cuillères à soupe supplémentaires de lait concentré sucré dans le mixeur et goûtez le mélange avant de verser. Vous pouvez ajuster le sucré à votre préférence personnelle. Le but est un équilibre parfait entre douceur et acidité.
Quels autres fruits pourrais-je utiliser avec cette recette de mousse ?
Cette recette est très versatile ! De la purée de mangue, de la purée de framboises ou de fraises tamisées, ou même de la purée de pêches fonctionneraient à merveille. Gardez un volume total de jus/purée de fruit d’environ 20 cl pour une consistance de prise parfaite. Vous devrez peut-être ajuster le sucre selon la douceur naturelle du fruit.
Comment démouler la mousse sans qu’elle casse ?
Un moule à charnière est essentiel ici. Une fois prise, passez la lame fine et chaude d’un couteau (trempée dans l’eau chaude et essuyée) délicatement tout autour de la mousse pour la décoller des bords. Ensuite, ouvrez simplement le cercle et retirez-le. Si vous avez utilisé un moule simple, il faudrait le tremper dans de l’eau chaude pour le démouler, ce qui est plus risqué avec un dessert crémeux.
Un Dernier Mot Doux
Et voilà—ma recette infaillible pour une superbe mousse au fruit de la passion qui va devenir un classique. C’est le genre de dessert qui impressionne mais qui vous laisse en secret vous détendre avant l’arrivée des invités. L’explosion de saveur tropicale est toujours une délicieuse surprise. J’espère que vous prendrez autant de plaisir à la faire que moi. N’oubliez pas d’explorer d’autres recettes délicieuses de gâteaux et pâtisseries juste ici pour votre prochaine aventure en cuisine. Maintenant, allez créer un peu de soleil et dégustez chaque cuillerée !
Equipment
- Blender
- Moule à gâteau à fond amovible 22 cm
- Bol de mélange
- Spatule en caoutchouc
- Verre doseur et cuillères
Ingrédients
- 200 g biscuits au chocolat écrasés
- 4 c.s beurre fondu
- 1 tasse lait condensé
- 1 tasse crème épaisse crème liquide
- 1 tasse jus de fruit de la passion concentré
- 1 sachet poudre de gélatine sans saveur
Instructions
- Préchauffez votre four à 200 °C.
- Mélangez les biscuits écrasés avec le beurre fondu jusqu'à obtenir une texture de sable mouillé.
- Pressez ce mélange dans le fond d'un moule à gâteau à fond amovible de 22 cm.
- Faites cuire au four pendant 10 minutes et laissez refroidir complètement.
- Préparez la gélatine selon les instructions du paquet.
- Dans un blender, mixez le lait condensé, la crème épaisse, le jus de fruit de la passion et la gélatine dissoute pendant 1 minute.
- Versez la mousse sur la croûte refroidie et tapotez le moule pour faire sortir les bulles d'air.
- Réfrigérez pendant au moins 4 heures, de préférence toute la nuit.
- Avant de servir, décorez avec des copeaux de chocolat.
Notes
Nutrition

Je suis Céline, une véritable passionnée d’ustensiles et de matériel de cuisine ! J’adore tester, comparer et découvrir les meilleurs équipements pour rendre la cuisine plus efficace et agréable. Que ce soit un bon couteau, un robot performant ou une poêle incontournable, je suis toujours à la recherche des outils qui feront la différence. Mon but est de vous guider dans vos choix pour que vous ayez le bon matériel adapté à vos besoins.