
Le Morceau Paradisiaque Qui a Bâtit une Légende : Le Cake au Citron du Ritz-Carlton
Vous connaissez cette sensation quand vous goûtez quelque chose si parfait, que vous fermez les yeux un instant ? C’est ce cake. Plus qu’une recette, c’est un créateur de souvenirs. La première fois que j’ai préparé ce Gâteau Citron Classique, l’odeur de citron et de beurre a rempli ma cuisine d’une pure lumière. Ma voisine a passé la tête par-dessus la clôture et a demandé : « Qu’est-ce que cette odeur divine ? ». Je lui ai tendu un petit morceau encore tiède. Elle en a pris une bouchée, ses yeux s’écarquillèrent, et elle murmura : « Tu dois me donner cette recette ! ». Et c’est ainsi que les légendes commencent.
Une Part d’Histoire : Le Cake au Citron du salon de thé du Ritz-Carlton
Ce n’est pas un simple cake au citron. C’est celui dont on murmure dans les cercles de gourmets, la recette légendaire du salon de thé du Ritz-Carlton Hotel des années 1920. Imaginez le glamour : les femmes en chapeaux cloche, la porcelaine fine, et ce cake humide, dense et incroyablement parfumé servi comme la pièce maîtresse du thé de l’après-midi. Un goût de nostalgie pure. J’adore penser aux générations de cuisiniers qui ont préparé ce cake, chacune ajoutant sa petite histoire à son patrimoine. Un témoignage que les recettes vraiment excellentes et classiques ne passent jamais de mode.
Pourquoi Vous Tomberez Amoureux de ce Cake au Citron Classique
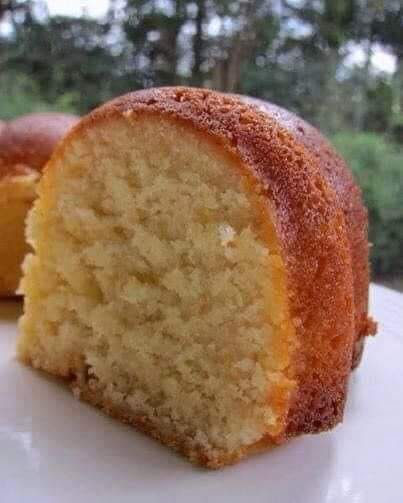
Ce cake est une masterclass en équilibre. Il est incroyablement riche et fondant grâce au beurre et au shortening, mais le zeste et le jus de citron frais apportent une note vive et enjouée. Pas trop sucré, pas trop acidulé—il est juste parfait. La texture est dense et veloutée, celle qui s’accorde merveilleusement avec une tasse de thé ou de café. Le meilleur ? Il est étonnamment simple. Pas de techniques sophistiquées, juste un bon vieux mélange crémeux et traditionnel. Un ami fidèle sur lequel vous pouvez toujours compter.
Quand Servir ce Gâteau Citron Spectaculaire
Ce cake est votre arme secrète pour de nombreuses occasions ! Il est élégant pour un brunch de baby shower ou un lunch de mariage, suffisamment familial pour un dîner du dimanche, et parfaitement transportable pour un picnic. Je le prépare toujours pour les nouveaux voisins—c’est le meilleur cadeau de « bienvenue dans le quartier ». Un cake emballé dans du papier kraft et noué avec un ruban ? Pure joie. C’est aussi mon choix quand je besoin d’un dessert qui peut rester quelques jours sur le comptoir et être toujours délicieux. Il se bonifie avec le temps.
Ingrédients pour le Cake au Citron Parfait
- 3 cups de farine
- 1 Tbsp de levure chimique
- 3/4 tsp de sel
- 3 cups de sucre granulé
- 1 cup de beurre non salé, à température ambiante
- 1/2 cup de shortening, à température ambiante
- 5 gros œufs, à température ambiante
- 1 cup de lait entier
- 6 Tbsp de jus de citron frais (environ 2-3 citrons)
- Le zeste d’un gros citron
Substitutions d’Ingrédients : Personnalisez-le
Il manque quelque chose ? Pas de panique ! Pour le shortening, vous pouvez utiliser la même quantité de beurre non salé supplémentaire, même si le shortening donne une texture fine unique. Si vous avez seulement du beurre salé, simplement omettre le sel ajouté dans la recette. Le lait entier peut être remplacé par du lait demi-écrémé ou même un yaourt nature entier pour plus de tang. Et bien que le jus et le zeste de citron frais soient indispensables pour la meilleure saveur, en cas d’urgence, vous pouvez utiliser 5 cuillères à soupe de jus de citron en bouteille et 2 cuillères à café d’extrait de citron.
Comment Préparer le Cake au Citron Légendaire du Ritz-Carlton
Prêt à créer de la magie ? Suivez ces instructions étape par étape. La clé est d’avoir tous vos ingrédients à température ambiante. Cela assure une pâte plus lisse et harmonieuse. Croyez-moi, cela vaut la peine !
Étape 1 : Préparez vos Moules et votre Four
Premièrement, placez une grille au centre de votre four et préchauffez à 350°F (175°C). Cela assure une cuisson uniforme. Prenez maintenant vos deux moules à cake de 9×5 pouces ou un grand moule Bundt de 10-12 cups. Appliquez généreusement un spray de cuisson ou, ma méthode favorite : enduire de beurre mou tous les recoins, puis saupoudrer de farine, en tapant pour éliminer l’excédent. Une fine couche blanche doit rester. C’est votre assurance pour un démoulage facile plus tard. L’odeur du beurre et de la farine est déjà une promesse de bonnes choses.
Étape 2 : Combinez les Ingrédients Secs
Dans un bol moyen, mesurez votre farine. Pour une texture aérienne, tamisez ensemble la farine, la levure chimique et le sel. Je utilise un tamis fin et tapote doucement sur le bol. Observez la fine neige d’ingrédients se mélanger. Ce n’est pas juste pour le spectacle— cela aère la farine et assure une distribution uniforme de l’agent levant, ce qui prévient les poches désagréables de levure chimique. Posez ce bol ; votre équipe sèche est prête.
Étape 3 : Crémez le Beurre, le Shortening et le Sucre
C’est là le cœur du cake. Dans le bol de votre robot culinaire avec le batteur en K (ou avec un batteur électrique), combinez le beurre, le shortening et le sucre granulé à température ambiante. Battez à vitesse moyenne pendant 4 à 5 minutes complètes. Ne précipitez pas ! Vous voulez que le mélange devienne extrêmement pale, léger et presque comme un nuage crémeux et épais. Les cristaux de sucre aideront à créer de petites poches d’air qui donnent le souffle au cake. Astuce pro : Interrompez et raclez les côtés du bol une ou deux fois pour assurer un mélange parfait.
Étape 4 : Incorporez les Œufs
À vitesse basse, ajoutez vos œufs un par un. Laissez chaque œuf se fondre complètement dans le mélange beurre-sucre avant d’ajouter le suivant. Je casse chaque œuf dans un petit bol d’abord— cela vous évite de devoir retirer des morceaux de coquille de votre magnifique pâte ! Après chaque addition, battez à vitesse moyenne jusqu’à ce que le mélange soit de nouveau lisse et brillant. Vous verrez la pâte se transformer, devenir plus riche et volumineuse avec chaque œuf. Après le cinquième œuf, cela devrait ressembler à une pâte luxueuse, satinée et jaune.
Étape 5 : Alternez les Ingrédients Secs et le Lait
Réduisez la vitesse de votre robot à faible. Nous ajouterons le mélange de farine et le lait en trois parties, commencant et terminant avec la farine. Donc, ajoutez environ un tiers du mélange de farine, mélangez juste jusqu’à que la dernière trace de blanc disparaisse. Suivez avec la moitié du lait, mélangez jusqu’à incorporation. Répétez : farine, le lait restant, puis la dernière portion de farine. Mélangez seulement jusqu’à que vous ne voyez plus de zones sèches. Trop mélanger à cette étape peut développer le gluten et rendre le cake compact, donc doucement.
Étape 6 : Ajoutez le Zeste et le Jus de Citron
Finalement, les stars du show ! Ajoutez le jus de citron frais et le zeste vibrant et parfumé de citron à la pâte. Mélangez à faible vitesse pendant juste 15-20 secondes jusqu’à que tout soit harmonieux. La pâte deviendra légèrement plus claire et toute la cuisine sentira le verger de citron. Astuce du chef : Utilisez un zesteur microplane pour le zeste plus fin, qui libère davantage des précieuses huiles de citron sans aucune partie blanche amère.
Étape 7 : Cuisez à la Perfection Dorée
Divisez la pâte entre vos moules préparés, en lissant les surfaces avec une spatule. Tapotez doucement les moules sur le comptoir pour libérer les grosses bulles d’air. Placez-les dans le four préchauffé. Cuisez environ 55-70 minutes. Commencez à vérifier à partir de 55 minutes. Le cake est prêt quand une longue brochette ou un cure-dent insérée dans la partie la plus profonde ressort propre, avec peut-être un ou deux morceaux de pâte, mais sans pâte liquide. Le dessus sera un brun doré magnifique, et les côtés commenceront à se détacher du moule.
Étape 8 : Refroidissez Complètement
C’est le test de patience ! Laissez les cakes refroidir dans leurs moules sur une grille pendant 15 minutes complètes. Cela permet à la structure de se stabiliser pour éviter qu’elle s’affaisse. Puis, passez un couteau fin autour des bord pour détacher, inversez les moules et tapotez doucement pour libérer les cakes. Laissez-les refroidir complètement retournés sur la grille. Un cake encore tiède est tentant, mais un cake complètement refroidi a une saveur plus développée et une texture parfaite pour être coupé.
Décomposition du Temps
- Temps de Préparation : 20 minutes
- Temps de Cuisson : 55-70 minutes
- Temps de Refroidissement : 2 heures
- Temps Total : Environ 3 heures 15 minutes
Secret du Chef pour le Gâteau Citron Classique Ultime
Pour une touche supplémentaire d’amour citronné, preparez un sirop simple ! Pendant que les cakes cuisent, combinez 1/4 cup de jus de citron et 1/4 cup de sucre dans une petite casserole. Faites chauffer jusqu’à que le sucre se dissolve. Immédiatement quand les cakes sortent du four et sont encore dans le moule, utilisez un pinceau à pâtisserie pour dab doucement ce sirop sur toute la surface chaude. Il imprègne, ajoutant une humidité incroyable et intensifiant la saveur du citron. C’est un changement radical.
Un Petit Plus : La Tradition du Cake
Le nom « pound cake » vient des recettes originales qui utilisaient littéralement une livre (pound) de farine, beurre, sucre et œufs chacun. C’était facile à mémoriser ! Cette version du Ritz-Carlton est une descendante plus raffinée et proportionnée de cette tradition. L’utilisation du beurre (pour la saveur) et du shortening (pour la texture) est une astuce de baking américaine brillante du début du 20e siècle, nous donnant le meilleur des deux mondes.
Équipement Nécessaire
- Deux moules à cake 9×5 pouces OU un moule Bundt de 10-12 cups
- Robot culinaire ou batteur électrique
- Bol de mélange moyen
- Tamis fin ou tamis
- Spatule
- Grille pour refroidissement
- Zesteur (microplane est le meilleur)
- Presse-citron ou fourchette pour le jus de citron
- Cure-dent ou brochette pour tester la cuisson
Comment Conserver votre Chef-d’œuvre
Quand complètement refroidi, votre cake au citron adore une maison douillette. La meilleure façon de le conserver est à température ambiante. Enveloppez-le étroitement dans du film plastique ou du papier aluminium, ou placez-le dans un cake keeper avec un couvercle serré. Il restera frais et délicieux jusqu’à 4 jours ainsi. Les saveurs se fusionnent et s’améliorent après un jour !
Pour une conservation plus longue, vous pouvez le congeler. Enveloppez le cake entier ou des tranches individuelles dans une couche de film plastique, puis une couche de papier aluminium robuste. Il se gardera magnifiquement dans le congélateur jusqu’à 3 mois. Quand une envie arrive, simplement décongeler-le au réfrigérateur pendant la nuit. Il aura le goût de juste cuisiné.
S’il vous plaît, ne le conservez jamais dans le réfrigéateur sauf si votre cuisine est très chaude et humide. Le frigo sèche les produits de baking et peut atténuer la belle saveur du citron. La température ambiante est son lieu heureux.
Astuces et Conseils pour un Succès en Baking
- Température ambiante est cruciale : Les œufs et le beurre froids ne s’incorporent pas bien et peuvent conduire à une pâte caillée ou un cake dense.
- Mesurez la farine correctement : Versez la farine dans votre cup de mesure et niveler avec un couteau. Ne scoop directement du sac ou vous incluez trop.
- Ne pas trop mélanger : Une fois que vous ajoutez la farine, mélangez seulement jusqu’à que les ingrédients sont combinés. Quelques petits grumeaux sont OK.
- Vérifiez votre four : Les thermostats peuvent être erronés. Utilisez un thermomètre de four séparé pour assurer que vous cuisez à la température correcte.
- Laissez-le refroidir complètement avant de couper. Je sais que c’est dur, mais cela vaut la peine pour des tranches nettes et propres.
Idées de Présentation pour le Sublimer
- Saupoudrez le dessus d’une chute de sucre glace juste avant le service.
- Nappez avec un glaçage simple fait de sucre glace et de jus de citron.
- Servez avec une quenotte de crème légèrement sucrée et des fruits frais.
- Pour un tea party, coupez fin et disposez en éventail sur un présentoir de cake élégant.
- Décorer avec des filaments de citron confit pour une touche professionnelle.
6 Variations Délicieuses à Essayer
Une fois que vous maîtrisez ce cake au citron classique, le monde est votre oyster ! Voici quelques inspirations variées :
- Citron-Myrtille : Incorporer 1 1/2 cups de myrtilles fraîches ou congelées (non thawed), mélangées avec 1 Tbsp de farine, dans la pâte à la fin.
- Citron-Graine de Pavot : Ajouter 1/4 cup de graines de pavot aux ingrédients secs. leur saveur nutty s’accorde parfaitement avec le citron.
- Vanille Glacée : Omit le citron. Utiliser 1 Tbsp d’extrait de vanille et les seeds d’une gousse de vanille dans la pâte. Couvrir avec un glacé vanille.
- Médley Citrus : Utiliser un mélange de zest et jus de citron, lime et orange pour une saveur complexe et ensoleillée.
- Earl Grey Lavande : Infuser 2 sachets de thé Earl Grey dans le lait tiède pendant 30 minutes avant utilisation. Ajouter 1 tsp de lavande culinaire avec les ingrédients secs.
- Citron Amande : Substituez 1/2 cup de la farine avec des amandes finement ground et ajoutez 1 tsp d’extrait d’amande pour un twist marzipan-like.
Si vous adorez les cakes riches et savoureux, vous devriez explorer nos autres recettes. Pourquoi ne pas essayer un cake mocha profondément indulgent cake mocha fondant pour votre prochaine envie chocolatée ? Ou peut-être un stunning cheesecake velvet rouge aux nuts pour une célébration spéciale ? Pour une delight fruitée, notre tarte aux fraises old-fashioned est un must de summer. Et vous ne pouvez jamais se tromper avec un simple, crowd-pleasing cake chocolat fait avec hot water.
Erreurs Courantes à Éviter
Erreur 1 : Utiliser des Ingrédients Froids
C’est la raison numéro un pour laquelle un cake devient dense et heavy. Le beurre et les œufs froids ne crément pas correctement avec le sucre. Vous n’obtiendrez pas les poches d’air cruciales nécessaires pour le lift. La pâte peut même sembler caillée. Pour éviter cela, sortez votre beurre, œufs et lait du frigo au moins une heure avant de commencer. votre beurre devrait presser facilement avec un finger mais ne être melted. Les ingrédients à température ambiante blends smoothly pour une texture aérienne et uniforme.
Erreur 2 : Trop Mélanger la Pâte après Ajout de la Farine
Une fois que la farine rencontre le liquide, le gluten commence à se développer. Mélanger trop rend les strands de gluten forts et elastic, ce qui est great pour bread mais terrible pour un cake tender. Cela conduit à une texture tough, chewy. Mélangez just jusqu’à que les dernières streaks de flour disparaissent. C’est okay si la pâte n’est pas perfectly smooth. Quelques petites lumps sont beaucoup mieux qu’une pâte overworked. Utilisez un mouvement folding gentle avec votre spatula pour le stir final.
Erreur 3 : Ne Pas Tester Correctement la Cuisson
Dépendre seulement du temps ou de la couleur peut résulter en un centre underbaked, gummy ou un cake dry, overbaked. Les fours varient. Le vrai test est la brochette. Insérez-la dans le centre même du cake. Elle devrait ressortir clean ou avec quelques dry crumbs attachés. Si vous voyez wet batter, cela nécessite more time. vérifiez chaque 5 minutes. aussi, listen pour le cake— il arrêtera de faire un sound subtil sizzling quand il sera presque done.
Erreur 4 : Omission de la Préparation du Moule
« Je utiliserai seulement spray de cuisson, ce sera fine. » Famous last words avec un cake dense comme celui-ci ! Une graissage et farine inadequate est un ticket direct vers un cake broken qui sticks au moule. Prendre une minute supplémentaire pour butter chaque corner et dust le thorough avec flour crée une barrière anti-adhérence. Pour les moules Bundt, être extra diligent dans tous les grooves. Cette simple étape assure que votre magnifique Gâteau Citron sort en une piece glorieuse.
Note sur les Ingrédients de Qualité
La simplicité de cette recette signifie que chaque ingrédient se démarque. Utiliser des citrons frais et high-quality et du beurre good fait une différence notable en saveur. Pour plus d’insight sur comment la qualité de votre nourriture impact votre cuisine et bien-être, considérer lire sur pratiques nutritionnelles et la qualité des aliments de ressources trusted.
Ce Cake au Citron est juste un des nombreux desserts timeless que nous adoremos. Pour plus d’inspiration en baking, de treats simples pour weeknights à cakes pour grandes célébrations, assurez-vous de parcourir notre collection entière de recettes de cakes classiques et modernes.
Questions Fréquemment Posées
Peut-on faire ce cake dans un moule différent ?
Absolument ! La recette est versatile. Deux moules à cake standard de 9×5 pouces sont perfect. vous pouvez aussi utiliser un moule Bundt ou tube de 10 cups pour une présentation stunning—just augmenter le temps de cuisson de 10-15 minutes. Pour cupcakes, remplissez les tins lined 2/3 full et bake pour 20-25 minutes. toujours faire le test cure-dent pour vérifier la cuisson, puisque le temps de bake changer avec différentes sizes de moule et matériaux. Les moules darker bake faster que les moules light-colored.
Pourquoi faut-il du beurre et du shortening ?
C’est le secret de la texture du Ritz-Carlton ! Le beurre donne une incredible, rich saveur que le shortening ne peut égaler. Le shortening, however, est 100% fat sans water, ce qui crée une texture plus tender et aide le cake à rester moist pour days. Utiliser les deux donne le meilleur des deux mondes : fantastic taste et une texture melt-in-your-mouth qui holds up beautifully. Si vous deviez choisir un seul, utiliser all butter, mais savoir que la texture sera légèrement différente.
Mon cake brun trop vite sur le dessus. Que faire ?
Cela arrive si votre four runs hot ou la grille est trop haute. Immédiatement quand vous remarquez que le dessus devient un brun doré profond (usuellement autour de la marque 40 minutes), loosely tent une piece de aluminium foil sur le dessus. Ne le wrap tight—just le pose doucement sur le moule pour créer un petit shield. cela permet la heat de circuler mais prévient le dessus de burner pendant que le centre finishes baking. Continuez baking jusqu’à que une brochette ressort clean du centre.
Peut-on congeler le cake baked ?
Yes, ce cake freezes exceptionally well ! Assurez que il est complètement cooled d’abord. Wrap le cake entier ou des slices individuelles tightly dans du film plastique, puis encore dans du aluminium foil ou un freezer bag. Il se gardera jusqu’à 3 months. Pour servir, thaw-le overnight au réfrigérateur ou à température ambiante pour quelques heures. vous pouvez même warm une slice doucement au microwave pour 10 seconds— c’est divin.
Dois-je utiliser du jus de citron frais ?
Je recommande fortement cela pour la saveur citronnée plus bright et clean. Le jus de citron bottled often contient des preservatives et peut avoir un goût légèrement metallic ou stale. Le jus freshly squeezed a des huiles vibrant et acidity qui font vraiment ce cake sing. Si vous êtes dans une true pinch, vous pouvez substitute bottled juice, mais try à utiliser au moins half fresh, et définitivement utiliser fresh zest si possible. Le zest contient la plupart de la potent huile de citron.
Peut-on ajouter un glaçage ou une icing ?
Vous pouvez certainement ! Un glaçage simple est lovely. Whisk ensemble 1 cup de sucre glace avec 1.5-2 cuillères à soupe de jus de citron frais jusqu’à smooth. Drizzle-le sur le cake complètement cooled. Alternatively, un frosting cream cheese est decadent. Pour une touche plus light, un dusting de sucre glace juste avant service est elegant et classic. Si vous le glaçez, notez que le cake sera un peu stickier pour storage.
Pourquoi mon cake sink au milieu ?
Un centre sunken usually pointe vers quelques issues : Le cake était underbaked, donc la structure n’était pas set. La porte du four était opened trop early ou trop often, causant une drop de température. Or, il y avait trop de levure (like un overly heaped tablespoon de levure chimique). Assurez que votre four est properly preheated, éviter ouvrir la porte pour les first 45 minutes, et measure votre levure chimique carefully. Utiliser le test cure-dent est votre meilleure guard contre underbaking.
Comment s’assurer que mon cake est moist ?
La recette est designed pour moisture ! La combination de beurre, shortening et lait assure une texture riche. Les steps clés sont : ne pas overbake it, et le laisser refroidir properly dans le moule avant removal. Le jus de citron aussi ajoute moisture et saveur. Pour un boost extra, essayez le trick du sirop citronné mentionné dans le Secret du Chef. Un storage proper dans un container airtight à température ambiante aussi locks dans la moisture.
Ce cake est approprié pour gifting ?
C’est le gift ultime ! Sa texture sturdy travels well, il reste fresh pour days, et il est universally loved. J’adore le préparer dans des moules à cake disposable aluminium. Quand complètement cool, je wrap le moule entier tightly dans du cellophane colorful et ties avec un ribbon. Vous pouvez aussi le couper en slices et package les slices dans un nice box. Incluez une copy de la recette sur un pretty card — parce qu’après une bouchée, ils vont demander ça !
Peut-on doubler cette recette ?
Vous pouvez, mais c’est souvent easier de faire deux séparées batches. un single batch fait une quantité significative de batter. Si votre bol de mixer est très large, vous pouvez doubler, mais careful de ne pas overfill. Mixer un double batch pourrait nécessiter plus de time pour assurer que tout est incorporé evenly. aussi, vous aurez besoin de enough moules et oven space. Je usually fait juste deux single batches back-to-back pour les résultats plus consistant.
Une Note Douce Finale
Voilà — le cake légendaire qui a été passed de baker à baker pour près d’un siècle. Plus que farine et sucre ; c’est un morceau d’histoire de baking que vous pouvez recreer dans votre kitchen. Je espère que vous le bake, share-le, et peut-être commencez votre propre petite tradition. Quand ce scent citronné remplira votre home et vous verrez les smiles sur les faces de ceux que vous le share, vous comprendrez sa magie. Bon baking !
Equipment
- Mixeur sur socle ou mixeur à main
- Deux moules à cake de 9x5 pouces OU un moule Bundt de 10-12 tasses
- Bol de mélange moyen
- Tamis fin ou passoire
- Spatule
Ingrédients
- 375 g farine tout usage
- 1 cuillère à soupe levure chimique
- 0.75 cuillère à café sel
- 600 g sucre granulé
- 226 g beurre non salé température ambiante
- 113 g shortening température ambiante
- 5 unités gros œufs température ambiante
- 240 ml lait entier
- 90 ml jus de citron frais environ 2-3 citrons
Instructions
- Préchauffez le four à 175°C et préparez vos moules à cake.
- Dans un bol moyen, tamisez la farine, la levure et le sel.
- Dans un robot culinaire, battez le beurre, le shortening et le sucre jusqu'à obtenir un mélange pâle et crémeux.
- Incorporez les œufs un par un, en battant jusqu'à ce qu'ils soient bien mélangés.
- Ajoutez les ingrédients secs alternant avec le lait, en commençant et en finissant par la farine.
- Incorporez le jus et le zeste de citron.
- Versez la pâte dans les moules préparés et lissez le dessus.
- Faites cuire pendant 55-70 minutes jusqu'à ce qu'un cure-dent en ressorte propre.
- Laissez refroidir dans les moules pendant 15 minutes avant de démouler.
Notes
Nutrition

Je suis Céline, une véritable passionnée d’ustensiles et de matériel de cuisine ! J’adore tester, comparer et découvrir les meilleurs équipements pour rendre la cuisine plus efficace et agréable. Que ce soit un bon couteau, un robot performant ou une poêle incontournable, je suis toujours à la recherche des outils qui feront la différence. Mon but est de vous guider dans vos choix pour que vous ayez le bon matériel adapté à vos besoins.