
Le Gâteau Velvet Fromage Rouge aux Noix Ultime : Une Histoire d’Amour
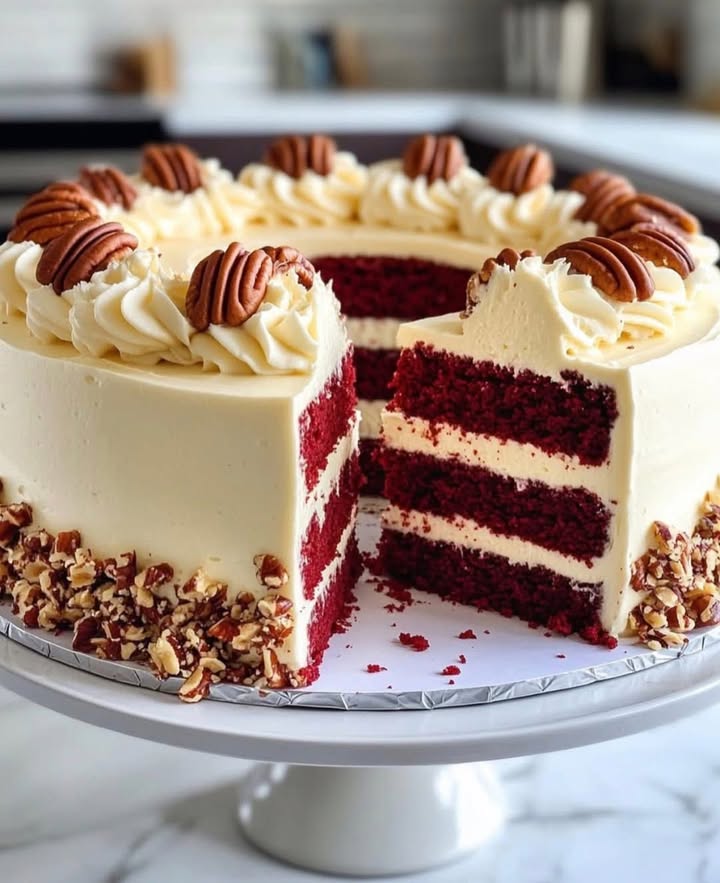
Avez-vous déjà eu un coup de cœur pour un dessert ? Moi oui, et ce fut pour ce spectaculaire Gâteau Velvet Fromage Rouge aux Noix. C’est le gâteau qui a fait taire les conversations du déjeuner dominical de ma famille. Imaginez : une superbe couche rouge velours profond, une garniture crémeuse de cheesecake aux noix, et une couronne de noix grillées. Ce n’est pas juste un gâteau ; c’est une célébration dans une assiette.
Un Conte à Deux Étages : Les Origines de ce Gâteau Velvet Nuté
Mon aventure avec ce dessert a commencé par un heureux accident. J’adore le gâteau red velvet classique, et je suis accro à tout ce qui est cheesecake. Un jour, en expérimentant pour une fête d’anniversaire, j’ai décidé de les marier. Le résultat fut de la pure magie. Si le red velvet a des racines dans le sud des États-Unis, et que le cheesecake est intemporel, l’ajout de cette couche croquante de noix grillées fut ma touche personnelle. Elle ajoute une texture qui rend chaque bouchée pleine de surprises délicieuses.
Pourquoi Vous Allez Adorer ce Gâteau Velvet Nuté
Cette recette est gagnante pour tant de raisons. D’abord, les saveurs forment une fête parfaite : acidulé, sucré, crémeux et croquant. Ensuite, bien qu’il ait l’air impressionnant, les étapes sont simples — pas besoin de compétences de chef étoilé ! Enfin, il est incroyablement indulgent. Même si vos couches ne sont pas parfaitement régulières, il sera délicieux. C’est le genre de gâteau qui vous fait vous sentir comme une superstar de la pâtisserie.
Les Moments Parfaits pour Votre Gâteau Velvet Fromage Rouge
Ce n’est pas juste un en-cas de semaine. C’est votre dessert incontournable pour les moments qui comptent. Sortez-le pour :
- Les anniversaires : Il est spectaculaire et festif.
- Les réunions de fêtes : Sa couleur rouge est parfaite pour Noël ou la Saint-Valentin.
- Les dîners : C’est un sujet de conversation garanti.
- Les repas partagés : Croyez-moi, on vous demandera la recette à chaque fois.
Rassembler Vos Ingrédients pour le Gâteau Velvet Fromage Rouge aux Noix
Préparons notre garde-manger ! Voici tout ce dont vous aurez besoin, séparé proprement pour les deux couches et la garniture.
Pour les Couches de Gâteau Red Velvet :
- 125 g de farine tout usage
- 200 g de sucre en poudre
- 1 cuillère à café de bicarbonate de soude
- 1 cuillère à café de cacao en poudre non sucré
- ½ cuillère à café de sel
- 240 ml de babeurre (lait ribot)
- 120 ml d’huile végétale
- 2 gros œufs
- 1 cuillère à soupe d’extrait de vanille
- 1 cuillère à café de vinaigre blanc
- 1 cuillère à soupe de colorant alimentaire rouge (la pâte donne une couleur plus intense)
Pour la Couche de Cheesecake aux Noix :
- 450 g de fromage à la crème (type Philadelphia), à température ambiante
- 100 g de sucre en poudre
- 100 g de cassonade (sucre roux)
- 2 gros œufs
- 1 cuillère à soupe d’extrait de vanille
- 150 g de noix hachées (comme des noix ou des noix de pécan), grillées
- 120 g de beurre fondu
Pour le Glaçage au Fromage à la Crème & la Décoration :
- 225 g de fromage à la crème, ramolli
- 115 g de beurre non salé, ramolli
- 500 g de sucre glace
- 2 cuillères à café d’extrait de vanille
- 75 g de noix hachées, grillées, pour saupoudrer
Des Substitutions Pratiques au Besoin
Ne paniquez pas s’il vous manque quelque chose ! La pâtisserie, c’est adaptable.
- Babeurre : Faites un substitut rapide en ajoutant 1 cuillère à soupe de jus de citron ou de vinaigre à 240 ml de lait entier. Laissez reposer 5 minutes.
- Noix : Utilisez les noix que vous aimez ou que vous avez sous la main. Noix, noix de pécan, amandes ou même noisettes fonctionnent à merveille.
- Colorant alimentaire : Si vous préférez une couleur naturelle, vous pouvez utiliser de la poudre de betterave, bien que le rouge sera plus doux.
- Fromage à la crème : Le fromage à la crème entier est meilleur pour la texture, mais vous pouvez utiliser une version allégée si besoin.
Créer Votre Chef-d’œuvre : Étapes par Étapes
Étape 1 : Préparer les Couches Red Velvet
Commencez par préchauffer votre four à 180°C (thermostat 6). Beurrez et chemisez vos moules à gâteau. Dans un grand saladier, tamisez ensemble la farine, le sucre, le bicarbonate, le cacao et le sel. Cela évite les grumeaux pour une pâte lisse. Dans un autre bol, fouettez le babeurre, l’huile, les œufs, la vanille, le vinaigre et ce colorant rouge vibrant. Le vinaigre est un héros secret — il réagit avec le bicarbonate pour donner au gâteau un bel effet levant. Astuce de pro : Ajoutez le colorant rouge lentement et mélangez bien. Vous voulez un cramoisi profond et uniforme qui rendra vos couches magnifiques.
Étape 2 : Combiner et Cuire le Red Velvet
Maintenant, versez vos beaux ingrédients liquides rouges dans les ingrédients secs. Mélangez délicatement jusqu’à ce que tout soit juste combiné. Quelques stries sont acceptables ; trop mélanger peut rendre le gâteau dur. La pâte sera d’un beau rouge velouté et assez liquide. Répartissez-la équitablement entre vos moules préparés. Glissez-les au four et faites cuire environ 25-30 minutes. Vous saurez qu’ils sont cuits quand la pointe d’un couteau insérée ressort propre et que le dessus revient légèrement sous la pression du doigt.
Étape 3 : Créer la Couche de Cheesecake aux Noix
Pendant que les couches red velvet refroidissent, faisons le cœur cheesecake de notre Gâteau Velvet Nuté. Assurez-vous que votre fromage à la crème est bien mou. Fouettez-le avec les sucres blanc et roux jusqu’à consistance lisse et crémeuse. La cassonade ajoute une belle note caramélisée. Incorporez les œufs un par un, puis la vanille. Incorporez délicatement vos noix hachées grillées — leur croquant chaud et parfumé est essentiel ! Enfin, ajoutez le beurre fondu en mélangeant jusqu’à homogénéité. Astuce du chef : Griller vos noix au préalable libère toute leur saveur. Juste quelques minutes dans une poêle sèche jusqu’à ce qu’elles sentent divin.
Étape 4 : Assembler et Cuire le Gâteau Final
Placez une couche red velvet complètement refroidie au fond d’un moule à charnière ou d’un moule à gâteau profond. Versez tout le mélange cheesecake aux noix par-dessus, en l’étalant de manière uniforme. Placez soigneusement la deuxième couche red velvet dessus, comme une couverture douillette. Remettez le gâteau assemblé au four, maintenant à 160°C (thermostat 5-6), et faites cuire environ 50-60 minutes. Le cheesecake doit être pris mais avoir encore un léger tremblement au centre. Cette température plus basse empêche la fissuration.
Étape 5 : Préparer le Glaçage Rêveur au Fromage à la Crème
Pendant que le gâteau refroidit complètement, préparez votre glaçage. Fouettez le fromage à la crème et le beurre ramollis jusqu’à consistance mousseuse. Ajoutez graduellement le sucre glace et la vanille. Fouettez jusqu’à obtenir une consistance lisse, épaisse et tartinable. Ce glaçage est sucré, acidulé, et la touche finale parfaite.
Étape 6 : Le Grand Final – Glacer et Décorer
Une fois le gâteau complètement froid — c’est vital pour que le glaçage ne fonde pas — déposez ou pipez le glaçage crémeux sur le dessus. Laissez-le couler un peu sur les côtés pour ce look magnifique et rustique. Enfin, prenez vos noix grillées réservées et saupoudrez-les généreusement sur le glaçage. Elles ajoutent la touche de croquant finale et une décoration naturelle et belle.
Votre Calendrier pour Réussir
Bien pâtisser, c’est une question de timing, pas de précipitation.
- Temps de préparation : 30 minutes
- Temps de cuisson : 90 minutes (pour les deux étapes)
- Temps de refroidissement & prise : Au moins 2 heures (crucial pour la couche cheesecake)
- Temps total : Environ 4 heures
Mon Secret de Chef Suprême
La clé absolue d’un parfait Gâteau Velvet Fromage Rouge aux Noix est la patience lors du refroidissement. N’essayez jamais de glacer ou de couper une couche cheesecake encore tiède. Laissez-la refroidir dans le moule, puis mettez-la au réfrigérateur pendant au moins deux heures. Cela garantit des parts nettes et une texture ferme et luxueuse.
Un Petit Plus d’Information
Le rouge du red velvet venait à l’origine d’une réaction chimique entre le cacao non alcalinisé et des ingrédients acides comme le babeurre et le vinaigre. Aujourd’hui, nous utilisons du colorant alimentaire pour cette teinte dramatique, mais cette touche de cacao et de vinaigre reste essentielle pour sa saveur unique et subtile.
Ce dont Vous Aurez Besoin dans Votre Cuisine
- Deux moules à gâteau ronds de 20 cm de diamètre
- Un moule à charnière ou moule à gâteau profond de 20 cm pour l’assemblage
- Fouet électrique ou batteur robuste
- Plusieurs saladiers
- Spatules
- Grille de refroidissement
Conserver Votre Gâteau Velvet Nuté à la Perfection
À cause de la couche crémeuse de cheesecake, ce gâteau doit être conservé au réfrigérateur. Couvrez-le légèrement de film alimentaire ou placez-le dans une boîte à gâteau. Il restera délicieux jusqu’à 5 jours. Le froid maintient le cheesecake ferme et les saveurs fraîches.
Pour une conservation plus longue, vous pouvez congeler ce gâteau remarquablement bien. Enveloppez le gâteau entier ou des parts individuelles hermétiquement dans du film alimentaire puis dans de l’aluminium. Congelez jusqu’à 2 mois. Décongelez une nuit au réfrigérateur avant de servir.
Utilisez toujours un couteau bien aiguisé et propre pour couper les parts. Tremper le couteau dans l’eau chaude et l’essuyer entre chaque coupe donne des portions parfaitement nettes et professionnelles sans écraser les superbes couches.
Mes Meilleurs Conseils et Astuces Amicales
- Les ingrédients à température ambiante sont vos amis ! Le fromage à la crème froid ne se mélangera jamais bien.
- Pour tester si vos couches red velvet sont cuites, écoutez-les. Elles doivent produire un léger « craquement » quand vous pressez délicatement le centre.
- Si votre glaçage semble trop épais, ajoutez une cuillère à café de lait. S’il est trop liquide, ajoutez un peu plus de sucre glace.
- N’hésitez pas à jouer avec les combinaisons de noix. Essayez moitié noix de pécan, moitié noisettes pour une touche sophistiquée.
Présenter Votre Petite Merveille
La présentation est la dernière joie ! Servez sur une assiette d’un blanc éclatant pour un contraste dramatique. Saupoudrez l’assiette d’un peu de cacao en poudre avant d’y placer la part. Ajoutez quelques framboises fraîches ou feuilles de menthe à côté pour une touche de couleur. Pour une fête, placez le gâteau entier sur un présentoir et laissez-le être la pièce maîtresse de votre table.
Explorer d’Autres Délicieuses Variations
Une fois que vous maîtrisez ce Gâteau Velvet Fromage Rouge aux Noix, le monde des desserts à étages s’ouvre à vous ! Voici six délicieuses variantes que vous pourriez essayer :
- Version pour Amoureux du Chocolat : Ajoutez une couche de ganache au chocolat noir entre le red velvet et le cheesecake.
- Délices aux Fruits Rouges : Incorporez une couche de compote de framboises ou de fraises fraîches sous la garniture cheesecake.
- Gâteau Épicé d’Automne : Ajoutez de la cannelle et une pincée de muscade dans la pâte red velvet pour une sensation cocooning d’automne.
- Zeste d’Agrumes : Ajoutez le zeste d’une orange à la couche cheesecake pour une note lumineuse et parfumée.
- Gâteau Délicieusement « Turtle » : Remplacez les noix par des noix de pécan caramélisées hachées et arrosez le glaçage de sauce caramel.
- Petits Pots Individuels : Faites des versions individuelles dans des pots mason pour un mignon dessert portable.
Si vous avez envie d’autres aventures pâtissières, mon site en a plein ! Vous pourriez aimer un classique gâteau aux carottes riche en chocolat, un incroyablement gâteau au chocolat ultra moelleux et rapide, un festif gâteau aux fruits facile pour les fêtes, ou un gâteau mocha fondant pour les amateurs de café.
Erreurs Courantes à Éviter
Erreur 1 : Utiliser du Fromage à la Crème Froid
C’est le coupable numéro un d’une couche cheesecake grumeleuse et difficile à mélanger. Le fromage à la crème froid ne se mélangera jamais bien avec les sucres et les œufs, conduisant à une texture irrégulière dans votre gâteau final. Prenez toujours le temps de laisser ramollir votre fromage à la crème sur le comptoir au moins une heure avant de commencer. Il devrait être aussi mou qu’une crème fouettée épaisse.
Erreur 2 : Trop Cuire la Couche Cheesecake
Un cheesecake sec et fissuré est souvent le résultat d’une trop longue cuisson. La couche cheesecake doit encore avoir un léger tremblement au tout centre quand vous la sortez du four — elle se raffermira en refroidissant. La cuire à une température plus basse (160°C) comme indiqué aide à prévenir cela. Voyez cela comme le « faire prendre » plutôt que le « cuire jusqu’à solidité ».
Erreur 3 : Sauter l’Étape de Grillage des Noix
Les noix crues ont une saveur plus douce et peuvent parfois sembler un peu fades ou molles. Griller vos noix pendant juste 5-7 minutes dans une poêle sèche ou au four les transforme. Cela fait ressortir un arôme profond et riche et un croquant satisfaisant qui élève tout le Gâteau Velvet Nuté. Ne sautez jamais cette étape simple mais puissante.
Erreur 4 : Appliquer le Glaçage sur un Gâteau Encore Tiède
Si le gâteau est encore tiède, ce joli glaçage au fromage à la crème va fondre, glisser et devenir une flaque désordonnée. Il pourrait même imbiber les couches du gâteau. La patience est clé. Laissez le gâteau refroidir complètement dans le moule, puis placez-le au frigo. Un gâteau froid offre une toile parfaite pour que votre glaçage tienne fièrement.
Un Mot sur l’Indulgence Équilibrée
Ce gâteau est un dessert de célébration, riche et joyeux. Profiter de ces petits plaisirs fait partie d’une vie heureuse, et l’équilibre est la clé. Pour les repas de tous les jours, se concentrer sur des assiettes équilibrées avec beaucoup de variété nous permet de savourer ces moments spéciaux sans culpabilité.
Si ce Gâteau Velvet Fromage Rouge aux Noix a réveillé votre joie de pâtisser, vous trouverez plein d’autres idées délicieuses dans ma collection de gâteaux et pâtisseries.
Vos Questions, Réponses
Puis-je préparer ce gâteau à l’avance ?
Absolument, et c’est même recommandé ! Les saveurs se marient et la texture devient encore meilleure après une nuit au réfrigérateur. Vous pouvez le cuire complètement 1-2 jours avant de le servir. Conservez-le au frais, et ajoutez le glaçage et la décoration finale de noix le jour même où vous prévoyez de le servir pour garder tout frais et croustillant.
Quel type de colorant alimentaire rouge est le meilleur ?
Pour cette couleur red velvet intense et classique, le colorant alimentaire en gel est supérieur au liquide. Il est plus concentré, donc vous en utilisez moins, et il n’ajoute pas de liquide supplémentaire à votre pâte ce qui pourrait affecter la texture. Une seule cuillère à soupe d’un bon colorant rouge en gel devrait vous donner un rouge profond et vibrant. Si vous utilisez du liquide, vous pourriez en avoir besoin de plus, mais soyez prudent pour ne pas déséquilibrer la pâte.
Ma couche cheesecake a fissuré ! Qu’ai-je fait de mal ?
La fissuration vient généralement d’une trop longue cuisson, d’un changement brusque de température ou d’un mélange trop énergique de la pâte après avoir ajouté les œufs. Pour l’éviter, cuisez à la température plus basse jusqu’à ce que ce soit juste pris, n’ouvrez pas souvent la porte du four, et incorporez les œufs juste jusqu’à ce qu’ils soient amalgamés — pas de fouettage supplémentaire. Une petite fissure n’est pas un désastre ; votre glorieux glaçage la couvrira !
Puis-je utiliser un autre type de noix ?
Oui, s’il vous plaît, faites-le ! Cette recette est merveilleusement adaptable. Les noix et les noix de pécan sont classiques, mais les amandes hachées, les noisettes ou même les macadamias seraient fantastiques. Assurez-vous juste de les griller d’abord pour la meilleure saveur. Vous pouvez aussi utiliser un mélange de noix pour un goût plus complexe.
Dois-je utiliser un moule à charnière ?
Un moule à charnière est idéal car il facilite énormément le démoulage du gâteau fini, qui est haut. Cependant, si vous n’en avez pas, un moule à gâteau profond avec fond amovible ou même un moule standard bien beurré fonctionnera. Vous devrez juste être un peu plus prudent lors du démoulage.
Pourquoi utilise-t-on du vinaigre dans le gâteau red velvet ?
Le vinaigre réagit avec le bicarbonate de soude pour créer des bulles de dioxyde de carbone. Cela donne au gâteau une texture plus légère, plus moelleuse et un certain gonflant. C’est un petit ingrédient mais crucial qui contribue à la texture « velours » unique des couches du gâteau. Ne vous inquiétez pas, vous ne le goûterez pas dans le produit final !
Comment savoir quand les couches red velvet sont cuites ?
Le test classique est celui du couteau ou de la pointe de couteau. Insérez-le au centre de la couche ; il doit ressortir propre ou avec quelques miettes sèches. De plus, les bords se détacheront légèrement du moule, et le dessus sera ferme et rebondira légèrement au toucher.
Puis-je congeler des parts individuelles ?
Oui, congeler des parts individuelles est une excellente idée pour des friandises futures. Enveloppez chaque part hermétiquement dans du film alimentaire, puis dans de l’aluminium ou placez-la dans un sachet de congélation. Elles se conserveront bien jusqu’à 2 mois. Décongelez une nuit au réfrigérateur pour la meilleure texture.
Que faire si mon glaçage est trop liquide ?
Si votre glaçage est trop liquide, c’est probablement parce que le beurre ou le fromage à la crème était trop mou ou que le sucre glace n’a pas été mesuré avec précision. Pour le corriger, placez le mélange du glaçage au réfrigérateur pendant 15-20 minutes pour raffermir les matières grasses. Puis, fouettez-le à nouveau. Vous pouvez aussi ajouter graduellement un peu plus de sucre glace jusqu’à obtenir une consistance tartinable.
Y a-t-il un moyen d’alléger cette recette ?
Vous pouvez faire quelques modifications pour une version allégée. Utilisez du fromage à la crème allégé et du babeurre allégé. Vous pouvez aussi réduire le sucre dans la couche cheesecake d’environ 25g, bien qu’il sera moins sucré. Le gâteau sera toujours délicieux, même si la texture sera un peu moins riche.
La Dernière Part
Préparer ce Gâteau Velvet Fromage Rouge aux Noix est plus que suivre une recette ; c’est créer un moment de pure joie. Des couches rouges frappantes au cœur crémeux et noisetté, et cette dernière touche de croquant, chaque étape est un plaisir. C’est un dessert qui impressionne à l’œil, qui est incroyable en bouche, et qui contient tout l’amour que vous y mettez en le faisant. Alors rassemblez vos ingrédients, prenez votre temps, et préparez-vous à partager quelque chose de vraiment spécial. Bonne pâtisserie !
Equipment
- Mixeur électrique
- Moules ronds de 20 cm (8 pouces)
- Moule à charnière de 20 cm (8 pouces)
- Spatules
- Grille de refroidissement
Ingrédients
- 125 g farine tout usage
- 200 g sucre granulé
- 1 c.s bicarbonate de soude
- 1 c.s poudre de cacao
- 0.5 c.s sel
- 240 ml buttermilk
- 120 ml huile végétale
- 2 œufs
- 1 c.s extrait de vanille
- 1 c.s vinaigre blanc
- 1 c.s colorant alimentaire rouge
- 450 g cream cheese à température ambiante
- 100 g sucre granulé
- 100 g sucre brun
- 2 œufs
- 1 c.s extrait de vanille
- 150 g noix hachées, grillées comme des noix ou des pacanes
- 120 g beurre fondu
- 225 g cream cheese ramolli
- 115 g beurre non salé ramolli
- 500 g sucre glace
- 2 c.s extrait de vanille
- 75 g noix hachées, grillées pour saupoudrer
Instructions
- Préchauffez votre four à 180°C (350°F) et préparez vos moules à gâteau.
- Dans un grand bol, tamisez la farine, le sucre, le bicarbonate, le cacao et le sel.
- Dans un autre bol, fouettez le buttermilk, l'huile, les œufs, la vanille, le vinaigre et le colorant rouge.
- Incorporez les ingrédients liquides aux ingrédients secs.
- Divisez la pâte entre les moules préparés et faites cuire pendant 25-30 minutes.
- Pendant le refroidissement des couches de gâteau, préparez la couche de cheesecake en battant le cream cheese, le sucre granulé et le sucre brun jusqu'à consistance crémeuse.
- Ajoutez les œufs un par un et la vanille, puis incorporez les noix et le beurre fondu.
- Placez une couche de gâteau rouge velouté dans un moule à charnière, puis versez le mélange de cheesecake dessus.
- Ajoutez l'autre couche de gâteau rouge par-dessus et faites cuire à 160°C (325°F) pendant 50-60 minutes.
- Au frais, préparez le glaçage en battant le cream cheese et le beurre jusqu'à ce que le mélange soit aérien, puis incorporez le sucre glace et la vanille.
- Une fois le gâteau complètement refroidi, appliquez le glaçage sur le dessus et saupoudrez de noix grillées.
Notes
Nutrition

Je suis Céline, une véritable passionnée d’ustensiles et de matériel de cuisine ! J’adore tester, comparer et découvrir les meilleurs équipements pour rendre la cuisine plus efficace et agréable. Que ce soit un bon couteau, un robot performant ou une poêle incontournable, je suis toujours à la recherche des outils qui feront la différence. Mon but est de vous guider dans vos choix pour que vous ayez le bon matériel adapté à vos besoins.