
Existe-il quelque chose de mieux que l’odeur du chocolat qui cuit dans le four ? Maintenant, imaginez cette senteur chaude et riche mêlée à la fraîcheur festive de la menthe poivrée. C’est la magie de ces Brownies à la Menthe. Je les ai préparés pour la première fois pour un échange de biscuits de Noël, et je vous le dis, ils ont été les premiers à disparaître ! Ils sont plus qu’un dessert ; ils sont un petit carré de joie festive—fondants, décadents, et garnis avec un croustillant brillant qui fait sourire tout le monde. Cuisons ensemble quelques souvenirs.
Une Petite Histoire sur la Menthe et le Chocolat
Cette recette est ma version personnelle d’un classique. J’ai toujours adoré la combinaison du chocolat noir intense et de la menthe fraîche. Cela me rappelle les soirées d’hiver près du feu. Ma grand-mère faisait des brownies simples, et je prenais toujours un morceau encore tiède du plat. Une année, j’avais des restes de cannes de bonbon écrasées après la décoration du sapin. Sur une impulsion, je les ai incorporées à la pâte. Le résultat fut un heureux accident qui est maintenant une tradition familiale. La version moderne avec un topping au chocolat blanc les rend aussi spéciaux à regarder qu’à manger, parfaits pour offrir ou partager lors d’une fête.
Pourquoi Vous Adorerez Ces Brownies
Vous adorerez cette recette car elle est merveilleusement simple mais semble incroyablement spéciale. La base du brownie est profondément chocolatée et fantastiquement fondante—pas de texture cake ici ! Le contraste avec le topping frais et mentholé et le craquant des bonbons à la menthe est un pur plaisir. Ils se préparent dans un seul bol (principalement !), cuisent rapidement, et cette magnifique coulée de chocolat blanc durcit pour un fini professionnel. C’est le genre de gourmandise qui semble avoir demandé des heures de travail, mais votre secret reste avec moi.
Occasions Parfaites pour Ces Brownies Festifs
Ces brownies sont faits pour être partagés et célébrés. Ils sont la star de toute table de dessert de fête, du repas de Noël à la soirée du Nouvel An. Emballez-les dans des boîttes pour des cadeaux maison sincères pour les voisins, les enseignants ou les amis. Ils sont aussi idéals pour les échanges de biscuits, les potlucks, ou simplement comme un projet de cuisine cosy du weekend à savourer avec votre famille. Tout moment devient plus festif avec un plateau de ces brownies à côté.
Ingrédients pour Vos Brownies à la Menthe
- 1 tasse de beurre
- 1 tasse de sucre
- 4 œufs
- 1 cuillère à café d’extrait de vanille
- 1 tasse de farine
- 3/4 tasse de poudre de cacao
- 1 cuillère à café de levure chimique
- Une pincée de sel
- 1 tasse de bonbons à la menthe écrasés
- 2 tasses de pépites de chocolat blanc
- Décors roses ou rouges (optionnel)
Substitutions d’Ingrédients
Pas de panique si vous manquez quelque chose ! Voici des alternatives faciles :
Beurre: Vous pouvez utiliser une quantité égale de margarine ou d’un bâtonnet pour pâtisserie.
Sucre: Pour une saveur plus profonde, remplacez la moitié du sucre blanc par du sucre brun.
Farine: Un mélange de farine sans gluten 1:1 fonctionne parfaitement ici.
Bonbons à la Menthe: Pas de cannes de bonbon ? Utilisez 1/2 cuillère à café d’extrait de menthe poivrée dans la pâte du brownie et garnissez avec des Andes mints hachés.
Pépites de Chocolat Blanc: Les pépites de chocolat au lait ou noir sont une alternative délicieuse pour le topping.
Comment Faire les Meilleurs Brownies à la Menthe
Suivez ces étapes simples pour des résultats fondants et parfaits chaque fois.
Étape 1 : Préparation et Préchauffage
Commencez par préchauffer votre four à 350°F (175°C). Cela lui donne le temps d’atteindre la température idéale. Prenez un plat de cuisson de 9×13 pouces et graissez-le légèrement avec du beurre ou tapissez-le avec du papier sulfurisé. Cette petite étape est votre ticket pour un démoulage facile et net ensuite. L’anticipation commence !
Étape 2 : Crémer le Beurre et le Sucre
Dans un grand saladier, utilisez un mixeur à main ou une spatule robuste pour crémer ensemble le beurre ramolli et le sucre granulé. Vous voulez qu’il devienne léger et aéré, presque comme un nuage jaune pâle. Ce processus incorpore de l’air, ce qui aide à donner une structure à vos brownies. Ensuite, incorporez les œufs, un à un, puis l’extrait de vanille. La mixture devi brillante et homogène.
Étape 3 : Combiner les Ingrédients Secs
Dans un bol séparé, mélangez ensemble la farine, la poudre de cacao, la levure chimique et le sel. Le mélange est important—il distribue uniformément la levure et le sel pour éviter une sensation amère. Le riche parfum de cacao noir commencera à remplir votre cuisine. Astuce pro: Pour des brownies ultra-fondants, tamisez votre poudre de cacao pour enlever les grumeaux.
Étape 4 : Assembler la Pâte
Ajoutez graduellement les ingrédients secs à la mixture de beurre humide. Mélangez doucement avec une spatule jusqu’à ce qu’ils soient juste combinés. Vous verrez une pâte épaisse, magnifique et chocolatée se former. Attention à ne pas trop mélanger, cela peut rendre les brownies durs. Quelques traces de farine sont acceptables ; elles disparaîtront. La pâte doit être épaisse et coulable.
Étape 5 : Cuire jusqu’à la Perfection Fondante
Versez la pâte luxueuse dans votre plat préparé. Utilisez la spatule pour l’étaler uniformément dans tous les coins. Placez le plat au centre de votre four préchauffé. Cuisez pendant 20-25 minutes. Le secret est de les sortir quand un cure-dent inséré au centre ressort avec quelques miettes humides attachées, pas complètement sec. C’est le secret du fondant ! Laissez le plat refroidir complètement sur une grille.
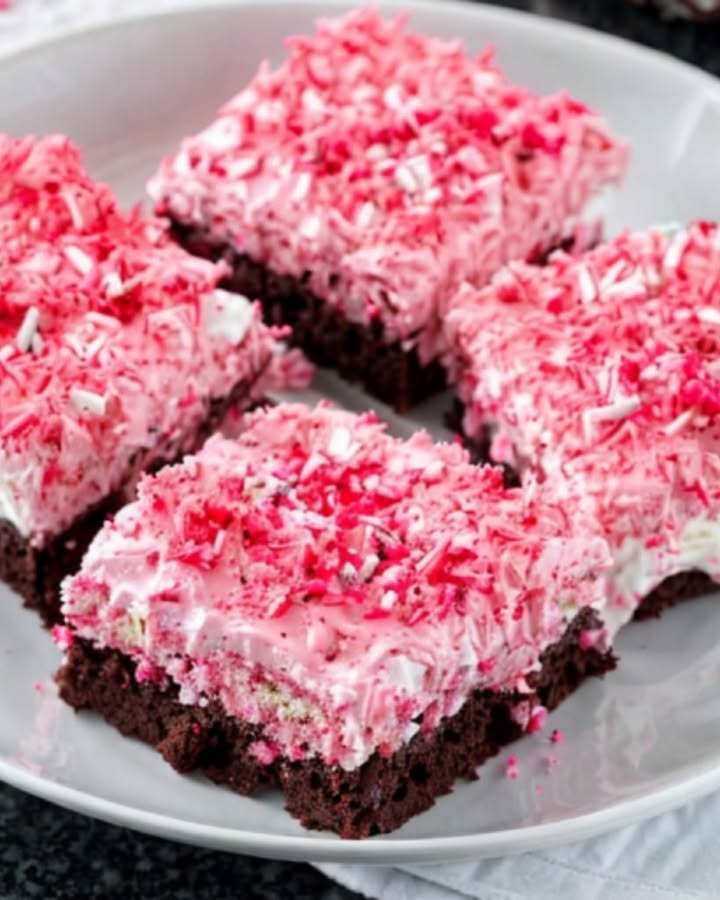
Étape 6 : Créer le Topping à la Menthe
Une fois les brownies refroidis, c’est le moment du topping ! Placez les pépites de chocolat blanc dans un bol adapté au micro-ondes. Faites chauffer par intervalles de 30 secondes, mélangez bien après chaque intervalle, jusqu’à ce qu’il soit complètement fondu et homogène. Versez le chocolat fondu sur les brownies refroidis et étalez-le rapidement avec une spatule offset ou le dos d’une cuillère. Immédiatement, saupoudrez les bonbons à la menthe écrasés et les décors optionnels sur le dessus. Les couleurs sont si joyeuses contre le chocolat blanc !
Étape 7 : Durcir et Servir
Pour aider le topping à durcir rapidement et net, placez le plat entier au réfrigérateur pendant 15-20 minutes. Le chocolat durcira magnifiquement. Une fois dur, utilisez un couteau tranchant pour couper en carrés. Pour des coupes nettes, nettoyez le couteau avec un chiffon humide et chaud entre les tranches. Puis, présentez-les et regardez-les disparaître !
Astuce Secrète du Chef
Pour une touche supplémentaire de saveur menthe qui imprègne le brownie entier, ajoutez 1/4 cuillère à café d’extrait de menthe poivrée à la pâte quand vous ajoutez la vanille. Cela vous donne cette fraîcheur mentholée dans chaque bouchée, pas juste sur le dessus !
Décomposition du Timing
Temps de Préparation: 15 minutes
Temps de Cuisson: 20 minutes
Temps de Réfrigération: 20 minutes
Temps Total: 55 minutes
Nombre de Parts: 12 carrés généreux
Calories: Approximativement 250 kcal par brownie
Un Petit fait Gourmand
La combinaison du chocolat et de la menthe est vieille de plusieurs siècles ! On pense que les Aztèques appréciaient le chocolat avec des herbes épicées, et plus tard en Europe, la menthe fut ajoutée pour ses qualités rafraîchissantes. Aujourd’hui, c’est un duo intemporel, surtout pendant les fêtes de fin d’année. Faire ces brownies est comme participer à une tradition délicieuse et ancienne.
Ce que Vous Avez besoin pour les Faire
- Plat de cuisson 9×13 pouces
- Saladiers (2)
- Mélangeur
- Mixeur à main ou spatule robuste en bois
- Spatule
- Mesures (tasses et cuillères)
- Bol adapté au micro-ondes
- Grille de refroidissement
- Couteau tranchant pour couper
Conservation de Vos Brownies Délicieux
Pour garder vos brownies frais et fondants, conservez-les dans un contenant hermétique à température ambiante jusqu’à 3 jours. Le topping restera dur.
Si vous devez les conserver plus longtemps, vous pouvez les réfrigérer jusqu’à une semaine. Laissez-les revenir à température ambiante environ 15 minutes avant de servir pour la meilleure texture et saveur.
Pour une conservation plus longue, ces brownies se congèlent exceptionnellement bien. Placez les carrés coupés en une seule couche sur une plaque pour qu’ils congèlent solidement, puis transferez-les dans un sac de congélation. Ils se garderont jusqu’à 3 mois. Dégel à température ambiante ou passez un carré congelé au micro-ondes 15 secondes pour un instant gourmand.
Mes Astuces Top pour Réussir
- Ingrédients à Température Ambiante: Utiliser des œufs et du beurre à température ambiante aide à leur incorporation harmonieuse, créant une pâte plus homogène.
- Ne Pas Trop Cuire: Souvenez-vous, le test du cure-dent avec des miettes humides est votre ami. Les brownies continueront de durcir pendant qu’ils refroidissent.
- Écraser Facilement les Bonbons: Placez les cannes de bonbon ou les bonbons à la menthe dans un sac plastique fermé et écras et-les avec un rouleau à pâtisserie. C’est amusant et évite les dégâts !
- Coupures Nettes: Pour des carrés dignes d’une photo, nettoyez votre couteau avec un chiffon chaud et humide entre chaque coupe.
Idées de Présentation pour Impressionner
Stackez-les sur un présentoir à étages pour une fête de Noël. Attachez quelques carrés avec un ruban et du cellophane pour un cadeau charmant. Servez sur un plateau saupoudré d’un peu de sucre glace ou de bonbon écrasé supplémentaire pour un effet de neige. Placez une petite branche de menthe fraîche sur le plateau de service pour une touche de vert.
Autres Recettes Festives que Vous Pourriez Adorer
Si vous adorez ces brownies, vous devez explorer d’autres gourmandises de fête ! Notre site est plein d’idées, comme ces Pralines aux Pacanes et au Sucre de Buttermilk pour une touche sudiste. Pour une option plus simple, sans cuisson, ces Galettes Graham Festives au Chocolat et Menthe sont toujours un succès. Si vous êtes fan des desserts fondants et crémeux, ce Délice de Gâteau au Beurre Fondant est incroyable. Et pour l’ultime amateur de chocolat, mon Gâteau Brownie Fondant et Décadent de Nanny est une pure indulgence. Vous pouvez trouver tout cela et plus dans notre collection de gâteaux et pâtisseries.
Erreurs Courantes à éviter
Erreur 1 : Utiliser du Beurre Fondu Trop Chaud
Si vous faites fondre votre beurre complètement et qu’il est très chaud quand vous ajoutez le sucre et les œufs, vous risquez de « cuire » les œufs. Cela peut conduire à une pâte grasse, séparée et des brownies dense. Toujours laisser le beurre fondu refroidir quelques minutes jusqu’à qu’il soit juste tiède au toucher avant de le crémer avec le sucre.
Erreur 2 : Trop Mélanger la Pâte
Une fois que vous ajoutez la farine, trop mélanger développe le gluten dans la farine. Cela rend les brownies dur et élastique au lieu de tendre et fondant. Mélangez les ingrédients secs juste jusqu’à que vous ne voyez plus de traces de farine. Quelques petits grumeaux sont parfaitement acceptables.
Erreur 3 : Ajouter le Topping sur des Brownies Tièdes
Étaler le chocolat blanc sur des brownies encore même légèrement tièdes est une recette pour un désastre. La chaleur causera que le chocolat fond en une couche gluante et fine et les garnitures de bonbon perdront leur couleur. La patience est clé ! Laissez les brownies refroidir complètement dans le plat sur une grille avant de commencer le topping.
Erreur 4 : Trop Cuire
Ceci est l’erreur la plus commune. Les brownies continuent de cuire à cause de la chaleur résiduelle après être sortis du four. Si vous attendiez un cure-dent complètement sec, vous avez trop tardé. Sortez-les quand le cure-dent a encore quelques miettes fondantes attachées. Ils seront parfaits après refroidissement.
Questions Fréquemment Posées
Peut-je faire ces brownies sans menthe?
Absolument ! C’est une recette fantastique de brownie fondant basique. Simplement omettez les bonbons à la menthe du topping. Vous pouvez garder la coulée de chocolat blanc simple, ou la remplacer par du chocolat au lait ou noir. Vous pouvez aussi les garnir avec des noix hachées, des morceaux de toffee, ou une touche de sel de mer pour un profil de saveur complètement différent.
Mon chocolat blanc a figé et est devenu granuleux. Qu’est-il arrivé?
Le chocolat blanc est très sensible à la chaleur et l’humidité. Le figage arrive si même une petite goutte d’eau pénètre dans le chocolat fondant, ou s’il est trop chauffé. Pour le réparer, essayez de mélanger une cuillère à café de shortening végétal ou d’huile de coco pour le homogénéiser. Pour prévenir, assurez-vous toujours que votre bol et vos ustensiles sont complètement secs, et faites fondre le chocolat lentement utilisant des intervalles courts au micro-ondes.
Comment peut-je préparer ces brownies en avance?
Ceux-ci sont un dessert super à préparer en avance ! Vous pouvez cuire les brownies (sans le topping) jusqu’à deux jours en avance. Laissez-les refroidir complètement, puis emballez le plat entier serré dans un film plastique et conserve à température ambiante. Le jour où vous planifiez servir, ajoutez le topping de chocolat blanc et menthe. Vous pouvez aussi congeler les brownies complètement assemblés et coupés jusqu’à trois mois.
Peut-je utiliser un autre type de chocolat pour la base du brownie?
Pour la meilleure texture, gardez la poudre de cacao non sucrée comme indiqué. Utiliser du chocolat en tablette peut changer le ratio de gras à farine et donner un résultat différent. Si vous voulez une saveur chocolat plus intense, utiliser une poudre de cacao noir de haute qualité. Ne substituez pas du mélange pour chocolat chaud, car il contient du sucre et de la poudre de lait et dérouter la recette.
Y a-t-il des noix dans cette recette?
La recette telle qu’écrite ne contient pas de noix. Cependant, elles seront une addition délicieuse ! Si vous voulez ajouter des noix, incorporez 3/4 tasse de noix ou pacanes hachées dans la pâte juste avant de la verser dans le plat. Le craquant noix se marie merveilleusement avec le chocolat et la menthe.
Quelle est la meilleure façon d’écraser les bonbons à la menthe?
La méthode plus simple est de placer les bonbons durs ou les cannes de bonbon dans un sac plastique robuste à zip. Fermez-le presque complètement, en évacuant un peu d’air. Ensuite, utilis un rouleau à pâtisserie, un maillet, ou même le fond d’une casserole lourde pour les écraser. Vous pouvez contrôler la taille, de la poudre fine aux morceaux, selon votre préférence.
Peut-je doubler cette recette?
Oui, vous pouvez facilement doubler tous les ingrédients. Vous aurez besoin de cuire dans un plat plus grand, comme un demi-plat de cuisson (approx. 18×13 pouces). Gardez un œil attentif sur le temps de cuisson ; il peut demander quelques minutes supplémentaires. Alternativement, vous pouvez faire deux batches séparés dans deux plats de 9×13 pouces.
Pourquoi mes brownies ont plongé au centre?
Un centre enfoncé indique généralement une sous-cuisson ou l’ouverture de la porte du four trop tôt. La structure n’a pas eu le temps de se fixer. Assurez que votre four est complètement préchauffé et essayez de ne pas ouvrir la porte jusqu’à au moins la marque de 18 minutes. Utiliser une levure chimique fraîche est aussi crucial pour une élévation correcte.
Peut-je utiliser l’extrait de menthe poivrée au lieu des bonbons?
Vous pouvez utiliser l’extrait pour aromatiser les brownies eux-mêmes. Ajoutez 1/4 à 1/2 cuillère à café d’extrait de menthe poivrée à la pâte quand vous ajoutez la vanille. Vous voulez encore *quelque chose* croustillant sur le dessus pour la texture, donc considérez utiliser les bonbons pour garnir ou les remplacer par des biscuits sablés écrasés ou même des morceaux de bretzel.
Comment obtenir des coupures nettes, tranchées sur mes brownies?
Pour les coupes plus nettes, refroidissez les brownies après que le topping a durci. Utilisez un long couteau tranchant. Passer le couteau sous de l’eau très chaude, essuyez-le, et fait votre coupe. Répétez l’échauffement et l’essuyage pour chaque coupe. La chaleur aide le couteau à glisser doucement à travers le topping chocolat et la base fondante sans tirer.
Commentaires Finales
Ces Brownies à la Menthe sont plus qu’une gourmandise ; ils sont un moment de magie de Noël que vous pouvez créer dans votre propre cuisine. Ils équilibrent le chocolat riche et la menthe rafraîchissante d’une façon qui semble nostalgique et nouvelle. J’espère que cette recette apporte autant de warmth et de happiness à votre maison qu’à ma maison. Souvenez-vous, la grande cuisine est à propos de joie et de partage. Pour plus d’inspiration sur l’équilibre entre indulgence et choix conscient, des ressources comme équilibre nutritionnel peuvent offrir des conseils utiles. Maintenant, préchauffez ce four, mettez de la musique de fêtes, et préparez-vous pour les compliments qui vont arriver. Bonne cuisine !
Equipment
- Moule de 9x13 pouces
- Bols de mélange 2
- Fouet
- Mixeur à main ou cuillère en bois
- Spatule
Ingrédients
- 225 g beurre
- 200 g sucre
- 4 œufs
- 1 c.s. extrait de vanille
- 120 g farine
- 75 g cacao en poudre
- 1 c.c. levure chimique
- 1 pincée sel
- 150 g bonbons à la menthe écrasés
- 300 g pépites de chocolat blanc
Instructions
- Préchauffez votre four à 350°F (175°C) et préparez un moule de 9x13 pouces en le beurrant ou en le tapissant de papier parchemin.
- Dans un grand bol, crémez le beurre ramolli avec le sucre jusqu'à obtenir une texture légère et mousseuse. Ajoutez les œufs un par un, suivi de l'extrait de vanille.
- Dans un autre bol, tamisez la farine, le cacao, la levure chimique et le sel.
- Incorporez progressivement les ingrédients secs au mélange humide tout en remuant délicatement jusqu'à obtenir une pâte homogène.
- Versez la pâte dans le moule préparé et étalez uniformément. Faites cuire au four pendant 20-25 minutes, jusqu'à ce qu'un cure-dent en ressorte avec quelques miettes humides.
- Laissez refroidir complètement sur une grille. Pendant ce temps, faites fondre les pépites de chocolat blanc au micro-ondes en bouffées de 30 secondes.
- Étalez le chocolat blanc fondu sur les brownies refroidis et saupoudrez de bonbons à la menthe écrasés et de paillettes si désiré.
- Réfrigérez pendant 15-20 minutes pour que le chocolat durcisse, puis découpez en carrés.
Notes
Nutrition

Je suis Céline, une véritable passionnée d’ustensiles et de matériel de cuisine ! J’adore tester, comparer et découvrir les meilleurs équipements pour rendre la cuisine plus efficace et agréable. Que ce soit un bon couteau, un robot performant ou une poêle incontournable, je suis toujours à la recherche des outils qui feront la différence. Mon but est de vous guider dans vos choix pour que vous ayez le bon matériel adapté à vos besoins.