
¡Hola! Bienvenue dans ma cuisine et notre aventure du gâteau à la guayaba
Y a-t-il quelque chose de plus réconfortant que l’odeur d’un gâteau qui cuit ? Maintenant, imaginez ce parfum mêlé au doux parfum tropical de la goyave bien mûre. C’est la magie que nous allons créer aujourd’hui ! Ce gâteau à la guayaba est mon nouveau petit secret préféré pour transformer un après-midi ordinaire en une mini-vacances. C’est un dessert moelleux, juteux, avec un cœur sucré qui fait vraiment fondre l’âme. Je l’ai préparé pour la première fois pour l’anniversaire de ma fille, et croyez-moi, les « oh » et les « ah » autour de la table ont été le plus beau compliment pour une cuisinière maison. Parfait pour le partager en famille ou surprendre tout le monde avec quelque chose de merveilleusement différent et délicieux.
Une Douce Tranche de Soleil : L’Histoire du Gâteau à la Guayaba
La pâte de goyave, ou « pasta de guayaba », est un incontournable dans de nombreuses cuisines d’Amérique latine et des Caraïbes. C’est une façon géniale de préserver la saveur vibrante du fruit. Traditionnellement, elle est dégustée avec du fromage pour une alliance sucré-salé classique. Cette recette de gâteau à la goyave est une belle revisite moderne de cette tradition, en cuisant ces saveurs tant aimées directement dans un gâteau tendre et moelleux. Ma version a été inspirée par une amie cubaine, qui m’a raconté les gâteaux que sa *abuela* préparait. J’ai testé dans ma cuisine pendant des semaines, ajoutant plus de goyave par-ci, un liquide différent par-là, jusqu’à trouver cette recette parfaitement équilibrée. C’est un hommage douillet à la tradition avec une méthode simple et infaillible qui fonctionne dans n’importe quelle cuisine.
Pourquoi Vous Allez Absolument Adorer Cette Recette de Gâteau à la Goyave
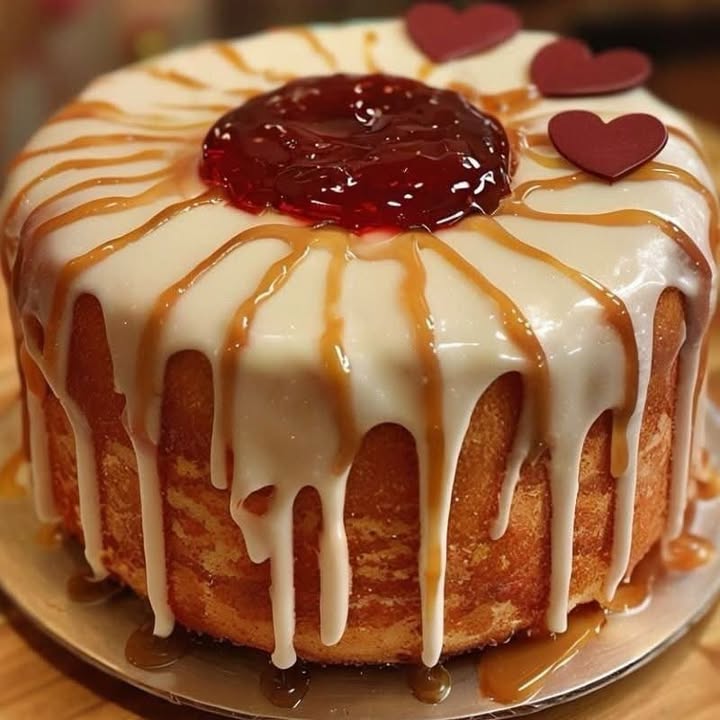
D’abord, la saveur est un vrai rayon de soleil ! Chaque bouchée a le goût tropical unique de la goyave, pas trop envahissant mais parfaitement présent. Ensuite, la texture est divine – une mie aérée avec de petites poches de pâte de goyave fondante et sucrée. Et troisièmement, c’est étonnamment simple ! Vous n’avez besoin d’aucun équipement sophistiqué ni d’ingrédients difficiles à trouver. C’est le genre de dessert juteux qui donne l’impression d’avoir passé la journée en cuisine, mais le secret réside dans les étapes astucieuses et faciles. Et ce glaçage brillant et rose vif ? C’est l’équivalent comestible d’un sourire heureux dans l’assiette.
Les Occasions Parfaites pour Votre Chef-d’œuvre Tropical
Ce gâteau est une star à n’importe quel rassemblement ! Il est fantastique pour un pique-nique d’été, apportant une touche des tropiques au parc. C’est aussi une fin de repas de fête merveilleuse et inattendue, offrant une alternative lumineuse aux desserts au chocolat lourds. J’adore le préparer pour les déjeuners familiaux du week-end ou comme gourmandise « juste comme ça » à savourer avec un café l’après-midi. C’est aussi un succès garanti pour les buffets – il est différent des choses habituelles et lance toujours la conversation. Tous les jours sont bons pour un gâteau à la guayaba !
Ce Dont Vous Avez Besoin : Ingrédients pour le Gâteau à la Goyave
Rassemblons notre soleil ! Voici tout ce dont vous avez besoin pour cette pâtisserie sucrée à la goyave.
Pour le Gâteau :
- 2 tasses de farine de blé tout usage
- 1 tasse de sucre granulé
- 3 gros œufs, à température ambiante
- 1/2 tasse de beurre ou margarine ramolli(e)
- 1 tasse de lait entier
- 2 cuillères à café de levure chimique
- Pâte de guayaba, coupée en petits dés (environ 1 tasse, ou selon votre goût !)
- Un peu de farine supplémentaire pour saupoudrer les cubes de goyave
Pour le Glaçage Irrésistible :
- 200 g de pâte de goyave
- 1/4 de tasse d’eau OU de vin blanc sec (le vin ajoute une note délicate et sophistiquée)
Échanges Simples : Options de Substitution
Pas de panique si il vous manque quelque chose ! Voici des substitutions faciles :
- Beurre/Margarine : Une quantité égale d’huile végétale neutre fonctionne bien.
- Lait : N’importe quel lait végétal comme le lait d’amande ou d’avoine peut être utilisé pour un gâteau à la goyave sans lactose.
- Vin Blanc dans le Glaçage : Utilisez simplement de l’eau, ou essayez du jus d’orange pour une touche citronnée.
- Goyave Fraîche : Bien que la pâte soit traditionnelle, vous pouvez utiliser environ 1 tasse et demie de purée de goyave fraîche, passée au tamis. Réduisez légèrement les autres liquides.
C’est Parti pour la Cuisson ! Votre Guide Étape par Étape
Enfilez votre tablier, et créons un peu de magie. Suivez ces étapes pour le parfait dessert moelleux à la goyave.
Étape 1 : Créer la Base du Gâteau
Commencez par préchauffer votre four à 180°C. Cela lui laisse le temps de chauffer parfaitement. Maintenant, prenez votre mixeur ou robot culinaire. Cassez-y les trois œufs, versez le lait, ajoutez le beurre ramolli et le sucre. Mixez à vitesse élevée pendant une bonne minute ou deux jusqu’à ce que le mélange soit pâle, crémeux et bien lisse. Vous le verrez prendre une jolie couleur jaune clair. Cette étape incorpore de l’air, c’est le premier secret d’un gâteau léger.
Étape 2 : Combiner le Liquide et le Sec
Tamisez votre farine dans un grand saladier. Ce n’est pas juste pour faire joli – cela élimine les grumeaux et ajoute de l’air, rendant le gâteau plus léger. Faites un puits au centre de votre montagne de farine. Maintenant, versez ce magnifique mélange crémeux du mixeur directement dans le puits. À l’aide d’un fouet manuel, commencez à incorporer délicatement la farine aux ingrédients liquides du centre vers l’extérieur. Allez doucement au début pour éviter un nuage de farine ! Continuez à mélanger jusqu’à obtenir une pâte lisse et sans grumeaux. Astuce de pro : Ne pas trop mélanger ! Une fois que la farine est juste incorporée, arrêtez. Un mélange excessif développe le gluten et peut rendre le gâteau caoutchouteux.
Étape 3 : Le Pouvoir Levant
Saupoudrez les deux cuillères à café de levure chimique uniformément sur la pâte. Maintenant, incorporez-la délicatement avec une spatule, en vous assurant qu’elle soit répartie partout. Vous verrez la pâte devenir un peu bouillonnante – la magie commence ! C’est l’agent levant qui va donner à notre biscuit à la goyave sa belle levée et sa mie tendre dans le four.
Étape 4 : Superposer la Surprise Sucrée
Prenez votre moule à gâteau (un moule rond de 22 cm ou un moule à cake fonctionnent très bien) et beurrez-le et farinez-le bien. Versez la moitié de votre pâte à gâteau et étalez-la. Maintenant, prenez vos cubes de pâte de goyave et roulez-les légèrement dans un peu de farine – cela les empêche de tous couler directement au fond. Parsemez une bonne poignée de ces cubes farinés sur la première couche de pâte. Cela crée ce merveilleux « cœur sucré qui fait fondre l’âme ».
Étape 5 : La Dernière Couche
Versez soigneusement le reste de la pâte sur les cubes de goyave. Utilisez votre spatule pour l’étaler uniformément, couvrant tous les morceaux de goyave. Pour une explosion de saveur supplémentaire et un dessus joli, pressez légèrement quelques cubes de goyave farinés supplémentaires sur la surface de la pâte. Ils vont légèrement caraméliser à la cuisson, ajoutant une texture incroyable.
Étape 6 : Cuisson jusqu’à la Perfection Dorée
Placez le moule au centre de votre four préchauffé. Maintenant, la partie la plus difficile : soyez patient ! Faites cuire pendant environ 40 minutes. Le gâteau est prêt lorsqu’il est d’un brun doré foncé sur le dessus et qu’un cure-dent ou une brochette inséré(e) au centre (en évitant un gros cube de goyave) en ressort propre. Votre cuisine sentira absolument divin. Une fois cuit, sortez-le et laissez-le refroidir complètement dans le moule sur une grille.
Étape 7 : Préparer le Glaçage Brillant
Pendant que le gâteau refroidit, préparons ce nappage brillant ! Dans une petite casserole, combinez les 200g de pâte de goyave avec l’eau ou le vin. Chauffez à feu doux en remuant constamment avec une cuillère en bois. Regardez la pâte s’assouplir, fondre et se transformer lentement en une sauce lisse et rose vif. Cela prend environ 5-7 minutes. Une fois que c’est un sirop pouvant être versé, retirez du feu et laissez refroidir un peu – il va s’épaissir un peu en refroidissant, ce qui est parfait.
Étape 8 : Le Final
Assurez-vous que votre gâteau est complètement froid. S’il est encore un peu tiède, le glaçage fondra et imbibera le gâteau au lieu de former ce beau revêtement brillant. Versez lentement le glaçage encore tiède sur le dessus du gâteau, en l’aidant à couler joliment sur les côtés avec le dos d’une cuillère. Laissez le glaçage prendre pendant 10-15 minutes. Maintenant, coupez, servez, et préparez-vous aux compliments !
Astuce du Chef : Pour une présentation vraiment spectaculaire, décorez avec quelques fines tranches de goyave fraîche ou une pincée de pétales de fleurs comestibles juste après le glaçage.
Timing de Votre Gâteau à la Goyave
Voici un guide rapide pour planifier votre séance de cuisine :
- Temps de Préparation : 20 minutes
- Temps de Cuisson : 40 minutes
- Temps de Refroidissement & Glaçage : 1 heure
- Temps Total : Environ 2 heures
Le Secret du Chef pour la Texture Ultime
Le secret d’une mie incroyablement moelleuse et tendre ? Des ingrédients à température ambiante. Sortez vos œufs, lait et beurre du réfrigérateur environ une heure avant de commencer. Les ingrédients à température ambiante s’émulsionnent et se mélangent beaucoup plus facilement, créant une pâte plus lisse qui emprisonne mieux l’air. Cela se traduit par une levée plus uniforme et une texture tendre et délicate qui complète parfaitement la goyave fondante.
Un Peu Plus d’Infos : La Goyave Elle-même
La goyave n’est pas seulement délicieuse ; c’est une vraie source de nutriments ! Elle est réputée pour sa richesse en vitamine C – une seule goyave peut contenir plus de 200% de vos besoins quotidiens. Elle fournit également des fibres alimentaires et des antioxydants. Ce fruit ajoute une douceur naturelle merveilleuse et une explosion de saveur qui donne à ce gâteau une sensation d’indulgence relativement vertueuse. Comprendre la qualité de vos ingrédients compte, car choisir une bonne pâte de goyave naturelle fait toute la différence en saveur. Pour plus d’infos sur la sélection d’aliments de qualité qui contribuent à votre énergie, vous pourriez trouver des ressources comme la discussion sur l’énergie au quotidien très utiles.
Équipement Dont Vous Aurez Besoin
- Mixeur ou robot culinaire
- Grand saladier
- Fouet manuel et spatule
- Moule à gâteau rond de 22 cm ou moule à cake
- Petite casserole
- Grille de refroidissement
- Tasses et cuillères à mesurer
Conservation de Votre Délicieuse Création
Parce que ce gâteau est très moelleux, il se conserve très bien. Une fois le glaçage complètement pris, vous pouvez couvrir le gâteau avec une cloche ou d’un film alimentaire en le laissant un peu aéré. Il restera frais et délicieux à température ambiante jusqu’à 2 jours. Les saveurs se marient et s’améliorent même un peu après une nuit !
Si vous devez le garder plus longtemps ou si votre cuisine est très chaude, la réfrigération est votre amie. Placez le gâteau glacé dans un contenant hermétique ou enveloppez-le bien. Il se gardera au réfrigérateur jusqu’à 5 jours. Le froid rendra la texture un peu plus ferme, mais c’est toujours délicieux.
Vous pouvez aussi congeler ce gâteau pour une gourmandise future ! Il est préférable de le congeler sans le glaçage. Enveloppez le gâteau complètement refroidi et non glacé dans du film alimentaire, puis dans du papier aluminium. Il se conservera au congélateur jusqu’à 2 mois. Décongelez-le une nuit au réfrigérateur, puis ramenez-le à température ambiante et préparez le glaçage frais juste avant de servir pour le meilleur goût et la meilleure texture.
Astuces et Conseils pour une Réussite Garantie
- Fariner les Cubes de Goyave : Ne sautez pas l’étape d’enrober les cubes de farine ! Cette simple astuce est clé pour les empêcher de couler dans une couche au fond du moule.
- Testez la Cuisson : Les fours peuvent varier. Commencez à vérifier votre gâteau à 35 minutes. Si le dessus brunit trop vite mais le centre est encore humide, couvrez-le légèrement avec une feuille d’aluminium.
- Refroidir Complètement : Je sais que c’est tentant, mais soyez patient ! Glacer un gâteau encore tiède fera que le glaçage sera absorbé, rendant le dessus collant au lieu de brillant.
- Si vous aimez découvrir de nouveaux gâteaux, vous trouverez bien d’autres idées merveilleuses dans notre collection de recettes de gâteaux et pâtisseries.
Idées de Présentation pour Épater Vos Invités
- Servez chaque tranche avec une quenelle de crème fouettée légèrement sucrée ou une boule de glace à la vanille. Le contraste est divin.
- Décorez l’assiette de service avec quelques feuilles de menthe fraîche pour une touche de couleur et de fraîcheur.
- Pour un dîner, servez des tranches plus petites et élégantes à côté d’un plateau de fromages avec un cheddar blanc fort – c’est un clin d’œil moderne à l’association classique goyave-fromage.
Variations Plus Saines et Créatives de la Recette
Cette recette versatile invite à la créativité ! Voici six façons de la modifier :
- Gâteau Goyave & Citron Vert : Ajoutez le zeste d’un citron vert à la pâte à gâteau pour une touche acidulée et tropicale qui équilibre la douceur.
- Gâteau à la Goyave au Blé Complet : Remplacez la moitié de la farine tout usage par de la farine de blé complet pour plus de fibres et une saveur plus noisetée.
- Gâteau à la Goyave Fourré au Fromage Frais : Battez 150g de fromage frais type Philadelphia avec 1/4 de tasse de sucre et un œuf. Versez la moitié de la pâte à gâteau, ajoutez la couche de fromage frais, puis terminez avec le reste de pâte et les cubes de goyave.
- Cakelets Individuels à la Goyave : Cuisez la pâte dans un moule à muffins pour des gourmandises faciles et portionnées. Réduisez le temps de cuisson à 20-25 minutes.
- Gâteau Goyave & Noix de Coco : Remplacez 1/4 de tasse de lait par du lait de coco et saupoudrez de noix de coco râpée sur le glaçage encore humide pour un duo tropical.
- Gâteau à la Goyave Végétalien : Utilisez des œufs de lin, du lait végétal et du beurre végétalien. La pâte de goyave est naturellement végétalienne, ce qui rend cette adaptation facile.
Si vous aimez l’ambiance tropicale de ce dessert, vous pourriez aussi tomber amoureux de notre incroyablement rafraîchissante mousse au fruit de la passion. Pour une expérience chocolatée décadente, notre tarte au chocolat crémeuse façon French Silk Pie est un pur luxe. Si vous avez envie de préparer quelque chose de frit et délicieux, ces beignets à la crème sont à essayer absolument. Et pour un dessert à étages amusant et sans cuisson, ce gâteau au flan et aux biscuits chocolatés fait toujours son effet.
Erreurs Courantes à Éviter pour un Gâteau à la Goyave Parfait
Erreur 1 : Sauter l’Étape « Saupoudrage de Farine » pour les Cubes de Goyave
Cela peut sembler être une petite étape supplémentaire inutile, mais rouler vos cubes de pâte de goyave dans la farine change tout. Sans cela, les cubes denses et collants agissent comme de petits poids et couleront presque certainement tout droit au fond du moule pendant la cuisson. Vous vous retrouvez alors avec un gâteau dont toute la goyave est cachée dans une seule couche à la base. L’enrobage de farine crée une barrière légère qui aide à les suspendre dans la pâte, garantissant d’avoir cette merveilleuse surprise de goyave fondante à chaque bouchée. Astuce pratique : Utilisez simplement un petit bol avec deux cuillères à soupe de farine, ajoutez les cubes et remuez-les doucement jusqu’à ce qu’ils soient légèrement enrobés.
Erreur 2 : Utiliser des Ingrédients Froids Sortis Directement du Réfrigérateur
Commencer avec des œufs, du lait et du beurre froids est l’une des principales raisons pour lesquelles un gâteau peut devenir dense ou ne pas bien lever. Les matières grasses froides ne se crèment pas bien avec le sucre, et les ingrédients froids ne s’émulsionnent pas de manière homogène, donnant une pâte qui a l’air caillée. Cela affecte la façon dont l’air est incorporé et piégé, ce qui influence directement la texture finale de votre dessert moelleux. Une pâte à température ambiante cuit de manière plus uniforme et donne une mie plus légère et fine. Planifiez simplement à l’avance et laissez vos ingrédients laitiers sur le comptoir pendant 30 à 60 minutes avant de commencer.
Erreur 3 : Trop Mélanger la Pâte à Gâteau
Une fois que vous avez ajouté la farine aux ingrédients liquides, votre technique de mélange doit changer. Battre vigoureusement avec un fouet ou un batteur à cette étape développe excessivement le gluten de la farine. Imaginez le gluten comme de petits élastiques ; plus vous les travaillez, plus ils deviennent résistants et caoutchouteux. Nous voulons un gâteau tendre, pas un gâteau qui ressemble à du pain ! Comment l’éviter : Passez à une spatule pour incorporer délicatement. Utilisez des mouvements doux, en soulevant du bas du bol vers le haut, juste jusqu’à ce que vous ne voyiez plus de traces de farine. Quelques petits grumeaux sont parfaitement acceptables et préférables à une pâte trop mélangée.
Erreur 4 : Glacer le Gâteau alors qu’il Est Encore Tiède
L’impatience est réelle, je sais ! Mais verser ce beau glaçage tiède sur un gâteau encore légèrement chaud est un moyen infaillible d’obtenir un dessus détrempé et collant au lieu d’une finition brillante et ferme. La chaleur du gâteau fera que le glaçage se liquéfiera davantage et sera absorbé par la couche supérieure, perdant son éclat et sa texture distincte. La patience est clé ici. Laissez le gâteau refroidir complètement dans le moule sur une grille, ce qui peut prendre une bonne heure. L’attente garantit ce superbe nappage brillant qui donne au gâteau une apparence aussi professionnelle que son goût.
Questions Fréquemment Posées (FAQ)
Puis-je utiliser de la goyave fraîche au lieu de la pâte de goyave pour le gâteau ?
Oui, vous pouvez, mais cela nécessite un ajustement. La goyave fraîche a une teneur en eau plus élevée, ce qui peut rendre la pâte à gâteau trop humide. Pour utiliser de la goyave fraîche, pelez et épépinez d’abord 3-4 grosses goyaves. Mixez la chair puis faites-la réduire dans une casserole à feu moyen jusqu’à ce qu’elle ait la consistance d’une pâte (cela réduit l’eau). Il vous faudra environ 1 à 1 1/4 tasse de cette purée réduite. Utilisez-la pour remplacer les cubes de pâte de goyave, mais vous devrez probablement l’incorporer à la pâte différemment, peut-être en la marbrant. La saveur sera un peu moins concentrée mais merveilleusement fraîche.
Ma pâte de goyave est très dure. Comment puis-je l’assouplir pour la couper facilement en dés ?
La pâte de goyave peut devenir assez ferme, surtout si elle est stockée depuis un moment. N’essayez pas de la couler froide ! Le moyen le plus simple est de la passer brièvement au micro-ondes. Placez le bloc (ou la portion dont vous avez besoin) sur une assiette allant au micro-ondes et chauffez par intervalles de 10 secondes. Vérifiez après chaque chauffe ; vous voulez juste qu’elle soit malléable pour couper, pas fondue. Sinon, vous pouvez la placer dans un bol résistant à la chaleur au-dessus d’une casserole d’eau frémissante (bain-marie) pendant quelques minutes jusqu’à ce qu’elle se ramollisse légèrement. Laissez refroidir un peu avant manipulation et découpage.
Pourquoi mes cubes de goyave ont-ils quand même coulé au fond même après les avoir farinés ?
Si cela arrive, deux coupables courants sont la consistance de la pâte et la taille des cubes. Premièrement, assurez-vous que votre pâte n’est pas trop liquide. Bien mesurer votre farine (versez-la dans la tasse à mesurer et nivelez, ne plongez pas la tasse) est important. Deuxièmement, vos cubes de goyave sont peut-être trop gros ou lourds. Essayez de les couper en morceaux plus petits, de la taille d’une pièce. Enfin, assurez-vous de ne pas trop mélanger la pâte après avoir ajouté la goyave, car cela peut éliminer l’enrobage de farine. Incorporez-les délicatement juste jusqu’à ce qu’ils soient répartis.
Puis-je préparer ce gâteau la veille pour le servir ?
Absolument ! En fait, le préparer la veille est souvent recommandé. Les saveurs ont plus de temps pour se marier et se développer, et l’humidité se répartit uniformément dans tout le gâteau, le rendant encore plus délicieux. Cuisez et laissez refroidir complètement le gâteau, puis enveloppez-le hermétiquement (non glacé) dans du film alimentaire et conservez-le à température ambiante toute la nuit. Préparez le glaçage frais le lendemain et appliquez-le quelques heures avant de servir pour le meilleur brillant et la meilleure texture.
Que puis-je utiliser si je n’ai pas de mixeur pour la première étape ?
Aucun problème ! Un mixeur fait juste plus vite. Vous pouvez obtenir le même résultat avec un batteur électrique manuel ou un robot pâtissier muni de la feuille. Cremez d’abord le beurre ramolli et le sucre jusqu’à obtenir un mélange léger et mousseux (environ 3 minutes). Ajoutez ensuite les œufs un par un, en battant bien après chaque ajout. Enfin, incorporez le lait progressivement. La clé est d’obtenir ce mélange léger et bien combiné avant d’ajouter les ingrédients secs.
Le vin blanc sec est-il nécessaire pour le glaçage ? Qu’est-ce qu’il apporte ?
Le vin n’est pas nécessaire mais fortement recommandé si vous aimez les saveurs plus complexes. L’eau fonctionne parfaitement bien et crée un glaçage sucré et fruité. Cependant, un vin blanc sec (comme un Sauvignon Blanc ou un Pinot Grigio) ajoute une note acide subtile et de la profondeur qui équilibre magnifiquement la douceur intense de la pâte de goyave. Il élève le glaçage d’une simple douceur à une sophistication. Si vous préférez ne pas utiliser d’alcool, l’eau est un excellent substitut, ou vous pouvez utiliser un jus de fruit léger comme du jus de pomme ou de raisin blanc.
Comment savoir quand le gâteau est parfaitement cuit ?
Utilisez les tests visuels et tactiles ! D’abord, le gâteau doit commencer à se détacher légèrement des bords du moule et le dessus doit être d’un brun doré profond et uniforme. Le test le plus fiable est celui du cure-dent. Insérez un cure-dent, une brochette en bois ou un couteau fin au centre du gâteau (en essayant d’éviter un gros cube de goyave). Il doit en ressortir propre ou avec quelques miettes sèches attachées. Si vous voyez de la pâte humide et collante, il a besoin de plus de temps. Cuisez par incréments de 5 minutes et testez à nouveau.
Puis-je congeler le glaçage restant ?
Oui, vous pouvez ! Le glaçage à la goyave se congèle très bien. Laissez refroidir complètement tout glaçage restant, puis placez-le dans un petit contenant hermétique ou un sac de congélation. Étiquetez-le avec la date. Il se conservera au congélateur jusqu’à 3 mois. Lorsque vous êtes prêt à l’utiliser, décongelez-le une nuit au réfrigérateur. Il sera très épais. Réchauffez-le doucement dans une casserole à feu doux ou au micro-ondes par courtes impulsions, en remuant fréquemment, jusqu’à ce qu’il retrouve une consistance pouvant être versée.
Mon glaçage est trop épais. Comment puis-je le fluidifier ?
Si votre glaçage a refroidi et épaissi trop pour être versé, ou s’il a trop réduit pendant la cuisson, c’est facile à réparer. Remettez-le simplement dans la casserole et ajoutez plus de liquide – une cuillère à café à la fois d’eau, de vin ou même de jus de citron. Chauffez à feu doux en remuant jusqu’à obtenir la consistance parfaite, comme du miel. N’oubliez pas qu’il épaissira un peu plus en refroidissant sur le gâteau, donc vous voulez qu’il soit légèrement plus fluide que ce que vous pensez dans la casserole.
Cette recette est-elle adaptée aux pâtissiers débutants ?
C’est une excellente recette pour les débutants ! Les étapes sont simples, et l’utilisation d’un mixeur pour le mélange initial simplifie le processus et réduit les risques d’erreur. C’est un gâteau très indulgent qui ne nécessite pas de dressage précis ou de techniques de décoration complexes. Les plus grandes leçons pour un débutant ici sont d’apprendre l’importance des ingrédients à température ambiante, la technique d’incorporation délicate et de faire confiance aux tests de cuisson. Réussir cette recette de gâteau à la goyave va certainement booster votre confiance en pâtisserie !
Servir un Goût de Bonheur
Et voilà – votre guide pour créer un vraiment spécial et joyeux gâteau à la guayaba. Ce gâteau est plus qu’un simple dessert ; c’est une expérience de saveurs chaudes et tropicales et de sourires partagés. Il prouve qu’un petit peu de soleil, sous forme de pâte de goyave, peut transformer des ingrédients simples en quelque chose d’extraordinaire. Alors, rassemblez vos proches, coupez une tranche de cette délicieuse douceur moelleuse et juteuse, et regardez ce cœur fondant et sucré apporter un moment de pur bonheur à votre table. Bonne pâtisserie, et bon appétit !
Equipment
- Blender
- Moule à gâteau rond de 22 cm
- Petite casserole
- Spatule
- Grille de refroidissement
Ingrédients
- 240 g farine de blé tout usage
- 200 g sucre granulé
- 3 grands œufs à température ambiante
- 113 g beurre ramolli ou margarine
- 240 ml lait entier
- 10 g poudre à lever
- 200 g pâte de guayaba coupée en petits cubes
Instructions
- Préchauffez votre four à 180°C (350°F).
- Dans un blender, mélangez les œufs, le lait, le beurre ramolli et le sucre jusqu'à obtenir un mélange crémeux et lisse.
- Tamisez la farine dans un grand bol et formez un puits au centre.
- Versez le mélange crémeux dans le puits et incorporez délicatement la farine à l’aide d’un fouet à main.
- Ajoutez la poudre à lever et incorporez-la doucement à la pâte.
- Graissez et farinez un moule à gâteau de 22 cm, puis versez la moitié de la pâte.
- Farinez légèrement les cubes de pâte de guayaba et dispersez-les sur la première couche de pâte.
- Versez le reste de la pâte sur les cubes de guava et lissez le dessus.
- Enfournez et faites cuire pendant environ 40 minutes, jusqu'à ce que le gâteau soit doré.
- Laissez refroidir complètement sur une grille.
- Pour le glaçage, faites chauffer la pâte de guayaba avec l'eau ou le vin dans une casserole jusqu'à obtenir un mélange lisse.
- Versez le glaçage sur le gâteau refroidi et laissez-le prendre pendant 10-15 minutes avant de servir.
Notes
Nutrition

Je suis Céline, une véritable passionnée d’ustensiles et de matériel de cuisine ! J’adore tester, comparer et découvrir les meilleurs équipements pour rendre la cuisine plus efficace et agréable. Que ce soit un bon couteau, un robot performant ou une poêle incontournable, je suis toujours à la recherche des outils qui feront la différence. Mon but est de vous guider dans vos choix pour que vous ayez le bon matériel adapté à vos besoins.