
Le Guide Ultime pour le Cheesecake Baklava au Miel et aux Pistaches
Vous connaissez ce moment lors d’un dîner où vous hésitez entre une part riche et onctueuse de cheesecake et la douceur collante et fruitée d’un baklava ? Eh bien, j’ai décidé de mettre fin à ce dilemme une bonne fois pour toutes. Après plusieurs (délicieuses) expériences dans ma cuisine, j’ai créé quelque chose de vraiment magique : le Cheesecake Baklava au Miel et aux Pistaches. Ce dessert est comme un câlin chaleureux pour vos papilles, fusionnant deux classiques adorés en un chef-d’œuvre inoubliable. Laissez-moi vous montrer comment le réaliser !
Une Douce Histoire : L’origine de ce Cheesecake Baklava Hybride
Mon amour pour ce dessert a commencé lors d’un voyage, il y a des années, en savourant les fines couches imbibées de miel du baklava traditionnel. De retour à la maison, ma famille est une tribu fanatique de cheesecake. Un dimanche, inspirée par une boîte de pâte filo à moitié entamée et une envie de sucré, j’ai commencé à superposer les couches. Le résultat fut ce beau mariage de cultures et de saveurs. Il honore l’ancienne tradition de pâtisserie feuilletée de la Méditerranée orientale tout en adoptant la joie crémeuse et décadente du cheesecake new-yorkais classique. C’est un hommage moderne à deux desserts intemporels.
Pourquoi Vous Allez Tomber Amoureux de ce Cheesecake Baklava Miel
Ce n’est pas juste une autre recette de dessert. Voici pourquoi il deviendra votre nouveau favori :
- Le Paradis des Textures : Vous obtenez le croquant satisfaisant de la pâte filo et des pistaches beurrées, associé à la garniture de cheesecake veloutée et lisse.
- Une Bombe de Saveurs : La pistache profonde et fruitée, le fromage à la crème acidulé, le zeste de citron aromatique et le sirop de miel floral créent une symphonie à chaque bouchée.
- Facteur Bluffant Garanti : Il a l’air incroyablement impressionnant, mais les étapes sont simples. C’est une arme secrète pour faire croire que vous avez étudié la pâtisserie !
- La Magie de la Préparation à l’Avance : Il est encore meilleur après une nuit au réfrigérateur, ce qui élimine tout stress de dernière minute quand on reçoit.
Quand Préparer ce Dessert Spectaculaire
Ce Cheesecake Baklava au Miel et aux Pistaches n’est pas pour un goûter du mardi ordinaire (à moins de vous faire plaisir !). Il brille particulièrement pour :
- Les Réunions de Fêtes : Idéal pour l’Aïd, Noël, Thanksgiving, ou comme pièce maîtresse de toute table festive.
- Les Célébrations Spéciales : Anniversaires, rendez-vous galants ou un dîner entre amis « juste parce que » pour les impressionner.
- Les Repas Partagés : Préparez-vous à distribuer la recette, car tout le monde vous la demandera !
- Les Soirées Fusion Culinaire : Parfait pour un menu qui mélange différentes traditions gastronomiques.
Ce Dont Vous Aurez Besoin : La Liste des Ingrédients
Préparer votre mise en place rend le processus bien plus fluide. Voici votre liste de courses :
Pour les Couches de Baklava :
- Pâte Filo : 10 feuilles (décongelées selon les instructions du paquet)
- Beurre Doux : 120 g (1/2 tasse), fondu
- Pistaches : 180 g (1 tasse et demie), finement hachées
Pour la Garniture au Cheesecake :
- Fromage à la Crème : 680 g (3 blocs), ramollis à température ambiante
- Sucre en Poudre : 200 g (1 tasse)
- Œufs Gros : 3, à température ambiante
- Extrait de Vanille : 2 cuillères à café
- Zeste de Citron : 1 cuillère à café
Pour le Sirop au Miel :
- Miel : 120 ml (1/2 tasse)
- Eau : 60 ml (1/4 de tasse)
- Jus de Citron : 1 cuillère à soupe
- Zeste d’Orange : 1 cuillère à café
- Cannelle en Poudre : 1/2 cuillère à café
Pas de Panique : Les Substitutions d’Ingrédients
Ne paniquez pas si il vous manque quelque chose ! Voici des substitutions faciles :
- Pistaches : Les noix ou les pacanes font une alternative délicieuse et plus traditionnelle pour le baklava.
- Pâte Filo : Si vous ne la trouvez pas, utilisez des feuilles de pâte filo du commerce ; c’est la même chose.
- Zestes de Citron & d’Orange : Utilisez seulement du zeste de citron ou seulement d’orange si vous préférez.
- Miel : Pour une saveur plus profonde, essayez un miel plus foncé comme le miel de sarrasin.
- Fromage à la Crème : Le fromage entier est meilleur pour la texture, mais un mélange entier et allégé peut dépanner.
C’est Parti pour la Cuisson ! Instructions Étape par Étape
Suivez ces étapes attentivement pour un Cheesecake Baklava Miel parfait.
Étape 1 : Construire votre Fondation Baklava
Préchauffez votre four à 175°C (350°F). Prenez votre moule à charnière de 23 cm (9 pouces) et badigeonnez-le généreusement avec un peu de beurre fondu. Maintenant, commençons le feuilletage amusant ! Déroulez vos feuilles de filo décongelées et couvrez-les d’un torchon humide pour éviter qu’elles ne sèchent. Placez une feuille dans le moule, en laissant les bords remonter un peu sur les côtés. Badigeonnez-la généreusement de beurre fondu. Répétez ceci quatre fois de plus, pour avoir 5 feuilles beurrées. Saupoudrez une couche généreuse et uniforme de la moitié de vos pistaches hachées sur cette base de filo dorée. Ensuite, répétez tout le processus : 5 feuilles beurrées supplémentaires, recouvertes du reste des pistaches. Astuce de pro : Travaillez vite avec la filo pour la garder souple, et ne vous souciez pas des bords parfaits—l’aspect rustique a son charme !
Étape 2 : Préparer la Garniture Rêvée au Cheesecake
Dans un grand bol, battez votre fromage à la crème ramolli avec un batteur électrique jusqu’à ce qu’il soit parfaitement lisse et sans grumeaux. C’est la clé pour cette texture soyeuse. Ajoutez graduellement le sucre et battez jusqu’à ce que le mélange soit léger et mousseux. Maintenant, ajoutez les œufs un par un, en battant bien après chaque addition. Cela empêche la garniture de cailler. Enfin, mélangez l’extrait de vanille et le vibrant zeste de citron. L’odeur à ce stade est une pure joie—crémeuse, citronnée et prometteuse de merveilles. Votre garniture doit être veloutée et unie.
Étape 3 : Assembler et Cuire jusqu’à Perfection Dorée
Versez soigneusement votre luxueuse garniture au cheesecake sur les couches de baklava préparées dans le moule à charnière. Utilisez une spatule pour lisser le dessus en une couche uniforme et belle. Tapotez doucement le moule sur le plan de travail pour éliminer les bulles d’air. Placez-le au centre de votre four préchauffé. Faites cuire pendant 60 à 70 minutes. Le cheesecake est cuit lorsque les bords sont pris mais que le centre a encore un léger tremblement—comme de la gelée. Le dessus sera d’un joli brun doré clair. À la fin de la cuisson, éteignez le four, entrouvrez la porte et laissez le gâteau refroidir à l’intérieur pendant une heure pour éviter qu’il ne se fendille.
Étape 4 : Préparer le Fragrant Sirop au Miel
Pendant que le cheesecake refroidit, préparez le sirop qui fait chanter ce dessert. Dans une petite casserole, mélangez le miel, l’eau, le jus de citron, le zeste d’orange et la cannelle en poudre. Portez à ébullition douce à feu moyen, en remuant juste jusqu’à ce que le miel soit dissous. Réduisez le feu et laissez frémir pendant environ 5 minutes. Vous le verrez légèrement épaissir et l’arôme d’agrumes et d’épices emplira votre cuisine. Retirez du feu et laissez refroidir 10 à 15 minutes. Il doit être tiède, pas brûlant, lorsque vous le verserez sur le cheesecake.
Étape 5 : L’Imprégnation Finale et le Repos au Frais
Une fois que votre cheesecake est à température ambiante, c’est l’heure de la douche dorée ! Versez lentement le sirop au miel tiède sur toute la surface. Écoutez ce grésillement satisfaisant lorsqu’il s’imprègne dans les couches supérieures de filo. Vous devrez peut-être incliner le moule pour l’étaler uniformément. Maintenant, la partie la plus difficile : la patience. Couvrez le moule légèrement de film alimentaire et réfrigérez pendant au moins 4 heures, mais une nuit entière est vraiment idéale. Cela permet à tout de bien prendre et aux saveurs de s’harmoniser parfaitement.
Étape 6 : Présenter et Se Régaler !
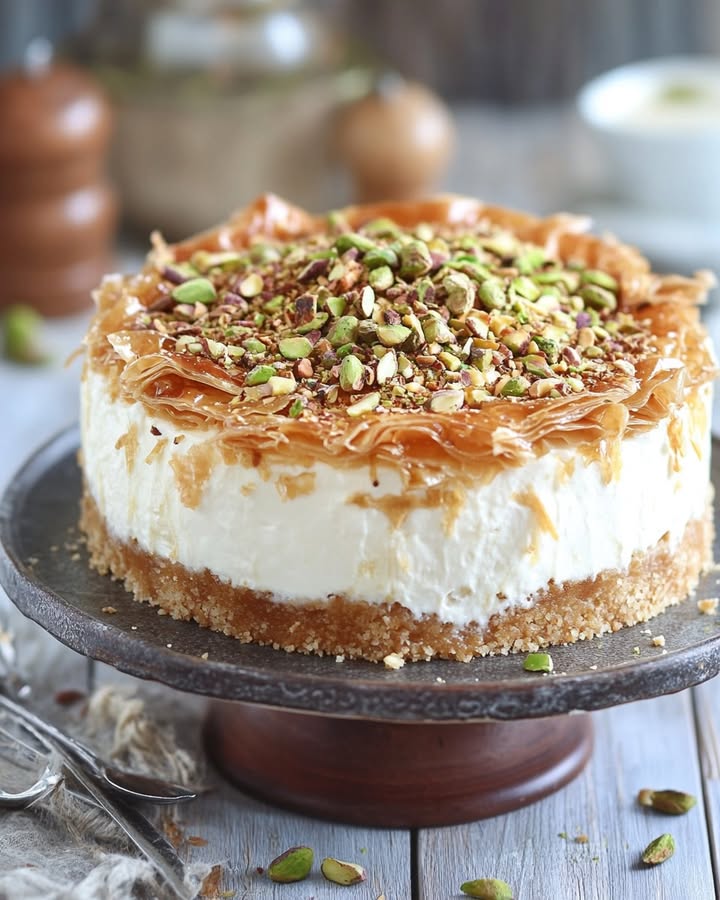
Vous avez assez attendu ! Passez un couteau fin ou une spatule coudée autour du bord du moule pour détacher le dessert. Déclipssez et retirez soigneusement le cercle du moule à charnière. Pour une finition magnifique, saupoudrez une poignée de pistaches hachées supplémentaires sur le dessus brillant. Utilisez un couteau bien aiguisé, trempé dans de l’eau chaude (et essuyé) pour des parts nettes. Servez chaque part sur une assiette et regardez les visages s’illuminer. Ce Cheesecake Baklava au Miel et aux Pistaches est une célébration dans l’assiette.
Le Secret du Chef
Pour une saveur et un croquant supplémentaires, faites griller vos pistaches avant de les hacher. Étalez-les simplement sur une plaque de cuisson et faites-les griffer au four à 175°C pendant 5 à 7 minutes jusqu’à ce qu’elles soient parfumées. Cela approfondit magnifiquement leur saveur fruitée et rend la base baklava encore plus irrésistible.
Votre Plan de Bataille : Le Timing est Crucial
| Phase | Temps Nécessaire |
|---|---|
| Préparation | 30 minutes |
| Cuisson | 60-70 minutes |
| Refroidissement & Repos au Froid | Au moins 5 heures (idéalement toute une nuit) |
| Temps Total (Actif) | Environ 1h30 |
Ce calendrier le rend parfait pour une préparation la veille d’un grand événement.
Un Petit Fait Gourmand : L’Histoire des Couches
Saviez-vous que les origines exactes du baklava sont âprement débattues ? De nombreuses cultures le revendiquent ! La technique de la pâte feuilletée a probablement voyagé sur la Route de la Soie, évoluant des pains plats d’Asie centrale vers la merveille aux noix et au miel que nous connaissons aujourd’hui. En l’associant au cheesecake—un dessert aux racines grecques anciennes—cette recette est un délicieux clin d’œil à des siècles d’échanges culinaires. Ce n’est pas juste un gâteau ; c’est une part d’histoire comestible !
Équipez-vous : Le Matériel Nécessaire
Pas besoin d’ustensiles sophistiqués, mais ceux-ci sont essentiels :
- Moule à Charnière de 23 cm : Non négociable pour un démoulage facile.
- Pinceau de Pâtissier : Pour beurrer efficacement toutes ces couches de filo.
- Batteur Électrique : Un batteur à main ou sur pied pour une garniture lisse.
- Bol à Mélanger : Quelques-uns de tailles différentes.
- Casserole : Pour le sirop au miel.
- Tasses & Cuillères à Mesurer : Pour la précision.
- Couteau Aiguisé & Spatule : Pour servir et lisser.
Le Garder Frais : Instructions de Conservation
Ce cheesecake se conserve à merveille, ce qui en fait un dessert parfait à préparer à l’avance. Une fois assemblé et réfrigéré, gardez-le couvert au réfrigérateur. Les saveurs continuent de se développer, et les couches de filo s’attendrissent délicieusement dans le sirop. Il restera parfait jusqu’à 4-5 jours.
Pour une conservation plus longue, vous pouvez congeler des parts individuelles. Enveloppez chaque part hermétiquement dans du film alimentaire, puis placez-les dans un sac ou un contenant hermétique allant au congélateur. Congelez jusqu’à 2 mois. Décongelez toute une nuit au réfrigérateur avant de servir.
N’oubliez pas de toujours le conserver au réfrigérateur, jamais à température ambiante, à cause des produits laitiers. Le sirop au miel agit comme un conservateur naturel, gardant le dessert moelleux et savoureux tout au long de sa conservation.
Mes Meilleurs Conseils pour la Réussite de votre Cheesecake Baklava
- Décongelez la Pâte Filo Correctement : Suivez les instructions du paquet (généralement une nuit au frigo). La filo à température ambiante est plus facile à manipuler et se déchire moins.
- La Température Ambiante est Clé : Assurez-vous que votre fromage à la crème et vos œufs soient vraiment à température ambiante. Cela évite une garniture grumeleuse et assure une cuisson uniforme.
- Ne Trop Cuisez Pas : Ce léger tremblement au centre est votre ami. Le gâteau continuera à prendre en refroidissant.
- Refroidissez Progressivement : Laisser le gâteau refroidir dans le four éteint avec la porte entrouverte aide à éviter les fissures dues aux changements brutaux de température.
- Le Repos au Froid est Non Négociable : Sauter le long repos au frais donnera une part désagrégée et non prise. Soyez patiente !
Lui Donner des Airs de Millionnaire : Idées de Présentation
Les premières impressions comptent ! Voici comment dresser votre chef-d’œuvre :
- Versez un peu de miel supplémentaire en volutes artistiques sur l’assiette de service avant d’y déposer la part.
- Décorez avec quelques pistaches entières et de délicats pétales de rose comestibles ou une petite pincée de cannelle en poudre.
- Servez avec une petite touche de crème fouettée ou une boule de glace à la vanille à côté.
- Saupoudrez l’assiette d’une légère neige de sucre glace pour le contraste.
- Utilisez un présentoir à gâteau pour une présentation grandiose et surélevée.
Vous Aimez ce Dessert Fusion ? Essayez Ces Autres Gâteaux & Pâtisseries !
Si vous avez aimé mélanger les textures et saveurs ici, vous allez adorer ces autres recettes de dessert créatives de ma cuisine. Pour des gourmandises de fête, mes Billes de Cheesecake Red Velvet font toujours fureur. Les amateurs de chocolat, vous devez absolument essayer mon incroyable Gâteau au Chocolat Juteux à la crème aigre—il est incroyablement moelleux. Pour une touche d’agrumes éclatante, mon Gâteau Orange et Chocolat combine deux saveurs parfaites. Et si vous avez envie de chic, un Roulé Prestige au chocolat et noix de coco est un projet impressionnant qui vaut le coup. Vous trouverez encore plus d’inspiration dans ma collection complète de gâteaux et pâtisseries.
Erreurs Courantes à Éviter pour un Cheesecake Baklava au Miel et aux Pistaches Parfait
Évitez ces écueils simples pour garantir que votre dessert soit parfait à chaque fois.
Erreur 1 : Utiliser du Fromage à la Crème et des Œufs Froids
C’est la raison numéro un d’une garniture de cheesecake grumeleuse et dense. Les ingrédients froids ne s’incorporent pas bien. Ils peuvent faire cailler la pâte ou la faire cuire de façon inégale, entraînant des fissures. Anticipez toujours. Sortez votre fromage à la crème et vos œufs du frigo au moins 2 heures avant de commencer. Le fromage doit être mou au toucher. Astuce de Pro : En cas d’urgence, vous pouvez ramollir le fromage à la crème au micro-ondes par intervalles de 10 secondes, mais attention à ne pas le faire fondre.
Erreur 2 : Déchirer la Pâte Filo
La filo est réputée fragile et sèche en un clin d’œil. Travailler avec des feuilles déchirées et cassantes donne une base baklava irrégulière et dépareillée, sans ce croustillant feuilleté caractéristique. Gardez les feuilles que vous n’utilisez pas activement couvertes d’un torchon de cuisine humide (pas trempé) ou de film alimentaire. Travaillez vite mais doucement, et ne vous inquiétez pas des petites déchirures—collez-les simplement avec un peu de beurre et continuez.
Erreur 3 : Trop Cuire le Cheesecake
Il est tentant de cuire jusqu’à ce que le centre soit complètement solide, mais cela donnera une texture sèche et friable. Un cheesecake parfait doit avoir un léger tremblement au centre même lorsque vous secouez doucement le moule—comme de la gelée. Il continuera à prendre en refroidissant dans le four éteint et ensuite au frigo. Faites confiance au processus et au timing. Utilisez un thermomètre de four pour vous assurer que la température est précise.
Erreur 4 : Verser le Sirop Bouillant sur le Cheesecake
Si le sirop au miel est trop chaud lorsque vous le versez, il peut faire fondre le dessus de la garniture du cheesecake et créer une couche détrempée et souillée au lieu d’un glaçage brillant. Il peut aussi faire fendiller le cheesecake à cause du choc thermique. Laissez toujours le sirop refroidir 10 à 15 minutes hors du feu jusqu’à ce qu’il soit juste tiède au toucher. Il doit être visqueux et parfumé, pas brûlant.
Erreur 5 : Zapper le Long Repos au Froid
L’impatience est l’ennemie du bon cheesecake ! Le couper avant qu’il ne soit complètement pris donnera une flaque triste et désordonnée au lieu de belles parts nettes. Le temps de réfrigération permet aux graisses du cheesecake de se raffermir. Pour la texture absolument parfaite et des découpes nettes, laissez-le reposer au frigo toute une nuit sans y toucher. Votre futur moi vous remerciera lorsque vous servirez des parts parfaites.
Vos Questions, Répondues : FAQ
Puis-je préparer ce Cheesecake Baklava Miel à l’avance ?
Absolument, et je le recommande vivement ! Ce dessert a même meilleur goût le lendemain. Les saveurs ont plus de temps pour se mélanger, les couches de filo s’attendrissent légèrement dans le sirop, et le cheesecake prend parfaitement. Vous pouvez le cuire, ajouter le sirop et le laisser refroidir complètement jusqu’à deux jours avant de le servir. Gardez-le simplement bien couvert au réfrigérateur. C’est un choix fantastique et sans stress pour recevoir.
Dois-je obligatoirement utiliser un moule à charnière ?
Oui, un moule à charnière est essentiel pour cette recette. Les parois amovibles vous permettent de démouler le cheesecake proprement sans abîmer la croûte baklava délicate du fond. Essayer de le retourner d’un moule ordinaire serait un désastre ! Si vous n’en avez pas, c’est un excellent investissement pour les cheesecakes et autres desserts délicats. Assurez-vous simplement qu’il soit de bonne qualité et qu’il ne fuit pas.
Ma pâte filo ne cesse de se déchirer. Que puis-je faire ?
Ne paniquez pas ! D’abord, assurez-vous qu’elle soit complètement décongelée selon le paquet (généralement une nuit au frigo). Gardez-la couverte d’un torchon humide pendant que vous travaillez. Travaillez vite mais délicatement. Si une feuille se déchire, ne la jetez pas. Placez-la simplement sur la couche beurrée, rafistolez la déchirure avec un petit morceau d’une autre feuille, et badigeonnez de plus de beurre par-dessus. Le beurre agira comme une colle, et une fois cuit, personne ne s’en apercevra.
Puis-je utiliser un autre type de fruit à coque ?
Certainement ! Bien que les pistaches donnent une belle couleur et saveur, le baklava traditionnel utilise souvent des noix. Des pacanes ou un mélange de noix fonctionneraient aussi à merveille. L’important est de les hacher finement pour créer une couche uniforme qui se coupe bien. Pour la meilleure saveur, faites griller vos fruits à coque choisis dans une poêle sèche ou au four quelques minutes avant de les hacher. Cela libère leurs huiles et arômes naturels.
Pourquoi mon cheesecake s’est-il fendillé sur le dessus ?
Les fissures surviennent généralement à cause de changements brutaux de température ou d’un excès de battage/de cuisson. Pour les éviter : ne battez pas trop la pâte une fois les œufs ajoutés, faites cuire au bain-marie si votre moule à charnière est bien étanche, et laissez le gâteau refroidir lentement dans le four avec la porte entrouverte. Mais honnêtement, ne stressez pas ! Un cheesecake fissuré est toujours délicieux. Le glorieux sirop au miel et la garniture aux pistaches couvriront magnifiquement toutes les imperfections.
Comment savoir quand le cheesecake est cuit ?
Cherchez un bord extérieur pris et légèrement gonflé, tandis que le centre (de la taille d’une pièce de monnaie) a encore un léger et doux tremblement lorsque vous secouez le moule. Il ne doit pas être liquide, mais bouger comme de la gelée molle. La température interne devrait être d’environ 65°C (150°F) si vous utilisez un thermomètre. Souvenez-vous, il continuera à cuire et à prendre en refroidissant.
Puis-je congeler le Cheesecake Baklava au Miel et aux Pistaches ?
Vous pouvez, avec d’excellents résultats ! Congelez le cheesecake entier ou des parts individuelles. Enveloppez-le très hermétiquement dans une couche de film alimentaire, puis une couche de papier d’aluminium pour éviter les brûlures de congélation. Décongelez-le toute une nuit au réfrigérateur avant de servir. La texture se maintient étonnamment bien, bien que je trouve qu’il ait meilleur goût dans le premier mois après congélation.
Quelle est la meilleure façon de couper des parts nettes ?
Utilisez un couteau long, fin et bien aiguisé. Trempez la lame dans de l’eau très chaude, essuyez-la complètement avec un torchon propre, et faites une coupe unique et assurée. Nettoyez et réchauffez le coupeau entre chaque part. Cette méthode coupe facilement à travers la filo collante et la garniture crémeuse sans arracher ni déchirer. Cela donne à vos parts un aspect professionnel.
Existe-t-il un moyen de rendre cette recette un peu plus saine ?
Vous pouvez faire de petits ajustements, mais ils changeront la texture et la saveur classiques. Vous pourriez utiliser du fromage à la crème allégé et réduire le sucre dans la garniture d’un quart de tasse. Pour la base baklava, vous pourriez badigeonner légèrement la filo au lieu de la tremper. Comme pour tout plaisir, déguster une portion raisonnable est la clé. Pour plus de conseils sur l’équilibre entre plaisir et choix sains, considérez les bonnes pratiques alimentaires générales de sources fiables.
Le sirop au miel est trop épais/trop liquide. Comment le rectifier ?
S’il est trop épais après refroidissement, réchauffez-le doucement sur la plaque avec une toute petite goutte d’eau ou de jus de citron supplémentaire jusqu’à ce qu’il atteigne une consistance coulante. S’il est trop liquide, il avait probablement besoin de frémir un peu plus longtemps pour réduire et se concentrer. Vous pouvez le faire frémir encore 2 à 3 minutes hors du feu, mais attention à ne pas le laisser brûler. Le sirop parfait doit napper le dos d’une cuillère.
Prête à Briller !
Voilà donc—mon ultime œuvre d’amour, le Cheesecake Baklava au Miel et aux Pistaches. Il a l’air d’avoir passé toute la journée dans une pâtisserie chic, mais les étapes sont totalement réalisables. Ce dessert, c’est partager de la joie, créer des souvenirs et célébrer la belle fusion des saveurs. Il est riche, impressionnant et rempli d’amour à chaque bouchée feuilletée. J’ai hâte que vous l’essayiez, le partagiez et entendiez tous les « oh » et « ah » de votre propre famille et amis. Bonne pâtisserie !
Equipment
- Mixeur électrique
- Moule à gâteau à fond amovible de 9 pouces
- Casserole
- Spatule
- Pinceau à pâtisserie
Ingrédients
- 10 feuilles pâte phyllo thaw selon les instructions du paquet
- 1/2 tasse beurre non salé fondu
- 1 1/2 tasse pistaches finement hachées
- 24 onces cream cheese ramollis à température ambiante
- 1 tasse sucre granulé
- 3 œufs grands, à température ambiante
- 2 cuillères à café extrait de vanille
- 1 cuillère à café zeste de citron
- 1/2 tasse miel
- 1/4 tasse eau
- 1 cuillère à soupe jus de citron
- 1 cuillère à café zeste d'orange
- 1/2 cuillère à café cannelle moulue
Instructions
- Préchauffez votre four à 175°C (350°F). Beurrez un moule à gâteau à fond amovible de 9 pouces.
- Disposez une feuille de pâte phyllo dans le moule, en laissant les bords dépasser. Badigeonnez de beurre fondu. Répétez quatre fois pour cinq couches.
- Ajoutez la moitié des pistaches hachées sur les couches de pâte phyllo. Répétez avec cinq autres couches de pâte, puis le reste des pistaches.
- Dans un grand bol, battez le cream cheese jusqu'à consistance lisse. Ajoutez le sucre et battez jusqu'à légèreté. Ajoutez les œufs un à un, en battant bien après chaque ajout. Incorporez la vanille et le zeste de citron.
- Versez la garniture au cream cheese sur les couches de baklava et lissez le dessus. Tapotez le moule pour enlever les bulles d'air.
- Faites cuire au four pendant 60-70 minutes jusqu'à ce que le bord soit pris mais que le centre ait un léger mouvement.
- Pour le sirop, combinez le miel, l'eau, le jus de citron, le zeste d'orange et la cannelle dans une casserole et portez à ébullition. Réduisez le feu et laissez mijoter pendant 5 minutes.
- Une fois le cheesecake refroidi, versez le sirop chaud sur le dessus. Réfrigérez au moins 4 heures ou toute la nuit.
- Pour servir, retirez délicatement le moule et garnissez de pistaches hachées supplémentaires.
Notes
Nutrition

Je suis Céline, une véritable passionnée d’ustensiles et de matériel de cuisine ! J’adore tester, comparer et découvrir les meilleurs équipements pour rendre la cuisine plus efficace et agréable. Que ce soit un bon couteau, un robot performant ou une poêle incontournable, je suis toujours à la recherche des outils qui feront la différence. Mon but est de vous guider dans vos choix pour que vous ayez le bon matériel adapté à vos besoins.