
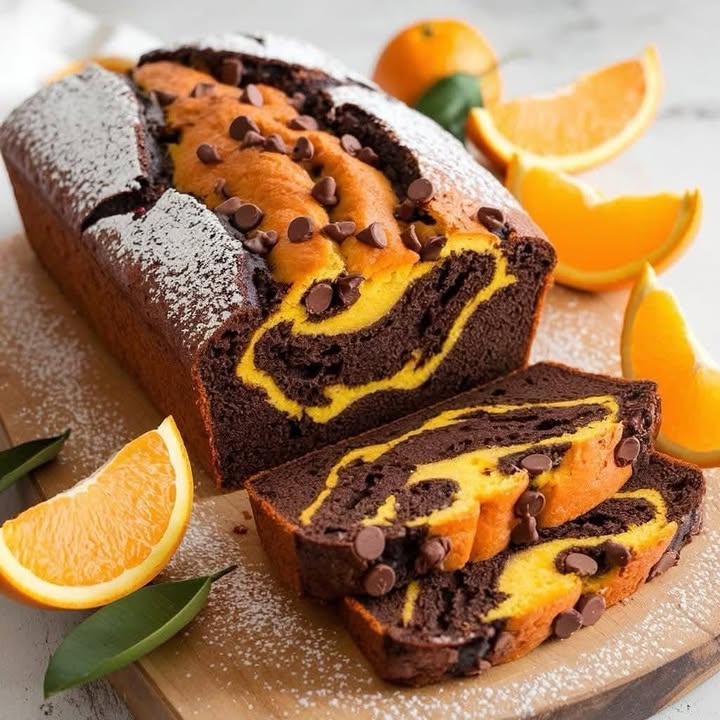
Un Accord Parfait : L’Histoire du Gâteau Orange Chocolat
Vous connaissez ce sentiment quand une combinaison de saveurs fait simplement tilt ? C’est ce qui m’est arrivé la première fois que j’ai goûté du chocolat avec une touche d’orange. C’était comme si mes papilles faisaient la fête ! Cette recette de Gâteau Orange Chocolat est le fruit de nombreuses expériences joyeuses (et délicieuses) dans ma cuisine. C’est le gâteau que je prépare quand je veux voir les yeux de ma famille s’illuminer. Il est riche, moelleux, et possède cette touche d’agrumes, lumineuse et pétillante, qui équilibre parfaitement le chocolat profond. Croyez-moi, ce n’est pas juste un gâteau ; c’est un boosteur de moral dans une assiette.
Plus Qu’un Simple Gâteau : Une Histoire Pleine de Zeste
D’où vient cet accord magique ? Pensez à ces oranges en chocolat fantaisie qu’on offre à Noël. Cette idée a des racines plus anciennes et plus élégantes. En France, l’association du chocolat et de l’orange est un classique depuis des siècles, souvent présente dans les desserts et confiseries sophistiqués. Ma version apporte cette inspiration chic française directement dans votre cuisine. C’est un Gâteau Orange Chocolat qui ne nécessite pas de toque de chef, juste l’amour des saveurs simples et merveilleuses. Je me souviens d’avoir peaufiné cette recette pour l’anniversaire d’une amie, et c’est maintenant sa gourmandise la plus demandée !
Pourquoi Vous Allez Tomber Amoureux de Ce Gâteau Orange Chocolat
Ce gâteau est un succès pour tant de raisons. Premièrement, l’équilibre est incroyable. Le cacao noir, presque amer, joue magnifiquement avec l’orange douce et aromatique. Deuxièmement, il est étonnamment simple ! Vous n’avez pas besoin de compétences particulières. Juste deux saladiers et un fouet. Enfin, l’odeur qui envahit votre maison pendant la cuisson est du pur bonheur. C’est le genre d’arôme chaleureux et accueillant qui fait que tout le monde demande : « Qu’est-ce que tu fais ? Je peux en avoir un peu ? »
Quand Préparer ce Gâteau Soleil & Péché Mignon
Ce gâteau est votre arme secrète pour toutes les occasions ! Il est assez élégant pour un dessert de dîner mais assez réconfortant pour un goûter du dimanche. J’adore le préparer pour :
– Les brunchs en famille ou entre amis (il se marie à merveille avec le café).
– Les anniversaires de ceux qui n’aiment pas le glaçage trop sucré.
– Les périodes de fêtes, surtout autour de Noël, pour cette touche d’agrumes festive.
– Tout simplement parce que c’est mardi et que vous méritez une part de joie.
Rassembler Vos Ingrédients
Mettons tout sur le plan de travail ! Utiliser des ingrédients simples et de bonne qualité fait toute la différence.
- Ingrédients Secs :
- 150 g de farine tout usage
- 90 g de cacao en poudre non sucré
- 1 c. à café de levure chimique
- ½ c. à café de bicarbonate de soude
- Une pincée de sel
- Ingrédients Humides :
- 200 g de sucre en poudre
- 2 gros œufs
- 120 ml d’huile végétale (ou une huile neutre)
- 1 c. à café d’extrait de vanille
- Le zeste et le jus d’une grosse orange (environ 120 ml de jus)
- 120 ml de babeurre (lait ribot)
- La Partie Plaisir :
- 130 g de pépites de chocolat (noir ou mi-sucré sont parfaits)
Substitutions Sans Stress
Un oubli ? Pas de panique ! Voici des alternatives faciles :
- Pas de babeurre ? Faites-le vous-même ! Ajoutez 1 c. à café et demie de vinaigre blanc ou de jus de citron à 120 ml de lait entier. Laissez reposer 5 minutes jusqu’à ce qu’il caille légèrement.
- Plus d’huile végétale ? Du beurre fondu refroidi ou même de la compote de pommes (pour une texture plus légère) fonctionnent très bien.
- Pas d’orange fraîche ? Utilisez 120 ml de jus d’orange de qualité et 1 c. à café d’extrait d’orange. Mais le zeste frais, c’est magique !
- Pour remplacer les pépites : Un peu de tablette de chocolat noir hachée, ou même des pépites de chocolat blanc pour une touche différente.
Préparer Votre Chef-d’Œuvre : Pas-à-Pas
Retroussez vos manches, mettez votre tablier, et créons un peu de magie.
Étape 1 : Préparer la Scène
Première chose, préchauffez votre four à 175°C (thermostat 6). Cette étape est cruciale ! Un four bien préchauffé assure une levée uniforme et un beau dôme. Pendant qu’il chauffe, prenez un moment pour beurrer votre moule à cake préféré ou un moule rond de 23 cm. J’aime utiliser un peu de beurre et saupoudrer de cacao au lieu de farine pour garder cette belle couleur chocolat. L’odeur du cacao chaud commence l’expérience en avance !
Étape 2 : L’Équipe « Sèche » Se Rassemble
Prenez un saladier moyen. C’est ici que notre équipe sèche se rencontre. Fouettez ensemble la farine, la poudre de cacao, la levure, le bicarbonate et la pincée de sel. Fouetter est important ici—cela aère la farine et assure que les agents levant sont bien répartis. Personne ne veut une bouchée de pur bicarbonate ! Vous verrez le mélange devenir une poudre brun foncé uniforme qui sent déjà le dessert.
Étape 3 : Le Fouettage de l’Équipe « Humide »
Dans un plus grand saladier, c’est l’heure de la fête des ingrédients humides. Mélangez le sucre, les œufs, l’huile et l’extrait de vanille. Fouettez jusqu’à ce que le mélange soit lisse et légèrement pâle. Maintenant, place à la star : zestez votre orange directement dans le saladier. Ce zeste brillant et huileux, c’est de l’or en barre pour le goût ! Pressez ensuite le jus frais et ajoutez le babeurre. Fouettez le tout. Le mélange peut sembler un peu séparé, mais c’est parfaitement normal.
Étape 4 : La Grande Union & L’Ajout des Pépites
C’est ici que la pâte prend vie. Ajoutez progressivement les ingrédients secs aux ingrédients humides. Je le fais en trois fois environ, en incorporant délicatement avec une spatule après chaque ajout. Ne mélangez pas trop ! Nous voulons une mie tendre. Mélangez juste jusqu’à ce qu’il n’y ait plus de traces de farine. Ensuite, incorporez doucement ces glorieuses pépites de chocolat. Elles fondront en petites poches de bonheur dans le gâteau cuit. Astuce de pro : Enrobez vos pépites dans une cuillère à café du mélange de farine avant de les incorporer. Cela les empêche de tomber au fond pendant la cuisson.
Étape 5 : La Cuisson Transformative
Versez la belle pâte épaisse dans votre moule préparé. Lissez le dessus avec votre spatule. Placez-le maintenant au centre de votre four préchauffé. Le temps de cuisson est de 50 à 60 minutes. L’attente est la partie la plus dure ! Votre cuisine se remplira d’un arôme enivrant de chocolat et d’orange. Pour vérifier la cuisson, insérez un cure-dent au centre vers 50 minutes. Il doit ressortir avec quelques miettes humides, mais pas de pâte liquide. Astuce du chef : Si le dessus dore trop vite, couvrez-le légèrement d’une feuille d’aluminium pour les 15 dernières minutes de cuisson.
Étape 6 : Le Refroidissement, Une Étape Cruciale
Quand le gâteau est cuit, sortez-le et laissez-le refroidir dans son moule sur une grille pendant au moins 15 minutes. Je sais, c’est tentant d’y goûter tout de suite, mais cette patience est clé ! Le gâteau continue de se fixer. Après 15 minutes, passez un couteau sur les bords et démoulez-le délicatement sur la grille pour le laisser refroidir complètement. Ce temps de repos permet aux saveurs de se fondre et à la texture de se fixer parfaitement pour la découpe.
Votre Chronologie de Préparation
| Temps de Préparation : | 20 minutes |
| Temps de Cuisson : | 55 minutes |
| Temps de Refroidissement : | 1 heure |
| Temps Total : | Environ 2 heures 15 minutes |
Le Secret d’un Moelleux Suprême
Mon petit secret ? Ne zappez pas le combo babeurre et huile. L’acidité du babeurre attendrit le gluten, créant une mie incroyablement douce, tandis que l’huile (contrairement au beurre) reste liquide à température ambiante, garantissant un gâteau moelleux même le deuxième ou troisième jour. C’est le duo gagnant pour une texture parfaite !
Une Anecdote Juteuse Sur les Oranges
Saviez-vous que le zeste d’une orange contient la saveur la plus intense ? La peau colorée est chargée d’huiles aromatiques. C’est pour ça qu’on le zeste directement dans la pâte ! Pour choisir vos oranges, prenez celles qui paraissent lourdes pour leur taille—elles sont les plus juteuses. Et lavez-les toujours bien avant de les zester, car vous ne voulez que les huiles parfumées, pas la cire ou les résidus. Pour plus de conseils sur le choix et la manipulation des ingrédients frais, vous pouvez consulter les recommandations de la Direction Générale de la Concurrence, de la Consommation et de la Répression des Fraudes (DGCCRF).
Votre Boîte à Outils de Cuisine
Pas besoin de matériel sophistiqué ! Voici ce que j’utilise :
- Deux saladiers (un moyen, un grand)
- Un fouet et une spatule
- Une microplane ou une râpe fine pour zester
- Un presse-agrumes ou tout simplement vos mains fortes !
- Un moule à cake de 23×13 cm ou un moule rond de 23 cm
- Des tasses et cuillères à mesurer
- Une grille de refroidissement
Conserver Votre Gâteau Frais & Délicieux
Une fois votre gâteau complètement refroidi, le conserver est un jeu d’enfant. La meilleure façon de garder son moelleux est de l’emballer étroitement dans du film alimentaire ou de le conserver dans une boîte hermétique à température ambiante. Il restera délicieux ainsi pendant 3 à 4 jours.
Si vous voulez le garder plus longtemps, vous pouvez le congeler ! Emballer le gâteau entier ou des parts individuelles dans du film alimentaire, puis d’une couche de papier aluminium. Il se conservera bien au congélateur jusqu’à 3 mois. Décongelez-le simplement à température ambiante pendant la nuit quand l’envie vous prend.
Je ne recommande pas de le mettre au frigo, sauf si votre cuisine est très chaude et humide. Le frigo peut en fait l’assécher plus vite. Si vous le réfrigérez, laissez-le revenir à température ambiante avant de servir pour profiter pleinement de sa saveur et de sa texture moelleuse.
Mes Meilleurs Conseils pour Réussir Votre Gâteau
- Température ambiante : Sortez vos œufs et votre babeurre à l’avance. Ils s’incorporent plus facilement à la pâte, pour une meilleure texture.
- Mesurez la farine correctement : Pour éviter un gâteau dense, versez la farine dans la tasse à mesurer avec une cuillère et nivelez avec le dos d’un couteau. Ne plongez pas la tasse directement dans le paquet !
- Ne pas trop mélanger : Une fois les ingrédients secs ajoutés, mélangez juste jusqu’à ce qu’ils soient incorporés. Quelques petits grumeaux, c’est ok. Trop mélanger rend le gâteau caoutchouteux.
- Testez la cuisson intelligemment : Le test du cure-dent est votre ami. Quelques miettes qui collent, c’est parfait. Propre, c’est peut-être trop cuit.
Le Rendre aussi Beau que Bon
La présentation, c’est la dernière touche d’amour ! Saupoudrez le gâteau refroidi d’un peu de sucre glace ou de cacao en poudre à travers un tamis fin. Pour une finition chic, nappez-le d’un simple glaçage à l’orange (mélangez du sucre glace avec un peu de jus d’orange) ou d’une ganache au chocolat noir. Servez chaque part avec une quenelle de crème chantilly et un petit zeste d’orange frais sur le dessus. Cela transforme un gâteau simple en une pièce montée.
6 Variations Délicieuses à Essayer
Vous aimez cette combinaison ? Voici d’autres façons de jouer avec ces saveurs et d’inspirer votre prochaine aventure en pâtisserie !
- Gâteau Marbré Orange Chocolat : Divisez la pâte en deux. Laissez une moitié au chocolat nature et ajoutez du zeste d’orange supplémentaire à l’autre. Marbrez-les dans le moule pour un bel effet.
- Gâteau Orange Chocolat Sans Gluten : Remplacez la farine tout usage par un mélange sans gluten « 1 pour 1 ». Le résultat est tout aussi tendre et délicieux.
- Cake Vegan Orange Chocolat : Utilisez des « œufs » de lin (1 c. à soupe de graines de lin moulues + 3 c. à soupe d’eau par œuf), un lait végétal + vinaigre pour le babeurre, et des pépites de chocolat sans lait.
- Cupcakes Orange Chocolat : Versez la pâte dans des caissettes et faites cuire 18-22 minutes. Décorez avec une crème au beurre parfumée à l’orange.
- Gâteau Orange Chocolat Épicé : Ajoutez une cuillère à café d’épices chaudes comme la cannelle ou la cardamome aux ingrédients secs pour une touche douce et aromatique.
- Gâteau à Étages Déca dent : Doublez les quantités et faites cuire dans deux moules ronds. Garnissez et recouvrez d’une riche crème au beurre chocolat orange pour une pièce centrale d’exception. Si vous aimez les desserts impressionnants, vous pourriez aussi adorer les couches généreuses de notre gâteau Kinder Bueno, un autre succès garanti qui est plus facile qu’il n’y paraît !
Erreurs Courantes à Éviter
Même les meilleurs pâtissiers peuvent avoir un jour sans. Voici comment éviter les pièges classiques pour un Gâteau Orange Chocolat parfait à chaque fois.
Erreur 1 : Mal Mesurer la Farine
C’est la raison numéro un pour laquelle les gâteaux sont secs ou denses. Prélever la farine directement dans le paquet tasse la farine. Vous finissez avec bien plus de farine que prévu. Versez toujours la farine à la cuillère dans votre tasse à mesurer jusqu’à ce qu’elle déborde, puis nivelez avec le dos d’un couteau. Cette méthode « à la cuillère » garantit précision et légèreté.
Erreur 2 : Trop Mélanger la Pâte
Une fois les ingrédients secs ajoutés aux humides, un compte à rebours démarre. Trop mélanger développe le gluten de la farine, ce qui donne une texture caoutchouteuse au lieu d’une mie tendre. Mélangez juste jusqu’à ce qu’il n’y ait plus de traînées de farine. Quelques petits grumeaux ne sont absolument pas gênants—ils disparaîtront à la cuisson.
Erreur 3 : Utiliser des Ingrédients Froids
La pâtisserie est une science, et la température compte. Des œufs ou du babeurre froids sortis du frigo peuvent faire cailler la pâte ou l’empêcher de bien émulsionner. La pâte met aussi plus de temps à s’homogénéiser, ce qui conduit souvent à trop la travailler. Sortez vos œufs et votre babeurre environ 30 à 60 minutes avant de commencer. Ils s’incorporeront facilement et assureront une meilleure levée.
Erreur 4 : Zapper le Zeste
Le jus d’orange donne du goût, mais le zeste est là que résident les huiles d’agrumes, puissantes et aromatiques. Le sauter, c’est priver votre gâteau de cette touche vive et pétillante qui rend cette recette spéciale. Utilisez une microplane fine et ne râpez que la partie orange, en évitant le ziste blanc et amer en dessous. Ce zeste, c’est de l’or liquide pour la saveur !
Vos Questions sur le Gâteau Orange Chocolat, Répondues
Puis-je utiliser de l’extrait d’orange au lieu d’une orange fraîche ?
Vous pouvez, mais le profil aromatique sera différent. Le zeste et le jus d’orange frais apportent une saveur d’agrumes complexe, vive et naturelle. L’extrait peut être un peu unidimensionnel et parfois artificiel. Si vous devez substituer, utilisez 120 ml de jus d’orange (du commerce, c’est bien) plus 1 c. à café d’extrait pur d’orange. Mais je vous encourage vivement à utiliser une vraie orange—cela fait toute la différence dans votre gâteau orange chocolat.
Pourquoi mon gâteau s’est-il affaissé au centre ?
Un gâteau qui s’affaisse est généralement le signe d’une sous-cuisson ou d’une porte de four ouverte trop tôt. La structure n’est pas encore figée, donc elle s’effondre. Assurez-vous que votre four est bien préchauffé et utilisez un thermomètre de four pour vérifier sa température. N’ouvrez pas la porte du four pendant au moins les 40 premières minutes de cuisson. Faites toujours le test du cure-dent au centre ; il doit ressortir avec des miettes humides, pas de la pâte liquide.
Puis-je préparer ce gâteau à l’avance ?
Absolument ! En fait, je trouve que ce gâteau est encore meilleur le lendemain. Les saveurs ont eu le temps de se marier. Faites-le cuire, laissez-le refroidir complètement, emballez-le bien dans du film alimentaire et conservez-le à température ambiante. Vous pouvez le cuire jusqu’à deux jours à l’avance. Pour une conservation plus longue, congelez-le comme décrit dans la partie conservation.
Par quoi remplacer le babeurre si je n’en ai pas ?
Pas de babeurre ? Pas de problème ! Mon substitut express préféré : ajoutez 1 c. à café et demie de vinaigre blanc ou de jus de citron dans une tasse à mesurer. Complétez ensuite jusqu’au trait des 120 ml avec du lait entier. Mélangez et laissez reposer 5 à 10 minutes jusqu’à ce que ça caille légèrement. Cela fonctionne parfaitement en dépannage pour ce gâteau chocolat orange.
Puis-je ajouter des noix à cette recette ?
Bien sûr ! Des noix ou des noix de pécan grillées sont un ajout fantastique. Elles apportent un croquant et une saveur terreuse. Incorporez environ 50 à 75 g de noix hachées avec les pépites de chocolat. Assurez-vous juste qu’elles soient refroidies avant de les ajouter à la pâte.
Comment obtenir un goût d’orange plus intense ?
Pour un coup d’orange plus marqué, vous pouvez ajouter une cuillère à soupe supplémentaire de zeste frais. Vous pouvez aussi badigeonner le gâteau encore tiède avec un sirop à l’orange. Il suffit de chauffer à parts égales du jus d’orange et du sucre jusqu’à dissolution du sucre, puis de badigeonner délicatement le dessus du gâteau à sa sortie du four. Cela ajoute de l’humidité et une puissante note orangée.
Cette recette convient-elle pour des cupcakes/muffins ?
Oui, elle s’y adapte à merveille ! Garnissez un moule à muffins de caissettes en papier. Remplissez chaque cavité aux ⅔ de pâte. Faites cuire à la même température (175°C) pendant 18 à 22 minutes, ou jusqu’à ce qu’un cure-dent inséré ressorte propre. Cela devrait donner environ 12 à 14 délicieux cupcakes.
Mon gâteau est très foncé dessus mais encore cru à l’intérieur. Que s’est-il passé ?
Cela signifie généralement que votre four est trop chaud, ce qui fait que l’extérieur cuit et dore avant l’intérieur. Les températures des fours peuvent être inexactes. Je recommande d’utiliser un thermomètre de four peu cher pour vérifier. Si le dessus dore trop vite, couvrez-le légèrement d’une feuille d’aluminium pour le reste du temps de cuisson.
Puis-je glacer ce gâteau ?
Il est délicieux nature, mais un glaçage le sublime. Une simple ganache au chocolat noir, un glaçage au fromage à la crème avec une touche de zeste d’orange, ou même un saupoudrage de sucre glace sont tous d’excellents choix. Si vous aimez les glaçages onctueux et riches, vous pourriez trouver de l’inspiration dans les garnissements gourmands d’autres desserts comme ces amusantes Billes de Cheesecake Red Velvet.
Puis-je utiliser une autre huile ?
Oui, toute huile au goût neutre conviendra. L’huile végétale, de colza, ou même une huile d’olive légère sont de bons choix. Évitez les huiles au goût prononcé comme l’huile d’olive extra vierge ou l’huile de coco, car elles entreraient en compétition avec les saveurs du chocolat et de l’orange.
J’espère que cette recette deviendra un favori chéri chez vous, comme il l’est chez moi. Pour plus d’inspiration en pâtisserie et de délicieuses gourmandises, n’hésitez pas à découvrir toutes nos autres créations dans notre collection de gâteaux et pâtisseries. Que vous soyez débutant ou pâtissier confirmé, il y a toujours quelque chose de nouveau et de délicieux à essayer.
Prêts, Feu, Pâtissez !
Voilà donc ma recette infaillible et réconfortante de Gâteau Orange Chocolat. C’est plus qu’une simple liste d’ingrédients et d’étapes. C’est une invitation à créer un moment de joie pure et simple. Le processus de mélange, l’attente pendant la cuisson, et cette première part partagée font tous partie de la magie. Que vous pâtissiez pour une foule ou juste pour vous, ce Gâteau Orange Chocolat est une petite célébration à chaque bouchée. Maintenant, allez préchauffer ce four et préparez-vous aux compliments. Bonne pâtisserie !
Equipment
- Deux bols à mélanger
- Moule à cake de 23x13 cm ou un moule rond de 23 cm
- Fouet
- Spatule
- Microplane ou râpe fine pour le zeste
- Presse-agrumes
- Grille de refroidissement
Ingrédients
- 120 g farine tout usage
- 70 g cacao en poudre non sucré
- 5 g levure chimique
- 2.5 g bicarbonate de soude
- 1 g sel
- 200 g sucre cristallisé
- 2 grands œufs
- 125 ml huile végétale ou une huile neutre
- 5 ml extrait de vanille
- 1 orange zeste et jus
- 120 ml babeurre
- 135 g pépites de chocolat noires ou semi-sucrées
Instructions
- Préchauffer le four à 175°C (350°F) et préparer un moule à gâteau.
- Dans un bol moyen, mélanger la farine, le cacao, la levure, le bicarbonate et le sel.
- Dans un grand bol, fouetter le sucre, les œufs, l'huile et la vanille jusqu'à obtenir un mélange lisse.
- Ajouter le zeste et le jus d'orange, puis le babeurre et bien mélanger.
- Incorporer graduellement le mélange sec au mélange humide.
- Ajouter les pépites de chocolat et mélanger délicatement.
- Verser la pâte dans le moule préparé et lisser le dessus.
- Cuire au four pendant 50-60 minutes, jusqu'à ce qu'un cure-dent inséré en ressorte avec des miettes humides.
- Laisser refroidir dans le moule pendant 15 minutes puis démouler sur une grille pour refroidir complètement.
Notes
Nutrition

Je suis Céline, une véritable passionnée d’ustensiles et de matériel de cuisine ! J’adore tester, comparer et découvrir les meilleurs équipements pour rendre la cuisine plus efficace et agréable. Que ce soit un bon couteau, un robot performant ou une poêle incontournable, je suis toujours à la recherche des outils qui feront la différence. Mon but est de vous guider dans vos choix pour que vous ayez le bon matériel adapté à vos besoins.