
Mon Joyeux Cheesecake Tropical aux Fruits Frais
Vous connaissez ce sentiment quand vous avez besoin d’un dessert qui ressemble à des vacances ? C’est exactement ce qui s’est passé la semaine dernière. Ma famille venait à la maison, le soleil brillait enfin, et mon gâteau au chocolat classique me semblait… trop lourd. Je voulais quelque chose de lumineux, de frais et débordant de joie. C’est comme ça que mon Cheesecake Tropical aux Fruits Frais est né. C’est comme une tranche de soleil dans l’assiette, et je vous promets, c’est plus facile qu’il n’y paraît !
Un Petit Morceau de Paradis : L’Inspiration de ce Cheesecake
Le cheesecake en lui-même est ancien, adoré des Grecs aux New-Yorkais. Mais la touche tropicale ? C’est de la magie pure pour remonter le moral. Je me suis inspirée des plateaux de fruits vibrants que l’on voit dans les resorts polynésiens et des cheesecakes sans cuisson que ma grand-mère faisait les jours de grande chaleur. C’est une version moderne et sans prise de tête qui allie le confort crémeux que nous aimons à la fraîcheur irrésistible de fruits mûrs et colorés. C’est une fête sur une croûte !
Pourquoi Vous Allez Absolument Adorer ce Cheesecake Tropical Fruité
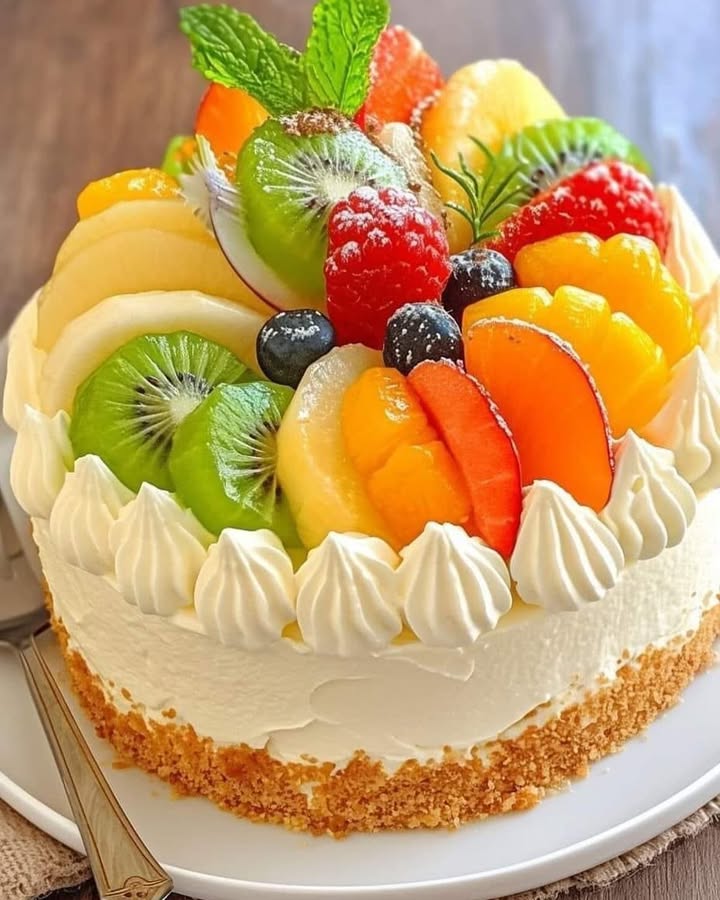
Premièrement, il est sans cuisson. Cela signifie pas de cuisine surchauffée et pas de stress à cause des fissures ! Deuxièmement, il est vraiment spectaculaire. L’arc-en-ciel de fruits fait dire « waouh » à tout le monde avant même la première bouchée. Mais le vrai secret ? Il est incroyablement indulgent et parfait pour faire participer les enfants à la décoration. En plus, cette combinaison de croûte beurrée, de garniture vaporeuse et de fruits juteux est tout simplement imbattable.
Les Moments Parfaits pour un Cheesecake Tropical aux Fruits
Ce n’est pas qu’un dessert ; c’est une occasion. Apportez-le à un barbecue d’été, et regardez-le disparaître. C’est la star d’un brunch pour un mariage ou une baby shower. Servez-le comme une fin de repas raffinée, légère et impressionnante lors d’un dîner. Honnêtement, il transforme même un mardi ordinaire en quelque chose de spécial. À chaque fois que vous voulez ajouter une touche de gaieté tropicale, c’est la recette qu’il vous faut.
Rassembler Vos Ingrédients Soleil
Voici ce dont vous aurez besoin pour créer cet arc-en-ciel comestible. Restons simple et frais !
Pour la croûte :
- 2 tasses de chapelure de biscuits type « petit beurre » (graham crackers)
- 1/4 de tasse de sucre en poudre
- 1/2 tasse de beurre non salé, fondu
Pour la garniture au cheesecake :
- 16 oz (2 paquets) de fromage à la crème (type Philadelphia), ramolli
- 1/2 tasse de sucre glace
- 1 cuillère à café d’extrait de vanille
- 1 tasse et 1/2 de crème fouettée
Pour la décoration :
- Fruits frais assortis : kiwi, ananas, pêches, fraises, framboises, myrtilles, mandarines
- Feuilles de menthe fraîche (optionnel)
- Sucre glace pour saupoudrer
Substitutions Pratiques : Personnalisez-le !
Ne stressez pas si il vous manque quelque chose. La cuisine, c’est la créativité !
- Croûte : Utilisez des biscuits digestifs, des boudoirs, ou même des biscuits au gingembre écrasés pour une note épicée.
- Fromage à la crème : Le gras donne la meilleure texture, mais un fromage frais allégé type « spécialité laitière » peut dépanner (la garniture sera plus molle).
- Crème fouettée : Utilisez de la crème en bombe pour un montage ultra-rapide, ou une crème fouettée végétale.
- Fruits : Utilisez absolument ce qui est de saison ! Mangue, fruit de la passion, carambole, ou mûres sont tous fantastiques.
Donnons Vie à ce Rêve Tropical !
Suivez ces étapes, et vous aurez un chef-d’œuvre en un rien de temps. Je vous guide à chaque partie.
Étape 1 : Préparer la Base Beurrée
Commencez par mélanger vos miettes de biscuits et le sucre dans un bol. Versez ce beurre doré et fondu. L’odeur est déjà divine ! Mélangez jusqu’à ce que cela ressemble à du sable humide. Maintenant, tassez fermement ce mélange au fond de votre moule à charnière. J’utilise le fond d’un verre pour l’uniformiser et le compacter. Cette croûte est la fondation de notre Cheesecake Tropical Fruité, alors faites-la bien ferme. Mettez-la au frigo pour qu’elle prenne pendant que vous préparez la garniture.
Étape 2 : Préparer la Garniture Vaporeuse
Prenez votre fromage à la crème ramolli et fouettez-le dans un grand bol jusqu’à ce qu’il soit parfaitement lisse. Pas de grumeaux autorisés ! Tamisez le sucre glace et ajoutez la vanille. Fouettez à nouveau jusqu’à ce que le mélange soit soyeux et sucré. Maintenant, voici la magie : incorporez délicatement la crème fouettée. Utilisez une grande spatule et soulevez la mixture du fond pour garder de l’air. Vous le verrez se transformer en un nuage léger et aérien. Astuce de pro : Si votre fromage était trop froid, vous pourriez avoir des petits grumeaux. Assurez-vous qu’il est vraiment ramolli à température ambiante !
Étape 3 : Assembler Votre Chef-d’œuvre
Sortez votre croûte froide du frigo. Déposez votre magnifique garniture légère par-dessus. Étalez-la doucement jusqu’aux bords, en lissant le dessus avec votre spatule. Maintenant, la patience est clé. Couvrez et laissez prendre au frais pendant au moins 4 heures, mais une nuit entière est idéale. Ce temps de repos permet aux saveurs de se marier et à la texture de devenir parfaitement tranchable. C’est difficile d’attendre, mais croyez-moi, ça en vaut la peine !
Étape 4 : La Touche de l’Artiste : La Décoration aux Fruits
C’est la partie amusante ! Coupez vos fruits choisis en jolies formes — des demi-lunes de kiwi, des fraises en éventail, des morceaux d’ananas. Disposez-les sur le cheesecake refroidi dans un beau motif coloré. Créez un arc-en-ciel, une étoile, ou juste un joyeux empilement de délices. Terminez avec quelques feuilles de menthe pour une touche de vert et une légère poussière de sucre glace, comme une neige sur une île tropicale. Astuce du chef : Séchez vos morceaux de fruits avec un essuie-tout avant de les disposer. Cela garde le dessus du cheesecake net et empêche le jus en trop de s’accumuler.
Votre Chronologie pour le Cheesecake
- Temps de préparation : 30 minutes
- Temps de repos au frais : 4 heures minimum (idéalement une nuit)
- Temps de décoration : 15 minutes
- Temps total : Environ 5 heures (surtout du repos sans surveillance)
Mon Arme Secrète pour la Tranche Parfaite
Passez votre couteau sous l’eau très chaude, essuyez-le, puis tranchez. Faites cela pour chaque coupe. La chaleur glisse à travers la garniture crémeuse et les fruits durs sans coller, vous donnant des tranches impeccables et nettes dignes d’un restaurant à chaque fois.
Une Histoire Amusante sur Vos Ingrédients
Saviez-vous que le fromage à la crème que nous connaissons aujourd’hui a été inventé par un laitier américain nommé William Lawrence en 1872 ? Il essayait de fabriquer un fromage français appelé Neufchâtel et a accidentellement créé une version plus riche et plus crémeuse. Son heureux accident nous a donné l’ingrédient clé de nos cheesecakes adorés !
Ce Dont Vous Aurez Besoin dans Votre Cuisine
- Moule à charnière de 23 cm (pour un démoulage facile)
- Bol à mélanger (grand et moyen)
- Fouet électrique ou fouet manuel robuste
- Spatule
- Tasses et cuillères à mesurer
- Couteau et planche à découper pour les fruits
Conserver Votre Cheesecake Tropical Frais
Une fois décoré, votre cheesecake est meilleur dans les 24 heures. Gardez-le couvert au frigo. Les fruits vont lentement libérer leur jus, donc pour une présentation absolument parfaite, décorez-le le jour où vous prévoyez de le servir.
Si vous avez des restes, ils se conserveront jusqu’à 2-3 jours au frigo. La croûte va ramollir un peu, mais le goût sera toujours délicieux. Utilisez un contenant hermétique ou enveloppez bien le moule avec du film alimentaire.
Vous pouvez aussi congeler le cheesecake non décoré (juste la croûte et la garniture) jusqu’à un mois. Décongelez-le une nuit au frigo avant d’ajouter votre garniture de fruits frais. Je ne recommande pas de le congeler avec les fruits dessus, car ils deviendront mous.
Mes Meilleurs Conseils pour un Cheesecake Réussi
- Ramollir le fromage : Sortez-le du frigo au moins une heure avant. Un fromage mou se mélange bien et évite les grumeaux.
- Fouetter la crème : Assurez-vous que votre crème et votre bol sont froids pour obtenir les meilleurs pics.
- Tasser fermement : Compactez vraiment cette croûte. Une croûte ferme ne s’émiettera pas à la découpe.
- Bien laisser prendre au frais : Ne précipitez pas le temps de repos. Un cheesecake bien pris est un rêve à trancher et servir.
Idées de Présentation pour Impressionner Vos Convives
- Servez chaque tranche sur une assiette blanche avec un filet de coulis de mangue ou de fruit de la passion.
- Ajoutez des fleurs comestibles parmi les fruits pour un effet vraiment magnifique, comme un jardin.
- Pour des portions individuelles, faites le cheesecake dans des petits pots en verre ou des ramequins.
- Râpez un peu de zeste de citron vert sur le dessus juste avant de servir pour une note d’agrume parfumée.
Vous Aimez Ça ? Essayez Ces Autres Gâteaux Incroyables !
Si vous avez aimé créer ce dessert sans cuisson, vous êtes peut-être prêt à explorer d’autres délices sucrés. Pour les amateurs de chocolat, l’ultra gourmand Cheesecake Oreo Ultime fait toujours son effet. Pour un dessert réconfortant du quotidien, mon simple Gâteau Yaourt aux Poires et Amandes est parfait. Si vous vous sentez aventureux et aimez les saveurs brésiliennes, le gâteau incroyablement riche Brigadeiro Humide transporteront vos papilles. Et si vous aimez les cerises, un classique comme le Délice Cerise et Fromage impressionne toujours.
Erreurs Courantes à Éviter Avec Votre Cheesecake Tropical
Évitez ces pièges simples pour un dessert parfait à chaque fois.
Erreur 1 : Utiliser un Fromage à la Crème Froid et Dur
C’est la raison numéro un d’une garniture grumeleuse. Le fromage froid ne se mélange pas bien avec le sucre et la crème fouettée. Vous vous retrouverez avec de petits morceaux de fromage dans votre nuage autrement léger. Pour éviter cela, sortez le fromage du frigo au moins une heure avant de commencer. Il doit être mou au toucher mais pas fondu.
Erreur 2 : Trop Mélanger la Garniture Après l’Ajout de la Crème Fouettée
Une fois que vous incorporez la crème fouettée, il faut une main délicate. Si vous continuez à fouetter au batteur ou à remuer trop vigoureusement, vous allez faire retomber tout l’air que vous venez d’incorporer. Cela donne une garniture dense et lourde au lieu d’une légère et aérienne. Utilisez une spatule et incorporez doucement, juste jusqu’à ce qu’il ne reste plus de traînées blanches.
Erreur 3 : Ne Pas le Laisser Prendre Assez Longtemps au Froid
L’impatience est l’ennemie d’un bon cheesecake sans cuisson. Si vous essayez de le trancher ou d’ajouter les fruits trop tôt, la garniture sera trop molle et pourrait même s’étaler. Elle ne tiendra pas sa belle forme. Le minimum de quatre heures est crucial, mais une nuit est vraiment idéale. Cela donne à la garniture le temps de se raffermir complètement pour des tranches nettes et propres.
Erreur 4 : Ajouter des Fruits Trop Humides Trop Tôt
Si vous décorez le cheesecake et le remettez ensuite au frigo pendant des heures, les fruits (surtout les plus juteux comme l’ananas et les pêches) vont libérer de l’eau à la surface. Cela peut rendre le dessus détrempé et faire baver les couleurs. Pour l’aspect le plus frais, séchez vos fruits et disposez-les sur le dessus juste avant de servir.
Une Note sur le Choix de Vos Fruits
Pour la meilleure saveur et texture, choisir des fruits mûrs et de saison fait toute la différence. La qualité de vos ingrédients impacte directement votre plat. Si vous êtes curieux d’incorporer plus d’options végétales, explorer des guides réputés sur l’alimentation végétale peut offrir de bonnes idées pour sélectionner et utiliser des produits frais.
Vos Questions sur le Cheesecake Tropical, Répondues
Puis-je préparer ce cheesecake à l’avance ?
Absolument ! En fait, je le recommande. Vous pouvez préparer la croûte et la garniture jusqu’à deux jours à l’avance. Couvrez-le bien et conservez-le au frigo sans la garniture de fruits. Ensuite, ajoutez votre décoration de fruits frais quelques heures avant de servir. Cela en fait un dessert idéal et sans stress pour les fêtes.
Quels autres fruits fonctionnent bien en plus de ceux listés ?
Vous pouvez vraiment faire preuve de créativité ! Mangue, papaye, fruit de la passion (récupérez la pulpe), fruit du dragon, et physalis (coquerets du Pérou) sont tous d’excellents choix tropicaux. Pour une touche non tropicale, essayez les figues, les raisins ou les graines de grenade. La clé est d’utiliser des fruits qui ne sont pas excessivement aqueux.
Ma croûte est trop friable et s’effrite. Qu’ai-je fait de travers ?
Cela signifie généralement que vous avez besoin d’un peu plus de « colle ». Assurez-vous d’avoir utilisé la quantité totale de beurre fondu. De plus, tassez le mélange dans le moule aussi fermement que possible. J’utilise le fond d’un verre plat ou d’une tasse à mesurer et j’appuie vraiment. Une croûte bien compactée tient ensemble parfaitement.
Puis-je utiliser des fruits surgelés pour la garniture ?
Je ne recommande pas d’utiliser des fruits surgelés directement sur le dessus, car ils décongèlent et deviennent très mous et libèrent beaucoup de liquide. Cependant, vous pouvez utiliser des fruits surgelés pour faire un beau coulis ou une sauce à napper autour de l’assiette. Décongelez les fruits, réduisez-les en purée, passez au chinois si besoin, et sucrez légèrement.
Y a-t-il un moyen de rendre ce dessert moins sucré ?
Oui, vous pouvez l’ajuster à votre goût. Vous pouvez réduire le sucre dans la croûte de moitié ou l’omettre complètement. Dans la garniture, vous pouvez légèrement réduire le sucre glace. L’acidité des fruits frais sur le dessus aidera aussi à équilibrer la douceur du cheesecake lui-même.
Puis-je utiliser un autre type de moule si je n’ai pas de moule à charnière ?
Vous pouvez utiliser un moule à tarte classique ou un moule à tartelette profond. Le seul défi sera le service. Vous devrez couper et servir à la cuillère plutôt que de sortir un cercle parfait. Pour la présentation la plus soignée, un moule à charnière est le mieux, mais ne vous arrêtez pas pour autant !
Comment éviter que la garniture au fromage n’ait un goût « granuleux » ?
Une texture granuleuse vient d’un fromage mal mélangé ou de l’utilisation de sucre en poudre au lieu de sucre glace. Fouettez toujours votre fromage ramolli seul en premier jusqu’à ce qu’il soit parfaitement lisse. Ensuite, utilisez du sucre glace, qui se dissout instantanément et crée cette texture soyeuse en bouche.
Ma crème fouettée s’est transformée en beurre ! Que s’est-il passé ?
Vous l’avez trop fouettée. Lorsque vous faites de la crème fouettée, arrêtez-vous dès que vous voyez des pics fermes qui tiennent leur forme. Si vous allez trop loin, la graisse se sépare, et vous obtenez du beurre et du babeurre. Si cela arrive, il est malheureusement préférable de recommencer avec de la crème fraîche.
Puis-je aromatiser la garniture du cheesecake elle-même ?
Absolument ! Ajoutez une cuillère à soupe de zeste de citron ou de citron vert pour une touche d’agrumes. Vous pourriez aussi mélanger une cuillère à soupe de crème de coco pour une vibe piña colada. Faites juste attention avec les arômes liquides, car ils peuvent fluidifier la garniture.
Combien de temps les restes se conservent-ils au frigo ?
Le cheesecake (avec les fruits dessus) se conservera 2 à 3 jours au réfrigérateur. La croûte va ramollir progressivement, et les fruits peuvent rendre un peu d’eau, mais il sera toujours délicieux. Il est toujours meilleur frais, cela dit !
J’espère que cette recette apportera autant de joie à votre table qu’à la mienne. C’est une célébration des ingrédients simples et des saveurs lumineuses. Pour plus d’inspiration comme celle-ci, n’oubliez pas de parcourir notre collection d’autres merveilleuses recettes de gâteaux et pâtisseries.
Bonne Pâtisserie (ou plutôt, Bonne Préparation Sans Cuisson) !
Et voilà ! Ma façon préférée de capturer un peu de soleil tropical, sans passeport requis. Ce Cheesecake Tropical Fruité est plus qu’une recette ; c’est un moment de bonheur partagé. C’est le sourire sur le visage de vos amis quand vous l’apportez. C’est l’amusement joyeux et un peu désordonné de le décorer avec vos enfants. Alors rassemblez vos fruits les plus colorés, mettez une musique entraînante et créez quelque chose de beau. J’ai hâte que vous l’essayiez. N’oubliez pas de me taguer dans vos photos – j’adore voir vos créations !
Equipment
- Moule à charnière de 9 pouces
- Bols à mélanger grand et moyen
- Mixeur électrique ou fouet robuste
- Spatule
- Tasses et cuillères à mesurer
Ingrédients
- 240 g de miettes de biscuits Graham
- 50 g sucre granulé
- 115 g beurre non salé, fondu
- 450 g fromage à la crème, ramolli
- 60 g sucre glace
- 5 ml extrait de vanille
- 360 ml crème fouettée
- 500 g fruits frais assortis : kiwi, ananas, pêches, fraises, framboises, myrtilles, mandarines
- 9 g feuilles de menthe fraîches (facultatif)
- 15 g sucre glace pour saupoudrer
Instructions
- Mélangez les miettes de biscuits Graham et le sucre dans un bol, puis ajoutez le beurre fondu et mélangez jusqu'à obtention d'une consistance semblable à du sable humide.
- Tassez ce mélange au fond d'un moule à charnière et placez-le au réfrigérateur.
- Dans un grand bol, battez le fromage à la crème ramolli jusqu'à ce qu'il soit lisse, puis incorporez le sucre glace et la vanille en battant jusqu'à ce que ce soit crémeux.
- Incorporez délicatement la crème fouettée à la préparation de fromage à la crème jusqu'à obtenir un mélange léger et aérien.
- Versez la préparation sur la croûte réfrigérée et lissez le dessus, puis couvrez et laissez au réfrigérateur pendant au moins 4 heures (idéalement toute la nuit).
- Découpez les fruits et disposez-les joliment sur le cheesecake frais, ajoutez de la menthe et un saupoudrage de sucre glace.
Notes
Nutrition

Je suis Céline, une véritable passionnée d’ustensiles et de matériel de cuisine ! J’adore tester, comparer et découvrir les meilleurs équipements pour rendre la cuisine plus efficace et agréable. Que ce soit un bon couteau, un robot performant ou une poêle incontournable, je suis toujours à la recherche des outils qui feront la différence. Mon but est de vous guider dans vos choix pour que vous ayez le bon matériel adapté à vos besoins.