
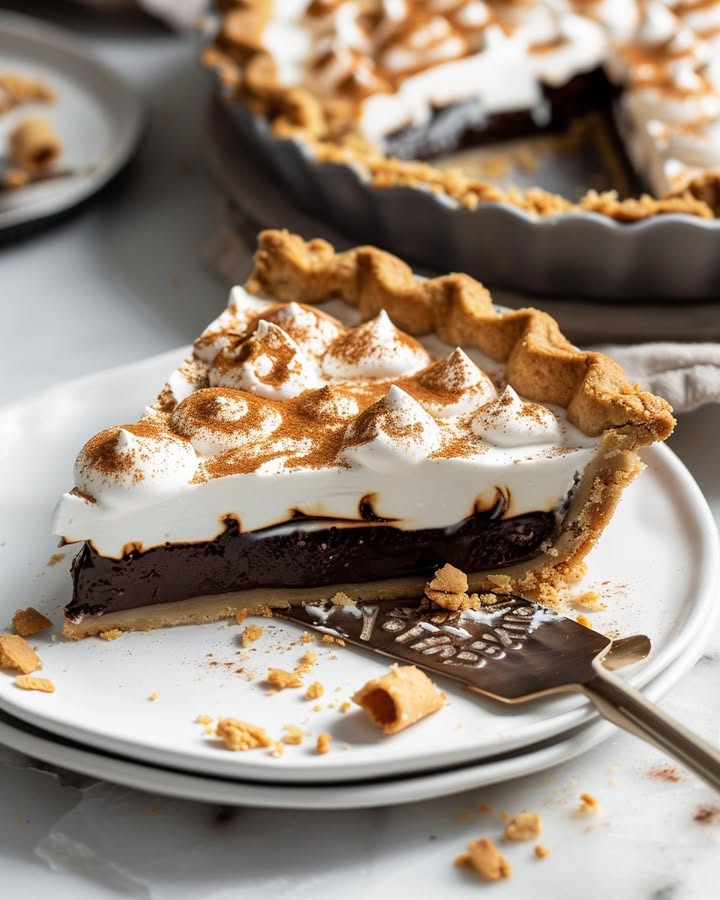
Tarte Smores Facile : Un Classique du Feu de Camp, Maintenant en Forme à Découper !
Imaginez cela : le dernier jour des vacances d’été, un feu qui crépite, et la joie inimitable d’une marshmallow parfaitement grillée écrasée entre du chocolat et des biscuits Graham. C’est cette magie que je voulais capturer, mais sans la fumée dans mes cheveux ! Cette Tarte Smores Facile est ma solution joyeuse. C’est toute la saveur nostalgique de votre friandise favorite au feu de camp, transformée en un dessert spectaculaire et sans tracas qui impressionne les convives. Promis, après une seule bouchée, personne regrettera le bois de chauffage.
L’histoire derrière notre Tarte Smores
Le s’more classique est un morceau du folklore américain, son histoire liée aux manuels des Girl Scouts et aux summers au bord du lac. Le nom lui-même est une contraction de « some more » — parce qu’un seul ne suffit jamais ! J’ai toujours adoré cette combinaison mais voulais une version que je pouvais préparer à l’avance pour les fêtes. Cette Tarte Smores Facile est mon hommage à cette tradition. Elle prend le plaisir chaotique et aux doigts collants de construire des s’mores et le transforme en une tarte élégante à partager. C’est la façon moderne et sans souci de savourer une saveur intemporelle.
Pourquoi vous allez tomber amoureux de cette recette
Ce n’est pas juste une autre recette de tarte. C’est un succès garanti auprès des convives, pour tellement de raisons ! Premièrement, c’est incroyablement simple — pas besoin de talents de pâtissier. La croûte se fait en pressant, et la garniture s’assemble au micro-ondes. Le résultat est un contraste glorieux : une croûte Graham croustillante et butterée, une couche de ganache chocolat luxueuse et soyeuse, et une couverture de marshmallows grillés qui bénéficie d’une seconde garniture croustillante. C’est doux, salé, moelleux et crispé à la fois. La perfection !
Occasions parfaites pour votre Tarte Smores
Cette tarte est votre arme secrète pour tellement d’événements ! C’est un triomphe aux barbecues et aux repas partagés d’été. Elle est cozy et réconfortante pour les gatherings d’automne. Préparez-la pour un anniversaire au lieu d’un cake, ou amenez-la à une fête pour une touche fun. C’est aussi le treat ultime « juste parce que » pour une soirée ciné en famille. À chaque fois que vous voulez apporter des smiles et une touche d’indulgence whimsique, cette Tarte Smores est la réponse.
Tout ce dont vous aurez besoin
Rassemblons nos ingrédients. La beauté réside dans sa simplicité ! Vous avez probablement déjà la plupart dans votre pantry.
Pour la croûte :
- 1 1/2 tasse(s) de chapelure de biscuits Graham
- 1/4 tasse de sucre granulé
- 1/2 tasse de beurre non salé, melted
Pour la garniture :
- 1 tasse de pépites de chocolat semi-sucré
- 1/2 tasse de crème épaisse
- 1 cuillère à café d’extrait de vanille
- 2 tasses de mini marshmallows
Pour la garniture finale ( topping ) :
- 1 tasse de mini marshmallows
- 1/2 tasse de chapelure de biscuits Graham
- 1/4 tasse de pépites de chocolat semi-sucré, fondues
Substitutions & Alternatives astucieuses
Vous manquez de quelque chose ? Pas d’inquiétude ! Voici des swaps faciles : Utilisez des pépites de chocolat au lait ou noir au lieu du semi-sucré. Pour la croûte, les biscuits digestifs fonctionnent wonderfully. Si vous n’avez pas de crème épaisse, la crème de coconut full-fat donne une ganache riche et sans dairy. Pour une twist nutty, ajoutez 1/4 tasse de noix de peanuts ou pecans crushed à la mixture de la croûte. Le but est de l’adapter pour vous !
Prêts à créer cette Tarte Smores Facile !
Prêts à créer de la magie ? Suivez ces steps simples pour un dessert qui fait sensation.
Step 1 : Préparer la croûte
Commencez par préchauffer votre oven à 350°F (175°C). Cela assure qu’il est parfaitement hot quand votre croûte est ready à cuire. Dans un bol moyen, combinez la chapelure de biscuits Graham et le sucre granulé. Versez le glorious beurre melted. La mixture se rassemblera beautifully quand vous stir, releasing un sweet, toasty aroma. Pressez cela firmly et evenly dans le bottom et sur les sides d’un plat à tarte de 9-inch. J’utilise le bottom d’une tasse à mesurer pour qu’elle soit nice et compact. Bake ceci pendant 10 minutes pour la faire set, puis laissez-la cool completely. Une croûte warm fondra votre garniture !
Step 2 : Créer la garniture chocolat
Maintenant pour le cœur riche de la tarte. Placez les pépites de chocolat et la crème épaisse dans un bol safe pour micro-ondes. Micro-ondes en bursts de 30-secondes, stirring bien après chaque. Watch comme la crème warm et melt le chocolat en un smooth, glossy river. C’est votre ganache ! Once qu’elle est soyeuse et lump-free, stir dans l’extrait de vanille. Cette vanille adds une wonderful profondeur de flavor. Gently versez cette luxurious mixture chocolat dans votre waiting, cooled croûte. Tilt le plat pour la spread en un even layer. Immediately sprinkle ces 2 tasses de mini marshmallows evenly sur le top. Ils commenceront à peek dans le warm chocolat, ce qui est exactly what you want.
Pro tip: Pour une ganache super smooth, laissez la crème hot sit sur les pépites de chocolat une minute avant de stir.
Step 3 : Cuire la tarte jusqu’à la perfection dorée
Carefully place votre tarte assemblée back dans l’oven. Bake pendant 10 à 12 minutes. Gardez un close eye sur elle ! Vous wait pour que les marshmallows puff up et turn un beautiful, golden brown. Le smell dans votre kitchen sera absolutely intoxicating — comme un feu de camp et une chocolaterie avaient une party. Once dorée, remove la tarte et laissez-la cool sur un rack pour environ 10-15 minutes. Elle sera still quite warm, ce qui est perfect pour ajouter les toppings finals.
Step 4 : Ajouter les toppings finals
Ce step est où la magie de la texture arrive. Sprinkle le restant de 1 tasse de mini marshmallows sur la tarte warm. Ils sick nicely. Then, scatter le 1/2 tasse de chapelure de biscuits Graham sur tout. Cela adds un delightful crunch. Finally, melt le dernier 1/4 tasse de pépites de chocolat (un autre quick 30 secondes dans le micro-ondes fait) et drizzle cela artfully sur le top avec une spoon ou fork. Laissez la tarte cool completely pour que les layers chocolat puissent set properly avant de slice.
Chef’s tip: Pour un drizzle truly professionnel, mettez le chocolat melted dans un petit zip-top bag, snip un tiny corner, et pipe-le sur la tarte.
Le Timing est Tout
Bonne news pour les planners et les bakers spontanés alike ! Cette tarte s’assemblée en under une heure.
- Temps de Préparation: 15 minutes
- Temps de Cuisson: 22 minutes
- Temps de Refroidissement: 1 heure (recommandé)
- Temps Total: Environ 1 heure 37 minutes de start à slice
Kcal: Approximativement 350 par serving. Portions: 8 slices généreuses.
Mon Secret pour la Croûte Ultime
Mon secret weapon ? Une pinch de sel de mer flaky mélangée dans la croûte Graham crackers. Cela ne la rend pas salty, mais cela heightens brilliantment le sweetness du chocolat et de la marshmallow, creating un flavor plus complexe et « can’t-put-your-finger-on-it » delicious. Essayez !
Un Fun Fact sur les Biscuits Graham
Saviez-vous que les biscuits Graham ont été originally inventés comme partie d’un bland, vegetarian diet dans les 1830s pour curb les passions « unhealthy » ? Le ministre Sylvester Graham serait shocked de voir sa sober creation maintenant holding des pools de chocolat et marshmallow dans notre decadent Tarte Smores Facile. Je pense qu’il l’adorerait secretly.
Équipement Nécessaire
Vous n’avez besoin d’aucun fancy tool !
- Plat à tarte de 9-inch
- Bol(s) de mixing moyen(s)
- Bol sûr pour micro-ondes
- Tasses à mesurer et spoons
- Rubber spatula ou spoon
- Oven
Comment conserver votre masterpiece
Cette tarte est best enjoyed le jour où elle est faite, quand le topping marshmallow est à son texture peak. Si vous avez leftovers, couvrez la tarte loosely avec du film alimentaire ou placez-la sous un cake dome. Store-la à température room pour jusqu’à 2 jours. La croûte se softira slightly de la moisture de la garniture et des marshmallows, mais elle aura still un wonderful taste.
Évitez de réfrigérer la tarte entière si vous pouvez. Le cold causera les marshmallows à devenir très chewy et hard, et la ganache chocolat peut devenir overly ferme. Cependant, si vous vivez dans un climate très warm et êtes worried concernant la ganache, la refrigeration est okay. Juste laissez un slice revenir à température room pour 20 minutes avant serving pour améliorer la texture.
Je ne recommande pas de freezing cette tarte. Les marshmallows et la texture de la ganache ne hold pas bien au freezing et thawing. C’est un dessert meant to be shared et savoured rapidement !
Tips & Advice pour la perfection de la tarte
- Pour un extra toasty flavor, vous pouvez toast la chapelure de biscuits Graham pour la croûte dans une skillet dry pour quelques minutes avant de mixer avec le beurre.
- Si vos marshmallows brunissent trop rapidement dans l’oven, tent la tarte loosely avec de l’aluminium foil.
- Laissez la tarte cool completely avant slicer pour les cuts les plus clean. Run votre knife sous hot water et dry-le entre les slices.
- Pour les adultes, un drizzle de caramel salé sur la finished tarte est une sublime addition.
Ideas de présentation pour impress
- Servez chaque slice avec un dollop de freshly whipped cream et un tiny biscuit Graham sur le side.
- Dust le plate avec un peu de cocoa powder ou cinnamon sugar avant de placer le slice.
- Garnish avec quelques fresh raspberries ; leur tartness cuts le sweetness beautifully.
- Pour une party, faites des mini versions dans un muffin tin using des foil liners !
Vous voulez varier ? Essayez ces variations !
Vous love ce format ? Voici six delicious twists sur le concept de Tarte Smores Facile :
- Peanut Butter Cup : Swirl 1/2 tasse de peanut butter dans la ganache chocolat warm avant de la verser dans la croûte.
- Mint Chocolate : Utilisez des pépites de chocolat noir et ajoutez 1/4 cuillère à café d’extrait de peppermint à la ganache avec la vanille.
- Cookie Butter : Remplacez 1/2 tasse de la chapelure Graham dans la croûte avec des crumbs de biscuit Biscoff crushed.
- Salted Caramel : Versez un layer de sauce caramel salée store-bought ou homemade sur la croûte baked avant de ajouter la garniture chocolat.
- Rocky Road : Fold 1/2 tasse de almonds chopped et 1/4 tasse de mini pépites de chocolat dans la ganache chocolat avant de ajouter les marshmallows.
- Coconut Dream : Toast 1 tasse de shredded coconut et sprinkle-le sur la tarte avec la chapelure Graham finale. Utilisez coconut milk dans la ganache pour un full tropical vibe.
Si vous êtes un fan de desserts layered stunning, vous devriez essayer mon Velvet Red Cheese Cake With Nuts pour une autre option qui fait sensation. Pour plus de tartes fruit-focused, mon Old-Fashioned Strawberry Pie est un timeless classic. Les lovers chocolat, ne miss pas ce incredibly moist Chocolate cake with hot water. Et pour un treat citrusy, elegant, The Famous Ritz Carlton Hotel 1920s Tea Room Lemon Pound Cake est absolutely legendary.
Erreurs communes à éviter
Erreur 1 : Ne pas laisser la croûte refroidir
Verser la ganache chocolat warm sur une croûte hot est une recette pour un bottom soggy. La heat empêchera la croûte de set properly, et elle peut devenir mush. Le beurre melted dans la croûte needs time pour cool et re-solidifier, creating un firm, crisp base. Laissez toujours votre baked croûte cool completely sur un rack wire avant de ajouter la garniture. La patience ici fait toute la différence en texture.
Erreur 2 : Micro-ondes le chocolat trop longtemps
Le chocolat peut scorch ou « seize » (become grainy et hard) si heated trop agressivement. Micro-ondes pour une full minute ou plus sans stirring est un common culprit. Once que le chocolat seize, il est très difficult de le sauver. Le key est gentle, incremental heat. Utilisez toujours des intervals de 30-secondes et stir bien entre. La heat résiduelle du bol et de la crème often finish le melting job. Stop quand just un few small lumps restent, et stir jusqu’à smooth.
Erreur 3 : Omettre le second ajout de topping
La recette appelle des marshmallows dans la garniture et comme topping final après baking. Si vous les utilisez tous dans la garniture, vous missing le wonderful contrast textural. Le premier layer melt et toast dans le chocolat, creating un blanket moelleux. Le second, fresh layer ajouté après baking vous donne ces delightful, soft-yet-crisp bits de marshmallow sur le top. Cela mimic l’expérience d’un s’more freshly made avec both melted et fresh marshmallow.
Erreur 4 : Couper la tarte pendant qu’elle est warm
C’est tempting de dive right in, mais une tarte warm est une tarte messy. La ganache chocolat needs time pour fully set so qu’elle hold sa shape quand cut. Slicing too soon causera la garniture à ooze out, et les layers ne seront pas distinct. Pour des slices clean, beautiful qui show off tous les layers, laissez la tarte cool completely à température room. Cela peut prendre une bonne heure ou plus. Cela worth le wait pour cette perfect présentation.
Une note sur les ingrédients de qualité
Utiliser de bonnes-quality pépites de chocolat et du real butter dans la croûte really elevate ce simple dessert. Pour guidance sur sélectionner des ingrédients qui balance indulgence avec everyday eating, des resources comme les recommandations alimentaires officielles françaises (Manger Bouger) offre un sensible framework pour enjoying treats like this comme partie d’un diet varié.
Cette Tarte Smores Facile est juste un parmi tant de desserts beloved dans ma kitchen. Si vous cherchez plus d’inspiration baking, vous trouverez un treasure trove d’ideas dans ma full collection de recettes de cakes et pastries.
Vos questions sur la Tarte Smores Facile, answered
Est-ce que je peux préparer cette tarte à l’avance ?
Vous pouvez préparer la croûte un jour en advance. Bake-la, laissez-la cool completely, then wrap-la tightly dans film alimentaire et store à température room. Pour la meilleure texture, je recommande d’assembler et cuire la tarte entière le jour où vous plan de la servir. Les marshmallows sont à leur peak freshness et toastiness dans quelques heures de baking. Si vous must la faire une jour en advance, store-la loosely covered à température room et ajoutez le topping final de chapelure Graham juste avant serving pour le garder crunchy.
Qu’est-ce que je peux utiliser à la place de la crème épaisse ?
La crème de coconut full-fat est le meilleur substitute direct pour une ganache riche et sans dairy. Assurez-vous d’utiliser la crème thick du top de la can, pas le light coconut milk. Vous pouvez aussi utiliser du lait entier full-fat en last resort, mais votre ganache sera slightly moins riche et ferme. Pour une version plus light, certains readers ont had success avec half-and-half, même si le pouvoir de setting sera weaker. Le fat dans la crème est key pour cette lush, sliceable texture.
Mes marshmallows ne brunissent pas. Que faire ?
Les ovens peuvent varier ! Si vos marshmallows sont still white après 12 minutes, vous pouvez switch votre oven au broil pour le dernier 30-60 seconds. Watch-le comme un hawk ! Ils peuvent aller de pale à burnt en un instant. Alternativement, vous pouvez utiliser un torch kitchen pour toast le top layer de marshmallows après que la tarte sort de l’oven. Cela vous donne un contrôle très précis et crée ce perfect, professional-looking toasted finish.
Est-ce que je peux utiliser des marshmallows réguliers au lieu des mini ?
Oui, mais les mini marshmallows sont highly recommandés. Ils se distribuent plus evenly, melt consistently, et sont easier à slice through. Si vous avez only des large marshmallows, utilisez des kitchen shears pour les cut en smaller pieces (coat les shears avec un peu de spray cooking pour prevent sticking). Utiliser des large marshmallows whole créera des pockets uneven et rendra slicing la finished tarte much more difficult.
C’est okay d’utiliser une croûte Graham cracker store-bought ?
Absolument ! Cela est un great shortcut qui save environ 10 minutes. Just skip les steps de making la croûte et start avec une croûte Graham 9-inch pre-made. Il est no need de pre-bake. Simply versez votre garniture et proceed avec la recette. Le flavor d’une croûte homemade est superior, mais une store-bought fonctionne perfectly well pour un super-fast, delicious dessert.
Comment obtenir un slice clean sans faire un mess ?
Le secret est un knife hot, clean. Fill un tall glass avec very hot water. Avant chaque cut, dip votre sharp knife dans le water, wipe-le completely dry avec un clean towel, et then slice straight down en un smooth motion. La heat aide le knife à glider through les marshmallows sticky et le chocolat firm sans dragging. Wipe le blade clean et reheat entre chaque slice pour des pieces picture-perfect.
Est-ce que je peux ajouter d’autres flavors à la layer chocolat ?
Definitely ! La ganache chocolat est un wonderful canvas. Avec la vanille, considérez ajouter une pinch de powder espresso pour enhance le flavor chocolat, une tablespoon de votre favorite liqueur comme Bailey’s ou Grand Marnier, ou un 1/4 cuillère à café de cinnamon ground pour une twist Mexican chocolat. Just ajoutez ces extras quand vous stir dans la vanille, et assurez-vous que tout addition liquide est en small quantities pour que la ganache still set.
Pourquoi ma mixture chocolat est-elle devenu gritty ?
Ceci est appelé « seizing », et cela usually arrive si un tiny bit d’eau ou de steam got dans le chocolat durant le melting. Even une drop peut causer les cocoa solids à clump. Pour éviter cela, assurez que votre bol et utensils sont completely dry. Si cela arrive, vous pouvez sometimes le rescuer par immediately stirring dans une teaspoon d’huile végétale warm ou plus de crème warm jusqu’à qu’elle smooth out again. La prevention avec gentle, dry heat est best.
Combien de temps les leftovers garderont ?
La leftover tarte gardera à température room, loosely covered, pour jusqu’à 2 jours. Les marshmallows se soften et lose leur toast, et la croûte se soften, mais elle aura still un taste delicious. Je ne recommande pas de freezing, comme les textures de la marshmallow et de la ganache deviennent unpleasant upon thawing. Cette tarte est truly designed pour être enjoyed fresh, alors share-la avec friends et family pour ensure qu’il n’y a pas de leftovers !
Est-ce que je peux faire ceci sans un oven ?
Vous pouvez faire une version no-bake ! Pour la croûte, simplement press la mixture butter-crumb dans le plat à tarte et réfrigérer-le pour une heure pour set au lieu de baking. Pour la garniture, prepare la ganache comme directed, versez-la dans la croûte chilled, et immediately top avec marshmallows. Au lieu de baking, vous pouvez toast le topping avec un torch kitchen. Chill la tarte pour 2-3 heures pour set la ganache completely avant de ajouter les toppings finals unmelted et le drizzle.
Prêts pour une slice de summer ?
Et voilà ! Votre guide pour créer l’ultimate Tarte Smores Facile qui amène le feu de camp directement à votre dining table. C’est simple, joyfully messy, et packed avec les flavors que nous love tous. Que ce soit pour une occasion spéciale ou un simple Tuesday treat, cette tarte est guaranteed pour créer des sweet memories. Alors préchauffez cet oven, melt ce chocolat, et ready pour les compliments. Happy baking !
Equipment
- Moule à tarte de 9 pouces (23 cm)
- Bols de mélange moyens
- Bol allant au micro-ondes
- Tasses et cuillères à mesurer
- Spatule en caoutchouc ou cuillère
Ingrédients
- 1.5 tasses miettes de biscuits graham
- 1/4 tasse sucre granulé
- 1/2 tasse beurre non salé, fondu
- 1 tasse pépites de chocolat mi-sucré
- 1/2 tasse crème épaisse
- 1 cuillère à café extrait de vanille
- 2 tasses mini guimauves
- 1 tasse mini guimauves (pour le dessus)
- 1/2 tasse miettes de biscuits graham (pour le dessus)
- 1/4 tasse pépites de chocolat mi-sucré, fondues (pour le dessus)
Instructions
- Préchauffez votre four à 175°C (350°F).
- Dans un bol moyen, mélangez les miettes de biscuits graham et le sucre granulé, puis ajoutez le beurre fondu.
- Pressez le mélange au fond et sur les côtés d'un moule à tarte de 23 cm (9 pouces).
- Faites cuire la croûte pendant 10 minutes et laissez-la refroidir complètement.
- Dans un bol allant au micro-ondes, placez les pépites de chocolat et la crème épaisse.
- Faites chauffer au micro-ondes par intervalles de 30 secondes en remuant jusqu'à obtention d'une consistance lisse.
- Incorporez l'extrait de vanille et versez la ganache sur la croûte refroidie.
- Répartissez les 2 tasses de mini guimauves sur le chocolat encore chaud.
- Faites cuire au four pendant 10 à 12 minutes jusqu'à ce que les guimauves soient dorées.
- Laissez refroidir 10-15 minutes sur une grille.
- Ajoutez le reste des mini guimauves et les miettes de biscuits graham sur le dessus.
- Faites fondre les pépites de chocolat restantes et draguez le dessus du gâteau.
- Laissez la tarte refroidir complètement avant de couper en parts.
Notes
Nutrition

Je suis Céline, une véritable passionnée d’ustensiles et de matériel de cuisine ! J’adore tester, comparer et découvrir les meilleurs équipements pour rendre la cuisine plus efficace et agréable. Que ce soit un bon couteau, un robot performant ou une poêle incontournable, je suis toujours à la recherche des outils qui feront la différence. Mon but est de vous guider dans vos choix pour que vous ayez le bon matériel adapté à vos besoins.