
La Pièce Maîtresse de l’Automne, Facile à Réaliser : le Gâteau Éclair aux Pommes Caramel
Vous connaissez cette sensation quand l’air devient frais et que les feuilles commencent à rougir ? J’ai une irrésistible envie de préparer un dessert réconfortant. Mais soyons honnêtes—entre les trajets à l’école et les visites au champ de citrouilles, je n’ai pas toujours l’énergie pour une pâtisserie compliquée. C’est pourquoi ce Gâteau Éclair Caramelisé sans cuisson est mon arme secrète. On dirait que vous avez passé la journée en cuisine, mais le secret réside dans ses couches astucieuses. Imaginez des pommes fondantes épicées, une garniture vanille onctueuse et une couverture de caramel fondante, le tout enveloppé par des biscuits Grahams moelleux. C’est le goût de l’automne à chaque cuillérée, sans aucune complication !
L’Histoire Réconfortante du Gâteau Éclair aux Pommes Caramel
Ce dessert est une merveilleuse fusion américaine. Il reprend le concept bien-aimé de l’éclair classique—une pâte à choux garnie de crème et nappée de chocolat—et lui donne une touche automnale et douillette. À la place de la pâte à choux, nous utilisons des biscuits Grahams qui deviennent magiquement moelleux, comme une génoise. C’est un gâteau « paresseux », une merveille sans cuisson devenue légendaire pour les repas partagés. Ma version est extra spéciale car elle utilise de vraies pommes cuisinées à la place d’une garniture en boîte. Le parfum de la cannelle et du caramel qui embaume ma cuisine ? C’est ça, la vraie magie. C’est une interprétation moderne de la tradition, parfaite pour nos vies bien remplies.
Pourquoi Vous Allez Adorer Cette Recette
D’abord, c’est sans cuisson. Votre four peut se reposer ! Ensuite, c’est un succès garanti. Je n’ai jamais ramené un plat vide. Le mélange du pudding frais et onctueux avec les pommes chaudes et épicées est tout simplement irrésistible. C’est aussi incroyablement indulgent. Pas besoin de couches parfaites—l’aspect rustique a son charme ! Enfin, il se prépare à l’avance à merveille. En fait, il doit reposer au frais, c’est donc le dessert ultime sans stress pour recevoir.
Les Occasions Parfaites pour Votre Gâteau Éclair aux Pommes Caramel
Ce gâteau est votre meilleur ami pour tout rassemblement automnal. Il brille à Thanksgiving à côté de la tarte, fait fureur aux fêtes d’Halloween et est la conclusion parfaite d’un dîner familial casual le week-end. J’adore l’apporter pour un tailgate de football ou offrir des parts à des voisins reconnaissants. C’est cette douceur polyvalente qui paraît sophistiquée mais est secrètement simple.
Rassembler Vos Ingrédients
Décomposons-la en trois composantes simples. Utiliser le meilleur que vous puissiez trouver fait toute la différence !
Pour les Pommes Épicées :
- 2,2 kg de pommes Granny Smith, pelées, épépinées et coupées en dés
- 200 g de sucre blanc
- 1 cuillère à soupe de cannelle moulue
- 1-2 cuillères à soupe de farine tout usage (seulement si nécessaire)
Pour la Garniture Rêvée :
- 2 petits sachets (100g chacun) de préparation pour pudding vanille instantané
- 840 ml de lait entier
- 120 ml de crème fraîche épaisse
- 225 g de chantilly en bombe (type Cool Whip), décongelée
Pour les Couches et la Topping :
- 21 biscuits Grahams à la cannelle (environ 2 paquets)
- 450 g de trempette au caramel pour pommes (trouvée près des pommes !)
Astuces pour Remplacer les Ingrédients
Pas de stress s’il vous manque quelque chose ! Voici des substitutions faciles :
- Pommes : Utilisez une garniture pour tarte aux pommes de bonne qualité en conserve pour un raccourci. Pour une version maison, essayez des pommes Honeycrisp ou Braeburn.
- Produits Laitiers : Utilisez n’importe quel pourcentage de lait. Remplacez la crème fraîche par du yaourt grec nature. Utilisez de la crème chantilly maison à la place de la chantilly en bombe.
- Pudding : La préparation pour cheesecake est une délicieuse variation ! Pour une version sans sucre, utilisez un mélange pour pudding sans sucre.
- Biscuits Grahams : Les Grahams nature ou au miel fonctionnent très bien. Vous pouvez même utiliser des biscuits type petit-beurre.
Créer Votre Chef-d’Œuvre Sans Cuisson
Mettez de la musique et créons des couches de saveurs. Le processus est aussi satisfaisant que la première bouchée.
Étape 1 : Cuire les Pommes
Dans votre plus grande casserole, mélangez les pommes en dés, le sucre et la cannelle. Portez à feu moyen-doux. Vous entendrez un léger grésillement lorsque le sucre commencera à fondre et à enrober les pommes. Remuez-les de temps en temps. En 15 à 20 minutes, elles deviendront tendres et libéreront leur sirop juteux et parfumé. Si le mélange paraît très liquide, saupoudrez une cuillère à soupe de farine et mélangez bien. Il épaissira en une compote de pommes épicée et brillante. Laissez refroidir complètement—la patience évite un gâteau détrempé !
Étape 2 : Préparer la Garniture
Dans un grand saladier, fouettez les mélanges pour pudding et le lait pendant deux bonnes minutes. Il se transformera d’un liquide pâle en une crème épaisse et luxueuse. Incorporez maintenant la crème fraîche. Cela ajoute une belle pointe d’acidité qui équilibre la douceur. Enfin, incorporez délicatement la chantilly décongelée jusqu’à obtenir une garniture lisse et aérienne. Réservez pendant que vous montez les couches.
Étape 3 : Monter les Couches
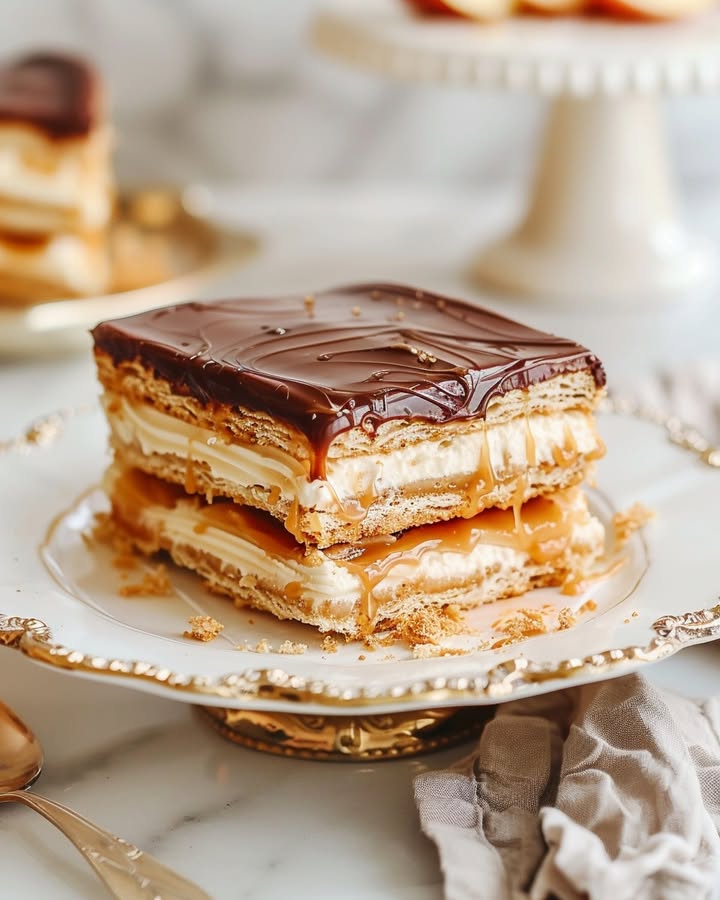
Prenez votre plat rectangulaire (env. 23×33 cm). Tapissez le fond avec 7 biscuits Grahams, en les cassant pour qu’ils s’ajustent. Étalez la moitié de vos pommes refroidies sur les biscuits, en les répartissant uniformément. Ensuite, déposez la moitié de la garniture au pudding sur les pommes et étalez-la délicatement jusqu’aux bords. Répétez les couches : d’autres biscuits, le reste des pommes, le reste du pudding. Couronnez le tout d’une dernière et parfaite couche de biscuits Grahams. C’est comme construire un délicieux puzzle comestible !
Étape 4 : La Couverture de Caramel
Voici la magie ! Versez la trempette au caramel dans un bol allant au micro-ondes. Faites chauffer 30 secondes, mélangez, puis chauffez encore 20 à 30 secondes jusqu’à ce qu’elle soit tiède et facile à étaler mais pas brûlante. Versez-la sur la couche supérieure de biscuits. À l’aide d’une spatule coudée ou du dos d’une cuillère, étalez-la en une mer de caramel lisse et irrésistible qui couvre chaque centimètre.
Étape 5 : Le Repos Essentiel au Froid
C’est l’étape la plus difficile mais la plus importante ! Couvrez le plat hermétiquement et réfrigérez pendant au moins 8 heures, ou toute une nuit. Ce temps permet aux biscuits Grahams de ramollir pour une texture tendre, semblable à un gâteau, et laisse toutes les saveurs se marier pour créer quelque chose d’extraordinaire. Croyez-moi, l’attente en vaut la peine.
Votre Investissement en Temps
Ce gâteau est un investissement en saveurs, pas en temps ! La préparation prend environ 30 minutes de travail actif. La cuisson des pommes prend 15-20 minutes. La vraie magie opère dans le frigo. Vous devez le laisser reposer au frais pendant minimum 8 heures, mais une nuit est vraiment idéale. Cela donne aux biscuits Grahams le temps d’absorber l’humidité et de devenir tendres, comme les couches moelleuses d’un éclair. Prévoyez donc environ 9 heures du début à la fin glorieuse.
Le Secret du Chef pour le Gâteau Ultime
Mon secret réside dans les pommes. Ne précipitez pas le refroidissement ! Si vous étalez des pommes encore chaudes sur les biscuits, elles commenceront à absorber l’humidité trop vite et peuvent devenir molles. Laisser le mélange de pommes refroidir à température ambiante (ou même le réfrigérer brièvement) garantit des couches parfaitement définies, crémeuses mais fermes, dans chaque part.
Une Anecdote Amusante sur les Biscuits Grahams
Saviez-vous que les biscuits Grahams ont été inventés dans les années 1830 dans le cadre d’un régime végétarien fade pour freiner les « pulsions pécheresses » ? Leur créateur, Sylvester Graham, s’évanouirait probablement en nous voyant les napper de caramel et de pudding ! Je pense qu’il reviendrait sur sa position après une seule bouchée de ce gâteau.
De Quoi Avez-Vous Besoin pour le Préparer
- Grande casserole
- Plat rectangulaire de cuisson (env. 23×33 cm)
- Grands saladiers
- Fouet et spatule
- Tasses et cuillères à mesurer
- Couteau et planche à découper (pour les pommes)
Conserver Votre Gâteau Frais
Ce gâteau se conserve magnifiquement, ce qui le rend parfait pour une préparation à l’avance. Conservez-le toujours couvert au réfrigérateur. Du film alimentaire pressé directement sur la surface du caramel l’empêchera de sécher ou de former une peau.
Pour la meilleure texture et saveur, dégustez-le dans les 3-4 jours. Les biscuits Grahams continueront de ramollir, mais il reste délicieux. Je ne recommande pas de congeler ce gâteau, car la couche de pudding peut se séparer et devenir aqueuse à la décongélation.
Si vous devez le transporter, gardez-le simplement dans son plat, couvrez-le bien et apportez-le dans une glacière ou un sac isotherme. C’est un dessert très robuste qui voyage bien vers n’importe quel repas partagé ou fête.
Mes Meilleurs Conseils pour Réussir
- Taillez les Pommes Uniformément : Coupez vos pommes en dés de taille similaire pour une cuisson uniforme.
- Épaississez avec Sagesse : N’ajoutez la farine que si votre mélange de pommes est vraiment trop liquide après cuisson. Vous voulez une compote épaisse, pas une soupe.
- Refroidissez Bien : Je ne le répéterai jamais assez—le repos au frais toute la nuit est non-négociable pour la texture parfaite.
- Servez Frais : Utilisez un couteau bien aiguisé trempé dans l’eau chaude pour obtenir des parts nettes.
Le Rendre aussi Beau que Bon
La présentation est facile et amusante ! Avant de servir, j’aime saupoudrer légèrement le caramel de fleur de sel. Vous pouvez aussi disposer quelques fines tranches de pomme sur le dessus ou un peu de cannelle en poudre. Pour des portions individuelles, utilisez un emporte-pièce rond pour créer des ronds de gâteau nets. Une noix de chantilly supplémentaire et un filet de caramel sur chaque assiette font un effet magnifique.
Variations Autour de Votre Gâteau Éclair aux Pommes Caramel
Vous aimez l’idée des desserts superposés sans cuisson ? Il faut explorer davantage ! Par exemple, si vous appréciez le contraste crémeux et acidulé, notre cheesecake déconstruit au combava et à la rhubarbe offre une touche vibrante et citronnée. Une envie de plus de chocolat ? Un gâteau au chocolat classique riche et moelleux est toujours gagnant. Pour une autre fantastique association de saveurs automnales, essayez ce sublime gâteau pomme et spéculoos. Et si vous vous sentez aventureux avec les classiques européens, le gâteau « Vague du Danube » aux cerises et au chocolat est une véritable pièce maîtresse.
Versions Plus Légères du Classique
Vous pouvez facilement alléger ce dessert sans sacrifier la saveur ! Voici six idées simples :
- Laitages Allégés : Utilisez du lait écrémé, de la crème fraîche légère et une alternative de chantilly allégée ou sans sucre.
- Moins Sucré : Optez pour un mélange pour pudding vanille sans sucre et réduisez le sucre dans les pommes d’un quart de tasse. La douceur naturelle des pommes ressort souvent.
- Base Complète : Cherchez des biscuits Grahams à la cannelle complets ou allégés.
- Croquant Noisetté : Saupoudrez une couche de noix de pécan ou de noix hachées et toastées entre les couches de pommes et de pudding pour des bonnes graisses et du croquant.
- Le Pouvoir du Yaourt : Remplacez toute la couche de pudding par un mélange de yaourt grec épais, d’un peu de miel et de vanille.
- Plus de Fruits : Ajoutez une couche de fines tranches de poires fraîches ou de baies avec les pommes pour plus de fibres et de vitamines.
Erreurs Courantes à Éviter
Erreur 1 : Utiliser des Pommes Chaudes
Superposer une garniture de pommes chaude est la principale raison d’un gâteau mou et détrempé. La chaleur commence à ramollir les biscuits immédiatement, faisant dissoudre les couches du bas. Laissez toujours, TOUJOURS, votre mélange de pommes cuites refroidir complètement à température ambiante avant d’assembler. Je prépare souvent les pommes en premier pour qu’elles aient tout le temps de refroidir pendant que je prépare le reste.
Erreur 2 : Lésiner sur le Temps de Repos
L’impatience est l’ennemi ici ! Sortir le gâteau après seulement 2-3 heures signifie que les biscuits Grahams seront encore durs et friables. La magie de la texture « éclair » se produit pendant le long repos au frais. Les biscuits absorbent l’humidité de la garniture et des pommes, devenant moelleux et semblables à un gâteau. Préparez-le la veille au soir. C’est une chose de moins à gérer le jour de votre événement.
Erreur 3 : Trop Faire Fondre le Caramel
Si vous surchauffez la trempette au caramel, elle deviendra trop fine et liquide. Elle imbibera directement la couche supérieure de biscuits au lieu de reposer gentiment dessus. Faites-la chauffer par courtes impulsions en mélangeant bien entre chaque. Vous voulez qu’elle soit tiède et tartinable, comme du beurre de cacahuète mou, pas une sauce liquide. Si elle devient trop liquide, laissez-la refroidir quelques minutes pour épaissir avant de l’étaler.
Erreur 4 : Utiliser un Mauvais Format de Plat
Un plat plus petit et plus profond rendra très difficile la création des bonnes couches et pourrait faire déborder le gâteau. Un plat rectangulaire standard (env. 23×33 cm) est idéal. Si vous n’avez qu’une taille légèrement différente, ajustez en utilisant moins ou plus de biscuits Grahams par couche pour couvrir le fond complètement sans grands trous.
Rappelez-vous, la beauté des repas faits maison est le contrôle que vous avez sur les ingrédients et l’amour que vous y mettez, ce qui conduit toujours à une meilleure saveur et souvent à une meilleure valeur nutritionnelle comparé aux desserts du commerce.
Si cette merveille sans cuisson vous a séduit, vous pouvez trouver tellement d’autres idées inspirantes dans notre collection complète de gâteaux et pâtisseries.
Vos Questions sur le Gâteau Éclair aux Pommes Caramel, Répondues
Puis-je préparer ce gâteau plus d’un jour à l’avance ?
Absolument ! En fait, il est souvent encore meilleur le lendemain. Les saveurs ont plus de temps pour se marier à merveille. Assurez-vous simplement qu’il soit bien couvert de film alimentaire ou dans un contenant hermétique. Il se conservera parfaitement au réfrigérateur pendant 3-4 jours. Je ne recommande pas d’aller au-delà de quatre jours car les biscuits Grahams peuvent devenir trop mous.
Par quoi puis-je remplacer la chantilly en bombe (Cool Whip) ?
Vous avez quelques excellentes options. La plus simple est d’utiliser la même quantité de crème chantilly maison. Battez simplement 500 ml de crème fleurette avec 30 g de sucre glace et 1 cuillère à café de vanille jusqu’à ce qu’elle soit ferme. Vous pouvez aussi utiliser une bombe de 225 g d’une autre marque de crème en bombe. L’important est que votre garniture finale soit légère et tartinable.
Ma garniture au caramel est trop dure à étaler. Que faire ?
Cela arrive si la trempette au caramel est trop froide. Le léger chauffage au micro-ondes préconisé dans la recette règle généralement le problème. Si elle est encore ferme, ajoutez une cuillère à café de lait ou de crème à la trempette avant de chauffer. Cela aidera à la détendre. Chauffez par impulsions de 10 secondes en remuant soigneusement à chaque fois, jusqu’à ce qu’elle soit lisse et coulante.
Puis-je utiliser de la vraie crème chantilly dans la couche de pudding ?
Oui, mais avec un petit ajustement. Si vous incorporez de la vraie crème chantilly dans le mélange de pudding, la garnition peut être un peu plus molle. Pour l’aider à bien prendre, envisagez d’utiliser seulement 720 ml de lait au lieu de 840 ml lors de la préparation du pudding. Cela crée une base plus épaisse qui tient mieux lorsqu’on y incorpore la crème chantilly plus légère.
Pourquoi recommande-t-on les pommes Granny Smith ?
Les pommes Granny Smith sont idéales car elles sont fermes et acidulées. Elles tiennent bien à la cuisson et leur saveur acidulée offre un merveilleux contraste avec le caramel sucré et le pudding crémeux. Cet équilibre empêche le dessert d’être trop sucré. Si vous préférez une pomme plus douce, Honeycrisp est une bonne alternative.
Y a-t-il un moyen de faire ce gâteau sans pudding instantané ?
Pour une version entièrement maison, vous pouvez préparer une crème pâtissière vanille maison. Faites-la cuire sur la plaque avec des jaunes d’œufs, de la maïzena, du lait et du sucre jusqu’à épaississement, puis laissez-la refroidir complètement avant d’incorporer la crème chantilly ou la crème en bombe. Cette méthode prend plus de temps mais vous donne un contrôle total sur les ingrédients.
Comment obtenir une part bien nette en servant ?
L’astuce est un couteau tranchant à lame fine. Passez la lame sous l’eau très chaude et essuyez-la avant chaque coupe. La chaleur aide la lame à glisser facilement à travers le caramel et les couches crémeuses, vous donnant des parts nettes et parfaites. Essuyez la lame entre chaque coupe pour la plus jolie présentation.
Puis-je ajouter des noix à ce gâteau ?
Les noix sont un ajout fantastique ! Des noix de pécan ou des noix hachées et toastées se marient à merveille avec le caramel et la pomme. Je recommande de saupoudrer une légère couche sur les couches de pommes pendant l’assemblage, plutôt que de les mélanger au pudding. Cela apporte une belle surprise de texture. Vous pouvez aussi en saupoudrer quelques-unes sur le dessus pour la décoration juste avant de servir.
Mes biscuits Grahams sont encore un peu durs après le repos. Que s’est-il passé ?
Cela signifie généralement que le gâteau n’a pas reposé assez longtemps. Les biscuits ont besoin d’un minimum de 8 heures complètes pour bien ramollir. Si vous êtes pressé, assurez-vous que votre mélange de pommes est complètement froid et que votre pudding est bien mélangé. Appuyez aussi légèrement sur la dernière couche de biscuits pour assurer un bon contact avec la garniture humide en dessous, ce qui aide au processus de ramollissement.
Puis-je utiliser une sauce au caramel maison à la place de la trempette ?
Vous pouvez, mais soyez prudent. De nombreuses sauces au caramel maison sont bien plus liquides que la trempette au caramel épaisse et tartinable. Si vous utilisez une sauce fine, elle imbibera directement le gâteau. Si vous voulez utiliser du caramel maison, réduisez-le sur la plaque jusqu’à ce qu’il soit très épais et refroidisse à une consistance tartinable, similaire à la trempette.
La Dernière Part
Alors voilà—mon astuce ultime sans cuisson pour conquérir n’importe quel public automnal. Ce Gâteau Éclair aux Pommes Caramel est bien plus qu’un dessert ; c’est un câlin dans un plat. Il prouve que les douceurs les plus mémorables n’ont pas besoin d’être compliquées. Elles ont juste besoin d’être préparées avec une pincée d’amour et une bonne nuit de repos au frigo. Préparez-le, partagez-le avec les gens qui vous sont chers, et regardez chaque dernière bouchée crémeuse, caramélisée et pommelée disparaître. Bonne pâtisserie—ou devrais-je dire, bon assemblage !
Equipment
- Grande casserole
- Plat de cuisson de 9x13 pouces
- Grands bols de mélange
- Fouet et spatule
- Tasses et cuillères à mesurer
Ingrédients
- 5 livres pommes Granny Smith pelées, évidées et coupées en dés
- 1 tasse sucre blanc
- 1 cuillère à soupe cannelle moulue
- 1-2 cuillères à soupe farine tout usage au besoin
- 2 boîtes pudding à la vanille instantané (3,4 oz chacune)
- 3.5 tasses lait entier
- 1/2 tasse crème aigre
- 8 onces Cool Whip décongelé
- 21 entiers crackers Graham à la cannelle environ 2 paquets
- 16 onces trempette caramel aux pommes trouvée près des pommes
Instructions
- Dans une grande casserole, mélanger les pommes en dés, le sucre et la cannelle. Cuire à feu moyen-doux pendant 15-20 minutes jusqu'à ce qu'elles soient tendres.
- Laissez le mélange de pommes refroidir complètement.
- Dans un grand bol, fouetter les mélanges de pudding avec le lait pendant 2 minutes, puis incorporer la crème aigre et le Cool Whip.
- Dans un plat de cuisson de 9x13 pouces, installer 7 crackers Graham au fond.
- Étendre la moitié des pommes cuites sur les crackers, puis la moitié du mélange de pudding.
- Répéter avec le reste des crackers, des pommes et du mélange de pudding.
- Terminer avec une couche de crackers Graham.
- Chauffer la trempette caramel aux pommes au micro-ondes jusqu'à ce qu'elle soit étalable puis l'étendre sur le dessus des crackers.
- Couvrir le plat et réfrigérer pendant au moins 8 heures ou toute la nuit.
Notes
Nutrition

Je suis Céline, une véritable passionnée d’ustensiles et de matériel de cuisine ! J’adore tester, comparer et découvrir les meilleurs équipements pour rendre la cuisine plus efficace et agréable. Que ce soit un bon couteau, un robot performant ou une poêle incontournable, je suis toujours à la recherche des outils qui feront la différence. Mon but est de vous guider dans vos choix pour que vous ayez le bon matériel adapté à vos besoins.