
Ton Nouveau Dessert Favori : Délice au Cheesecake Cerise
Y a-t-il quelque chose de meilleur que le moment où on coupe dans un cheesecake parfait ? Le centre crémeux, la base croustillante et cette garniture fruitée et brillante promettent un pur moment de joie. Ma famille applaudit pratiquement lorsqu’elle voit ce Délice Cerise Fromage sur la table. C’est le dessert que je sors pour chaque célébration et soirée douillette. Laissez-moi vous montrer comment réaliser cette œuvre simple et magnifique.
Un Coin de douceur: L’histoire de ce Délice au Cheesecake Cerise
Le cheesecake a traversé le temps, de la Grèce antique aux diners de New York. Ma version est un humble hommage à cette riche histoire. Il mélange le cheesecake classique au four avec la joie d’une garniture facile de cerises comme pour une tarte. Je me souviens que ma grand-mère faisait quelque chose similaire, mais elle faisait compoter ses propres cerises pendant des heures ! Cette recette de famille est ma version moderne et sans tracas. Elle capture toute l’élégance d’un dessert traditionnel sans le stress. C’est un beau mélange d’ancien et de nouveau, idéal pour les cuisiniers pressés de aujourd’hui.
Pourquoi Tu Vas Adorer Cette Recette de Cheesecake Cerise
Tu vas adorer cette recette parce qu’elle marche chaque fois. La texture est un rêve — incroyablement douce et riche sans être trop lourde. La garniture sucrée-tangente aux cerises équilibre parfaitement le côté crémeux. Elle est aussi trompeusement simple. Tu n’as pas besoin de techniques sophistiquées, juste d’un bon mélange et un peu de patience pendant la réfrigération. Le résultat ressemble à celui d’une pâtisserie professionnelle. C’est le genre de dessert qui fait que les gens demandent la recette immédiatement.
Quand Servir Ton Délice Cerise Fromage
Ce cheesecake est merveilleusement versatile ! C’est mon choix pour les fêtes d’anniversaire et les repas festifs comme Noël ou Pâques. Il fait sensation lors des pique-niques d’été et des repas partagés car il voyage très bien. Je adore aussi le préparer pour un simple dîner familial le dimanche. Transformer un repas ordinaire en quelque chose spécial est un plaisir. Quelle que soit l’occasion, ce dessert est comme un cadeau.
Rassembler Tes Ingrédients pour le Délice au Cheesecake Cerise
Utiliser des ingrédients simples et de qualité est le secret ici. Tout est facile à trouver au marché local.
Pour la Base:
- 1 1/2 cup de biscuits Graham écrasés
- 1/4 cup de sucre
- 1/2 cup de beurre fondu
Pour la Garniture:
- 3 paquets (8 oz chacun) de cream cheese, ramollis
- 1 cup de sucre
- 1 tsp de extract de vanille
- 3 œufs
- 1/4 cup de farine tous usages
- 1/2 cup de crème épaisse
Pour la Topping:
- 1 can (environ 21 oz) de garniture pour tarte aux cerises
Substitutions Sans Stress
Ne te inquiète pas si tu manques un ingrédient ! Tu peux facilement adapter cette recette.
- Biscuits Graham: Utilise des biscuits digestifs, des gaufrettes vanille, ou même des bretzels écrasés pour une touche sucrée-salée.
- Crème Épaisse: Le yaourt grec nature entier est un substitut parfait.
- Garniture Cerise: Toute garniture pour tarte en can fonctionne — bleuets, pomme, ou fraise. Ou, faites-la maison en faisant mijoter des cerises fraîches/congelées avec un peu de sucre et de fécule de maïs.
Créer Ton Délice Cerise Fromage : Un Guide Pas-à-Pas
Suivez ces étapes pour un cheesecake impeccable. Profite du processus — l’odeur du cheesecake qui cuit est divine !
Étape 1: Construire la Fondation
Premièrement, préchauffe ton oven à 325°F (160°C). Prends tes biscuits Graham écrasés et mélange-les avec le sucre dans un bol. Les fines miettes sablées scintilleront avec les cristaux de sucre. Verse le beurre fondu doré. Mélange jusqu’à que chaque miette soit humidifiée et que la mixture se maintienne quand elle est pressée. Appuie-ceci fermement dans le fond de ton moule à fond amovible. Je utilise le fond d’un verre pour le rendre uniforme et compact. Cette couche buttery et crunchy rend chaque bouchée si satisfaisante.
Étape 2: Préparer la Garniture Luxueuse
Maintenant, pour la star : la garniture. Dans un grand bol, bat le cream cheese ramolli jusqu’à qu’il soit complètement doux et fluffy. Pas de lumps permis ! Ajoute le sucre et la vanille, et bat encore jusqu’à que la mixture soit soyeuse. Casse les œufs, un à un, mixant juste jusqu’à que chaque yellow yolk disparaisse. Overbeating ici peut causer des cracks. Finalement, mélange doucement la flour et la cool, tangy crème épaisse. La batter deviendra gloriously thick et creamy. Verse-la sur votre base préparée et doucement smooth le top avec spatula.
Astuce pro: Assure que votre cream cheese, œufs, et crème épaisse sont à temperature room. C’est le #1 trick pour une garniture douce, sans lumps qui bake evenly.
Étape 3: L’Art de la Cuisson et du Refroidissement
Place votre pan au centre du oven préchauffé. Bake pour 50-55 minutes. Les edges seront set et légèrement gonflés, mais le centre devrait encore avoir un gentle, jiggly wobble — comme Jell-O. C’est parfait ! Turn off le oven. Crack la door open avec wooden spoon et let le cheesecake cool inside pour une heure. Ce slow, gentle cooling prevent le top de sinking ou cracking. Then, refrigerate-le pour au moins 4 heures, ou better yet, overnight. Cette patience est rewarded avec le ideal firm, creamy texture.
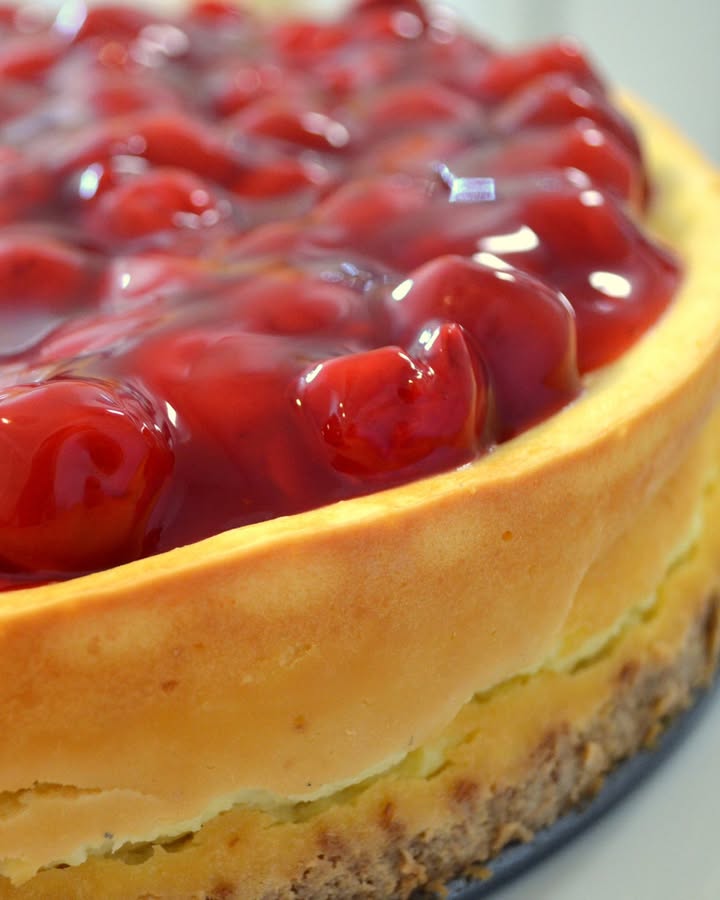
Étape 4: Le Grand Final: Garniture Cerise
C’est la partie plaisante ! Open votre can de glossy, deep-red cherry pie filling. Spoon-le generously over le cheesecake complètement chilled. Utilise le back du spoon pour spread les cerises et leur glossy syrup into un even, beautiful layer. Le vibrant red contre le pale cream filling est stunning. Maintenant, carefully release le springform pan, slice, et serve. Prépare-toi pour les compliments !
Secret du chef: Pour un finish shiny, professional, lightly warm la garniture pour tarte dans un small pan avant spreading. Il glidera on plus smoothly et lookera even more glossy.
Le Timeline de Ton Cheesecake
- Prep Time: 20 minutes
- Cook Time: 55 minutes
- Cooling Time: 1 heure (in oven)
- Chilling Time: 4 heures minimum (overnight best)
- Total Time: Environ 6 heures 15 minutes (mostly hands-off)
Un peu d’Info Extra sur le Cheesecake Cerise
Savais-tu que la farine dans la garniture est un stabilizer clever ? Il aide à prevenir cracks et donne au cheesecake une lovely, fine crumb. C’est un petit ingredient qui fait une big difference. Also, utiliser dairy full-fat n’est pas juste pour flavor — il assure que votre cheesecake sets properly et a luxurious mouthfeel nous aimons tous.
Tools Tu Vas Need
- Moule à fond amovible (springform pan) de 9 ou 10-inch (essential!)
- Mixer électrique (hand ou stand)
- Bol de mixage
- Cups et spoons de mesure
- Spatula
Garder Ton Délice au Cheesecake Cerise Frais
Une fois topped, votre cheesecake devrait être stored dans le refrigerator. Cover-le loosely avec plastic wrap ou place-le dans un large cake carrier. Les cerises sont moist, donc keeping it coveré prevents it de absorber other fridge odors. Il stayera perfect pour 4-5 jours.
Tu peux aussi freeze ce cheesecake pour longer storage. Il best pour freeze-le without la garniture cerise. Wrap le cheesecake chilled, plain tight dans plastic wrap, puis dans foil. Il keepera pour jusqu’à 2 mois.
Pour servir un cheesecake frozen, thaw-le overnight dans le refrigerator. Then, ajoute la fresh garniture pour tarte cerise just avant serving. Ceci keeps le topping vibrant et le crust de getting soggy.
Tips pour les Best Results
- Always utilise un moule à fond amovible (springform pan). C’est le seul easy way pour obtenir le cheesecake out cleanly.
- Les ingredients à température ambiante sont non-negotiable pour une batter douce.
- Don’t open le oven door durant baking! Sudden temperature changes peut causer cracks.
- Pour ultra-neat slices, dip votre knife dans hot water et wipe-le clean entre chaque cut.
Idées de Présentation pour Impress
- Ajoute une dollop de whipped cream freshly sur chaque slice.
- Garnish avec quelques feuilles de mint fresh pour un pop de green.
- Serve sur individual plates avec drizzle de sauce chocolat dark.
- Pour une dinner party, place une single perfect cerise sur top de chaque slice.
Explore More Idées Dessert Delicious
Si vous avez aimé ce Délice Cerise Fromage, vous avez un monde sweet à explorer ! Pour un autre cake show-stopping, essayez ce stunning cake de célébration chocolat layered avec strawberries. Les amoureux Oreo vont devenir crazy pour les deep, creamy layers de ce Ultimate Oreo Cheesecake. Looking pour quelque chose un bit lighter ? Ce gateau yaourt avec pears et almonds est moist et delightful. Et pour le ultimate indulgence chocolat, vous must experience les rich, fudgy layers d’un traditional Wet Brigadeiro Cake.
Erreurs Courantes à Éviter
Éviter ces simple errors garantit le succes cheesecake chaque fois.
Erreur 1: Utiliser des Ingredients Cold
Ceci est le pitfall plus common. Cold cream cheese ne blend smoothly, leading à une batter lumpy. Cold œufs et crème épaisse peut aussi causer mixture split ou look curdled. Always take votre dairy et œufs out du fridge à l’heure avant vous start baking. Le result sera velvety, homogeneous filling qui bake dans perfect creaminess.
Erreur 2: Overmixing les Œufs
Une fois vous ajoute les œufs, votre style mixing needs de changer. Beating-les trop hard ou long incorporate trop air. Ceci air expands dans le oven et then collapses, creating cracks sur le surface de votre cheesecake. Après adding chaque œuf, mix sur low speed juste jusqu’à le yolk disappear dans batter. Quelques remaining streaks sont okay — ils incorporeront avec final gentle mixing.
Erreur 3: Skipping le Slow Cool
Pulling le hot cheesecake out du oven et putting directement dans fridge est shock. Le temperature drop sudden presque always cause top crack et centre sink. Le gradual cooling process dans le oven turned off est pas suggestion — c’est crucial step. Il allows le cheesecake à set sa structure gently, ensuring smooth, level top.
Erreur 4: Not Chilling Long Enough
Il peut look set après seulement une heure dans fridge, mais pas ready. Slicing dans un cheesecake warm results dans messy, almost runny interior. Le long chill (au moins 4 heures, overnight est gold standard) allows les fats à firm up complètement. Ceci donne-vous ces clean, picture-perfect slices et luxurious, dense texture qui défine un great baked cheesecake.
Tes Questions sur le Cheesecake Cerise, Répondues
Propriété des cerises fraîches au lieu de garniture pour tarte ?
Absolument! Tu vas need environ 3 cups cerises fraîches ou frozen pitted. Dans saucepan, combine-les avec 1/4 à 1/2 cup sucre (à taste), une tablespoon jus lemon, et 2 tablespoons cornstarch mixed avec un peu water. Cook sur heat moyen, stirring, jusqu’à les cerises break down légèrement et sauce thickens dans consistency jammy. Let-le cool complètement avant spreading sur cheesecake chilled. Cette version homemade est moins sucrée et wonderfully fruity.
Pourquoi mon cheesecake a cracké dans le centre ?
Les cracks arrivent habituellement de batter overmixing (adding trop air), overbaking, ou cooling trop quickly. Le key est gentle mixing après adding œufs, baking jusqu’à jiggly wobble centre, et suivant cool-down slow dans oven. Even si crack, worry pas! Garniture cerise flavorful hide complètement, et taste sera fantastic toujours. C’est secret baker’s.
Comment je sais quand le cheesecake est done baking ?
Le « test jiggle » est meilleur ami. À environ 50 minutes, gently shake rack oven. Les edges cheesecake devraient look set et possible légèrement gonflé. Le centre, environ circle de 2-3 inch, devrait avoir soft wobble — comme Jell-O. Il firm up comme cools. Si le centre est liquidy, needs plus temps. Si whole surface est firm et ne move pas, likely overbaked. Remember, il continue cook à heat residual durant slow cool.
Propriété faire ce recette gluten-free ?
Oui, très simple. Pour crust, utilise amount égal favorite biscuits Graham-style gluten-free ou cookies gluten-free crushed. Ensure powder chocolat utilisé certifié gluten-free si faire variation chocolat. Also, swap 1/4 cup farine tous usages dans garniture pour blend baking gluten-free 1:1. Les autres ingredients sont naturellement gluten-free, donc vous pouvez enjoy ce dessert sans worry.
My garniture cream cheese est lumpy. Peut-je fixer ?
Prévention est best avec cheese température ambiante. Si tu avez lumps petits, essayez presser garniture dans sieve fine-mesh avant pouring into crust. Pour issues grandes, utilise immersion blender brief pour smooth out. Be cautious pas over-blend et add plus air. Quelques tiny lumps peuvent bake out, mais start smooth toujours goal pour perfect creamy texture.
Quel est purpose de crème épaisse dans garniture ?
Crème épaisse fait deux wonderful choses. Premier, elle ajoute tang plaisant subtle qui balance sweetness cream cheese et sucre. Ceci rend flavor plus complexe et intéressant. Second, son acidity et content fat aid créer texture incredibly douce, riche, velvety. Il rend cheesecake plus luxueux. Si tu out, yaourt grec nature entier est substitut best.
Propriété bake ceci dans regular cake pan ?
Je recommend pas. Pan springform a removable sides, essential pour facile release ce dessert fragile sans damaging. Si tu avez seulement regular pan, vous must line complètement avec parchment paper hanging over sides. Even alors, unmolding très tricky. Pan springform investissement worthwhile pour amoureux cheesecake.
Quelle advance peut-je faire ce cheesecake ?
Ce dessert est fantastic option make-ahead ! Cuire et refrigerate complètement (without topping) jusqu’à 2 jours advance. Keep-le wrapped dans fridge. Ajoute garniture cerise day plan serve, ideally quelques heures avant. Ceci keep crust crisp. Vous pouvez aussi freeze cheesecake plain pour jusqu’à 2 mois pour planning plus long.
Y a-t-il way prevenir crust soggy ?
Bottom soggy souvent causé par filling wet leaking sur crust. Assure garniture right consistency — thick et creamy, pas runny. Also, assure press base crumbs fermement et même dans pan. Quelques bakers pre-bake crust pour 8-10 minutes avant adding garniture créer barrier ferme. Ceci step inclus dans recipe et aide vraiment.
Quel toppings work autre que cerise ?
Possibilités endless ! Bleuets, strawberry, ou apple garniture tarte tous classics. Drizzle salted caramel ou sauce chocolat hot decadent. Fruit fresh comme fraises sliced, raspberries, ou compote mango options lighter. Vous pourrait even top avec layer curd lemon tangy pour contrast bright. Feel free créative et match topping mood ou season.
Ce Délice au Cheesecake Cerise est plus que juste recette — c’est path reliable créer sweet memories. Il earned permanent spot dans collection favorite gateaux et patisseries. Process simple, result stunning, et joy bring real. Hope devient cherished part table famille, comme chez moi. Now, go préchauffe oven et prepare kitchen smell amazing. Happy baking, et ne forget share love (et slice) !
Equipment
- Mixeur électrique
- Moule à charnière de 23 ou 25 cm
- Bols à mélanger
- Spatule
- Tasses et cuillères à mesurer
Ingrédients
- 1.5 tasse biscuits Graham écrasés
- 0.25 tasse sucre
- 0.5 tasse beurre fondu
- 3 paquets fromage à la crème ramolli
- 1 tasse sucre
- 1 c. à café extrait de vanille
- 3 œufs
- 0.25 tasse farine tout usage
- 0.5 tasse crème aigre
- 1 boîte garniture pour tarte aux cerises environ 21 oz
Instructions
- Préchauffez le four à 160°C (325°F).
- Mélangez les biscuits Graham avec le sucre dans un bol.
- Incorporez le beurre fondu, puis pressez ce mélange au fond d'un moule à charnière.
- Dans un grand bol, battez le fromage à la crème jusqu'à ce qu'il soit lisse et crémeux.
- Ajoutez le sucre et la vanille, puis battez à nouveau jusqu'à obtenir un mélange soyeux.
- Incorporez les œufs un à un, en mélangeant juste jusqu'à ce qu'ils soient incorporés.
- Ajoutez la farine et la crème aigre, puis mélangez doucement.
- Versez le mélange de remplissage sur la croûte préparée et lissez le dessus.
- Enfournez pendant 50-55 minutes jusqu'à ce que les bords soient pris et que le centre soit légèrement tremblotant.
- Laissez refroidir dans le four éteint pendant une heure avec la porte entrebâillée.
- Réfrigérez au moins 4 heures, ou idéalement toute la nuit.
- Étalez la garniture aux cerises sur le cheesecake refroidi et servez.
Notes
Nutrition

Je suis Céline, une véritable passionnée d’ustensiles et de matériel de cuisine ! J’adore tester, comparer et découvrir les meilleurs équipements pour rendre la cuisine plus efficace et agréable. Que ce soit un bon couteau, un robot performant ou une poêle incontournable, je suis toujours à la recherche des outils qui feront la différence. Mon but est de vous guider dans vos choix pour que vous ayez le bon matériel adapté à vos besoins.