
Le Gâteau aux Fraises Ultime : Votre Nouveau Dessert Rafraîchissant Favori
Y a-t-il quelque chose de mieux que l’odeur d’un gâteau qui cuit pendant que des fraises sucrées et juteuses caramélisent sur le dessus ? Je ne crois pas. Cette recette de gâteau aux fraises est mon petit rayon de soleil, celle vers laquelle je me tourne quand je veux faire sourire tout le monde sans passer des heures en cuisine. Il est simple, magnifique et a le goût d’un câlin réconfortant. Laissez-moi vous montrer comment réaliser ce gâteau fraises rafraîchissant parfait qui deviendra un incontournable chez vous, comme il l’est chez moi.
Un Petit Morceau de Soleil : L’Histoire de Ce Gâteau
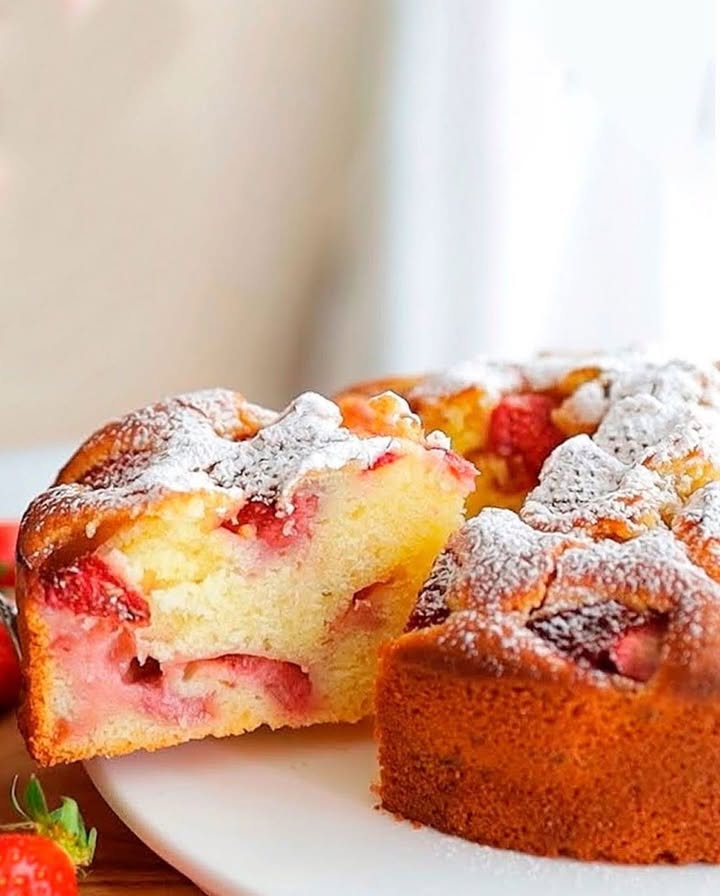
Cette recette occupe une place spéciale dans mon cœur. Elle est née du gâteau au beurre classique de ma grand-mère, qui était toujours un régal. Un été, alors que mes plants de fraises étaient très généreux, j’ai commencé à presser les baies directement dans la pâte avant la cuisson. Le résultat était magique ! Les fruits ont légèrement coulé pour créer des poches de douceur confiturée, tandis que le dessus devenait légèrement croustillant et glacé. C’est un beau mélange entre un gâteau classique et un dessert rustique où le fruit est à l’honneur, à la fois traditionnel et merveilleusement frais.
Pourquoi Vous Allez Tombez Amoureux de Ce Gâteau aux Fraises Rafraîchissant
D’abord, il est incroyablement indulgent — pas besoin de talent de pâtissier décorateur. Les fraises font tout le travail esthétique ! Ensuite, la texture est divine : une mie tendre et beurrée qui contraste avec les baies cuites et fondantes. Il n’est pas trop sucré, laissant la saveur naturelle du fruit s’exprimer. Qu’il soit servi tiède avec une lichette de crème ou à température ambiante avec une tasse de thé, ce dessert rafraîchissant aux fraises est un succès garanti qui célèbre les bonnes choses simples.
Les Occasions Parfaites pour Votre Gâteau Fraises Rafraîchissant
Ce gâteau est incroyablement polyvalent. C’est mon arme secrète pour :
- Les Brunchs du Dimanche : Il se marie à la perfection avec le café et un jus d’orange frais.
- Les Buffets et Pique-niques : Il se transporte bien et disparaît toujours en premier.
- Les Petits Plaisirs en Semaine : Parce que vous méritez un peu de douceur un mardi !
- Les Célébrations de Printemps et d’Été : Il capture merveilleusement l’essence de la saison ensoleillée.
Rassembler Vos Ingrédients pour un Délice aux Fraises
Voici ce dont vous aurez besoin pour cette recette de gâteau aux fraises simple :
- 190 g de farine de blé – La base de notre mie tendre.
- 1 c. à café de levure chimique – Pour une levée parfaite.
- 1/2 c. à café de sel – Pour équilibrer et rehausser toutes les saveurs.
- 85 g de beurre ou de margarine, ramolli – Pour le fondant et l’humidité.
- 200 g de sucre – Sucre le gâteau et aide les fraises à caraméliser.
- 1 œuf – Lie tous les éléments et apporte de la structure.
- 1 c. à café d’extrait de vanille – La base aromatique et réconfortante.
- 120 ml de lait – Garde la pâte bien moelleuse.
- 400 g de fraises fraîches – La star du spectacle ! Choisissez-les mûres et parfumées.
- 1 c. à soupe de sucre supplémentaire – Pour un dessus brillant et croustillant.
Substitutions Faciles : Personnalisez Ce Gâteau
Il vous manque un ingrédient ? Pas de problème !
- Farine : Vous pouvez utiliser un mélange sans gluten 1:1 pour une version adaptée.
- Beurre : La margarine, l’huile de coco ou un beurre végétal fonctionnent très bien.
- Lait : Tout lait fera l’affaire — lait de vache, d’amande, d’avoine ou de soja.
- Fraises : Les baies surgelées peuvent dépanner ! Pas besoin de les décongeler, ajoutez-les directement pour éviter trop de liquide.
Étape par Étape : La Cuisson de Votre Gâteau aux Fraises Parfait
C’est parti pour la cuisson ! Suivez ces étapes simples pour un gâteau fraises rafraîchissant infaillible.
Étape 1 : Préparez Votre Cuisine et Vos Baies
Commencez par préchauffer votre four à 180°C (th. 6). Cela garantit qu’il est parfaitement chaud quand votre pâte est prête. Beurrez généreusement un moule à gâteau rond de 22 cm. Maintenant, la partie amusante : lavez vos fraises à l’eau fraîche. Séchez-les délicatement, retirez les queues et coupez chacune en deux. Vous allez adorer voir les moitiés rouges ressembler à de petits cœurs sur la pâte claire. Astuce de pro : Sécher les fraises aide à éviter un fond de gâteau détrempé.
Étape 2 : Mélangez les Ingrédients Secs
Dans un saladier moyen, prenez votre farine, la levure et le sel. Prenez un moment pour les tamiser ensemble. Je sais, cela semble être une étape en plus, mais c’est le secret d’un gâteau léger et aéré, sans grumeaux. Cela incorpore de l’air et assure une distribution uniforme de la levure, pour une levée parfaite à chaque fois. La vue de cette fine poudre neigeuse est si satisfaisante !
Étape 3 : Crémez le Beurre et le Sucre
Dans un autre grand saladier, placez votre beurre ramolli et le sucre. À l’aide d’un batteur électrique, fouettez-les ensemble à vitesse moyenne pendant 3 bonnes minutes. Observez le mélange se transformer de granuleux à pâle, mousseux et merveilleusement crémeux. Cette étape est cruciale — elle crée de petites poches d’air qui vont se développer au four, rendant votre gâteau moelleux et tendre, et non dense.
Étape 4 : Construisez la Pâte
Baissez la vitesse de votre batteur. Ajoutez l’œuf et l’extrait de vanille. Fouettez jusqu’à ce que le mélange soit lisse et homogène ; il ressemblera à une crème jaune et brillante. Maintenant, ajoutez environ un tiers du mélange de farine et mélangez à basse vitesse jusqu’à ce que ce soit juste combiné. Continuez avec la moitié du lait. Répétez l’opération, en terminant par la dernière portion de farine. Mélangez jusqu’à ce qu’il n’y ait plus de traînées de farine, mais ne *surmélangez* pas ! Quelques petits grumeaux sont parfaitement acceptables. La pâte sera épaisse, lisse et délicieusement parfumée.
Étape 5 : Assemblez & Cuisez Jusqu’à Perfection Dorée
Versez cette belle pâte dans votre moule préparé, en lissant le dessus avec une spatule. Maintenant, disposez artistiquement vos moitiés de fraises, côté coupé vers le bas, sur toute la surface. Pressez délicatement chaque fraise juste jusqu’à ce qu’elle soit nichée mais dépasse encore un peu. Cela crée ces magnifiques poches confiturées. Enfin, saupoudrez tout le dessus avec la dernière cuillère à soupe de sucre. Cela créera une croûte délicieuse et légèrement croustillante. Enfournez à 180°C pendant 10 minutes, puis réduisez la température à 160°C (th. 5/6) et laissez cuire environ 50 minutes de plus. Astuce du chef : La chaleur initiale forte donne un coup de fouet rapide au gâteau, tandis que la température plus basse assure une cuisson douce et homogène sans qu’il ne brunisse trop.
Étape 6 : Le Grand Final — Refroidissement & Service
Votre cuisine va sentir incroyablement bon ! Le gâteau est cuit quand le dessus est doré, les fraises bouillonnent et qu’un cure-dent inséré dans la partie gâteau (pas dans une fraise) en ressort propre. Laissez-le refroidir dans le moule pendant 15-20 minutes. Cette patience permet à la structure de se fixer, pour qu’il ne s’effondre pas quand vous le démoulerez. Passez ensuite un couteau autour du bord et transférez-le sur une grille. Servez-le légèrement tiède ou à température ambiante.
Calculez le Temps pour Votre Dessert Rafraîchissant aux Fraises
Voici un rapide décomposé de votre investissement en temps :
- Temps de Préparation : 20 minutes
- Temps de Cuisson : 60 minutes
- Temps de Refroidissement : 20 minutes (si vous pouvez attendre !)
- Temps Total : Environ 1 heure 40 minutes
La majeure partie de ce temps est une cuisson sans surveillance, vous laissant libre de mettre la table ou simplement de profiter des arômes.
Mon Secret de Chef pour le Meilleur Gâteau aux Fraises
Pour un coup de boost en saveur, mélangez vos fraises coupées en deux avec une cuillère à café de vinaigre balsamique avant de les disposer sur la pâte. Cela peut sembler inhabituel, mais cela intensifie la douceur naturelle de la baie et ajoute une profondeur formidable qui fera dire à vos invités : « C’est quoi ton secret ? » Faites-moi confiance sur ce coup !
Un Fait « Fraisement » Intéressant
Saviez-vous qu’une fraise moyenne compte environ 200 petites graines à sa surface ? Ce ne sont pas que des graines ; chacune est techniquement un fruit séparé ! Cela fait de la fraise un « fruit accessoire agrégé ». Les cuire adoucit légèrement ces graines, libérant leur saveur légèrement noisetée et contribuant à la merveilleuse texture de ce dessert rafraîchissant aux fraises.
Le Matériel Qu’il Vous Faut : Simple et Basique
Aucun gadget sophistiqué requis !
- Un moule à gâteau rond de 22 cm (environ 9 pouces)
- Saladiers de mélange (2)
- Batteur électrique à main ou sur pied
- Spatule
- Grille de refroidissement
Conserver Votre Création Délicieuse
Ce gâteau est meilleur dégusté le jour même, quand le dessus est encore légèrement croustillant. Si vous avez des restes, couvrez-le légèrement de papier aluminium ou placez-le dans une boîte à gâteau à température ambiante pendant 2 jours maximum. Les fraises le rendront plus moelleux avec le temps, ce qui est toujours délicieux, mais avec une texture différente.
Pour une conservation plus longue, vous pouvez le réfrigérer jusqu’à 4 jours. Laissez les parts revenir à température ambiante environ 30 minutes avant de servir pour ramollir le beurre et retrouver toutes les saveurs. Le froid du frigo peut en effet atténuer un peu le goût.
Vous pouvez aussi congeler le gâteau entièrement refroidi (sans garniture à la crème) jusqu’à 2 mois. Enveloppez-le bien dans du film alimentaire, puis dans du papier aluminium ou placez-le dans un sac de congélation robuste. Décongelez-le une nuit au réfrigérateur et ramenez-le à température ambiante avant de servir.
Astuces & Conseils pour Réussir Votre Gâteau aux Fraises
- Utilisez des ingrédients à température ambiante (beurre, œuf, lait) pour une pâte plus lisse et mieux émulsionnée.
- Ne négligez pas la réduction de la température du four ! C’est la clé pour éviter un dessus trop foncé et dur.
- Si le dessus dore trop vite, couvrez-le légèrement avec une feuille de papier aluminium.
- Laissez le gâteau refroidir presque complètement avant de le couper pour des parts bien nettes.
Idées de Présentation pour Impressionner Vos Invités
Faites qu’il soit aussi beau que bon !
- Saupoudrez d’une légère neige de sucre glace juste avant de servir.
- Ajoutez une lichette de crème fouettée maison ou une boule de glace à la vanille sur le côté.
- Décorez avec quelques feuilles de menthe fraîche et des fraises entières pour une touche de couleur.
- Servez sur un beau pied à gâteau pour en faire la pièce maîtresse de votre table.
Vous Aimez Ce Gâteau ? Essayez Ces Versions Plus Légères !
Cette recette de gâteau aux fraises est merveilleusement adaptable. Voici six délicieuses variations à essayer :
- Blé Complet & Miel : Remplacez la moitié de la farine par de la farine complète et utilisez du miel pour la moitié du sucre. La saveur noisetée se marie à merveille avec les fraises.
- Remplacement par du Yaourt : Remplacez le lait par du yaourt grec nature pour plus de protéines et une touche acidulée délicieuse.
- Sans Gluten & Aux Amandes : Utilisez un mélange de farine sans gluten et ajoutez 50g d’amandes en poudre pour l’humidité et le goût.
- Réduction de Sucre : Diminuez le sucre dans la pâte à 150g. Les fraises apportent beaucoup de douceur naturelle.
- Délice Végétalien : Utilisez un beurre végétal, un « œuf » de graines de lin et votre lait végétal préféré. Ça fonctionne à merveille !
- Mélange de Baies : Remplacez la moitié des fraises par des framboises, myrtilles ou mûres pour une touche colorée et riche en antioxydants.
Si vous explorez d’autres gâteaux classiques, vous devez absolument essayer ce gâteau éponge magique adoré de ma famille. Pour une option plus riche et crémeuse, ce cheesecake marbré chocolat et vanille est un pur délice. Pour les fêtes, un gâteau aux fruits bien moelleux est une tradition. Et quand vous avez besoin d’une recette sans cuisson, ce flan au citron qu’on mixe et met au frais est un vrai sauveur.
Erreurs Courantes à Éviter pour un Gâteau Parfait
Erreur 1 : Utiliser des Ingrédients Froids
Si votre beurre, vos œufs ou votre lait viennent tout droit du frigo, ils ne s’incorporeront pas correctement. Le beurre froid ne crémera pas bien avec le sucre, ce qui donnera un gâteau dense. Des ingrédients froids peuvent aussi faire cailler ou séparer la pâte. Comment l’éviter : Sortez simplement vos produits laitiers et vos œufs du frigo environ 30 à 60 minutes avant de commencer. Votre beurre doit être mou au toucher mais pas fondu.
Erreur 2 : Trop Mélanger la Pâte
Une fois la farine ajoutée, mélanger trop est une erreur courante. Le sur-mélange développe le gluten de la farine, ce qui peut rendre votre gâteau caoutchouteux, dense et l’empêcher de bien lever avant de retomber au centre. Comment l’éviter : Mélangez à basse vitesse et arrêtez dès que vous ne voyez plus de traînées de farine sèche. Quelques petits grumeaux sont tout à fait acceptables — ils disparaîtront au four.
Erreur 3 : Ne Pas Réduire la Température du Four
Cuire tout le temps à 180°C est le moyen sûr d’obtenir un gâteau trop foncé sur le dessus et potentiellement pas assez cuit au centre. La chaleur initiale forte lui donne de la hauteur, mais la cuisson longue et douce à 160°C est ce qui le cuit parfaitement à cœur. Comment l’éviter : Réglez un minuteur pour les 10 premières minutes. Quand il sonne, sans ouvrir la porte du four, baissez simplement le thermostat à 160°C. Cette simple étape fait toute la différence.
Erreur 4 : Couper le Gâteau Quand Il est Chaud
Je sais, la tentation est forte ! Mais couper dans un gâteau chaud le fera s’émietter et s’écraser. La structure est encore en train de se fixer avec la chaleur résiduelle. Comment l’éviter : Pratiquez un peu de patience. Laissez-le refroidir dans le moule, puis sur une grille. L’attente en vaut la peine pour des parts parfaites et nettes qui gardent leur forme.
Vos Questions sur le Gâteau aux Fraises, Répondues !
Puis-je utiliser des fraises surgelées ?
Oui, absolument ! Inutile de les décongeler au préalable, car cela libérerait beaucoup d’eau et détremperait votre pâte. Prenez simplement les moitiés de fraises surgelées et pressez-les directement dans la pâte. Vous devrez peut-être ajouter quelques minutes de cuisson supplémentaire puisque vous partez d’un ingrédient froid. Le résultat sera tout aussi savoureux, même si les baies seront un peu plus fondantes.
Mon gâteau dore trop vite sur le dessus. Que faire ?
Cela peut arriver si votre four est trop chaud ou si la grille est trop haute. La meilleure solution est de poser légèrement une feuille de papier aluminium en « tente » sur le dessus du moule. Faites-le environ 30 à 40 minutes après le début de la cuisson totale, une fois que le dessus est fixé et a pris une belle couleur dorée. Le papier aluminium agira comme un bouclier, permettant au gâteau de continuer à cuire à l’intérieur sans que le dessus ne brûle.
Comment savoir si le gâteau est vraiment cuit ?
Les signes visuels sont un dessus doré-brun et des fraises qui ont l’air confites. Le test le plus fiable est le test du cure-dent. Enfoncez un cure-dent ou une fine brochette au centre du gâteau, en évitant les fraises. S’il en ressort avec quelques miettes humides collées, c’est parfait. S’il ressort avec de la pâte crue, il a besoin de plus de temps. Propre signifie qu’il pourrait être trop cuit.
Puis-je faire ce gâteau dans un moule différent ?
Certainement ! Un moule carré de 20×20 cm fonctionnera bien. Vous pouvez aussi utiliser un moule à cake, mais le temps de cuisson sera plus long. Pour des parts individuelles, essayez des moules à muffins — remplissez-les aux 2/3, déposez une demi-fraise sur chacun et cuisez 20-25 minutes à 175°C. Ajustez toujours le temps et surveillez, car les petits moules cuisent plus vite.
Pourquoi mes fraises ont-elles coulé au fond ?
Si votre pâte est trop liquide, les fruits plus lourds peuvent couler. Cela peut arriver si vous avez trop mesuré le lait ou pas assez de farine. Assurez-vous que votre pâte est épaisse et se tient à la cuillère, pas qu’elle coule comme un liquide. De plus, enrober vos moitiés de fraises d’un léger nuage de farine avant de les ajouter peut fournir une surface accrocheuse pour que la pâte les retienne.
Puis-je préparer la pâte à l’avance ?
Ce n’est pas recommandé. La levure chimique commence à s’activer dès qu’elle est en contact avec l’humidité. Si vous laissez la pâte reposer, la réaction chimique s’épuisera et votre gâteau ne lèvera pas correctement au four. Pour de meilleurs résultats, mélangez votre pâte et enfournez-la sans tarder dans le four préchauffé.
Ce gâteau convient-il à la congélation ?
Oui, il se congèle très bien ! Assurez-vous que le gâteau est complètement refroidi. Enveloppez-le bien dans du film alimentaire, puis dans du papier aluminium ou placez-le dans un sac de congélation épais. Il se conservera jusqu’à 2 mois. Décongelez-le une nuit au réfrigérateur et ramenez-le à température ambiante avant de servir pour la meilleure texture et saveur.
Par quoi puis-je remplacer l’extrait de vanille ?
Vous pouvez utiliser la même quantité de pâte de vanille, qui donnera de jolis points noirâtres. L’extrait d’amande est une alternative délicieuse — utilisez seulement 1/2 cuillère à café car il est plus fort. Les graines d’une gousse de vanille entière fonctionnent aussi merveilleusement. En cas de besoin, vous pouvez même l’omettre, mais la vanille équilibre vraiment le profil gustatif.
Comment rendre ce gâteau plus élégant pour une fête ?
Après cuisson et refroidissement, vous pouvez le glacer. Faites tiédir une cuillère à soupe de confiture de fraises avec une cuillère à café d’eau et badigeonnez délicatement le dessus pour un fini brillant et professionnel. Décorez avec des fraises entières fraîches et des fleurs comestibles. Le servir avec un peu de crème fraîche ou un coulis de baies le rend aussi plus chic, en s’inscrivant dans une approche équilibrée des plaisirs gourmands.
Mon gâteau est dense. Qu’est-ce qui n’a pas marché ?
Un gâteau dense pointe généralement vers quelques problèmes : avoir trop mélangé la pâte après l’ajout de la farine, utiliser de la levure chimique périmée, ou ne pas avoir assez créme le beurre et le sucre. Vérifiez la date de votre levure et assurez-vous d’avoir battu le beurre et le sucre pendant 3 minutes complètes jusqu’à ce qu’ils soient pâles et bien mousseux. Ces petits détails sont la clé d’une mie légère.
J’espère que cette recette apportera autant de joie dans votre cuisine qu’elle en apporte dans la mienne. Elle prouve à quel point des ingrédients simples peuvent créer quelque chose de vraiment spécial. Pour plus d’inspiration sucrée, n’oubliez pas de parcourir notre collection complète de recettes de gâteaux et pâtisseries où vous trouverez plein d’idées pour votre prochaine aventure en pâtisserie.
Prêts, Feu, Pâtissez !
Et voilà — mon gâteau fraises rafraîchissant préféré entre tous. C’est plus qu’une simple recette ; c’est un petit morceau de foyer, un garant de sourires et la façon parfaite de célébrer la saison des fraises. J’ai hâte que vous l’essayiez et que vous vous l’appropriiez. N’oubliez pas de partager une part avec quelqu’un que vous aimez. Bonne pâtisserie !
Equipment
- Mixeur électrique
- Moule à gâteau rond de 22 cm
- Deux bols à mélanger
- Spatule
- Grille de refroidissement
Ingrédients
- 190 g farine de blé
- 1 cuil. à café poudre à lever
- 1/2 cuil. à café sel
- 85 g beurre ou margarine, ramolli
- 200 g sucre
- 1 œuf œuf
- 1 cuil. à café extrait de vanille
- 120 ml lait
- 400 g fraises fraîches
- 1 cuil. à soupe sucre supplémentaire
Instructions
- Préchauffez le four à 180°C et graissez un moule à gâteau rond de 22 cm.
- Lavez les fraises, séchez-les, retirez les feuilles et coupez-les en deux.
- Dans un bol moyen, tamisez la farine, la poudre à lever et le sel.
- Dans un grand bol, battez le beurre et le sucre pendant 3 minutes jusqu'à obtenir un mélange crémeux.
- Ajoutez l'œuf et l'extrait de vanille, puis mélangez jusqu'à l'obtention d'une consistance lisse.
- Incorporez le mélange de farine en alternant avec le lait, sans trop mélanger.
- Versez la pâte dans le moule, disposez les fraises sur le dessus et saupoudrez de sucre.
- Faites cuire pendant 10 minutes à 180°C, puis réduisez à 160°C et poursuivez la cuisson pendant 50 minutes.
- Laissez refroidir le gâteau dans le moule pendant 15-20 minutes, puis transférez-le sur une grille.
Notes
Nutrition

Je suis Céline, une véritable passionnée d’ustensiles et de matériel de cuisine ! J’adore tester, comparer et découvrir les meilleurs équipements pour rendre la cuisine plus efficace et agréable. Que ce soit un bon couteau, un robot performant ou une poêle incontournable, je suis toujours à la recherche des outils qui feront la différence. Mon but est de vous guider dans vos choix pour que vous ayez le bon matériel adapté à vos besoins.