
L’Ultime Gâteau Chocolat Ganache : Une Histoire d’Amour en Couches
Il existe une magie particulière lorsque le gâteau au chocolat rencontre la ganache chocolatée et soyeuse. C’est le dessert dont vous rêvez, celui qui transforme un simple mardi en célébration. Ma quête pour le parfait gâteau chocolat ganache s’est terminée ici, dans ma propre cuisine, après quelques essais et beaucoup d’erreurs (et de dégustations !). Cette recette est mon trésor. C’est celle que je prépare pour les anniversaires, pour me consoler, et pour ces moments de « j’ai juste besoin de chocolat ». Elle ne me laisse jamais tomber.
Plus qu’un Simple Gâteau : L’Histoire de la Ganache au Chocolat
Alors que le gâteau au chocolat classique a des racines remontant à plusieurs siècles, l’ajout génial de la ganache est une touche relativement moderne. Ganache est un terme français, que l’on pense avoir été inventé à Paris dans les années 1850. C’est une chose merveilleusement simple : juste du chocolat et de la crème. Mais lorsqu’elle est versée sur un gâteau moelleux et tendre, elle transforme le dessert simple en quelque chose élégant et profondément satisfaisant. Ma version reste fidèle à cet esprit— sans chichis mais totalement luxueuse. C’est le pont entre un dessert familial et une masterclass de pâtisserie, idéal pour tout cuisinier maison voulant impressionner.
Pourquoi Vous Tomberez Fou d’Amour pour ce Gâteau Ganache au Chocolat
Vous allez adorer cette recette parce qu’elle marche. À chaque fois. Le gâteau est incroyablement moelleux, grâce à un ingrédient surprenant : l’eau bouillante ! Elle révèle la profondeur du goût du cacao. La crème au beurre est riche et pas trop sucrée, et la ganache ? C’est comme une couverture brillante et décadente qui donne un aspect professionnel à toute la création. Le meilleur, c’est qu’elle utilise des bols simples et un fouet— pas besoin d’équipement sophistiqué. C’est une recette indulgente qui donne des résultats spectaculaires.
Quand Préparer ce Gâteau Chocolat Spectaculaire
Ce gâteau est votre arme secrète pour tant d’occasions ! C’est un héros pour les fêtes d’anniversaire, bien sûr. Mais il est aussi parfait pour un dessert de dîner intimiste, pour impressionner à un repas partagé, ou pour un projet de baking du weekend « juste parce que ». J’ai même fait des versions mini pour la Saint-Valentin. Tout moment qui appelle une dose généreuse de joie et de chocolat est le bon moment pour ce gâteau au chocolat avec ganache.
Rassembler Vos Ingrédients pour une Ganache au Chocolat Parfaite
Préparez tout ! Avoir tous les ingrédients mesurés et à température ambiante (là où nécessaire) rend le processus fluide et agréable.
Pour le Gâteau au Chocolat :
- 200 g de farine tout usage
- 200 g de sucre granulé
- 50 g de cacao en poudre non sucré
- 1 1/2 cuil. à café de levure chimique
- 1 1/2 cuil. à café de bicarbonate de soude
- 1/2 cuil. à café de sel
- 2 gros œufs
- 240 ml de lait entier
- 120 ml d’huile neutre (comme végétale ou de colza)
- 2 cuil. à café d’extrait de vanille
- 240 ml d’eau bouillante
Pour la Crème au Beurre Chocolatée :
- 200 g de beurre doux ramolli
- 400 g de sucre glace
- 50 g de cacao en poudre non sucré
- 2 cuil. à café d’extrait de vanille
- 2-3 cuil. à soupe de lait
Pour la Ganache Chocolatée Soyeuse :
- 300 g de chocolat noir ou demi-sucré de bonne qualité, finement haché
- 300 ml de crème liquide entière (30% de matière grasse minimum)
Pas de Panique ! Idées de Substitutions Faciles
Vous manquez quelque chose ? Ne vous inquiétez pas ! Voici des swaps simples :
- Lait : Tout lait végétal comme l’almond ou l’oat fonctionne parfaitement.
- Huile : L’huile de coco fondue ou même du beurre fondu peuvent être utilisés.
- Cacao en Poudre : Utilisez du naturel ou du processus Holland ; les deux conviennent ici.
- Crème Liquide : Pour la ganache, une crème de coco full-fat peut être une alternative sans lactose.
- Chocolat : Utilisez des pépites de chocolat pour la ganache si c’est ce que vous avez— assurez-vous juste qu’ils soient de bonne qualité.
C’est Parti ! Votre Guide Pas-à-Pas pour un Gâteau Chocolat Ganache Parfait
Étape 1 : Préparation du Gâteau au Chocolat Incroyablement Moelleux
Commencez par préchauffer votre oven à 180°C. Graissez et chemisez deux moules round de 20cm. Dans un grand bol, fouettez ensemble la farine, le sucre, le cacao, la levure chimique, le bicarbonate de soude et le sel. Cela ressemblera à un sable riche et foncé. Faites un puits au centre et ajoutez les œufs, le lait, l’huile et la vanille. Fouettez jusqu’à ce que la pâte soit smooth et magnifique. Maintenant, versez cuidadosement l’eau bouillante. La pâte deviendra très liquide— c’est exactement ce qu’il faut ! C’est ce qui donne au gâteau sa texture amazing. Divisez la pâte evenly entre les moules et faites cuire 30-35 minutes, jusqu’à ce qu’un skewer ressort clean. Pro tip : Laissez les gâteaux cool dans leurs moules 10 minutes avant de les démouler sur un wire rack pour qu’ils cool complètement. Cela empêche qu’ils se cassent.
Étape 2 : Préparation de la Crème au Beurre Chocolatée Dreamy
Pendant que les gâteaux cool, préparez la crème au beurre. Dans un grand bol, battez le beurre ramolli avec un mixer électrique jusqu’à ce qu’il soit pale et fluffy. Tamisez le sucre glace et le cacao powder pour éviter les lumps. Commencez à mixer à low speed, puis augmentez à high. Battez pendant 3-4 bonnes minutes jusqu’à ce qu’elle soit super light et creamy. Ajoutez la vanilla et 2 cuil. à soupe de lait. Battez again. Si la frosting semble too thick pour être spread easily, ajoutez la extra cuil. à soupe de lait. Vous voulez une consistency smooth, spreadable qui hold its shape.
Étape 3 : Création de la Ganache Chocolatée Glossy et Pour-able
C’est la crowning glory ! Placez votre chocolat finement haché dans un bol heatproof. Heat la crème dans une small saucepan sur medium heat jusqu’à ce qu’elle commence juste à simmer— vous verrez des petites bubbles autour des edges. Ne la laissez pas boil vigorously. Immédiatement pour the hot cream sur le chocolat. Laissez reposer, untouched, 2-3 minutes. Cela permet à la heat de gently melt le chocolat. Then, starting from the center, stir slowly avec une spatula jusqu’à ce que vous avez une mixture perfectly smooth, glossy, et homogeneous. Chef’s tip : Laissez la ganache sit à température ambiante 10-15 minutes pour qu’elle thicken slightly avant de la pour sur le gâteau. Cela vous donne un beautiful, controlled flow.
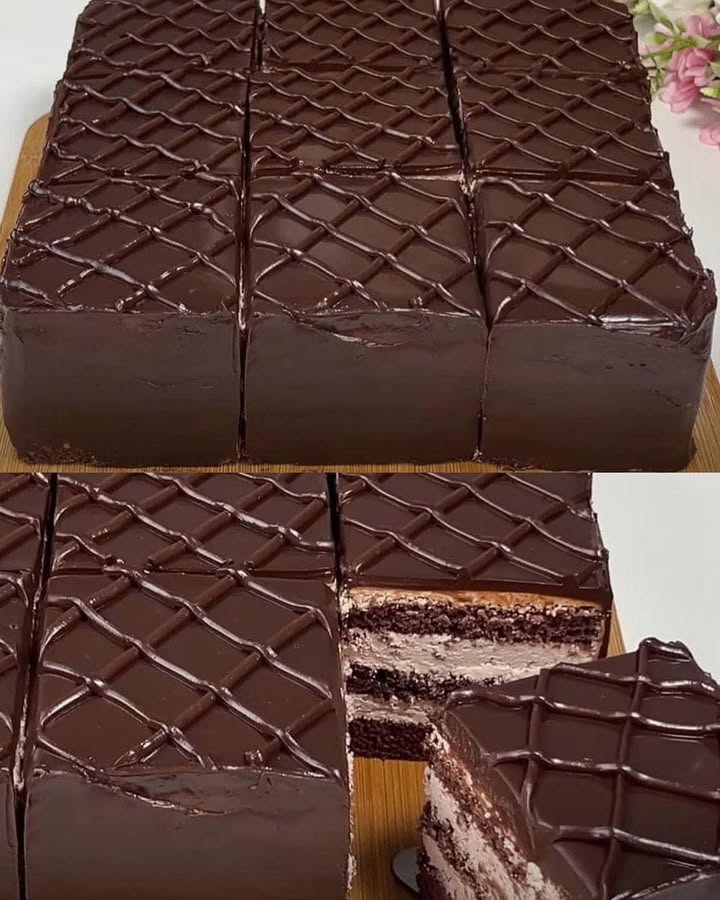
Étape 4 : Le Grand Final : Assemblage de votre Masterpiece
C’est le moment de la fun part ! Placez un cooled cake layer sur votre serving plate. Spread un generous, even layer de la crème au beurre chocolatée sur le top. Gently placez le second cake layer sur le top. Maintenant, pour le magic moment. Slowly pour la ganache thickened sur le center du top cake layer. Using un offset spatula ou le back d’une spoon, gently guidez-la over the edges, encouragant-la à drip deliciously down the sides. Don’t overwork it— les beautiful, rustic drips sont part of the charm. Step back et admirez votre stunning gâteau au chocolat recette facile!
Le Timing est Tout : Votre Planning de Baking
Voici un quick breakdown pour planifier votre baking adventure :
- Temps de Préparation : 30 minutes
- Temps de Cuisson : 35 minutes
- Temps de Refroidissement : 1 heure (très important !)
- Temps de Frosting & Ganache : 20 minutes
- Temps Total : Environ 2 heures 25 minutes
Le Secret du Chef pour le Goût Ultime du Chocolat
Mon secret weapon ? Une pincée de instant espresso powder (environ 1/2 cuil. à café) tamisée avec les dry ingredients pour le gâteau. Vous ne sentirez pas le café du tout. Au lieu de cela, cela intensifie et approfondit le goût du chocolat magiquement, le faisant paraître plus riche et complexe. Essayez une fois, et vous ne reviendrez jamais !
Un Sweet Morceau d’Info Extra
Saviez-vous que le terme « ganache » pourrait venir du mot français pour « jowl » ou « cheek »? Certains disent qu’il était originellement un playful insult pour un apprentice clumsy en cuisine qui spilled de la crème dans du chocolat ! Heureusement, son « mistake » est devenu un des éléments les plus aimés en pastry. Pour plus d’infos sur les fondations du great baking, comprendre les apports nutritionnels et la qualité de vos ingrédients peut faire une vraie différence dans votre final creation.
Votre Kitchen Toolbox
Vous n’avez pas besoin de beaucoup ! Rassemblez :
- Deux moules round de 20cm
- Bol de mixage (large et medium)
- Fouet et spatule
- Mixer électrique main ou stand mixer
- Wire cooling rack
- Petite saucepan
- Mesure cups et spoons
Comment Conserver votre Gâteau Ganache au Chocolat
Si vous avez des leftovers (un gros if !), vous voudrez les store properly. Du fait de la crème au beurre et de la ganache, ce gâteau devrait être stored dans le refrigerator. Placez-le dans un airtight cake carrier ou cover-le loosely avec du plastic wrap. Le cold firmera la ganache dans une lovely consistency fudge-like.
Vous pouvez sortir les slices environ 20-30 minutes avant serving pour permettre au gâteau de revenir closer à température ambiante. Cela ramène le soft, tender crumb et permet aux chocolate flavors de shine their brightest. La ganache se soften beautifully.
Pour une storage longer, vous pouvez freeze les unfrosted cake layers tightly wrapped dans du plastic wrap jusqu’à 2 mois. Thaw overnight dans le fridge et frost fresh. Je ne recommande pas freezer le assembled cake avec ganache, car la texture peut changer.
Mes Meilleurs Tips et Conseils pour Success
- Mesurer votre flour correctement : Spoon-la dans la measuring cup et levelez-la. Ne scoop pas directement du bag, car cela packs trop de flour.
- Des ingrédients à température ambiante sont key pour que la crème au beurre emulsify properly et become fluffy, pas greasy.
- En faisant la ganache, utilisez un knife pour chop le chocolat très finement. Les smaller pieces melt faster et more evenly dans la hot cream.
- Si votre ganache se split ou paraît grainy, ajoutez un splash de cream à température ambiante et whisk vigorously. Elle devrait revenir ensemble.
Tips de Présentation pour le Rendre Encore Plus Special
- Top avec des fraises raspberries, strawberries, ou un sprinkle de sea salt flakes juste après pouring la ganache.
- Décorer avec des curls chocolat, gold leaf, ou edible flowers pour une touch truly élégante.
- Servir sur un beautiful cake stand avec un dusting de cocoa powder ou powdered sugar autour du plate.
- Pour des servings individuels, drizzle chaque plate avec un peu d’extra ganache ou une berry coulis avant placing le slice.
Vous Aimez ce Cake ? Essayez ces Variations Healthier & Fun !
Cette basic recipe est un wonderful canvas pour la créativité ! Voici six delicious twists à try :
- Gâteau Chocolat Sans Gluten : Swap simplement la farine tout usage pour un good 1:1 blend de baking gluten-free. Tout le reste reste le même !
- Chocolate Dream Vegan : Utilisez des flax eggs, du lait et du beurre plant-based, et de la crème de coco pour la ganache. C’est just as décadent.
- Delight Orange-Chocolat : Ajoutez le zest d’une orange dans la cake batter et une cuil. à soupe de liqueur d’orange dans la ganache pour un flavour bright, sophisticated.
- Version Mint Chocolate Chip : Fold 100g de mini pépites de chocolat dans la cake batter et ajoutez 1/2 cuil. à café d’extrait de peppermint dans la buttercream.
- Crunch Nutty Praline : Stir 100g de chopped hazelnuts toastées dans la buttercream et sprinkle more sur le top de la ganache pour une wonderful texture.
- Frosting Yogurt Plus Léger : Pour une option moins sucrée, remplacez la buttercream avec un frosting fait de Greek yogurt, whipped cream, et un peu de cocoa powder.
Si vous avez envie d’autres spectacular cakes, vous devrez explorer notre collection. Par exemple, la timeless elegance du gâteau au citron classique est toujours un winner. Ou, pour un treat fun, no-bake, cette tarte smores facile est pure joy. Les lovers chocolat cherchant l’expérience ultimate ne devraient pas manquer le stunning gâteau triple mousse chocolat. Et pour quelque chose uniquely delicious, le gâteau baklava bundt avec sa drizzle honey est unforgettable. Vous pouvez trouver tout cela et plus dans notre dédié catégorie gateaux et patisseries.
Erreurs Communes à Éviter pour un Cake Flawless
Erreur 1 : Utiliser des Ingrédients Cold pour la Crème au Beurre
C’est la première raison d’une buttercream lumpy, greasy, ou séparée. Si votre butter est directement du fridge, il ne blendera pas smoothly avec le sugar. Sortez toujours le butter au moins une heure avant de commencer. Il devrait être soft enough que votre finger y laisse une clear indent, mais pas melted ou oily. Du butter à température ambiante whip up light et airy, créant une base perfect pour votre frosting.
Erreur 2 : Overbake les Cake Layers
Un cake chocolat dry est un sad cake. Overbaking arrive lorsque nous rely solely sur le timer et ne check le cake ourselves. Les oven peuvent varier. Commencez checking au 30-minute mark avec un toothpick ou skewer. Il devrait ressort avec quelques moist crumbs attached, pas complètement clean. Le cake continue à cook a bit lorsqu’il cool dans le moule. Rappelez-vous, un perfectly moist gâteau au chocolat moelleux est le goal !
Erreur 3 : Pour Ganache That’s Too Hot ou Too Cold
Timing votre ganache est crucial. Si vous la pour right after mixing, pendant qu’elle est très hot et thin, elle floodera du cake et créera un messy pool sur votre plate. Si vous laissez-la cool trop longtemps, elle se set et devient too thick pour être pour, vous forcing à la spread comme frosting (ce qui est aussi fine, mais vous lose le glossy drip effect). Laissez-la sit à température ambiante 10-15 minutes jusqu’à ce qu’elle thickens à la consistency de warm honey pour ce perfectly, controlled pour.
Erreur 4 : Assembler et Frost un Warm Cake
Patience est la meilleure friend du baker. Si vous essayez de spread de la buttercream sur un cake qui est même slightly warm, la heat melt le butter. Cela cause le frosting à slide off, become greasy, et soak dans le cake. C’est une recipe for disaster. Laissez vos cake layers cool complètement sur un wire rack. Cela peut prendre une heure complète. Cette étape est non-negotiable pour un produit final stable et beautiful.
Your Chocolate Ganache Cake Questions, Answered
Can I make this gâteau chocolat ganache in advance?
Absolument ! Vous pouvez bake les cake layers un jour ahead. Laissez-les cool complètement, puis wrap-les tightly dans du plastic wrap et store à température ambiante. Vous pouvez aussi faire la buttercream et la ganache un jour ahead. Store la buttercream covered à température ambiante si utilisation within 24 hours, ou dans le fridge (then re-whip avant d’utiliser). La ganache peut être made et kept covered à température ambiante. Re-warmez-la gently dans des short bursts dans le microwave ou sur un double boiler si elle set too firmly. Assemblez le cake le jour où vous plan de serve pour le look et texture freshest.
Why do we add boiling water to the cake batter?
Cela peut sembler strange, mais c’est un brilliant trick. L’eau bouillante « bloom » le cocoa powder, ce qui signifie qu’elle intensifie et approfondit le chocolate flavor right away. Cela aide aussi à dissolve le sugar et créé une batter très thin. Cette batter thin permet au gluten dans la flour de develop moins, resulting en un crumb incredibly tender, moist plutôt qu’un tough, chewy. Ne soyez pas scared par son liquide— c’est le secret d’un chocolate cake supremely moist.
My ganache is too runny/thick. How can I fix it?
La ganache est tout à propos des ratios et temperature. Si elle est too runny, elle est likely trop warm. Simplement laissez-la sit à température ambiante longer, stirring occasionnellement, jusqu’à ce qu’elle thickens. Vous pouvez aussi la pop dans le fridge pour des intervals de 5 minutes, stirring well chaque fois. Si elle est too thick et fudge-like, elle a cooled trop. Gently re-warmez-la sur un pot de simmering water (double boiler) ou dans le microwave dans des bursts de 10-secondes, stirring jusqu’à ce qu’elle revienne à une consistency pourable. Un peu de patience et d’ajustement suffit.
Can I use milk chocolate or white chocolate for the ganache?
Yes, mais les ratios changent car différents chocolats ont différents contents de cocoa butter et sugar. Pour la ganache milk chocolate, utilisez un ratio 2:1 (e.g., 300g chocolat à 150ml crème). Pour le white chocolate, qui est plus delicate, utilisez un ratio 3:1 (e.g., 300g chocolat à 100ml crème). Heat la crème et pour-la sur le chocolat haché comme usual. Le method est identical, juste avec moins de crème pour account du chocolat plus soft.
How do I get perfectly smooth sides when frosting?
Premièrement, appliquez un « crumb coat ». C’est un very thin layer de buttercream sur tout le cake pour trap any loose crumbs. Chill le cake 15-20 minutes pour set ce layer. Then, appliquez votre final, thicker layer de frosting. Utilisez un offset spatula ou un bench scraper pour les sides. Dip votre tool dans de l’eau hot, wipe dry, puis smoothly glidez autour du cake. La heat aide à créer un finish flawless, professional-looking.
What’s the difference between this and a fondant cake?
Ils sont worlds apart en texture et taste ! Ce gâteau avec ganache présente un soft, moist cake avec une crème au beurre riche et crémeuse et un glaze chocolatée shiny et soyeux. Le fondant est une thick, rolled sugar paste utilisée principalement pour la décor. Il créé un look smooth, polished mais est souvent très sweet et pas particulièrement flavorful. Notre cake ganache est tout à propos d’indulging dans un goût chocolate deep, authentique avec une beautiful, mais moins formal, appearance.
Can I turn this into cupcakes?
Définitivement ! Cette recipe est perfect pour des cupcakes. Line un muffin tin avec des paper cases. Fill chaque case environ 2/3 full avec la cake batter. Bake à la même température (180°C) 18-22 minutes. Laissez-les cool complètement. Vous pouvez pipe la buttercream sur le top puis dip les tops frosted dans la ganache slightly cooled pour une stunning et delicious version cupcake de ce classic.
Why did my cake sink in the middle?
Un cake sunken usually pointe vers des issues de leavening ou underbaking. Assurez que votre levure chimique et bicarbonate de soude sont fresh (they lose power over time). Ne over-mixez pas la batter once vous ajoutez les ingrédients secs ; mix juste jusqu’à ce qu’il n’y ait plus de streaks de flour. Over-mixing développe le gluten et peut causer collapsing. Finalement, assurez que le cake est fully baked au centre. Utilisez le test toothpick, et ne openez pas la door oven trop early pendant le baking, car une drop temperature sudden peut aussi causer sinking.
Is it necessary to use two cake pans? Can I bake it in one?
Vous pouvez le bake dans un moule round de 22cm, mais vous devrez ajuster le baking time. Il nécessitera likely 45-55 minutes. Le centre doit être fully set. La main raison d’utiliser deux moules est de créer des layers, ce qui rend le cake look more impressive et donne un meilleur ratio frosting-to-cake dans chaque bite. Si vous utilisez un moule, vous aurez un single-layer cake plus tall, que vous pouvez toujours slice horizontally pour créer deux layers si vous wish.
How can I tell if my eggs and butter are truly at room temperature?
Pour les œufs, placez-les dans un bol d’eau warm (pas hot) 5-10 minutes. Pour le butter, le « finger test » est meilleur. Pressez votre finger dans le butter. Il devrait sink in easily et laisser une indentation claire, mais le butter devrait encore hold sa shape et pas être oily ou melted autour des edges. Si vous pouvez bend la stick de butter sans qu’elle snap, elle est ready. Des ingrédients véritablement à température ambiante sont le secret d’une batter et frosting smooth, emulsified.
Ready, Set, Bake Your Memories
Vous avez ici— mon cœur et soul versés dans ce guide pour le parfait gâteau chocolat ganache. Ce cake est plus qu’un dessert ; c’est un moment de happiness shared avec les personnes que vous love. C’est le smile sur la face d’un birthday boy, la quiet satisfaction d’un baking win, le rich chocolate taste qui ressemble à un hug. Alors tiez votre apron, mettez de la music, et bake. Je promets, le résultat est worth chaque minute. Maintenant, qui est ready pour une slice ?
Equipment
- Mixeur électrique ou robot pâtissier
- Deux moules à gâteau ronds de 20 cm
- Petite casserole
- Spatule
- Grille de refroidissement
Ingrédients
- 200 g farine tout usage
- 200 g sucre granulé
- 50 g cacao en poudre non sucré
- 1.5 cuil. à café levure chimique
- 1.5 cuil. à café bicarbonate de soude
- 0.5 cuil. à café sel
- 2 grands œufs
- 240 ml lait entier
- 120 ml huile neutre comme l'huile de colza
- 2 cuil. à café extrait de vanille
- 240 ml eau bouillante
- 200 g beurre non salé ramolli
- 400 g sucre glace
- 50 g cacao en poudre non sucré
- 2 cuil. à café extrait de vanille
- 2-3 cuil. à soupe lait
- 300 g chocolat noir ou semi-sweet de bonne qualité, finement haché
- 300 ml crème liquide minimum 30% de matière grasse
Instructions
- Préchauffez votre four à 180°C (350°F) et préparez deux moules à gâteau ronds de 20 cm.
- Dans un grand bol, mélangez la farine, le sucre, le cacao, la levure chimique, le bicarbonate de soude et le sel.
- Faites un puits au centre et ajoutez les œufs, le lait, l'huile et la vanille. Fouettez jusqu'à obtenir une pâte lisse.
- Ajoutez l'eau bouillante, mélangez bien, puis répartissez la pâte dans les moules.
- Enfournez pendant 30-35 minutes, jusqu'à ce qu'un cure-dent en ressorte propre. Laissez refroidir pendant 10 minutes dans les moules.
- Pendant ce temps, préparez le beurre crémeux au chocolat en battant le beurre jusqu'à ce qu'il soit léger et mousseux, puis incorporez le sucre glace et le cacao.
- Ajoutez la vanille et le lait, puis battez jusqu'à obtenir une texture lisse et étalable.
- Pour la ganache, faites chauffer la crème jusqu'à frémissement, puis versez-la sur le chocolat haché et laissez reposer 2-3 minutes.
- Remuez doucement jusqu'à obtenir un mélange lisse et homogène.
- Assemblez le gâteau en plaçant une base, étalez la crème au chocolat, puis ajoutez la seconde couche de gâteau. Ajoutez la ganache sur le dessus et faites-la couler sur les bords.
Notes
Nutrition

Je suis Céline, une véritable passionnée d’ustensiles et de matériel de cuisine ! J’adore tester, comparer et découvrir les meilleurs équipements pour rendre la cuisine plus efficace et agréable. Que ce soit un bon couteau, un robot performant ou une poêle incontournable, je suis toujours à la recherche des outils qui feront la différence. Mon but est de vous guider dans vos choix pour que vous ayez le bon matériel adapté à vos besoins.