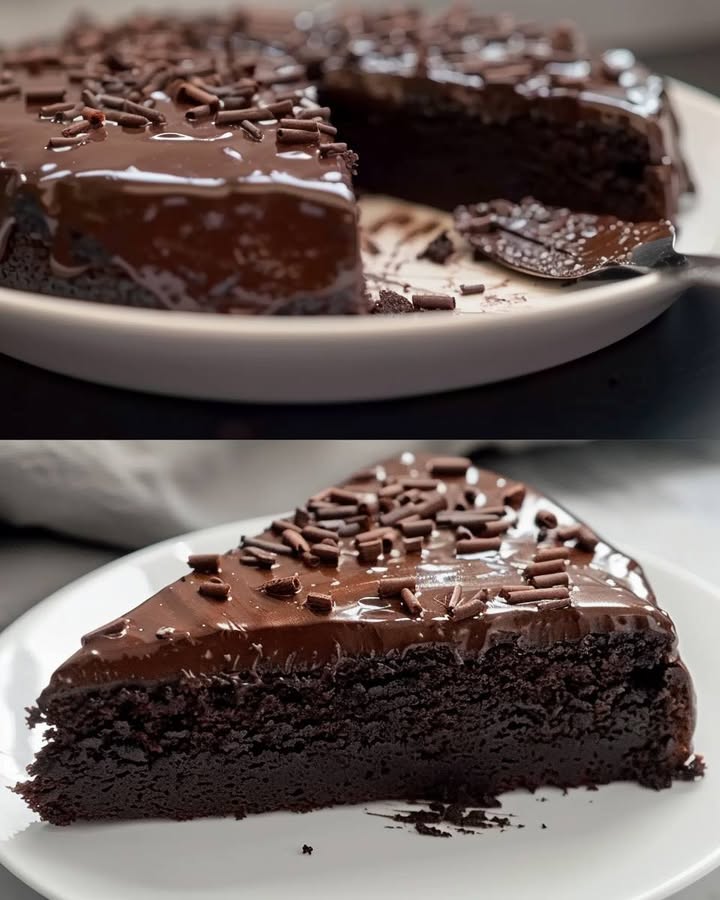
Gâteau Chocolat Ultra-Moelleux Facile et Savoureux

Gâteau Chocolat Ultra-Moelleux

Super Moist Chocolate Cake: Your 5-Minute Prep Miracle

You know that moment when a chocolate craving hits like a freight train? When only a slice of deep, dark, impossibly moist cake will do? I was there, with two hungry kids staring at me and zero time. This recipe was my kitchen miracle. It proves that a showstopping, fudgy chocolate cake doesn’t need hours of fuss. Just five minutes of prep and a few simple ingredients coming together in one bowl. Let me show you how.

A Slice of Chocolate History

Chocolate cake has been a symbol of celebration for centuries. While its exact origin is a bit fuzzy (unlike this cake!), it evolved alongside the availability of cocoa powder. Early versions were often dry and dense. The modern, moist chocolate cake we adore is a triumph of home baking chemistry. The secret weapon? Often, it’s a surprise liquid that deepens the flavor and creates that tender crumb. In our version, hot coffee is that magic touch. It doesn’t make the cake taste like coffee at all. Instead, it magnifies the chocolate flavor to a rich, complex level that makes people ask, « What’s your secret? »

Why You’ll Absolutely Adore This Chocolate Cake

This isn’t just any cake. It’s your new best friend for last-minute desserts. First, it’s unbelievably fast to mix. One bowl, dump, stir, and you’re done. Second, that hot coffee makes it incredibly moist and fudgy, staying soft for days. Third, the shiny chocolate ganache topping looks professional but is simpler than frosting. It’s a fail-proof recipe that turns anyone into a confident baker. Trust me, my family now requests this for every birthday.

Perfect Occasions for This Moist Chocolate Cake

This cake is wonderfully versatile. Bake it for a casual weeknight treat to cheer up a rainy day. It’s perfect for potlucks and picnics because it travels so well. Got a last-minute birthday party? This is your hero. I’ve even served it at more formal dinner parties, dressed up with a handful of raspberries and a dusting of powdered sugar. It always earns rave reviews, no matter the event.

Ingredients for Your Ultra-Moelleux Chocolate Cake

Gather these simple pantry staples. Make sure your eggs and milk are at room temperature for the smoothest batter.

  • 1 1/2 cups all-purpose flour
  • 1/2 cup cocoa powder (use good quality for best flavor)
  • 1 cup granulated sugar
  • 1/2 teaspoon salt
  • 1 teaspoon baking powder
  • 1/2 teaspoon baking soda
  • 1/2 cup neutral oil (like vegetable or canola)
  • 1/2 cup milk
  • 2 teaspoons vanilla extract
  • 2 large eggs
  • 1 cup hot, strongly brewed coffee

For the Chocolate Ganache:

  • 1 cup semi-sweet chocolate chips or chopped chocolate
  • 3/4 cup heavy cream

Easy Substitutions for Your Pantry

Out of something? No problem. Milk: Any kind works—dairy, almond, oat, or soy. Oil: Melted butter can be used for a richer flavor. Eggs: For a dairy-free version, use 1/2 cup of applesauce or a commercial egg replacer. Hot Coffee: If you don’t drink coffee, use an equal amount of hot water. The cake will still be delicious, though the chocolate flavor will be a bit less intense.

Let’s Bake! Step-by-Step Instructions

Step 1: Combine Your Dry Ingredients

Grab your biggest mixing bowl. This is our one-bowl wonder! Sift in the flour and cocoa powder. This isn’t just for show—it prevents lumps and makes the cake extra light. Add the sugar, salt, baking powder, and baking soda right on top. Give everything a good whisk with a fork or a balloon whisk. You’ll see the mix turn a uniform, beautiful brown. It already smells like promise.

Step 2: Bring in the Wet Team

Make a little well in the center of your dry ingredients. Pour in the oil, milk, and vanilla extract. Crack in the eggs. Now, take your whisk or a spatula and start to mix. Start from the center and slowly pull in the dry ingredients. The batter will be thick and shiny at this stage. Don’t worry if it looks a bit fudgy, that’s perfect. Pro tip: If your eggs are cold, let the whole mix sit for 10 minutes before adding the coffee. This brings the temperature up gently.

Step 3: The Magical Coffee Pour

This is the step that makes this cake special. Have your hot coffee ready. I just brew a strong cup in my machine. Slowly, in a thin stream, pour the hot coffee into the batter while stirring continuously. Watch the magic happen. The thick batter will suddenly loosen into a silky-smooth, pourable, liquid dream. It will be thin, and that’s exactly right. The aroma of intensified chocolate will fill your kitchen.

Step 4: Preheat and Prepare the Pan

Now, turn on your oven to 350°F (175°C) to let it heat up. Take your 9×13 inch baking dish. Grease it lightly with butter or a non-stick spray. You can also line it with parchment paper for super easy removal. Pour your beautiful, liquid batter into the pan. It should spread out into an even layer by itself. Give the pan a gentle tap on the counter to release any air bubbles.

Step 5: Bake to Perfection

Place the pan in the center of your preheated oven. Set your timer for 40 minutes. Resist the urge to open the oven door before 35 minutes have passed, as drafts can cause the cake to fall. You’ll know it’s done when the top is springy to the touch and a toothpick inserted into the center comes out with just a few moist crumbs (not wet batter). The smell will be irresistible.

Step 6: Make the Simple Ganache

While the cake bakes, make your luxurious topping. Pour the heavy cream into a small saucepan. Heat it over medium heat until you see small bubbles form around the edges—it should be steaming but not boiling. Remove it from the heat immediately. Pour the hot cream over the chocolate chips in a heatproof bowl. Let it sit, untouched, for one full minute. This allows the chocolate to melt gently.

Step 7: Finish and Glaze

After that minute, take a whisk and start stirring from the center outwards. You’ll see the chocolate and cream emulsify into a glossy, smooth, and rich chocolate ganache. Once the cake is out of the oven, let it cool completely on a wire rack. A warm cake will melt the ganache right into it (still tasty, but less pretty). Pour the slightly cooled, thickened ganache over the cooled cake. Use an offset spatula to spread it into an even, shiny layer.

Step 8: Set, Slice, and Savor!

For a clean slice, pop the glazed cake into the refrigerator for about 30 minutes to let the ganache set. It will become firm to the touch but still melt in your mouth. Then, slice it into squares. The first bite reveals an incredibly moist, tender crumb and a deep, adult chocolate flavor that’s not too sweet. This is the cake that will make you a legend. Chef’s secret: A tiny pinch of flaky sea salt sprinkled over the wet ganache before it sets creates a wonderful sweet-salty contrast.

Your Cake Timeline

  • Prep Time: A lightning-fast 5 minutes
  • Cook Time: 40 minutes
  • Cooling & Setting Time: About 1 hour
  • Total Time: Around 1 hour 45 minutes (mostly hands-off)
  • Servings: 12 generous squares

A Little Cake Wisdom

Why does coffee make chocolate taste better? Science! Coffee contains compounds that enhance the flavor molecules in cocoa. It doesn’t add a coffee taste, but it broadens and deepens the chocolate experience, making it taste richer and more complex. It’s the same reason a drop of coffee is often added to chocolate sauces and puddings.

Gear You’ll Need

This recipe keeps it simple: one large mixing bowl, a whisk, a 9×13 inch baking pan (glass or metal both work), a small saucepan for the cream, and a heatproof bowl for the ganache. A sifter for the cocoa is helpful but not essential.

How to Store Your Masterpiece

Because of the ganache, this cake is best stored in the refrigerator. Cover it tightly with plastic wrap or store it in an airtight container. It will stay perfectly moist and delicious for up to 4-5 days.

The cool environment keeps the ganache firm and prevents the cake from drying out. In fact, many people find the flavor is even better on the second day, as it has more time to mature.

You can also freeze this cake. Slice it into portions, wrap each piece tightly in plastic wrap, and place in a freezer bag. Thaw overnight in the fridge for a ready-made treat.

My Best Tips for Success

  • Measure carefully: Use the spoon-and-level method for flour to avoid a dense cake.
  • Don’t overmix: Once you add the dry ingredients, mix just until combined. Overmixing develops gluten and leads to toughness.
  • Cool completely: Patience is key! Let the cake cool before adding the ganache for a beautiful, clean finish.
  • For a stunning presentation, decorate with fresh berries, chopped nuts, or edible flowers right after glazing.

Presentation Ideas to Wow Your Guests

While this cake is gorgeous in its simple, glossy state, you can easily dress it up. Try one of these ideas:

  • Scatter fresh raspberries or strawberries on top of the wet ganache.
  • Add a sprinkle of gold leaf flakes for a truly decadent look.
  • Use a vegetable peeler to create chocolate curls from a bar of white chocolate for contrast.
  • Serve each square with a dollop of lightly sweetened whipped cream or a scoop of vanilla ice cream.

Love This Cake? Try These Variations!

If you’re a fan of ultra-moist cakes, you have to explore our collection. For a Brazilian twist, our Wet Brigadeiro Cake is a chocolate lover’s dream with its creamy filling. If cheesecake is more your style, the tangy-sweet Cherry Cheesecake Delight is a crowd-pleaser. For a sunny, no-bake option, the vibrant Tropical Fresh Fruit Cheesecake is incredibly refreshing. And don’t miss the classic combination in our easy Chocolate Carrot Cake. You’ll find all these and more delicious ideas waiting for you.

Common Mistakes to Avoid

Mistake 1: Using Cold Ingredients

Adding cold eggs or milk to your batter can cause it to seize up or not emulsify properly with the oil. This can result in a dense, greasy cake texture. Always try to bring your eggs, milk, and even the sour cream (if using a substitute) to room temperature before you start. Just leave them on the counter for 30 minutes. It makes a world of difference in creating a smooth, homogenous batter.

Mistake 2: Overbaking the Cake

This is the number one reason for dry cake. The « toothpick test » is your friend, but you don’t want it to come out completely clean. Look for moist crumbs clinging to the toothpick, not wet batter. The cake will also continue to cook a little as it cools in the pan. Overbaking evaporates all that lovely moisture we worked so hard to achieve. Set that timer and start checking a few minutes early.

Mistake 3: Pouring Ganache on a Warm Cake

I know it’s tempting to glaze the cake as soon as it’s out of the oven because it smells amazing. But hot cake will melt the ganache completely, causing it to disappear into the top layer or drip messily down the sides. Let the cake cool completely on a wire rack. A cool cake allows the ganache to pool beautifully on top and set into that perfect, glossy, snap-when-you-cut-it layer.

Mistake 4: Skipping the Sifting Step

Cocoa powder is notorious for clumping. If you just dump it in with the flour, you’ll likely end up with little dry pockets of cocoa in your baked cake, which isn’t pleasant. Taking 30 seconds to sift your cocoa powder and flour together ensures a perfectly smooth batter and a consistent, light texture in every single bite. It’s a small step with a big payoff.

Frequently Asked Questions

Can I make this cake without coffee?

Absolutely! If you prefer not to use coffee, you can replace the cup of hot coffee with an equal amount of hot water. The cake will still be wonderfully moist, but the chocolate flavor will be simpler and less intense. The coffee acts as a flavor enhancer, not a primary taste. For a different twist, you could also try using hot chocolate or even a dark, hot tea like chai.

My ganache split or became grainy. What did I do wrong?

This usually happens if the cream was too hot (it scalded the chocolate) or if you stirred too vigorously before letting the chocolate melt. To fix a split ganache, try whisking in a tablespoon of room-temperature milk or cream, one teaspoon at a time, until it comes back together. To prevent it, just heat the cream until it’s steaming around the edges, pour it over the chocolate, let it sit, then stir gently from the center out.

Can I use a different type of pan?

Yes, but baking times will change. For two 9-inch round cake layers, reduce the baking time to about 25-30 minutes. For a Bundt pan, ensure it’s well-greased and bake for about 45-50 minutes. For cupcakes, fill liners 2/3 full and bake for 18-22 minutes. Always use the toothpick test to check for doneness in the center.

How can I tell if my baking powder and soda are still active?

This is a great question, as old leaveners are a common cause of flat cakes. To test baking powder, add 1/2 teaspoon to 1/4 cup of hot water. It should fizz vigorously. For baking soda, add 1/2 teaspoon to a few tablespoons of vinegar. It should bubble up immediately. If the reaction is weak, it’s time to buy fresh supplies for the best rise.

The cake sank in the middle. Why?

A sunken center is often due to underbaking, opening the oven door too early (before the structure has set), or an incorrect amount of leavening (too much baking soda/powder). Make sure your oven is properly preheated, don’t open the door in the first 30 minutes, and double-check your measurements of baking powder and soda.

Can I make this recipe gluten-free?

You can! Use a good quality 1-to-1 gluten-free all-purpose flour blend (one that contains xanthan gum) in place of the regular flour. Make sure your cocoa powder is certified gluten-free as well. The batter may be slightly thinner, but the result will be just as moist and delicious.

What’s the best cocoa powder to use?

For the deepest, darkest flavor, use a natural unsweetened cocoa powder. Dutch-processed cocoa will also work, but it reacts differently with leaveners. Since this recipe uses both baking soda and powder, it’s designed to work with either type. Pro tip: Choosing a high-quality cocoa powder makes the single biggest difference in flavor.

Can I frost this cake with buttercream instead of ganache?

Of course! This moist chocolate cake pairs beautifully with any frosting. A classic vanilla or chocolate buttercream, a whipped chocolate cream cheese frosting, or even a simple dusting of powdered sugar all work wonderfully. Just make sure the cake is completely cool before you start frosting to prevent melting.

How do I get really clean slices?

For pristine, clean-cut slices, follow these steps: 1) Let the ganache set completely in the fridge. 2) Use a sharp, thin knife. 3) Dip the knife in very hot water, wipe it dry with a towel, and then make your cut. Repeat the hot-water wipe between each slice. This melts through the ganache cleanly and prevents crumbs from sticking to the blade.

Is there a way to make the cake even more moist?

This cake is already incredibly moist, but for an extra tender crumb, some bakers add a tablespoon of mayonnaise or a 1/2 cup of sour cream to the batter along with the other wet ingredients. These ingredients contain fat and emulsifiers that can enhance the texture. Give it a try if you’re feeling experimental!

Baking is a wonderful way to express creativity and share joy. If you’re looking for more inspiration beyond this super moist chocolate cake, explore our full collection of delightful cakes and pastries for your next baking adventure.

Final Thoughts from My Kitchen to Yours

This Super Moist Chocolate Cake recipe is my gift to you for those « I need chocolate NOW » moments. It’s reliable, simple, and always delivers that wow factor. The minimal prep time means you can have a decadent, homemade dessert on the table with little effort. Remember, using quality ingredients like good cocoa powder makes a huge difference. For instance, opting for ingredients that contribute to a balanced diet, like those found in recipes rich in fiber, can enhance your overall culinary experience. You can learn more about this approach through resources discussing an alimentation riche en fibres. So, tie on your apron, preheat that oven, and get ready to bake a cake that will have everyone asking for seconds. Happy baking!

Gâteau Chocolat Ultra-Moelleux

Gâteau Chocolat Ultra-Moelleux

Gâteau Chocolat Ultra-Moelleux en 5 min de préparation. Un gâteau fondant au chocolat simple et rapide, avec ganache. Recette miracle pour tous les gourmands.
Temps de préparation: 5 minutes
Temps de cuisson: 40 minutes
Cooling & Setting Time: 1 heure
Temps total: 1 heure 45 minutes
Type de plat: Dessert
Cuisine: Italien
Keyword: Gourmand
Servings: 12 personnes
Calories: 350kcal
Cost: 15

Equipment

  • Grand bol à mélanger
  • Moule de 9x13 pouces
  • Petite casserole
  • Fouet
  • Bol résistant à la chaleur

Ingrédients

  • 190 g farine tout usage
  • 50 g poudre de cacao de bonne qualité pour un meilleur goût
  • 200 g sucre granulé
  • 3 g sel
  • 5 g levure chimique
  • 2 g bicarbonate de soude
  • 125 ml huile neutre comme l'huile de légumes ou de canola
  • 125 ml lait
  • 10 ml extrait de vanille
  • 2 grands œufs
  • 240 ml café chaud, fortement infusé

Instructions

  • Tamiser la farine et la poudre de cacao dans un grand bol.
  • Ajouter le sucre, le sel, la levure chimique et le bicarbonate de soude, puis fouetter le tout.
  • Faire un puits au centre et ajouter l'huile, le lait, l'extrait de vanille et les œufs, puis mélanger délicatement.
  • Verser le café chaud lentement dans le mélange tout en remuant.
  • Préchauffer le four à 175°C (350°F) et préparer un moule de 9x13 pouces.
  • Verser la pâte dans le moule en lissant la surface.
  • Cuire au four pendant 40 minutes, jusqu'à ce qu'un cure-dent en ressorte avec quelques miettes humides.
  • Pendant ce temps, préparer la ganache en chauffant la crème puis en la versant sur le chocolat haché.
  • Laisser reposer une minute, puis mélanger jusqu'à obtenir une consistance lisse.
  • Laisser le gâteau refroidir complètement avant de verser la ganache dessus.
  • Réfrigérer le gâteau pour que la ganache prenne, puis trancher et servir.

Notes

Pour un goût encore plus riche, utilisez un cacao en poudre de haute qualité.
Vous pouvez remplacer le café par de l'eau chaude si vous ne souhaitez pas utiliser de café.
Cette recette se conserve bien au réfrigérateur dans un contenant hermétique jusqu'à 4-5 jours.
Pour un effet visuel, garnissez de fruits frais ou de chouquettes après la glaze.

Nutrition

Calories: 350kcal | Carbohydrates: 45g | Protéines: 5g | Fat: 18g | Lipides saturés: 6g | Choléstérol: 50mg | Sodium: 180mg | Potassium: 200mg | Fibre: 2g | Sucre: 25g | Vitamine A: 3IU | Vitamine C: 1mg | Calcium: 4mg | Fer: 10mg
Tried this recipe?Let us know how it was!

Laisser un commentaire

Recipe Rating


This website stores cookies on your computer. These cookies are used to provide a more personalized experience and to track your whereabouts around our website in compliance with the European General Data Protection Regulation. If you decide to to opt-out of any future tracking, a cookie will be setup in your browser to remember this choice for one year.

Accept or Deny

Haut