
Pain aux Pommes et Cannelle avec un Tourbillon de Sucre : Votre Nouvelle Gourmandise Réconfortante
Vous connaissez cette odeur incroyable quand vous entrez dans une boulangerie par un matin d’automne frais ? Ce mélange chaleureux et réconfortant de pain beurré, de pommes sucrées et de cannelle épicée ? J’ai recréé cette magie dans ma propre cuisine, et ma famille en a été absolument folle. Ce Pain aux Pommes et Cannelle avec son Tourbillon de Sucre, c’est comme savourer la pâtisserie préférée de votre boulangerie, dans un pain moelleux que l’on peut trancher. C’est le genre de recette qui donne envie de se lover avec une tasse de café et d’oublier le monde extérieur. Croyez-moi, une fois que vous l’aurez essayé, vous le ferez en boucle tout au long de la saison.
Une Tranche d’Histoire : Du Beignet au Pain
Les beignets aux pommes sont un classique aux racines profondes dans les traditions de friture européennes. Mais soyons honnêtes, faire frire à la maison peut être une aventure salissante et intimidante. C’est là qu’intervient cette brillante version en « pain » ! Elle capture toutes les saveurs iconiques d’un beignet aux pommes classique—les morceaux tendres de pommes épicées, les rubans de sucre à la cannelle fondant, le glaçage sucré—mais cuit à merveille et simplement dans un moule à cake. C’est la version moderne et adaptée au cuisinier à domicile d’un grand classique. Pour moi, elle est spéciale car elle me rappelle le gâteau aux pommes de ma grand-mère, mais avec ce côté amusant, tourbillonnant et de pâtisserie que mes enfants adorent.
Pourquoi Vous Allez Tomber Amoureux de ce Pain Pomme Cannelle
Cette recette est un vrai succès, et voici pourquoi. Premièrement, la texture est absolument divine : un pain moelleux et tendre, truffé de pommes à la cannelle fondantes à chaque bouchée. L’arôme qui envahit votre maison, c’est du bonheur pur. C’est aussi étonnamment simple à faire—pas besoin de compétences particulières, juste un bon saladier et une cuillère. C’est le pont parfait entre un pain de petit-déjeuner simple et un dessert décadent. De plus, il se congèle à merveille, pour toujours avoir une tranche de réconfort sous la main. Ce Pain Pomme Cannelle est vraiment une recette qui fait chaud au cœur.
Quand Préparer ce Merveilleux Cake
Ce Pain aux Pommes et Cannelle est incroyablement polyvalent ! Il est parfait pour :
- Les Brunchs du Week-end : La star de la table, aux côtés d’œufs brouillés et de bacon.
- Les Matinées de Fêtes : Pour Noël, Thanksgiving ou le petit-déjeuner du Nouvel An.
- Le Goûter : Une gourmandise exceptionnelle pour quand les ami(e)s passent à l’improviste.
- Une Surprise dans la Lunchbox : Une petite douceur spéciale pour votre famille (elle disparaît toujours en premier !).
- Un Dessert Simple : Servez-le tiède avec une boule de glace à la vanille. Un délice !
Les Ingrédients pour votre Pain Pomme Cannelle Parfait
Rassemblons tout ce dont vous avez besoin. Vous avez probablement déjà la plupart des choses dans votre placard !
Pour le Tourbillon Cannelle et le Mélange aux Pommes :
- 80g de sucre roux blond
- 2 c.c. de cannelle moulue (à diviser)
- 2 grosses pommes, pelées et coupées en dés (j’adore mélanger Granny Smith et Honeycrisp)
- 2 c.s. de sucre en poudre
Pour la Pâte à Pain :
- 130g de sucre en poudre
- 115g de beurre non salé, ramolli
- 2 gros œufs
- 2 c.c. d’extrait de vanille
- 190g de farine tout usage
- 1 3/4 c.c. de levure chimique
- 120ml de lait
- Une pincée de sel
Pour le Glaçage Simple :
- 60g de sucre glace
- 2-3 c.s. de lait
Substitutions Astucieuses selon Votre Placard
Pas d’inquiétude s’il vous manque quelque chose ! Voici des échanges faciles :
- Pommes : Utilisez n’importe quelle pomme à cuisson ferme que vous avez. Les poires peuvent dépanner aussi !
- Lait : Tout lait que vous consommez—lait de vache, d’amande, d’avoine, ou de soja—fait l’affaire.
- Beurre : Vous pouvez utiliser la même quantité d’huile neutre, comme de l’huile végétale ou de colza.
- Sans Gluten : Utilisez un mélange de farine sans gluten 1 pour 1 en remplacement de la farine tout usage.
- Pas de Babeurre ? Pas de problème ! Si vous voulez plus de peps, utilisez 120ml de babeurre à la place du lait normal. Pas de babeurre ? Faites le vôtre en ajoutant 1/2 c.c. de jus de citron ou de vinaigre dans les 120ml de lait et laissez reposer 5 minutes.
La Préparation de votre Pain aux Pommes et Cannelle : Pas à Pas
Étape 1 : Préparation et Pré-chauffage
Commencez par préchauffer votre four à 180°C (350°F). C’est crucial pour une cuisson uniforme. Beurrez généreusement un moule à cake de 23×13 cm (9×5 pouces) avec du beurre ou un spray antiadhésif. J’aime bien y déposer une bande de papier sulfurisé pour un démoulage ultra-facile. L’excitation monte dès maintenant !
Étape 2 : Créer la Magie du Tourbillon Cannelle
Dans un petit bol, mélangez les 80g de sucre roux avec 1 c.c. de la cannelle moulue. Utilisez vos doigts pour casser les éventuels grumeaux. Ce simple mélange est le secret de ces magnifiques rubans sucrés à l’intérieur de votre Pain Pomme Cannelle. Réservez ce bol—c’est votre trésor en attente d’être déposé en couches.
Étape 3 : Préparer les Pommes Épicées
Pelez et coupez vos pommes en petits morceaux de la taille d’une bouchée. Mélangez-les dans un bol moyen avec les 2 c.s. de sucre en poudre et la c.c. de cannelle restante. Le sucre va commencer à tirer le jus naturel des pommes, créant un merveilleux enrobage sirupeux. Cette étape assure que chaque morceau de pomme est parfaitement épicé et sucré. Astuce de pro : Ne zappez pas l’épluchage ! La peau des pommes peut devenir dure à la cuisson.
Étape 4 : Mélanger la Pâte
Dans un grand bol, battez ensemble le beurre ramolli et les 130g de sucre en poudre jusqu’à ce que le mélange soit léger, mousseux et pâle. Cela prend environ 2-3 minutes et aide à obtenir une mie tendre. Incorporez les œufs un par un, puis l’extrait de vanille. Dans un autre bol, fouettez ensemble la farine, la levure chimique et une pincée de sel. Ajoutez doucement environ la moitié de ce mélange sec au bol de beurre, puis la moitié du lait. Répétez, en mélangeant juste jusqu’à ce que tout soit combiné. La pâte sera épaisse et luxueuse !
Étape 5 : L’Art de l’Assemblage
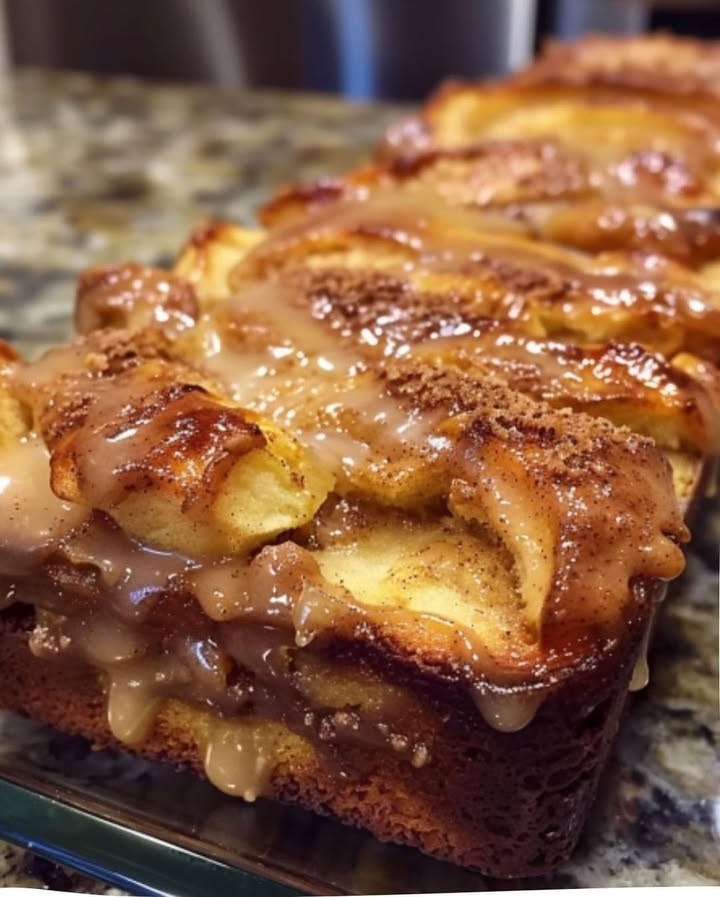
C’est la partie amusante ! Étalez la moitié de la pâte épaisse dans votre moule préparé. Elle sera un peu collante, étalez-la du mieux que vous pouvez. Maintenant, saupoudrez la moitié de votre mélange cannelle-sucre uniformément sur la pâte, suivie de la moitié des pommes épicées. Répétez les couches : le reste de la pâte, le reste du mélange cannelle-sucre, et enfin le reste des pommes. Prenez un couteau ou une baguette chinoise et tourbillonnez-la doucement à travers les couleurs juste 2-3 fois. Vous voulez obtenir un effet marbré, pas un mélange boueux !
Étape 6 : Cuisson jusqu’à la Perfection Dorée
Placez le moule au centre de votre four préchauffé. Faites cuire pendant 50 à 60 minutes. Il sera cuit quand le dessus sera d’un brun doré foncé, que les bords commenceront à se décoller légèrement du moule, et qu’un cure-dent inséré au centre en ressorte propre ou avec juste quelques miettes humides. L’odeur dans votre cuisine sera absolument divine ! Laissez le pain refroidir dans le moule pendant au moins 10 minutes avant de le transférer délicatement sur une grille.
Étape 7 : Le Dernier Filet de Douceur
Pendant que le pain refroidit complètement (c’est important pour que le glaçage ne fonde pas !), préparez le glaçage simple. Fouettez le sucre glace avec 2 cuillères à soupe de lait jusqu’à obtenir une consistance lisse. Il doit être épais mais coulant. Ajoutez la cuillère supplémentaire de lait doucement si vous devez l’allonger. Une fois le pain refroidi, versez le glaçage artistiquement sur le dessus, en le laissant couler sur les côtés biscornus. C’est la touche finale et belle qui lui donne l’air et le goût d’un chef-d’œuvre de boulangerie.
Chronologie de votre Aventure en Cuisine
- Temps de Préparation : Rapide et facile, 20 minutes
- Temps de Cuisson : 50 à 60 minutes d’arôme de cuisson béatifiant
- Temps de Refroidissement : Au moins 1 heure (pour que le glaçage prenne bien)
- Temps Total : Environ 1 heure 20 minutes de travail, plus le refroidissement
- Portions : Un cake glorieux (environ 10 tranches)
- Calories : Environ 280 kcal par tranche
Le Secret de la Cheffe pour le Meilleur Pain Pomme Cannelle
Mon arme secrète ? Laisser le cake refroidir complètement avant de le trancher. Je sais, la tentation est forte ! Mais cette période d’attente permet à la structure du pain de se fixer complètement. Si vous le coupez encore chaud, le centre peut être un peu gommeux. Patienter garantit une tranche parfaite, nette, et une texture incroyable. Préparez une cafetière, faites une petite danse, puis tranchez et savourez votre chef-d’œuvre.
Une Petite Histoire sur la Pomme
Saviez-vous que les pommes peuvent flotter dans l’eau car elles sont constituées à 25% d’air ? Cette flottabilité est un fait amusant, mais la vraie magie réside dans leur polyvalence pour la pâtisserie. Différentes variétés apportent des qualités différentes à votre Pain Pomme Cannelle. Les pommes acidulées comme la Granny Smith gardent leur forme et offrent un beau contraste avec le pain sucré, tandis que les pommes plus douces comme la Fuji ou la Honeycrisp fondent en de magnifiques poches de confiture.
Le Matériel Dont Vous Aurez Besoin
- Moule à cake 23×13 cm (9×5 pouces)
- Bol(s) à mélanger (un grand, un moyen)
- Batteur électrique ou fouet robuste
- Tasses et cuillères à mesurer
- Spatule
- Grille de refroidissement
- Petit fouet ou fourchette pour le glaçage
Conservation de votre Pain aux Pommes et Cannelle
Pour garder votre pain frais et délicieux, conservez-le correctement. Une fois le glaçage bien pris, vous pouvez envelopper le cake hermétiquement dans du film alimentaire ou le placer dans un contenant hermétique. Il restera incroyablement moelleux à température ambiante jusqu’à 2 jours.
Si vous devez le conserver plus longtemps, la réfrigération est votre amie. Bien enveloppé, il se gardera au réfrigérateur jusqu’à 5 jours. Le froid peut rendre la texture un peu plus dense, alors j’adore réchauffer des tranches individuelles au micro-ondes pendant 10-15 secondes avant de servir. Cela lui redonne toute sa douceur sortie du four.
Ce pain se congèle également magnifiquement pour les futures envies. Enveloppez le cake non glacé et complètement refroidi dans du film alimentaire, puis à nouveau dans du papier aluminium ou un sac de congélation. Il se conservera jusqu’à 3 mois. Décongelez-le une nuit au réfrigérateur et ajoutez un glaçage frais juste avant de servir pour un meilleur goût et une belle présentation.
Mes Meilleurs Conseils pour Réussir
- Ingrédients à Température Ambiante : Utiliser du beurre ramolli et des œufs et du lait à température ambiante aide la pâte à se mélanger facilement et donne une meilleure levée.
- Ne Pas Trop Mélanger : Une fois la farine ajoutée, mélangez juste jusqu’à ce que vous ne voyiez plus de traces sèches. Trop mélanger développe le gluten et peut donner un pain dur.
- Test de Cuisson : Les fours varient ! Commencez à vérifier à 50 minutes avec un cure-dent. S’il ressort avec de la pâte crue, il faut plus de temps. Quelques miettes humides, c’est parfait.
- Pour une qualité et une sécurité alimentaire optimales, commencez toujours avec des ingrédients frais et propres, un principe mis en avant dans les bonnes pratiques de manipulation des aliments.
Présentation de votre Chef-d’œuvre
- Servez d’épaisses tranches sur un beau porte-gâteau vintage.
- Ajoutez une légère neige de sucre glace sur le glaçage pour un look élégant et neigeux.
- Placez un bol de crème fouettée légère ou une boule de glace à la cannelle à côté.
- Décorez l’assiette de service avec quelques fines tranches de pomme en éventail et un bâton de cannelle.
Plus d’Inspirations Gourmandes à Essayer
Si vous avez adoré ce Pain Pomme Cannelle, vous devez absolument explorer mes autres pâtisseries préférées de la famille. Pour un délice fruité et roulé, vous devez essayer mes Roulés à la Myrtille et Cannelle qui débordent de baies. Les amateurs de chocolat, préparez-vous à être gâtés par les couches décadentes de ma Tarte Chocolat Oreo (Mississippi Mud Pie). Quand vous avez envie d’un classique maison, mes Beignets Maison Faciles sont étonnamment simples à faire et totalement irrésistibles. Et pour une saveur ensoleillée, rien ne vaut une tranche de mon Gâteau Citron Délice Éclatant. Vous trouverez toutes ces recettes et bien d’autres idées merveilleuses dans ma collection de recettes de gâteaux et pâtisseries.
Six Délicieuses Variations du Pain aux Pommes et Cannelle
Une fois que vous maîtrisez la version classique, le plaisir commence ! Voici six façons de le varier :
- Pain aux Pommes, Cranberries et Noix : Ajoutez 65g de cranberries séchées et 65g de noix ou de pacanes concassées au mélange de pommes pour une version festive et croquante.
- Pain aux Pommes et Caramel : Versez un filet de sauce caramel tiède sur le cake refroidi, à la place (ou en plus !) du glaçage à la vanille. Une pincée de sel marin sur le dessus, c’est divin.
- Pain aux Pommes et Épices de Citrouille : Remplacez 120ml du lait par 120ml de purée de citrouille et ajoutez une cuillère à café d’épices pour pain d’épices au mélange de farine.
- Cake avec Streusel : Omettez le tourbillon de cannelle à l’intérieur et recouvrez plutôt la pâte avant cuisson d’un crumble fait avec 30g de farine, 30g de sucre roux et 30g de beurre froid coupé en dés, mélangés avec 1 c.c. de cannelle.
- Version sans Gluten et sans Lait : Utilisez votre mélange de farine sans gluten 1 pour 1 préféré et remplacez le lait par du lait d’amande et le beurre par de l’huile de coco. Ça marche à merveille !
- Cadeaux en Mini Cakes : Répartissez la pâte dans 4-5 moules à mini cake beurrés. Réduisez le temps de cuisson à environ 30-35 minutes. Ils font des cadeaux adorables et personnels pour les voisins, les enseignants ou les amis.
Erreurs Courantes à Éviter avec votre Pain Pomme Cannelle
Erreur 1 : Utiliser du Beurre et des Œufs Froids
C’est une erreur très fréquente ! Quand votre beurre est froid, il ne pourra pas être bien crémeux avec le sucre. Cela signifie que moins d’air est incorporé, ce qui donne un pain plus dense et lourd. De même, des œufs froids peuvent faire figer le beurre crémeux et donner un aspect caillé. La Solution : Anticipez. Sortez votre beurre, vos œufs et votre lait du frigo environ 30 à 60 minutes avant de commencer la préparation. Votre beurre doit être mou au toucher mais pas fondu.
Erreur 2 : Trop Mélanger la Pâte
Une fois la farine ajoutée, une main légère est essentielle. Trop mélanger active le gluten de la farine, ce qui est bien pour du pain moelleux mais terrible pour des cakes tendres et aérés. Vous vous retrouverez avec un cake caoutchouteux et dur. La Solution : Mélangez les ingrédients secs aux ingrédients liquides juste jusqu’à ce que vous ne voyiez plus de traces de farine. Quelques petits grumeaux dans la pâte sont tout à fait acceptables et préférables à un excès de mixage.
Erreur 3 : Couper le Pain Quand il est Brûlant
Je sais, l’odeur est une torture ! Mais couper votre beau cake quand il est brûlant est une recette pour un désastre. La structure interne n’est pas encore fixée, donc le pain va s’écraser et s’émietter, et le centre peut sembler pas assez cuit même s’il l’est. La Solution : La patience est une vertu. Laissez le pain refroidir dans le moule pendant 10 minutes, puis transférez-le sur une grille. Attendez qu’il soit complètement froid ou juste légèrement tiède avant de faire la première tranche. Elle sera nette, belle et parfaitement texturée.
Erreur 4 : Ne Pas Beurrer Assez le Moule
Rien de plus triste qu’un magnifique cake qui reste collé au moule. Un léger enduit de graisse irrégulier ne suffit pas pour ce pain moelleux et sucré. La Solution : Soyez généreux ! Utilisez du beurre ramolli ou un spray de cuisson antiadhésif pour enduire chaque coin et chaque côté du moule à cake. Pour une tranquillité d’esprit absolue, tapissez le fond et deux côtés avec une bande de papier sulfurisé, en laissant dépasser pour servir de poignées et faciliter le démoulage.
Vos Questions sur le Pain aux Pommes et Cannelle, Répondues
Puis-je utiliser de la farine complète à la place de la farine blanche ?
Vous pouvez, mais je recommande un mélange pour la meilleure texture. Remplacez jusqu’à la moitié de la farine blanche par de la farine complète. Utiliser 100% de farine complète rendra le pain plus dense et lourd, et elle absorbera plus d’humidité, donc vous pourriez devoir ajouter un tout petit peu plus de lait si la pâte semble trop épaisse. La saveur noisettée de la farine complète se marie merveilleusement avec les pommes et la cannelle, donc un mélange moitié-moitié est un excellent compromis santé !
Quelles sont les meilleures pommes pour la pâtisserie ?
Vous voulez des pommes qui gardent leur forme et offrent un équilibre sucré-acidulé. Mes préférées sont Granny Smith (pour un bon contraste acidulé), Honeycrisp (sucrée et croquante), Braeburn ou Jonagold. Évitez les pommes comme la Red Delicious, qui ont tendance à devenir pâteuses à la cuisson. Utiliser deux types différents est mon astuce préférée pour une saveur et une texture plus complexes dans votre Pain Pomme Cannelle.
Pourquoi mon pain a-t-il creusé au centre ?
Un milieu creusé indique généralement deux problèmes : une sous-cuisson ou avoir ouvert la porte du four trop tôt. Si le pain n’est pas entièrement cuit au centre, la structure s’affaisse en refroidissant. De même, un courant d’air froid en ouvrant la porte du four pendant les 40 premières minutes de cuisson peut provoquer un affaissement prématuré. Assurez-vous que votre four est bien préchauffé, utilisez le test du cure-dent, et résistez à l’envie de regarder jusqu’aux 10 dernières minutes de la cuisson.
Puis-je faire cette recette en muffins ?
Absolument ! Cette pâte fait des muffins aux pommes et à la cannelle fantastiques. Beurrez un moule à 12 muffins ou utilisez des caissettes. Répartissez la pâte uniformément, en suivant la même technique de couches avec le sucre à la cannelle et les pommes à plus petite échelle. Faites cuire à la même température (180°C / 350°F) pendant 20 à 25 minutes, ou jusqu’à ce qu’un cure-dent ressorte propre. Le temps de cuisson plus court en fait un en-cas plus rapide !
Comment savoir quand le pain est parfaitement cuit ?
Utilisez tous les indices ! Premièrement, regardez : le dessus doit être d’un brun doré foncé, et les bords commenceront tout juste à se décoller des côtés du moule. Deuxièmement, appuyez doucement : le dessus doit reprendre sa forme quand on le touche légèrement. Troisièmement, et le plus fiable, faites le test du cure-dent. Insérez un cure-dent ou une pointe fine au cœur même du cake. Il doit ressortir propre ou avec quelques miettes sèches attachées. Si vous voyez de la pâte crue, il faut plus de temps.
Puis-je me passer du glaçage ?
Bien sûr ! Le pain est délicieux et sucré même sans le glaçage. Le glaçage ajoute une jolie touche finale et une couche supplémentaire de douceur qui imite un vrai beignet aux pommes. Si vous le zappez, vous pourriez saupoudrer le dessus d’un peu de sucre perlé avant la cuisson pour une croûte brillante et croquante. Ou, servez simplement les tranches avec un peu de crème fouettée ou une noix de beurre.
Mon glaçage est trop liquide/épais. Comment le rectifier ?
La consistance du glaçage est facile à ajuster ! S’il est trop liquide et coulant, fouettez simplement plus de sucre glace, une cuillère à soupe à la fois, jusqu’à ce qu’il épaississe à un état coulant. S’il est trop épais et pâteux, ajoutez plus de lait, mais seulement quelques gouttes à la fois. Il s’allonge vite, donc allez-y doucement. Vous visez un glaçage lisse et opaque qui garde sa forme une seconde avant de fondre sur le pain.
Puis-je ajouter des noix comme des noix ou des pacanes ?
Oui, les noix ajoutent un merveilleux croquant et de la saveur ! Je recommande d’ajouter 60 à 90g de noix ou de pacanes concassées. Faites-les griller légèrement à sec dans une poêle d’abord pour exhaler leur meilleur arôme. Vous pouvez les incorporer à la pâte avec le dernier ajout de farine, ou les saupoudrer sur la dernière couche de pommes avant de créer le tourbillon. Elles se marient parfaitement avec les pommes et la cannelle.
Est-il possible de faire ce pain la veille ?
C’est une excellente idée pour préparer à l’avance ! Faites cuire et refroidir complètement le cake. Enveloppez-le hermétiquement dans du film alimentaire (sans glaçage) et conservez-le à température ambiante. Préparez le glaçage séparément et conservez-le dans un petit récipient couvert au frigo. Le lendemain matin, laissez le glaçage revenir à température ambiante, remuez-le et versez-le sur le pain. Ainsi, le pain reste frais et le glaçage est parfait pour le service.
Puis-je congeler le pain glacé ?
Vous pouvez, mais le glaçage peut devenir collant et perdre son bel aspect à la décongélation. Pour de meilleurs résultats, je recommande de congeler le cake non glacé et complètement refroidi. Enveloppez-le très bien dans du film alimentaire puis du papier aluminium. Congelez jusqu’à 3 mois. Décongelez une nuit au réfrigérateur ou à température ambiante. Ensuite, préparez une nouvelle portion de glaçage et versez-la sur le cake décongelé pour un meilleur goût et une belle présentation.
Mot de la Fin
Vous avez désormais tout ce qu’il faut pour créer un superbe et délicieux Pain aux Pommes et Cannelle avec un Tourbillon de Sucre dans votre propre cuisine. Ce Pain Pomme Cannelle est plus qu’une recette ; c’est une expérience. C’est la joie de mélanger, l’anticipation de la cuisson, et le pur plaisir de partager quelque chose fait avec amour. Alors attachez votre tablier, attrapez ces pommes, et préparez-vous à remplir votre maison de la plus incroyable des odeurs. Bonne cuisine, mon amie !
Equipment
- Moule à cake de 23x13 cm
- Bols à mélanger un grand, un moyen
- Mixeur ou fouet solide
- Spatule
- Grille de refroidissement
Ingrédients
- 1/3 tasse sucre brun clair
- 2 cuil. à café cannelle moulue divisée
- 2 grandes pommes pelées et hachées
- 2 cuil. à soupe sucre granulé
- 2/3 tasse sucre granulé
- 1/2 tasse beurre non salé ramolli
- 2 grands œufs
- 2 cuil. à café extrait de vanille
- 1 1/2 tasse farine tout usage
- 1 3/4 cuil. à café levure chimique
- 1/2 tasse lait
- une pincée sel
- 1/2 tasse sucre glace
- 2-3 cuil. à soupe lait
Instructions
- Préchauffez votre four à 175°C (350°F) et graissez un moule à cake de 23x13 cm (9x5 pouces).
- Dans un petit bol, mélangez 1/3 tasse de sucre brun avec 1 cuil. à café de cannelle. Réservez.
- Épluchez et hachez les pommes en petits morceaux, puis mélangez-les avec 2 cuil. à soupe de sucre granulé et 1 cuil. à café de cannelle dans un bol moyen. Réservez.
- Dans un grand bol, battez le beurre ramolli et 2/3 tasse de sucre granulé jusqu'à obtenir un mélange léger et mousseux.
- Incorporez les œufs un à un, puis l'extrait de vanille.
- Dans un autre bol, mélangez la farine, la levure chimique et le sel. Ajoutez progressivement ce mélange à la pâte, en alternant avec le lait. Mélangez jusqu'à consistance lisse.
- Dans le moule préparé, déposez la moitié de la pâte, puis saupoudrez la moitié du mélange sucre-cannelle et la moitié des pommes. Répétez les couches.
- Avec un couteau, faites quelques tourbillons dans la pâte pour créer un effet marbré.
- Faites cuire pendant 50 à 60 minutes, jusqu'à ce que le dessus soit doré et qu'un cure-dent en ressorte propre.
- Laissez refroidir le pain dans le moule pendant 10 minutes, puis transférez-le sur une grille pour qu'il refroidisse complètement.
- Préparez le glaçage en mélangeant le sucre glace avec le lait jusqu'à obtention d'une consistance lisse, puis nappez le pain refroidi.
Notes
Nutrition

Je suis Céline, une véritable passionnée d’ustensiles et de matériel de cuisine ! J’adore tester, comparer et découvrir les meilleurs équipements pour rendre la cuisine plus efficace et agréable. Que ce soit un bon couteau, un robot performant ou une poêle incontournable, je suis toujours à la recherche des outils qui feront la différence. Mon but est de vous guider dans vos choix pour que vous ayez le bon matériel adapté à vos besoins.