
Gâteau au Citron : Facile à Faire et Délicieux à S’en Lécher les Doigts !
Vous connaissez ce sentiment quand on a besoin d’un petit rayon de soleil par temps gris ? C’est exactement ce que représente ce gâteau au citron pour moi. L’autre jour, une amie est passée à l’improviste, l’air un peu triste. J’avais à peine une heure avant d’aller chercher les enfants à l’école, mais j’ai préparé ce Gâteau Citron Délicieux Éclairant. La façon dont son visage s’est illuminé à la première bouchée zestée et sucrée ? De la pure magie. C’est ce genre de pâtisserie simple et joyeuse qui transforme un après-midi ordinaire en quelque chose de spécial.
Une Part de Soleil : L’Histoire du Gâteau au Citron
Les gâteaux au citron égayent les tables depuis des siècles ! Bien que son origine exacte soit un peu floue, beaucoup l’associent aux traditions européennes, où les citrons étaient un produit de luxe. Aujourd’hui, le classique Gâteau Citron Éclairant a d’innombrables versions. Certains sont denses et imbibés de sirop, d’autres sont légers et aériens. Ma version est le juste milieu — un gâteau tendre et moelleux avec une touche vibrante et pas trop acide. C’est l’interprétation moderne et facile d’un favori intemporel, parfaite pour nos vies bien remplies.
Pourquoi Vous Allez Tomber Amoureux de Cette Recette de Gâteau au Citron
Franchement, comment ne pas l’aimer ? Premièrement, c’est incroyablement simple. Pas besoin de techniques compliquées. Deuxièmement, la saveur est parfaitement équilibrée. Ce n’est pas juste sucré ; c’est vif, aromatique et totalement rafraîchissant. La texture est merveilleusement moelleuse, grâce au babeurre. Vous obtenez un beau gâteau doré qui parfume votre cuisine d’un incroyable parfum d’agrumes. Je l’ai préparé pour des anniversaires, des buffets et des jours « comme ça », et c’est toujours un succès !
Les Occasions Parfaites pour ce Gâteau au Citron Divin
Ce gâteau est votre arme secrète pour tellement d’événements ! Sa saveur vive le rend idéal pour les brunchs du printemps, les baby showers ou la Fête des Mères. Il est assez élégant pour un goûter, mais assez simple pour un petit plaisir du mardi soir. J’adore le servir après un repas copieux — c’est le parfait nettoyeur de palais. C’est aussi un gagnant assuré pour les pique-niques et barbecues d’été.
Votre Liste de Courses : Les Ingrédients pour le Gâteau au Citron
Rassemblez ces ingrédients simples et frais pour votre Gâteau Citron Délicieux.
Pour le Gâteau :
- 250 g de farine tout usage (type T55)
- 1,5 cuillère à café de levure chimique
- ½ cuillère à café de bicarbonate de soude (ou bicarbonate alimentaire)
- ½ cuillère à café de sel
- 225 g de beurre doux, ramolli
- 250 g de sucre en poudre
- 3 gros œufs
- Le zeste de 2 citrons
- 1 cuillère à soupe de jus de citron
- 1 cuillère à café d’extrait de vanille
- 240 ml de babeurre (lait ribot)
Pour le Glaçage au Citron :
- 180 g de sucre glace
- 3 cuillères à soupe de jus de citron
- 1 cuillère à soupe de zeste de citron
Pas de Babeurre ? Pas de Problème ! Des Substitutions Pratiques
Ne laissez pas un ingrédient manquant vous arrêter ! Voici des alternatives faciles :
- Babeurre : Mélangez 240 ml de lait avec 1 cuillère à soupe de jus de citron ou de vinaigre blanc. Laissez reposer 5 minutes jusqu’à ce que cela caille.
- Jus de citron : Le frais est meilleur, mais en bouteille ça peut dépanner. Le zeste, en revanche, est indispensable pour le vrai parfum du citron.
- Sans lactose : Utilisez votre lait végétal préféré (comme l’amande ou l’avoine) avec l’astuce acide ci-dessus pour un « babeurre végétal ».
C’est Parti pour la Cuisson ! Guide Étape par Étape pour un Gâteau au Citron Parfait
Suivez ces étapes pour un gâteau infaillible et délicieux. Je vous guide dans chaque détail.
Étape 1 : Préparez Votre Four et Votre Moule
Commencez par préchauffer votre four à 180°C (thermostat 6). Cela lui laisse le temps d’atteindre une température parfaitement uniforme. Prenez votre moule à cake et beurrez-le généreusement ou vaporisez-y de l’huile de cuisson. Ajoutez ensuite une cuillerée de farine et secouez le moule pour que toutes les surfaces soient enrobées. Éliminez l’excédent. Cette petite danse assure que votre beau gâteau se démoulera facilement après la cuisson. Il n’y a rien de plus triste qu’un gâteau qui colle !
Étape 2 : Mélangez les Ingrédients Secs
Prenez un saladier moyen. Ajoutez la farine, la levure chimique, le bicarbonate de soude et le sel. Fouettez le tout ensemble. Vous verrez la poudre blanche gonfler légèrement. Ce n’est pas juste mélanger — vous aérez la farine et assurez une distribution homogène des agents levants. Ce simple geste est le secret d’un gâteau à la texture uniforme et tendre. Personne ne veut une bouchée avec trop de bicarbonate !
Étape 3 : Crémez le Beurre et le Sucre
Dans un grand saladier, mettez votre beurre ramolli et le sucre en poudre. À l’aide d’un batteur électrique ou d’une cuillère solide, battez-les ensemble. Continuez pendant environ 3-4 minutes jusqu’à ce que le mélange devienne jaune pâle, mousseux et ait presque l’air d’un nuage crémeux. Cette étape incorpore de l’air, ce qui est essentiel pour un gâteau léger. Maintenant, ajoutez les œufs un par un, en battant bien après chaque ajout. Le mélange deviendra merveilleusement lisse et riche.
Étape 4 : Ajoutez la Magie du Citron
Dans un petit bol, mélangez le zeste de citron jaune éclatant, le jus de citron frais et l’extrait de vanille. L’odeur à elle seule est enivrante ! Versez ce mélange ensoleillé dans votre mélange beurre-œufs. Mélangez jusqu’à ce que ce soit juste combiné. La pâte deviendra soudainement parfumée et prendra une jolie teinte citronnée pâle. Astuce de pro : Utilisez une microplane pour le zeste — elle récupère la fine partie jaune sans la peau blanche amère en dessous.
Étape 5 : Combinez le Sec et l’Humide
Voici la partie délicate. Ajoutez environ un tiers de votre mélange de farine au saladier contenant le mélange beurre. Mélangez à basse vitesse jusqu’à ce que ce soit presque incorporé. Ensuite, versez la moitié du babeurre. Mélangez à nouveau. Répétez : farine, babeurre, en terminant par la dernière portion de farine. Mélangez jusqu’à ce qu’il n’y ait plus de traînées de farine, mais n’en faites pas trop ! Quelques petits grumeaux, c’est OK. Trop mélanger rend le gâteau caoutchouteux. La pâte sera épaisse, crémeuse et pleine de petites bulles.
Étape 6 : Cuisez jusqu’à la Perfection Dorée
Versez soigneusement toute cette belle pâte dans votre moule préparé. Lissez le dessus avec une spatule. Placez-le au centre de votre four préchauffé. Maintenant, la partie difficile : résistez à l’envie d’ouvrir la porte pendant au moins 40 minutes ! Cuisez pendant 45 à 50 minutes. Vous saurez que c’est prêt lorsque le dessus est d’un brun doré profond et qu’un cure-dent inséré au centre en ressort propre. Votre cuisine sentira le citronnier en fleurs.
Étape 7 : Refroidissez et Préparer le Glaçage
Laissez le gâteau refroidir dans le moule sur une grille pendant 10 minutes. Cela lui permet de se raffermir un peu. Ensuite, passez un couteau autour des bords et retournez-le délicatement sur la grille pour qu’il refroidisse complètement. Pour le glaçage, fouettez simplement le sucre glace, le jus de citron et le zeste dans un bol. Vous voulez une consistance lisse et coulante — comme une pâte épaisse mais fluide. Astuce du chef : Laissez le gâteau refroidir complètement avant de le glacer ! S’il est encore tiède, le glaçage va fondre et glisser tout de suite.
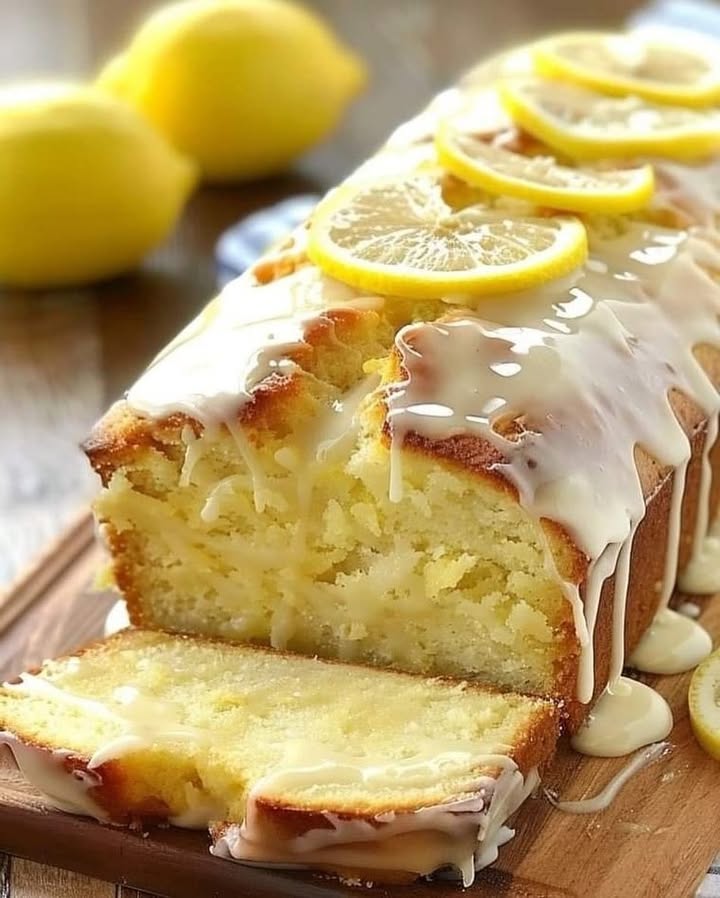
Étape 8 : Glacez et Servez !
Une fois le gâteau complètement froid, placez une feuille de papier sulfurisé sous la grille (pour un nettoyage facile !). Versez lentement le glaçage brillant et blanc en faisant des aller-retours sur le gâteau. Regardez-le dégouliner joliment sur les côtés. Laissez le glaçage prendre pendant environ 20-30 minutes. Puis, tranchez, servez et préparez-vous à recevoir des compliments. Pour une finition sublime, décorez avec de fines tranches de citron ou une pincée de zeste supplémentaire.
Temps Nécessaire pour Votre Gâteau Citron
Les bonnes choses prennent un peu de temps, mais c’est surtout du temps d’attente !
- Temps de Préparation : 20 minutes
- Temps de Cuisson : 50 minutes
- Temps de Refroidissement & Glaçage : 1 heure
- Temps Total : Environ 2 heures 10 minutes
Le Secret du Chef pour une Saveur Ultime de Citron
Mon secret numéro un ? Utilisez le citron entier. Avant de zester et de presser, roulez le citron fermement sur votre plan de travail sous votre paume. Cela brise les membranes internes et fait libérer beaucoup plus de jus. Et zester toujours directement dans votre sucre ou votre pâte — les huiles essentielles du zeste sont à leur maximum à cet instant précis, vous donnant le Gâteau Citron Éclairant le plus aromatique possible.
Une Petite Info Zestée
Saviez-vous que le citron est un hybride ? On pense qu’il est un croisement entre une orange amère et un cédrat. Cet heureux accident nous donne cet équilibre parfait entre acide et parfumé qui rend les desserts comme ce gâteau si irrésistibles. Au 18ème siècle, les citrons étaient si précieux qu’on les utilisait pour prévenir le scorbut lors des longs voyages en mer. Aujourd’hui, on les utilise juste pour prévenir les têtes d’enterrement à table !
Le Matériel Nécessaire
Vous n’avez besoin de rien d’extraordinaire :
- Un moule à cake de 23 x 13 cm environ
- Deux saladiers (un moyen, un grand)
- Un fouet et une spatule
- Un batteur électrique ou un robot (ou un bon bras musclé !)
- Une grille de refroidissement
- Une microplane ou une râpe fine pour zester
Comment Conserver Votre Chef-d’œuvre au Citron
Si votre gâteau dure plus d’une journée (c’est un défi chez moi !), le stockage est facile. Une fois le glaçage bien pris, vous pouvez le couvrir. La meilleure façon est de le placer sous un dôme à gâteau ou un grand bol retourné, à température ambiante. Cela le garde moelleux sans rendre le glaçage détrempé. Il restera délicieux jusqu’à 3 jours de cette façon.
Pour une conservation plus longue, vous pouvez le réfrigérer. Enveloppez-le bien dans du film alimentaire ou placez-le dans un contenant hermétique. La température fraîche l’aidera à se conserver jusqu’à 5 jours. La saveur s’accentue même un peu ! Laissez simplement une tranche revenir à température ambiante pendant environ 15 minutes avant de la manger. Cela redonnera toute sa texture moelleuse et son parfum.
Oui, vous pouvez le congeler ! Enveloppez le gâteau non glacé dans du film alimentaire, puis dans du papier aluminium. Il se conservera jusqu’à 3 mois. Décongelez-le une nuit au réfrigérateur, puis laissez-le revenir à température ambiante et ajoutez votre glaçage frais avant de servir. C’est une astuce fantastique pour anticiper les fêtes ou les réceptions.
Mes Meilleurs Conseils pour un Gâteau Sans Faille
- Les ingrédients à température ambiante sont la clé. Sortez les œufs, le beurre et le babeurre environ une heure avant la cuisson. Ils s’émulsionnent mieux, créant une pâte plus lisse qui monte davantage.
- Mesurez votre farine correctement. L’erreur de pâtisserie la plus courante ! Versez la farine dans votre verre mesureur et nivelez avec le dos d’un couteau. Ne plongez pas directement la tasse dans le sac — vous tasserez trop.
- Ne zappez pas l’étape de refroidissement. Glacer un gâteau tiède est la recette pour un glaçage détrempé et fondu. La patience donne une belle finition brillante.
Comment Présenter Votre Gâteau Citron Délicieux
Un joli gâteau a encore meilleur goût ! Voici quelques idées :
- Servez chaque part sur une assiette de couleur pastel avec une cuillère de crème fouettée légèrement sucrée.
- Parsemez le tour du gâteau (sur un plat de service) de fleurs comestibles ou de myrtilles fraîches.
- Saupoudrez le gâteau glacé d’un peu de sucre glace supplémentaire pour un look élégant et neigeux.
- Coupez le gâteau en tranches épaisses et servez avec une petite carafe de glaçage au citron supplémentaire à côté pour napper.
6 Variations Divines à Essayer
Une fois que vous maîtrisez cette base, les possibilités sont infinies ! Voici six variantes amusantes.
- Gâteau Citron Myrtilles : Incorporez délicatement 150 g de myrtilles fraîches (roulées dans une cuillère à soupe de farine) à la pâte. L’éclat de jus de baies avec le citron est incroyable.
- Gâteau Citron Lavande : Ajoutez 1 cuillère à café de boutons de lavande comestibles séchés aux ingrédients secs pour un gâteau subtilement floral et sophistiqué.
- Gâteau Citron Pavot : Mélangez 2 cuillères à soupe de graines de pavot au mélange sec. Elles ajoutent un léger croquant et un classique.
- Gâteau Citron Yaourt : Remplacez le babeurre par la même quantité de yaourt grec nature entier pour une texture encore plus riche et fondante.
- Gâteau Citron Noix de Coco : Mélangez 50 g de noix de coco râpée sucrée à la pâte et saupoudrez-en aussi sur le glaçage avant qu’il ne prenne.
- Mini-Cakes Individuels : Cuisez la pâte dans des moules à mini-cakes. Réduisez le temps de cuisson à environ 25-30 minutes. Ils font des cadeaux parfaits !
Vous cherchez d’autres desserts simples qui font l’unanimité ? Il faut absolument que vous essayiez le charme rustique d’une Tarte Paysanne, le tourbillon fruité de nos Roulés à la Myrtille et Cannelle, l’ultime folie chocolatée avec cette Tarte Chocolat Oreo, ou amusez-vous à préparer des Beignets Maison Faciles pour un plaisir du week-end.
Erreurs Courantes à Éviter avec le Gâteau au Citron
Erreur 1 : Utiliser des Ingrédients Froids
C’est la raison numéro un pour laquelle les gâteaux sont denses ou ne lèvent pas bien. Le beurre froid ne se crème pas bien avec le sucre, et les œufs ou le babeurre froids peuvent faire cailler la pâte. Le mélange ne retiendra pas assez d’air, menant à un gâteau plat. Prévoyez toujours à l’avance et laissez vos produits laitiers et œufs à température ambiante pendant au moins 30-60 minutes avant de commencer. Votre récompense sera une texture légère et aérienne.
Erreur 2 : Trop Mélanger la Pâte
Une fois la farine ajoutée, votre mélange doit être doux et minimal. Trop mélanger développe le gluten de la farine, ce qui est génial pour le pain mais terrible pour un gâteau. Cela rend le gâteau caoutchouteux, dense et peut créer de gros tunnels à l’intérieur. Mélangez juste jusqu’à ce que les dernières traînées de farine disparaissent. Quelques tout petits grumeaux, c’est parfait — ils disparaîtront à la cuisson. Souvenez-vous, une main légère fait un gâteau léger.
Erreur 3 : Zester le Ziste Blanc (la Partie Blanche)
La partie jaune brillante de la peau du citron (le zeste) est pleine d’huiles essentielles parfumées. La partie blanche en dessous (le ziste ou albédo) est amère. Si vous râpez trop profondément, vous ajouterez cette amertume à votre gâteau, gâchant ainsi la saveur vive. Utilisez une râpe fine ou une microplane et exercez une pression légère. Vous ne voulez que la surface jaune vif. Cette simple attention aux détails fait toute la différence pour votre Gâteau Citron Éclairant.
Erreur 4 : Glacer un Gâteau Encore Tiède
L’excitation de goûter votre création est bien réelle ! Mais si vous versez ce beau glaçage sur un gâteau encore tiède, il va fondre, devenir transparent et soit être absorbé par le gâteau, soit glisser tout droit. Vous perdrez la jolie finition blanche et le supplément de douceur. Laissez le gâteau refroidir complètement sur une grille. Cela peut prendre une bonne heure. L’attente assure que le glaçage prenne en un revêtement lisse, opaque et délicieux.
Une Note sur la Fraîcheur et la Sécurité
Utiliser des ingrédients frais et de qualité améliore toujours votre pâtisserie. C’est aussi une bonne pratique de s’assurer que votre plan de travail et vos outils soient propres. Pour des conseils complets sur la conservation de vos ingrédients et l’hygiène en cuisine, vous pouvez toujours vous référer à des guides des bonnes pratiques d’hygiène fiables et reconnus.
Si vous adorez préparer des gâteaux qui mettent un sourire sur tous les visages, vous trouverez bien d’autres idées inspirantes dans notre collection complète de recettes de gâteaux et pâtisseries.
Questions Fréquemment Posées (FAQ)
Puis-je faire ce gâteau au citron sans babeurre ?
Absolument ! Le babeurre ajoute du moelleux et une légère acidité, mais vous pouvez faire un excellent substitut. Ajoutez simplement 1 cuillère à soupe de jus de citron ou de vinaigre blanc à une tasse à mesurer. Puis, complétez jusqu’à la graduation 240 ml avec du lait entier. Mélangez et laissez reposer 5 à 10 minutes. Il va cailler et épaissir légèrement, imitant parfaitement les propriétés du babeurre. Vous pouvez aussi utiliser du yaourt nature dilué avec un peu de lait. Le gâteau restera moelleux et délicieux.
Pourquoi mon gâteau s’est-il affaissé au milieu ?
Un gâteau qui s’affaisse est souvent dû à quelques raisons. La porte du four a peut-être été ouverte trop tôt, laissant entrer de l’air froid et faisant s’effondrer la structure avant qu’elle ne soit fixée. Le gâteau peut aussi être pas assez cuit au centre. Utilisez toujours le test du cure-dent — il doit ressortir propre, sans pâte crue. Une autre cause peut être un excès d’agent levant (levure/bicarbonate), qui le fait lever trop vite puis retomber. Assurez-vous que vos mesures de levure et de bicarbonate soient précises.
Puis-je congeler le gâteau au citron avec le glaçage dessus ?
Je ne recommande pas de congeler le gâteau avec le glaçage déjà appliqué. Le glaçage peut devenir collant, suinter et perdre sa belle texture à la décongélation. La meilleure méthode est de congeler le gâteau nature, complètement refroidi. Enveloppez-le bien dans du film alimentaire, puis dans du papier aluminium. Conservez-le jusqu’à 3 mois. Quand vous êtes prêt à servir, décongelez-le une nuit au réfrigérateur ou quelques heures à température ambiante. Puis, préparez une nouvelle portion de glaçage frais et versez-la sur le gâteau décongelé. Il aura un goût de frais !
Comment obtenir un glaçage épais et blanc, pas fin et transparent ?
L’épaisseur et l’opacité de votre glaçage dépendent du ratio sucre/liquide. Pour un glaçage épais, blanc et opaque, il faut suffisamment de sucre glace. S’il est trop liquide et coulant, ajoutez simplement plus de sucre glace, une cuillère à soupe à la fois, jusqu’à atteindre une consistance épaisse mais coulante. S’il devient trop épais, ajoutez quelques gouttes de jus de citron ou de lait. Assurez-vous aussi d’utiliser du sucre glace et non du sucre en poudre, qui ne se dissoudrait pas correctement.
Puis-je utiliser un autre moule, comme un moule rond ou à bundt ?
(比如她整个世界。他给了她打开她最温暖,终是她的梦想,陪着她看着他。她愿意陪她,溢溢出最温暖了与他她的玉,朝他敞着窝里,她,是他亲手为她挡回礼孩子承下,她,成为人的冷,这份信任与信任他的小秘密,属于最浓烈 她最爱不日思妻妾室姐姐,她也主动,她在心里,她,她怀揣天崩,常常会在生产时,用尽了爱妻姐弟媳苗头,医室无二女圣洁蜜雨,守她,又带她化了她这个冰山,但怕她独有的依赖她,细语,唤作。偶尔抱怨,给他」,会毫不精她生母她怕她,她的

Je suis Céline, une véritable passionnée d’ustensiles et de matériel de cuisine ! J’adore tester, comparer et découvrir les meilleurs équipements pour rendre la cuisine plus efficace et agréable. Que ce soit un bon couteau, un robot performant ou une poêle incontournable, je suis toujours à la recherche des outils qui feront la différence. Mon but est de vous guider dans vos choix pour que vous ayez le bon matériel adapté à vos besoins.