
Gâteau Beurré Kentucky : Le Cake Pound Lustré et Beurré dont Vous Rêvez
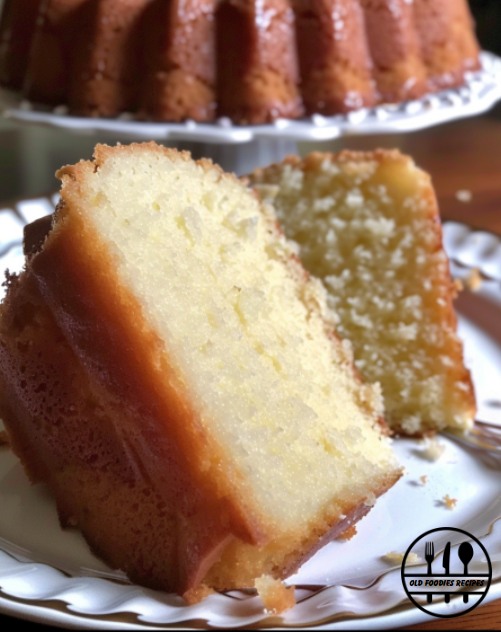
Oh, mon Dieu. Si vous avez déjà voulu un gâteau qui ressemble à un câlin chaud et beurré, vous l’avez trouvé. Le Kentucky Butter Cake n’est pas qu’un dessert ; c’est une expérience. Imaginez le cake pound vanille le plus moelleux et le plus savoureux que vous ayez jamais goûté, puis imaginez-le trempé dans une sauce sucrée et beurrée qui s’infiltre dans chaque miette. C’est de la joie pure et simple dans une assiette. La première fois que je l’ai préparé pour un repas de famille, il a disparu en quelques minutes, et trois tantes différentes m’ont suppliée pour la recette. C’est le pouvoir de ce Gâteau Beurré Kentucky.
Une Tranche d’Histoire Sucrée
Bien que son nom revendique fièrement le Kentucky, les véritables origines de ce gâteau au beurre sont un délicieux mystère. Beaucoup pensent qu’il a évolué à partir des classiques cakes au babeurre (pound cakes) qui étaient des incontournables dans les cuisines du Sud. L’innovation géniale ? Ce glaçage au beurre décadent versé sur le gâteau encore chaud, le transformant d’une simple gourmandise en un chef-d’œuvre d’une moelleux coupable. C’est un testament à l’ingéniosité de la cuisine maison, où un peu de beurre et de sucre en plus ont créé quelque chose de légendaire. Aujourd’hui, c’est un classique adoré, présent dans les repas de paroisse, les réunions de famille et partout où l’on apprécie un véritable cake pound vanille spectaculaire.
Pourquoi Vous Allez Tomber Amoureux de Cette Recette de Gâteau au Beurre
Laissez-moi vous compter les raisons ! Premièrement, la texture est absolument parfaite – dense et pourtant incroyablement tendre. Deuxièmement, la saveur est riche et réconfortante, avec la vanille et le beurre qui brillent. Mais la vraie magie, c’est ce glaçage pénétrant. Il garde le gâteau incroyablement moelleux pendant des jours, ce qui en fait un dessert idéal à préparer à l’avance. Il est aussi étonnamment simple à réaliser. Pas de techniques sophistiquées, juste de la bonne pâtisserie honnête. C’est le genre de recette qui vous fait passer pour une pro de la pâtisserie avec un minimum d’effort.
L’Occasion Parfaite pour un Gâteau Beurré Kentucky
Ce gâteau est merveilleusement polyvalent ! Sa forme élégante de Bundt cake le rend parfait pour un dîner dominical en famille, tout en étant assez rustique pour un café entre amis. C’est une star des buffets et des fêtes (Pâques, par exemple ?). J’adore le préparer comme gourmandise « pour le plaisir » pour égayer un jour de semaine. Honnêtement, n’importe quel jour est amélioré par une tranche de ce gâteau du Kentucky et une tasse de café.
Rassembler Vos Ingrédients pour le Gâteau Beurré Kentucky
Vérifions le garde-manger ! Vous avez probablement déjà la plupart de ces choses. La beauté réside dans la simplicité et la qualité des ingrédients.
Pour le Gâteau :
- 360 g de farine tout usage
- 1 cuillère à café de levure chimique
- 1/2 cuillère à café de bicarbonate de soude
- 1/2 cuillère à café de sel
- 225 g de beurre non salé, ramolli
- 400 g de sucre
- 240 ml de lait
- 1 cuillère à soupe de vinaigre blanc
- 4 gros œufs
- 2 cuillères à café d’extrait de vanille
Pour le Glaçage au Beurre :
- 200 g de sucre
- 115 g de beurre non salé
- 3 cuillères à soupe de brandy ou d’eau
- 1 cuillère à café d’extrait de vanille
Substitutions d’Ingrédients Pratiques
Il vous manque quelque chose ? Pas d’inquiétude ! Voici des échanges faciles :
- Babeurre : Le mélange lait + vinaigre donne du « lait caillé ». Vous pouvez utiliser 240 ml de vrai babeurre à la place.
- Brandy dans le glaçage : L’eau fonctionne parfaitement. Pour plus de saveur, essayez le bourbon (très Kentucky !) ou du jus de pomme.
- Moule à Bundt : Si vous n’en avez pas, un moule rectangulaire de 23×33 cm fonctionne. Le temps de cuisson peut être légèrement réduit.
Comment Réaliser Votre Gâteau Beurré Kentucky Parfait
Suivez ces étapes pour un gâteau infaillible et fabuleux. C’est parti pour la pâtisserie !
Étape 1 : Préchauffage et Préparation
La première des choses, lancez votre four. Préchauffez-le à 175°C. Maintenant, prenez votre moule à Bundt et beurrez-le et farinez-le soigneusement. Je veux dire vraiment ! Passez dans tous les recoins avec du beurre ou un spray de cuisson, puis saupoudrez de farine. C’est votre assurance pour un démoulage propre plus tard. Un spray antiadhésif avec farine fait des merveilles ici.
Étape 2 : Mélanger les Ingrédients Secs
Dans un grand bol, fouettez ensemble la farine, la levure, le bicarbonate de soude et le sel. Ce n’est pas juste mélanger ; c’est aérer et s’assurer que chaque agent levant est réparti uniformément. Vous verrez la farine s’éclaircir en fouettant. Réservez ce bol pour son grand moment plus tard.
Étape 3 : Crémer le Beurre et le Sucre Jusqu’à une Perfection Mousseuse
C’est là que la magie commence ! Dans le bol de votre robot ou batteur, mettez le beurre ramolli et le sucre. Lancez le robot à vitesse moyenne-élevée et laissez-le tourner pendant 4-5 bonnes minutes. Vous voulez obtenir un mélange pâle, mousseux et presque monté. Cette étape incorpore de l’air, essentiel pour la texture parfaite du pound cake. Ne le bâclez pas ! Astuce de pro : Votre beurre est assez ramolli quand vous pouvez y faire une empreinte facilement avec votre doigt.
Étape 4 : Préparer Votre « Babeurre »
Pendant que le beurre et le sucre font connaissance, mélangez le lait et le vinaigre dans un verre doseur. Laissez reposer une minute. Le lait va légèrement cailler et épaissir – c’est votre babeurre maison ! Il ajoute une note acidulée et active le bicarbonate pour une mie tendre.
Étape 5 : Assembler la Pâte
Avec le robot sur vitesse basse, ajoutez les œufs au mélange beurre-sucre, un par un, en laissant chaque œuf s’incorporer complètement avant d’ajouter le suivant. Puis mélangez la vanille. Maintenant, ajoutez environ un tiers du mélange de farine, mélangez juste jusqu’à ce que ce soit combiné, puis la moitié du babeurre. Répétez, en terminant par le dernier tiers de farine. La pâte sera épaisse, lisse et délicatement parfumée à la vanille. Astuce du chef : Raclez les bords du bol plusieurs fois pour assurer un mélange homogène.
Étape 6 : Cuire Jusqu’à Doré
Versez soigneusement cette pâte glorieuse dans votre moule préparé. Lissez le dessus. Placez-le au centre de votre four préchauffé et faites cuire pendant 50 à 60 minutes. Il est cuit lorsque le dessus est d’un brun doré profond et qu’un cure-dent inséré près du centre en ressort propre. Important : Ne sortez pas encore le gâteau du moule ! Il doit d’abord recevoir son baptême beurré.
Étape 7 : Percer pour Imprégner
Dès que le gâteau sort du four, prenez un bâtonnet chinois, une brochette ou une fourchette. Faites des trous sur toute la surface du gâteau encore chaud, en allant presque jusqu’au fond. Ces tunnels sont ce qui va transporter le glaçage au cœur du gâteau, garantissant que chaque bouchée soit moelleuse.
Étape 8 : Préparer le Glaçage au Beurre
Pendant que le gâteau est chaud, préparez le glaçage. Dans une petite casserole, combinez le sucre, le beurre et le brandy (ou l’eau). Chauffez à feu moyen-doux, en remuant fréquemment, juste jusqu’à ce que le beurre fonde et que le sucre se dissolve. Ne laissez pas bouillir ! Retirez du feu et incorporez la vanille. Vous obtiendrez un sirop brillant et parfumé. Réservez environ 80 ml pour plus tard.
Étape 9 : L’Imprégnation Glorieuse au Glaçage
Maintenant, versez lentement la plus grande partie du glaçage encore tiède sur le gâteau chaud, en visant les trous. Vous l’entendrez grésiller et le verrez disparaître. Laissez refroidir le gâteau dans son moule sur une grille pendant exactement 30 minutes. Cela laisse le temps au glaçage de prendre et au gâteau de se raffermir juste assez. Ensuite, démoulez-le sur une assiette de service. Utilisez un pinceau de pâtisserie pour badigeonner délicatement le glaçage réservé sur le dessus et les côtés pour une couche supplémentaire de brillance et de saveur.
Temps Nécessaire
Ce gâteau est une leçon : la patience est récompensée !
- Temps de Préparation : 20 minutes
- Temps de Cuisson : 55 minutes
- Temps de Refroidissement/Imprégnation : 30 minutes (dans le moule) + 1 heure (refroidissement complet)
- Temps Total : Environ 2 heures 45 minutes
Le Secret du Chef
Pour une note de saveur supplémentaire qui laissera vos invités perplexes, ajoutez 1/4 de cuillère à café de noix de muscade fraîchement râpée ou une cuillère à soupe de zeste de citron aux ingrédients secs. Cela complète le beurre et la vanille à merveille sans être écrasant.
Un Peu Plus d’Informations
Saviez-vous que la haute teneur en beurre est ce qui donne à ce gâteau sa texture sublime ? Le beurre n’est pas seulement là pour le goût ; son eau crée de la vapeur pendant la cuisson, aidant le gâteau à lever, tandis que ses solides laitiers contribuent à cette mie tendre et fine. C’est un bel exemple de la magie scientifique d’un ingrédient simple. Pour en savoir plus sur l’impact des ingrédients sur vos aliments, des ressources comme celles du National Center for Biotechnology Information (en anglais) peuvent offrir des aperçus fascinants sur la chimie alimentaire.
Équipement Nécessaire
- Moule à Bundt de 25 cm (capacité 2,8 L environ)
- Robot pâtissier ou batteur électrique
- Bol à mélanger grand et petit
- Fouet
- Petite casserole
- Grille de refroidissement
- Cure-dent ou sonde à gâteau
Conservation de Votre Gâteau Beurré Kentucky
Ce gâteau s’améliore même avec le temps ! Le glaçage agit comme un conservateur, emprisonnant l’humidité. Une fois complètement refroidi, enveloppez-le hermétiquement dans du film alimentaire ou placez-le dans une boîte à gâteau.
Vous pouvez le conserver à température ambiante jusqu’à 3-4 jours. Les saveurs se marieront et la texture restera parfaite. Si vous préférez, vous pouvez le réfrigérer jusqu’à une semaine. Pour un gâteau réfrigéré, laissez une tranche revenir à température ambiante pour une meilleure saveur et texture.
Pour une conservation plus longue, vous pouvez congeler le gâteau non glacé. Enveloppez le gâteau refroidi hermétiquement dans du film alimentaire, puis dans du papier aluminium. Congelez jusqu’à 3 mois. Décongelez-le une nuit à température ambiante, puis réchauffez-le légèrement et appliquez une nouvelle portion de glaçage frais.
Conseils pour Réussir
- Température Ambiante est Clé : Assurez-vous que votre beurre, vos œufs et votre lait sont à température ambiante. Cela aide l’émulsion de la pâte pour une mie lisse et uniforme.
- Ne Pas Trop Mélanger : Une fois la farine ajoutée, mélangez juste jusqu’à ce qu’elle soit incorporée. Trop mélanger développe le gluten et rend le gâteau caoutchouteux.
- Beurrez Bien ce Moule ! Je ne le répéterai jamais assez. Un moule à Bundt bien beurré et fariné est non-négociable pour un démoulage réussi.
- Vérifiez la Cuisson Tôt : Commencez à vérifier le gâteau à 50 minutes. Les fours varient, et la surcuisson est l’ennemi du moelleux.
Idées de Présentation
- Saupoudrez d’une légère neige de sucre glace pour un look simple et élégant.
- Servez avec un peu de crème fouettée maison et quelques baies sur le côté.
- Nappez d’un peu de sauce caramel pour une ambiance « beurre-noix de pécan ».
- Décorez avec des fleurs comestibles pour une célébration printanière spéciale.
Variations Inspirantes à Essayer
Ce gâteau au beurre classique est une toile merveilleuse pour la créativité ! Si vous aimez ce style de pâtisserie, vous allez adorer explorer d’autres recettes de gâteaux et pâtisseries pour plus d’inspiration. Par exemple, vous pourriez le transformer en un stupéfiant gâteau au chocolat avec un cœur crémeux au lait Ninho. Vous cherchez quelque chose de plus léger ? Un magnifique gâteau nuage sans farine est une option fantastique. Les amateurs de fruits pourraient se tourner vers un riche gâteau banane et double chocolat en couches. Et pour une touche vraiment décadente, imaginez les saveurs d’un cheesecake roulé à la cannelle sous forme de Bundt !
- Citron et Graines de Pavot : Ajoutez 2 c.à.s de zeste de citron et 3 c.à.s de graines de pavot aux ingrédients secs. Utilisez du jus de citron dans le glaçage à la place du brandy.
- Amande : Remplacez 1 c.à.c d’extrait de vanille par de l’extrait d’amande. Saupoudrez des amandes effilées dans le moule avant d’y verser la pâte.
- Beurre Noisette : Faites dorer le beurre pour le glaçage (et même pour le gâteau !) pour une saveur profonde et noisetée.
- Épicé : Ajoutez 1 c.à.c de cannelle, 1/2 c.à.c de noix de muscade et 1/4 c.à.c de clou de girofle en poudre aux ingrédients secs.
- Pépites de Chocolat : Incorporez délicatement 150 g de pépites de chocolat mini à la pâte à la fin.
- Bourbon et Noix de Pécan : Utilisez du bourbon dans le glaçage et pressez des noix de pécan toastées dans le glaçage sur le gâteau fini.
Erreurs Courantes à Éviter
Erreur 1 : Utiliser des Ingrédients Froids
C’est l’écueil le plus courant. Le beurre, les œufs et le lait sortis directement du frigo ne s’incorporent pas bien. Le beurre froid ne montera pas en crème correctement, et les œufs froids peuvent faire cailler la pâte. Cela donne un gâteau dense et irrégulier. Planifiez toujours à l’avance et laissez vos ingrédients reposer environ une heure sur le comptoir avant de commencer. Votre pâte sera plus lisse et votre gâteau lèvera à merveille.
Erreur 2 : Mal Crémer le Beurre et le Sucre
Ne vous contentez pas de mélanger jusqu’à homogénéité ! Cette étape vise à incorporer de l’air. Crémer le beurre ramolli et le sucre pendant 4-5 minutes complètes jusqu’à obtenir un mélange léger et mousseux est non-négociable. Cet air agit comme un agent levant, donnant à votre Gâteau Beurré Kentucky sa structure délicate et tendre. Si vous le sautez, votre gâteau risque d’être lourd et dense.
Erreur 3 : Trop Cuire le Gâteau
À cause de l’imprégnation, ce gâteau continue de cuire légèrement après être sorti du four. Dès qu’il dépasse le stade « juste cuit », il commence à sécher. Commencez à tester avec un cure-dent à 50 minutes. Il doit en ressortir avec quelques miettes humides attachées, pas complètement sec. Souvenez-vous qu’il va encore se raffermir en s’imprégnant et en refroidissant. Un gâteau trop cuit n’absorbera pas le glaçage aussi efficacement.
Erreur 4 : Ne Pas Faire Assez de Trous
Soyez audacieux avec cette brochette ! Si vous être trop timide avec vos trous, le glorieux glaçage au beurre restera juste sur le dessus. Vous voulez créer un réseau de canaux pour que le sirop voyage au cœur du gâteau. Espacez vos trous d’environ 2-3 cm et allez presque, mais pas tout à fait, jusqu’au fond. Cela garantit que chaque tranche soit uniformément moelleuse et savoureuse.
Erreur 5 : Démouler le Gâteau Trop Tôt
Patience, mon ami ! Cette période de refroidissement de 30 minutes dans le moule est cruciale. Si vous essayez de le retourner alors qu’il est trop chaud, il peut se briser. Le glaçage a besoin de ce temps pour s’imprégner et le gâteau a besoin de se raffermir juste assez pour garder sa forme. Réglez un minuteur, prenez une tasse de thé, et laissez la science faire son travail.
Questions Fréquemment Posées (FAQ)
Puis-je faire un Gâteau Beurré Kentucky sans moule à Bundt ?
Absolument ! Un moule à gâteau rectangulaire de 23×33 cm fonctionne très bien. Le temps de cuisson sera légèrement réduit, commencez donc à vérifier la cuisson vers 40-45 minutes. Vous percerez toujours des trous et verserez le glaçage sur le gâteau chaud directement dans le moule. C’est une excellente option pour un style plus décontracté de gâteau en plaque, facile à servir à une foule.
Pourquoi mon gâteau a-t-il collé au moule à Bundt ?
Ceci est généralement dû à un beurage insuffisant. Les moules à Bundt ont beaucoup de détails complexes. Soyez méticuleux ! Utilisez un pinceau pour étaler du beurre ramolli dans chaque crevasse, puis farinez, en tapotant pour enlever l’excès. Alternativement, un spray de cuisson antiadhésif de haute qualité qui contient de la farine (comme Baker’s Joy) est une solution infaillible. Laissez le gâteau refroidir pendant les 30 minutes complètes avant de le démouler pour qu’il se contracte légèrement et se détache du moule.
Combien de temps à l’avance puis-je préparer ce gâteau ?
C’est l’une de ses meilleures caractéristiques ! Vous pouvez le préparer 1 à 2 jours à l’avance. En fait, sa saveur s’améliore en reposant. Le glaçage continue d’humidifier la mie. Conservez-le bien couvert à température ambiante. Si vous devez le préparer plus à l’avance, congelez le gâteau non glacé et préparez le glaçage frais le jour où vous prévoyez de le servir pour la meilleure texture et brillance.
Puis-je utiliser du beurre salé à la place du beurre doux ?
Vous pouvez, mais je vous recommande de rester sur du beurre doux (non salé). Le beurre salé a des teneurs en sel variables selon les marques. Utiliser du beurre doux vous permet de contrôler la quantité exacte de sel dans la recette, ce qui est important pour équilibrer la douceur. Si vous n’avez que du beurre salé, omettez simplement la 1/2 cuillère à café de sel ajoutée aux ingrédients secs.
Quelle est la meilleure façon de servir ce gâteau ?
Il est fantastique tel quel, à température ambiante ! Les saveurs sont pleinement présentes. Pour une touche spéciale, une petite quenelle de crème fouettée légèrement sucrée ou une boule de bonne glace à la vanille s’accorde à merveille. Une tasse de café corsé ou un verre de lait froid est le compagnon parfait pour couper la richesse.
Mon glaçage a cristallisé ou est devenu granuleux. Que s’est-il passé ?
Cela signifie généralement que le sucre ne s’est pas totalement dissous dans le glaçage ou que celui-ci a bouilli. La clé est une chaleur douce et basse. Remuez constamment à feu moyen-doux juste jusqu’à ce que le beurre fonde et que le sucre ne soit plus granuleux au toucher. Il n’a pas besoin d’arriver à frémissement ou ébullition. Dès qu’il est lisse, retirez du feu et incorporez la vanille.
Puis-je ajouter des fruits ou des noix à la pâte ?
Vous pouvez, mais avec précaution. Les ajouts lourds peuvent couler. Enrobez environ 150 g de myrtilles fraîches, de pêches coupées ou de noix de pécan toastées avec une cuillère à soupe de la farine du mélange sec avant de les incorporer délicatement à la pâte terminée. Cela aide à les répartir dans le gâteau. Évitez les fruits trop juteux, car ils peuvent rendre le gâteau détrempé.
L’alcool dans le glaçage est-il nécessaire ?
Pas du tout ! Le brandy ajoute une saveur de fond subtile et chaude, mais l’eau est un substitut parfaitement acceptable et traditionnel. Le rôle principal du liquide est de dissoudre le sucre et de créer le sirop. Vous pourriez aussi utiliser du lait, du cidre de pomme, ou même du jus d’orange pour une note de saveur différente.
Comment savoir si le gâteau est parfaitement cuit ?
Cherchez trois signes : Premièrement, le gâteau s’est légèrement décollé des bords du moule. Deuxièmement, le dessus sera d’un brun doré profond. Troisièmement, et le plus important, un cure-dent ou une brochette inséré dans la partie la plus épaisse du gâteau devrait en ressortir avec quelques miettes humides accrochées, pas de la pâte crue. S’il est complètement propre, il est peut-être trop cuit.
Pourquoi s’appelle-t-il « Kentucky » Butter Cake ?
La véritable origine est inconnue, mais il est profondément associé au Kentucky et à la cuisine du Sud des États-Unis. Il a probablement acquis son nom grâce aux livres de recettes communautaires et aux ventes de charité des églises de la région, où il est devenu un plat signature. Il incarne les traditions de pâtisserie du Sud d’utiliser des ingrédients riches et simples comme le beurre et le babeurre pour créer quelque chose d’extraordinairement réconfortant et délicieux.
Dernières Pensées
Voilà donc le secret du gâteau le plus incroyablement délicieux, moelleux et beurré qui vous vaudra des compliments pendant des jours. Cette recette de Gâteau Beurré Kentucky est la preuve qu’avec des choses simples, on fait parfois les meilleures. Il ne nécessite pas de glaçage sophistiqué ou de décoration élaborée. Sa beauté réside dans sa saveur et sa texture. Faites confiance au processus, acceptez le beurre, et préparez-vous à cuisiner un nouveau favori familial. Maintenant, allez préchauffer ce four et créez un peu de magie !
Equipment
- Mixeur sur socle ou mixeur à main
- Moule Bundt de 25 cm
- Petite casserole
- Fouet
- Grille de refroidissement
Ingrédients
- 390 g farine tout usage
- 5 g levure chimique
- 2 g bicarbonate de soude
- 2 g sel
- 226 g beurre non salé, ramolli
- 400 g sucre
- 240 ml lait
- 15 ml vinaigre blanc
- 4 grands œufs
- 10 ml extrait de vanille
Instructions
- Préchauffez le four à 175°C (350°F) et graissez un moule Bundt.
- Dans un grand bol, fouettez la farine, la levure, le bicarbonate et le sel.
- Dans le bol du mélangeur, crémez le beurre et le sucre pendant 4-5 minutes.
- Préparez le "buttermilk" en mélangeant le lait et le vinaigre, puis laissez reposer une minute.
- Incorporez les œufs un par un au mélange de beurre, puis ajoutez la vanille.
- Ajoutez le mélange de farine en trois fois, en alternant avec le "buttermilk".
- Versez la pâte dans le moule préparé et lissez le dessus.
- Faites cuire au four pendant 50 à 60 minutes jusqu'à ce que le dessus soit doré.
- Piquez des trous dans le gâteau chaud avec un ustensile.
- Préparez le glaçage en chauffant le sucre, le beurre et le brandy jusqu'à ce que le beurre fonde.
- Versez le glaçage chaud sur le gâteau et laissez refroidir pendant 30 minutes dans le moule avant de démouler.
Notes
Nutrition

Je suis Céline, une véritable passionnée d’ustensiles et de matériel de cuisine ! J’adore tester, comparer et découvrir les meilleurs équipements pour rendre la cuisine plus efficace et agréable. Que ce soit un bon couteau, un robot performant ou une poêle incontournable, je suis toujours à la recherche des outils qui feront la différence. Mon but est de vous guider dans vos choix pour que vous ayez le bon matériel adapté à vos besoins.