
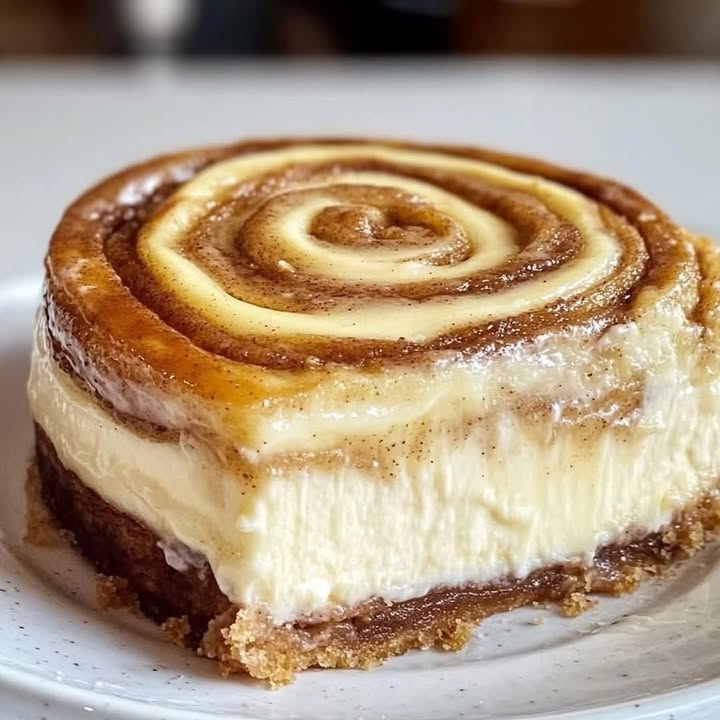
Mon cheesecake roulé à la cannelle magique : un câlin sous forme de dessert
Vous connaissez cette sensation quand vous entrez dans une boulangerie et que vous êtes enveloppé par l’odeur chaude et douce des roulés à la cannelle qui cuisent ? C’est exactement ce que je voulais recréer dans ma cuisine, mais avec le luxe crémeux du cheesecake. Ce Cheesecake Roulé à la Cannelle et son Glaçage au Miel est ma création culinaire la plus fière. Il combine l’amour de mon mari pour les briocites cinnamon moelleuses et l’obsession de ma fille pour le cheesecake. La première fois que je l’ai servi, il y a eu un beau moment de silence où tout le monde a simplement fermé les yeux pour le savourer. C’est à ce moment-là que j’ai su que cette recette était un véritable trésor.
La douce histoire derrière ce rêve de cheesecake à la cannelle
Cette recette est une délicieuse déclaration d’amour à deux classiques réconfortants. Le cheesecake a des racines anciennes, mais la version cuite et crémeuse que nous adorons aujourd’hui a pris forme en Amérique. Le roulé à la cannelle, avec ses spirales parfumées, trouve ses origines en Europe du Nord. J’ai imaginé les réunir – le meilleur des deux mondes ! Ma version est une revisite moderne et sans prise de tête. Elle saute la levure et la longue levée des roulés traditionnels. À la place, nous créons un tourbillon céleste de marbrures directement à l’intérieur de la garniture soyeuse. Toute la saveur réconfortante est là, sans l’attente, parfait pour les pâtissiers pressés d’aujourd’hui qui ont tout de même envie de quelque chose de spectaculaire.
Pourquoi vous allez tomber follement amoureux de cette recette
Laissez-moi vous compter les raisons ! Premièrement, la texture est pure magie : une base croustillante au beurre et aux biscuits, une garniture de cheesecake épicé léger comme un nuage, et un glaçage sucré et coulant. L’arôme pendant la cuisson fera sentir votre maison comme une pâtisserie cinq étoiles. Au-delà de ça, c’est étonnamment simple. Pas besoin d’être un chef pâtissier pour réussir ce dessert. Il a l’air incroyablement impressionnant, comme sorti de la vitrine d’une boulangerie chic, mais les étapes sont simples et indulgentes. C’est le dessert ultime pour faire se sentir les gens spéciaux et aimés.
Les occasions parfaites pour votre cheesecake à la cannelle époustouflant
Ce cheesecake n’est pas réservé qu’aux fêtes ! C’est mon arme secrète pour tellement de moments. J’adore l’apporter à des réunions automnales cosy ou à des brunchs de fête – il vole toujours la vedette. C’est aussi une surprise d’anniversaire sincère pour tous ceux qui adorent la cannelle. Pour un dîner en famille tranquille du dimanche, servir ce gâteau, c’est comme une petite célébration chaleureuse. Il est même fantastique comme gourmandise « juste parce que » pour égayer une semaine ordinaire. Croyez-moi, chaque fois que ce gâteau apparaît, les sourires suivent.
Rassemblez vos ingrédients pour le cheesecake tourbillon cannelle
Utiliser des ingrédients à température ambiante est la règle d’or ici ! Cela garantit une garniture lisse, sans grumeaux. Voici ce dont vous aurez besoin :
Pour la croûte :
- 2 tasses de miettes de biscuits type « petit beurre » (environ 15-16 biscuits)
- ½ tasse (1 plaquette) de beurre doux, fondu
Pour le tourbillon à la cannelle :
- ½ tasse de cassonade bien tassée
- 2 cuillères à soupe de cannelle moulue
- 4 cuillères à soupe de beurre doux, fondu
Pour la garniture au cheesecake :
- 3 paquets (225g chacun) de fromage à tartiner type Philadelphia, ramolli
- 1 tasse de sucre blanc
- ½ tasse de cassonade bien tassée
- 3 gros œufs, à température ambiante
- 1 cuillère à café d’extrait de vanille pur
- 1 cuillère à café de cannelle moulue
Pour le glaçage au miel :
- 1 tasse de sucre glace, tamisé
- 3 cuillères à soupe de lait ou de crème liquide
- ½ cuillère à café d’extrait de vanille
- 1 cuillère à soupe de miel (pour une vraie saveur de miel !)
Substitutions pratiques selon votre garde-manger
Ne vous inquiétez pas si il vous manque un ingrédient ! La pâtisserie, c’est adaptable. Pour la croûte, essayez des biscuits type « digestive » ou même des « gingersnaps » pour une touche épicée. Si vous n’avez plus de cassonade, mélangez du sucre blanc avec un tout petit peu de mélasse. Pour une version sans lactose, utilisez des alternatives végétales au fromage à tartiner et au beurre. Le miel dans le glaçage peut être remplacé par du sirop d’érable pour une autre profondeur de saveur. Le but est d’obtenir un dessert délicieux qui fonctionne pour vous.
Guide étape par étape pour un cheesecake parfait
Étape 1 : Préparez votre croûte
Commencez par préchauffer votre four à 160°C. Prenez vos miettes de biscuits et versez-les dans un bol. Versez le beurre fondu doré par-dessus. Le mélange aura l’aspect de sable mouillé et sentira bon le biscuit toasté. Tassez-le fermement au fond d’un moule à charnière de 23 cm. J’utilise le fond d’un verre plat pour bien l’aplatir et le serrer. Cette base est notre fondation, donc un bon tassage est clé ! Astuce de pro : Pour une croûte ultra-solide, faites-la pré-cuire seule pendant 8 minutes avant d’ajouter la garniture. Cela aide à éviter qu’elle ne devienne détrempée.
Étape 2 : Créez la pâte du tourbillon à la cannelle
Dans un petit bol, mélangez la cassonade et la cannelle moulue. Remuez jusqu’à obtenir un mélange sableux uniforme et parfumé. Ensuite, versez-y le beurre fondu en filet. Continuez à remuer jusqu’à former une pâte épaisse et étalable qui ressemble à du sable épicé et humide. C’est votre tourbillon magique ! Réservez-le pour l’instant. Le riche arôme à ce stade n’est qu’un avant-goût de la saveur à venir.
Étape 3 : Préparez la garniture luxueuse
Dans le bol de votre batteur, placez le fromage à tartiner ramolli. Fouettez à vitesse moyenne jusqu’à ce qu’il soit parfaitement lisse et crémeux, sans aucun grumeau. Cela prend environ 2 minutes. Ajoutez le sucre blanc et la cassonade, et fouettez à nouveau jusqu’à ce que le mélange soit mousseux. Maintenant, ajoutez les œufs un par un, en battant juste le temps que chaque œuf soit incorporé. Enfin, incorporez l’extrait de vanille et la cannelle. La garniture doit être soyeuse, pâle et constellée d’épices. Astuce du chef : Ne battez pas trop après avoir ajouté les œufs ! Cela peut incorporer trop d’air et provoquer des fissures.
Étape 4 : Assemblez avec les tourbillons
Versez environ la moitié de votre belle garniture sur la croûte préparée. Utilisez une cuillère pour déposer la moitié de votre pâte au tourbillon cannelle en petites touches sur cette couche. Prenez un couteau ou une pique en bois et tirez-le délicatement à travers la garniture et la pâte pour créer un effet marbré. N’en faites pas trop ! Répétez avec le reste de la garniture et de la pâte de tourbillon. Cette technique de double tourbillon garantit un ruban céleste de cannelle dans chaque part.
Étape 5 : Cuisez jusqu’à la perfection crémeuse
Placez votre chef-d’œuvre assemblé dans le four préchauffé. Cuisez pendant 50 à 60 minutes. Les bords doivent sembler pris, mais le centre (sur un cercle d’environ 8 cm) doit encore avoir un très léger tremblement quand vous bougez le moule. Éteignez le four, entrouvrez la porte avec une cuillère en bois et laissez le cheesecake refroidir à l’intérieur pendant environ une heure. Ce refroidissement lent et doux est le secret d’un dessus sans fissure !
Étape 6 : Réfrigérez et ajoutez le glorieux glaçage
Après le refroidissement au four, déplacez le moule sur une grille pour le laisser refroidir complètement. Ensuite, couvrez-le et placez-le au réfrigérateur pendant au moins 4 heures, mais une nuit entière est vraiment l’idéal. Cette patience permet à la texture de devenir parfaitement ferme et onctueuse. Juste avant de servir, fouettez ensemble le sucre glace, le lait, la vanille et le miel jusqu’à obtenir un glaçage lisse et coulant. Versez-le avec art sur le cheesecake bien froid. Maintenant, découpez, servez, et acceptez les compliments !
Détail des temps
- Temps de préparation : 25 minutes
- Temps de cuisson : 55 minutes
- Temps de refroidissement et repos : 5 heures et plus (sans surveillance)
- Temps total : Environ 6 heures 20 minutes
Mon astuce secrète de chef pour la texture ultime
Pour une garniture incroyablement lisse, passez le fromage à tartiner ramolli à travers un tamis fin avant de commencer à le battre. Cela retient les petits grumeaux récalcitrants et garantit la texture la plus soyeuse qui soit. C’est une étape supplémentaire, mais pour un cheesecake d’occasion spéciale, ça fait toute la différence.
Un petit fait sucré
Saviez-vous que la cannelle était autrefois plus précieuse que l’or ? Les rois et les reines la chérissaient. Quand vous cuisinez avec, vous utilisez une épice historiquement royale ! Cela rend ce cheesecake encore plus luxueux et spécial, vous ne trouvez pas ?
Ce dont vous aurez besoin dans votre cuisine
- Moule à charnière de 23 cm
- Batteur électrique (manuel ou sur pied)
- Bol(s) de mélange (de différentes tailles)
- Tasses et cuillères à mesurer
- Spatule
- Papier aluminium (pour emballer le moule si vous utilisez un bain-marie)
Comment conserver votre cheesecake frais
Une fois glacé, ce cheesecake est meilleur dégusté dans les 24 heures. Conservez les restes bien couverts au réfrigérateur. La croûte peut s’adoucir légèrement avec le temps, mais la saveur restera fantastique.
Pour une conservation plus longue, congelez le cheesecake sans le glaçage. Enveloppez le cheesecake refroidi dans son entier (ou les parts individuelles) hermétiquement dans du film alimentaire, puis dans du papier aluminium. Il se conservera au congélateur jusqu’à 2 mois.
Pour servir un cheesecake congelé, décongelez-le toute une nuit au réfrigérateur. Ensuite, préparez et ajoutez votre glaçage au miel frais juste avant de servir. Cette méthode préserve parfaitement toute l’humidité et la saveur.
Astuces de pro pour une cuisson impeccable
- Température ambiante est clé : Le fromage à tartiner froid ne se mélangera jamais en douceur. Sortez-le au moins 2 heures à l’avance.
- Ne pas trop battre : Une fois les œufs ajoutés, mélangez juste jusqu’à homogénéité pour éviter les bulles d’air.
- Évitez que ça colle : Pour des parts parfaitement nettes, plongez votre couteau dans de l’eau chaude et essuyez-le entre chaque découpe.
- Option bain-marie : Pour une garantie absolue contre les fissures, faites cuire votre cheesecake au bain-marie.
Idées de présentation qui impressionnent
- Versez le glaçage en zigzag avec une cuillère pour un rendu professionnel.
- Décorer avec une légère pincée de cannelle ou quelques noix de pécan concassées pour le croquant.
- Servez chaque part avec une petite quenelle de crème fouettée légèrement sucrée à côté.
- Pour une fête, coupez en petits carrés pour une dégustation facile.
Vous avez aimé ? Essayez ces autres délicieuses variantes !
Si vous avez adoré ce cheesecake roulé à la cannelle, votre aventure en pâtisserie ne fait que commencer ! Pour une gourmandise sans culpabilité, essayez un cheesecake crémeux et sans sucre luxueux, qui ne fait pas l’impasse sur la saveur. Les amateurs de chocolat doivent absolument découvrir les couches riches et indulgentes d’un gâteau volcan au chocolat Ninho. Si vous cherchez quelque chose d’incroyablement léger et aérien, le gâteau nuage léger sans farine ni sucre est un rêve. Et pour une touche fruitée, l’alliance banane et chocolat dans cet impressionnant gâteau à étages fait toujours l’unanimité.
Erreurs courantes à éviter avec votre cheesecake
Erreur 1 : Utiliser des ingrédients froids
C’est la raison numéro un d’une garniture grumeleuse. Le fromage à tartiner et les œufs froids ne se mélangent pas bien avec le sucre, donnant une texture hétérogène. Anticipez toujours. Sortez votre fromage à tartiner, vos œufs, et même votre crème fraîche si la recette le demande, du réfrigérateur au moins 1 à 2 heures avant de commencer. Ils doivent être frais au toucher, mais pas froids.
Erreur 2 : Trop battre l’appareil après avoir ajouté les œufs
Une fois les œufs ajoutés au mélange de fromage, il faut adopter une approche plus douce. Trop battre incorpore trop d’air. Cet air emprisonné se dilate au four puis s’effondre lors du refroidissement, provoquant de grosses fissures en surface. Battez juste jusqu’à ce que chaque œuf soit parfaitement mélangé, et pas plus. Un appareil lisse, mais pas mousseux, c’est ce que vous voulez.
Erreur 3 : Sauter le refroidissement lent
Sortir un cheesecake brûlant du four pour le poser sur le comptoir (ou pire, au frigo) est un choc thermique. Le changement soudain de température le fait se rétracter trop vite, garantissant presque une grande fissure en plein milieu. Le refroidissement dans le four entrouvert est non-négociable. Il permet au cheesecake de s’adapter progressivement et de se fixer correctement.
Erreur 4 : Ne pas étanchéifier le moule à charnière pour un bain-marie
Si vous utilisez un bain-marie pour une cuisson douce et homogène (et je le recommande !), vous devez emballer le moule à charnière. Le simple fait de placer le moule dans l’eau laissera celle-ci s’infiltrer par la jointure, créant une croûte détrempée. Utilisez une grande feuille d’aluminium solide pour envelopper hermétiquement le fond extérieur et les côtés du moule. Cela crée une barrière étanche.
Note sur la qualité des ingrédients
Pour la meilleure saveur et texture, la qualité de vos ingrédients compte vraiment. Utiliser du fromage à tartiner entier et du vrai beurre fait une différence notable en terme d’onctuosité. Quand il s’agit de nutrition et de tirer le meilleur de vos ingrédients, choisir des composants frais et sains est toujours un excellent point de départ. Vous pouvez trouver des conseils utiles pour une approche équilibrée de la cuisine et de l’alimentation auprès de sources fiables comme le guide pour des choix alimentaires quotidiens.
Si vous avez succombé à ce dessert décadent, vous adorerez explorer plus d’idées dans ma collection de gâteaux et pâtisseries.
Questions fréquemment posées
Puis-je préparer ce cheesecake roulé à la cannelle à l’avance ?
Absolument, et je le recommande fortement ! Un cheesecake a besoin de temps pour se fixer correctement au frigo. Vous pouvez le cuire jusqu’à deux jours avant de prévoir de le servir. Attendez simplement d’ajouter le glaçage au miel juste avant de le présenter. Cela garde le glaçage frais et l’empêche de s’imbiber dans le dessus du gâteau. Couvrez le cheesecake réfrigéré hermétiquement avec du film alimentaire. Les saveurs se développent et se marient magnifiquement pendant la nuit, le rendant encore plus délicieux.
Pourquoi mon cheesecake a-t-il fissuré au milieu ?
Une fissure vient généralement d’un stress trop important pendant la cuisson ou le refroidissement. Les coupables principaux sont : un appareil trop battu (trop d’air incorporé), une température de four trop élevée, ou un refroidissement trop rapide du gâteau. Pour éviter les fissures, ne battez pas trop après l’ajout des œufs, utilisez une température de four basse et régulière, et laissez toujours refroidir lentement dans le four éteint et entrouvert. Souvenez-vous, même s’il se fissure, il aura toujours un goût incroyable ! Vous pouvez toujours le recouvrir de glaçage et de garnitures.
Puis-je utiliser un autre type de moule si je n’ai pas de moule à charnière ?
Un moule à charnière est idéal car les parois amovibles permettent de sortir les parts facilement et proprement. Si vous devez absolument utiliser un moule à gâteau ordinaire, tapissez-le très soigneusement de papier sulfurisé, en laissant dépasser le papier sur les côtés. Cela crée des « poignées » pour soulever le cheesecake. Soyez très prudent, car il est fragile. Un moule à tarte profond peut aussi dépanner, mais vous le servirez directement du plat.
Comment savoir si le cheesecake est cuit ?
C’est la partie la plus délicate ! Le centre doit encore sembler un peu mou et trembler, comme de la gelée prise, quand vous secouez doucement le moule. Les bords seront gonflés et sembleront pris. Un thermomètre inséré au centre devrait indiquer environ 65°C. Souvenez-vous, la cuisson continue pendant le refroidissement dans le four éteint. Il vaut mieux légèrement sous-cuire que trop cuire, car une surcuisson donne une texture sèche et granuleuse.
Par quoi puis-je remplacer les biscuits pour la croûte ?
Beaucoup de biscuits font une croûte fantastique ! Essayez des biscuits type « digestive » pour un goût plus doux, des « gingersnaps » pour une note épicée, ou même des boudoirs. Vous pouvez aussi utiliser des céréales à la cannelle émiettées ou des biscuits sablés. Utilisez le même poids ou volume que les biscuits (2 tasses de miettes) et gardez la même quantité de beurre fondu. Le processus est identique.
Mon tourbillon a coulé au fond. Comment l’éviter ?
Si votre tourbillon à la cannelle coule, c’est peut-être qu’il est trop liquide ou que la garniture est trop fluide. Assurez-vous que votre pâte de tourbillon est bien épaisse, comme une pâte à tartiner. Aussi, vérifiez que votre garniture au fromage est bien épaissie avant l’assemblage. Si elle semble coulante, laissez-la au frais 15 minutes avant de faire les couches. Quand vous faites les marbrures, allez-y doucement et ne tourbillonnez pas trop profondément.
Puis-je congeler ce cheesecake ?
Oui, vous pouvez le congeler à merveille ! Congelez-le sans le glaçage. Enveloppez le cheesecake complètement refroidi hermétiquement dans du film alimentaire, puis dans du papier aluminium. Il se conservera 1 à 2 mois. Décongelez-le une nuit au réfrigérateur. Préparez et ajoutez le glaçage au miel frais juste avant de servir. La texture sera parfaite.
Y a-t-il un moyen de rendre cette recette moins sucrée ?
Vous pouvez légèrement réduire le sucre dans la garniture, mais attention car le sucre affecte la texture. Essayez de réduire le sucre blanc et la cassonade dans la garniture de 40g chacun. Pour le glaçage, vous pouvez utiliser moins de sucre glace ou ajouter un jus de citron pour équilibrer le sucré. Le sucre du tourbillon à la cannelle peut aussi être réduit d’une cuillère à soupe ou deux.
Le dessus de mon cheesecake a trop brun. Que s’est-il passé ?
Un brunissement excessif signifie généralement que votre four est trop chaud ou que la grille est trop haute. La prochaine fois, essayez de cuire à 150°C au lieu de 160°C. Vous pouvez aussi placer une plaque de cuisson sur la grille au-dessus du cheesecake pour le protéger pendant les 20 dernières minutes de cuisson. C’est ce qu’on appelle le « tenting ».
Puis-je ajouter des noix ou d’autres ingrédients à cette recette ?
Certainement ! Des noix de pécan ou des noix concassées sont un ajout fantastique. Faites-les légèrement griller d’abord pour plus de saveur. Vous pouvez incorporer ½ tasse de noix hachées dans la garniture, ou les saupoudrer entre les couches avec le tourbillon cannelle. Vous pourriez aussi ajouter une poignée de raisins secs ou même de la pomme finement hachée pour une autre touche.
Bon à savoir
Le saviez-vous ? La cannelle était autrefois plus précieuse que l’or ! Une épice de roi pour votre dessert de roi.
Bonnes pâtisseries !
Et voilà, ma chère amie – ma réconfortante recette de Cheesecake Roulé à la Cannelle. C’est plus qu’un dessert ; c’est une expérience, un souvenir parfumé en train de se créer. J’espère que cette recette apportera autant de joie dans votre cuisine que dans la mienne. Ne soyez pas intimidé par les étapes. Prenez votre temps, savourez le processus, et préparez-vous aux « oh » et aux « ah » quand vous dévoilerez votre chef-d’œuvre. Maintenant, allez préchauffer ce four et parfumez votre maison de la plus merveilleuse des odeurs. Bonnes pâtisseries !
Equipment
- Mixeur électrique
- Moule à ressort de 9 pouces
- Bols à mélanger
- Spatule
- Tasses et cuillères à mesurer
Ingrédients
- 2 tasses miettes de biscuits Graham environ 15-16 biscuits entiers
- ½ tasse beurre non salé fondu
- ½ tasse sucre brun tassé
- 2 cuillères à soupe cannelle moulue
- 4 cuillères à soupe beurre non salé
- 3 paquets fromage à la crème 8 oz chacun, ramolli
- 1 tasse sucre blanc granulé
- ½ tasse sucre brun
- 1 cuillère à café extrait de vanille pure
- 1 cuillère à café cannelle moulue
- 1 tasse sucre en poudre tamisé
- 3 cuillères à soupe lait ou crème épaisse
- ½ cuillère à café extrait de vanille
- 1 cuillère à soupe miel
Instructions
- Préchauffez votre four à 160°C (325°F).
- Dans un bol, mélangez les miettes de biscuits Graham avec le beurre fondu.
- Pressez ce mélange au fond d'un moule à ressort de 9 pouces.
- Dans un petit bol, combinez le sucre brun et la cannelle, puis ajoutez le beurre fondu pour créer une pâte épaisse.
- Dans un grand bol, battez le fromage à la crème jusqu'à ce qu'il soit lisse.
- Ajoutez le sucre blanc et le sucre brun, et battez jusqu'à obtenir une consistance légère.
- Incorporez les œufs un par un, en battant juste assez pour les mélanger.
- Ajoutez l'extrait de vanille et la cannelle.
- Versez la moitié du mélange de fromage sur la croûte, puis ajoutez des petites cuillerées de la pâte de cannelle.
- Avec un couteau, créez un effet marbré dans le fromage et la pâte de cannelle.
- Répétez avec le reste du mélange de fromage et de pâte de cannelle.
- Enfournez pendant 50-60 minutes jusqu'à ce que les bords soient bien cuits, mais que le centre soit légèrement tremblotant.
- Éteignez le four, entrouvrez la porte et laissez le cheesecake refroidir pendant environ une heure.
- Déplacez le gâteau sur une grille pour qu'il refroidisse complètement, puis couvrez-le et réfrigérez pendant au moins 4 heures.
- Pour le glaçage, mélangez le sucre en poudre, le lait, la vanille et le miel jusqu'à l'obtention d'une consistance lisse.
- Versez le glaçage sur le cheesecake réfrigéré avant de servir.
Notes
Nutrition

Je suis Céline, une véritable passionnée d’ustensiles et de matériel de cuisine ! J’adore tester, comparer et découvrir les meilleurs équipements pour rendre la cuisine plus efficace et agréable. Que ce soit un bon couteau, un robot performant ou une poêle incontournable, je suis toujours à la recherche des outils qui feront la différence. Mon but est de vous guider dans vos choix pour que vous ayez le bon matériel adapté à vos besoins.