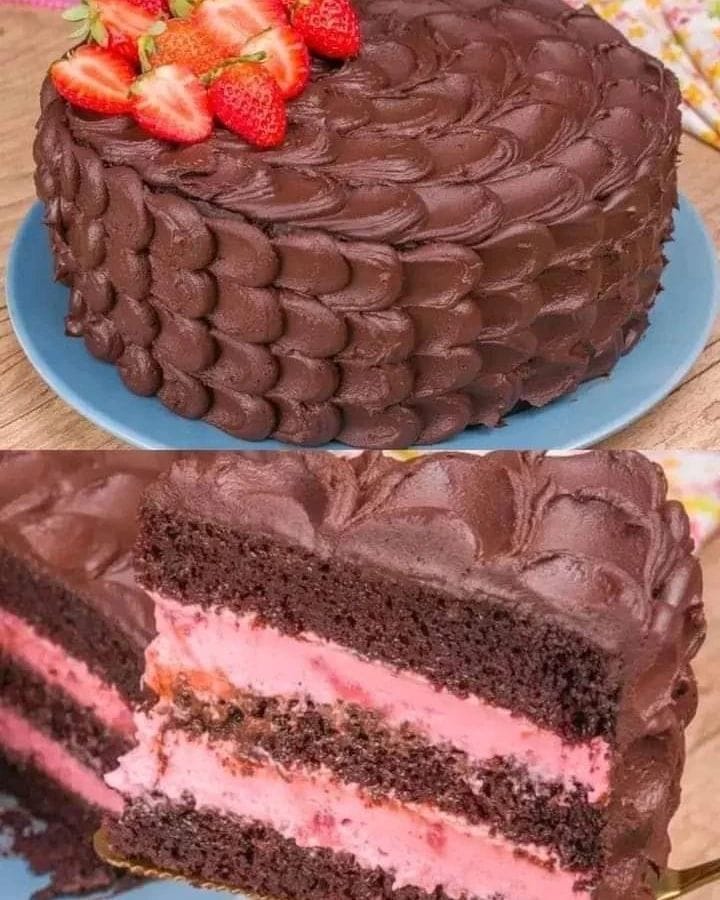
The Sensation Cake: A Chocolate & Strawberry Marvel That Will Wow Your Guests
Ever had a dessert that feels like a party in your mouth? Where rich, dark chocolate meets a burst of fresh, fruity strawberry, all wrapped up in a tender, luscious cake? That’s the Sensation Cake. I first made this for my daughter’s birthday, and let me tell you, the « oohs » and « aahs » from the table were the real reward. It’s not just a cake; it’s an experience – a showstopper that looks fancy but, thanks to a trusty microwave for key steps, is secretly quite simple to pull off.
A Little Story Behind This Sensational Treat
This recipe feels like a happy accident of modern cooking. It blends the timeless elegance of a Gâteau Mousse Chocolat with the convenience of quick microwave methods. While its exact origin is a mystery, it represents the best of home baking: taking classic components (chocolate cake, fruit mousse, glossy ganache) and using clever techniques to make them accessible. I love how it respects tradition—the delicate layers, the contrast of flavors—while embracing a little kitchen helper to speed things up. It’s a perfect example of how we can create spectacular desserts without spending all day in the kitchen.
Why You’ll Absolutely Adore This Recipe
This Sensation Cake is a triple threat of deliciousness, simplicity, and wow-factor. First, the flavor combination is unbeatable. The deep, moist chocolate cake soaked with cocoa liqueur, the bright and creamy strawberry mousse, and the silky chocolate coating create a symphony of tastes. Second, it uses the microwave for the cake and mousse base, which saves enormous time and reduces oven stress. Finally, its stunning ring shape with the mousse center makes it look like it came from a professional pastry shop. It’s the kind of recipe that builds your confidence as a baker.
When to Bake Your Sensation Cake
- Birthdays & Celebrations: Its festive look makes it a perfect centerpiece.
- Weekend Family Gatherings: A special treat to share over coffee and stories.
- Dinner Parties: Impress your friends without revealing how straightforward it really is.
- Just Because: Sometimes, a Tuesday needs a sensationally delicious cake!
Gathering Your Ingredients
Here’s what you need to create this masterpiece. I recommend measuring everything out before you start—it makes the process so smooth.
For the Coverage (Glaze)
- 400 g semi-sweet or milk chocolate, chopped
- 1/2 can of whey-free cream (like Nestlé or similar)
- 2 tablespoons of brandy
For the Cake Mass
- 3 eggs
- 1 tablespoon of butter
- 1 and 1/2 cup (tea) sugar
- 1 pot of natural yogurt (about 170g)
- 1 and 1/2 cup (tea) wheat flour
- 1/2 cup (tea) chocolate powder
- 1 tablespoon of baking powder
- 1/2 cup (tea) milk
- 2 tablespoons of cocoa liqueur
For the Strawberry Mousse
- 2 cups of fresh strawberries, cleaned and hulled
- 1 cup (tea) sugar
- 1 tablespoon cornstarch
- 1 envelope of unflavored powdered gelatin
- 1/2 can of whey-free cream
Smart Substitutions If You Need Them
Don’t fret if you’re missing something! Baking is about adaptability.
- Chocolate: You can use dark chocolate for a richer glaze, or even chocolate chips if chopping is a hassle.
- Whey-free Cream: Regular heavy cream (crème fraîche épaisse) works perfectly as a substitute.
- Brandy/Cocoa Liqueur: For a non-alcoholic version, use strong coffee or a tablespoon of vanilla extract mixed with a bit of milk.
- Fresh Strawberries: In off-season, good quality frozen strawberries can be used. Thaw and drain them well first.
- Gelatin: Agar-agar can be used as a vegetarian alternative, following package instructions for substitution.
Let’s Create the Sensation Step-by-Step
Follow these steps, and you’ll have a flawless cake. Remember, the magic is in the layers!
Step 1: Preparing the Chocolate Cake Base
Start by separating your eggs. In a clean bowl, beat the egg whites until they form soft, fluffy peaks. This air will give your cake a lovely lightness. Then, gently add the yolks, the soft butter, sugar, yogurt, flour, chocolate powder, and baking powder. Mix until you have a homogeneous, inviting brown batter. Generously grease a ring mold (a savarin mold) and dust it with flour. Pour your batter in and microwave it on high power for 7 to 8 minutes. The cake will rise and smell wonderfully chocolaty. Pro tip: Do not open the microwave during cooking to keep the heat steady. Once out, while it’s still warm and receptive, evenly pour over the mixture of milk and cocoa liqueur. This soak makes the cake incredibly moist and flavorful. Let it cool before unmolding.
Step 2: Crafting the Strawberry Mousse
Take your vibrant red strawberries, blend them with sugar and cornstarch into a smooth, fragrant puree. Pour this pink mixture into a microwave-safe bowl and cook on high for 3 to 5 minutes, stirring twice. You’ll see it thicken into a glossy, jam-like consistency. Meanwhile, dissolve your gelatin in 5 tablespoons of water. Once the strawberry mixture is hot, add the dissolved gelatin and stir vigorously. Then, fold in the whey-free cream. The color transforms into a beautiful, soft rose. Pour it into a bowl and refrigerate. It needs just enough time to firm up slightly so it holds its shape in the cake’s center but remains delightfully creamy.
Step 3: Making the Silky Chocolate Coverage
For the final glamorous touch, place your chopped chocolate in a bowl. Microwave on medium power for 3 to 4 minutes. The key is to stop before it’s fully melted and just stir until it becomes a smooth, glossy pool. If you overheat chocolate, it can seize. Once smooth, add the cream and brandy, stirring until you have a velvety, pourable glaze. Its shine is what makes the cake look so professional.
Step 4: The Grand Assembly
Unmold your cooled cake onto a serving plate. Its ring shape now reveals the central cavity, ready for filling. Take your slightly set strawberry mousse and spoon it generously into that center, spreading it evenly. Finally, pour your warm chocolate coverage over the entire cake, letting it cascade over the sides and cover every bit. The dark chocolate against the pink mousse is stunning. Refrigerate the cake for at least an hour to set everything perfectly.
Chef’s Secret Tip
The secret to a super-moist cake and a stable mousse is timing. Pour the milk and liqueur soak onto the cake while it is still warm from the microwave. The warm cake absorbs the liquid like a sponge. For the mousse, add the dissolved gelatin to the hot strawberry puree. This ensures the gelatin activates properly and sets the mousse beautifully without any lumps.
Timing Your Sensation Cake Creation
| Phase | Time |
|---|---|
| Preparation & Mixing | 25 minutes |
| Cake Microwave Cooking | 8 minutes |
| Mousse Microwave Cooking | 5 minutes |
| Glaze Preparation | 5 minutes |
| Assembly | 10 minutes |
| Refrigeration (Setting) | 1 hour (minimum) |
| Total Time (approx.) | 2 hours |
A Sweet Fact About Strawberries
Strawberries aren’t just delicious; they’re packed with vitamin C and antioxidants. Using fresh, ripe strawberries in your mousse not only gives incredible flavor but also adds a dash of natural goodness to your indulgent treat. For optimal flavor and nutrition, choosing quality ingredients matters. Learn more about the benefits of selecting fresh, vibrant produce from trusted sources here.
Equipment You’ll Need
- A microwave
- A ring mold (savarin mold)
- Blender or food processor
- Several mixing bowls
- Microwave-safe bowls
- Spatula and whisk
- Measuring cups and spoons
Storing Your Sensation Cake
This cake is best enjoyed within 2-3 days of making it. Due to the fresh strawberry mousse and creamy glaze, it should always be stored in the refrigerator. Cover it loosely with a dome or plastic wrap to protect the glaze from condensation marks.
For longer storage, you can freeze the unfilled and unglazed cake base separately. Wrap it tightly in plastic wrap and freeze for up to a month. The mousse and glaze should be made fresh when you plan to serve it, as freezing can alter their texture.
If you need to transport the cake, keep it cool. Place it on a stable plate in a cooler or an insulated bag, especially during warm weather. The cold helps maintain the structure of the mousse and the shine of the chocolate coating.
Tips and Advice for Success
- Room Temperature Ingredients: For the cake, using room temperature eggs and yogurt helps them incorporate more smoothly into the batter.
- Chocolate Chopping: Chop your chocolate for the glaze into uniform pieces so they melt evenly in the microwave.
- Testing Cake Doneness: Since microwaves vary, check your cake after 7 minutes. A toothpick inserted should come out with a few moist crumbs, not wet batter.
- Mousse Setting: Don’t rush the mousse refrigeration. It needs that hour to become firm enough to support the weight of the glaze without squishing out.
Presentation Ideas to Wow Your Table
- Dust the glazed cake with a light sprinkle of edible gold powder or cocoa powder for extra elegance.
- Place a few fresh, whole strawberries around the base of the cake on the plate.
- Serve each slice with a small dollop of extra whipped cream on the side.
- For a festive touch, add a few mint leaves beside each slice for color and freshness.
More Sensational Cake Variations to Explore
If you love the concept of this Sensation Cake, you’ll adore these other fantastic layered and chocolatey desserts from my kitchen. They all share that wonderful mix of textures and flavors.
- Easy Smores Pie: This pie brings the campfire fun indoors with a graham cracker crust, chocolate filling, and toasted marshmallows. It’s a playful, no-bake option that’s a huge hit with kids and adults alike.
- Triple Chocolate Mousse Cake: A true dream for chocolate lovers! This recipe features layers of dark and milk chocolate mousse over a cocoa cake base, finished with a glossy glaze. It’s the ultimate Gâteau Mousse Chocolat experience.
- Baklava Bundt Cake: A unique fusion dessert. It combines the fragrant nut and honey flavors of traditional baklava with the easy form of a bundt cake. It’s wonderfully moist and aromatic.
- Chocolate Cake with Ganache: Sometimes, simplicity is key. This is a classic, deeply chocolatey cake topped with a rich, flowing ganache. It’s perfect for when you want pure, unadulterated chocolate satisfaction.
- Citrus Sensation: Swap the strawberry mousse for a lemon or orange curd mousse. Use citrus juice and zest in the curd, and pair it with a dark chocolate cake and glaze for a bright, tangy contrast.
- Coffee & Hazelnut Twist: Replace the cocoa liqueur soak with a coffee syrup. Use a hazelnut mousse (made from hazelnut paste and cream) for the filling, and top with a chocolate glaze sprinkled with chopped toasted hazelnuts.
Common Mistakes to Avoid
A few small missteps can change the outcome. Here’s how to steer clear of them.
Mistake 1: Over-microwaving the Cake
Microwave power varies greatly. Cooking the cake for too long or on too high a power can make it dry and tough. The cake should be moist and springy. To avoid this, start with the minimum time (7 minutes) and check. If the toothpick test shows it’s not done, add only 30-second increments. Remember, it will continue to cook a little as it cools with the soak.
Mistake 2: Adding Gelatin to Cold Strawberry Mixture
Unflavored gelatin needs heat to dissolve and activate properly. If you add the dissolved gelatin to a strawberry puree that has cooled down, it won’t incorporate evenly and may form clumps or fail to set the mousse. Always ensure your cooked strawberry mixture is still hot when you stir in the gelatin solution.
Mistake 3: Pouring Glaze on a Cold Cake
The chocolate glaze should be warm and fluid. If you pour it over a cake that is too cold (especially if just out of the fridge), the glaze can set too quickly, resulting in a thick, uneven coating that might not cover smoothly. Let the assembled cake (with mousse) sit at room temperature for about 10 minutes before glazing, or ensure your glaze is warm enough to flow easily.
Mistake 4: Not Properly Preparing the Ring Mold
A ring mold has intricate sides. If you simply grease it, the cake might stick in the delicate curves. The combination of greasing (with butter or oil) AND dusting with flour is crucial. This creates a non-stick layer that ensures your beautiful ring shape comes out intact and clean.
For more inspiration and a whole collection of stunning desserts, don’t forget to browse through my other cake and pastry recipes. There’s always a new sweet adventure waiting!
Your Sensation Cake Questions Answered
Can I make this cake entirely in a conventional oven?
Absolutely! The microwave steps are for convenience. For the cake, bake in a preheated oven at 180°C (350°F) in the greased and floured ring mold for about 25-30 minutes, or until a toothpick comes out clean. For the strawberry mixture for the mousse, cook it in a small saucepan over medium heat, stirring until thickened, then add the gelatin. The rest of the steps remain the same.
What can I use if I don’t have a ring mold?
A ring mold gives the classic look with its central hole for the mousse. If you don’t have one, a regular round cake pan (like a 20cm springform) works. You would then simply spread the strawberry mousse on top of the entire cake layer before adding the glaze, creating a beautiful two-layer cake instead of a filled ring.
How can I tell if the strawberry mousse is set enough?
The mousse shouldn’t be fully solid like a jelly; it needs to be firm enough to hold its shape when spooned into the cake cavity. After about an hour in the fridge, give it a gentle push with your finger. It should feel set and not liquid, but still soft and creamy. If it’s too soft, give it another 15-20 minutes.
Can I make the mousse without gelatin?
Gelatin is used here to give the mousse enough structure to stand in the cake without collapsing. If you prefer not to use it, you could opt for a thicker strawberry compote or curd. However, it will be more of a filling than a mousse and may not have the same light, creamy texture.
Is the brandy in the glaze necessary?
The brandy adds a subtle depth of flavor that complements the chocolate wonderfully. If you prefer to omit alcohol, you can replace it with a tablespoon of strong coffee, a teaspoon of vanilla extract, or simply use an extra tablespoon of cream. The glaze will still be delicious and shiny.
My chocolate glaze became grainy or clumpy. What happened?
This usually means the chocolate was overheated or moisture got into it. Chocolate can « seize » if heated too aggressively or if a cold liquid is added suddenly. Always melt chocolate gently (medium power in microwave, stirring often). Ensure your cream is at room temperature before adding it to the melted chocolate.
How long can I store the assembled cake?
Due to the fresh fruit mousse, it’s best enjoyed within 2-3 days. Keep it refrigerated at all times. The cake itself will stay moist, but the mousse may begin to weep a little after the third day.
Can I use frozen strawberries?
Yes, frozen strawberries are a fine alternative, especially when fresh ones aren’t in season. Thaw them completely and drain any excess liquid before blending. You might need to reduce the added sugar slightly if the strawberries are pre-sweetened.
Why do I need to pour the milk mixture on the warm cake?
This step is crucial for moisture. A warm cake is more absorbent. The liquid (milk and liqueur) gets soaked right into the structure, making every bite tender and flavorful. If the cake cools completely first, the liquid will mostly just sit on the surface.
Can children eat this cake with the alcohol?
The small amount of brandy and liqueur in the soak and glaze is mostly for flavor, and much of the alcohol evaporates during the warm processes. If you’re serving to children or prefer to avoid alcohol entirely, use the non-alcoholic substitutes mentioned earlier (coffee or vanilla).
A Final Sweet Word
The Sensation Cake truly lives up to its name. It’s a joyful project that ends with a stunning, delicious result. Whether it’s for a special day or just to treat your family, this cake speaks of care and celebration. Remember, baking is about love and a bit of playful experimentation. So, put on your apron, gather your ingredients, and create your own sensation. Your table—and your guests—will thank you. Happy baking!

Equipment
- Micro-ondes
- Moule à savarin
- Mixeur ou robot culinaire
- Bols de mélange
- Spatule et fouet
Ingrédients
- 400 g chocolat semi-sucré ou au lait, haché
- 170 g crème sans lactosérum comme Nestlé ou similaire
- 2 c.s brandy
- 3 œufs
- 1 c.s beurre
- 1.5 tasse sucre
- 170 g yaourt nature environ 170 g
- 1.5 tasse farine de blé
- 0.5 tasse poudre de chocolat
- 1 c.s levure chimique
- 0.5 tasse lait
- 2 c.s liqueur de cacao
- 2 tasses fraises fraîches nettoyées et équeutées
- 1 tasse sucre
- 1 c.s fécule de maïs
- 1 enveloppe gélatine en poudre non aromatisée
- 85 g crème sans lactosérum
Instructions
- Séparez les blancs des jaunes d'œufs et battez les blancs en neige.
- Ajoutez doucement les jaunes, le beurre ramolli, le sucre, le yaourt, la farine, la poudre de chocolat et la levure. Mélangez jusqu'à obtenir une pâte homogène.
- Graissez un moule à savarin et farinez-le, puis versez la pâte et cuisez au micro-ondes à puissance maximale pendant 7 à 8 minutes.
- Une fois le gâteau cuit, imbibez-le avec un mélange de lait et de liqueur de cacao pendant qu'il est encore chaud.
- Pour la mousse, mixez les fraises avec le sucre et la fécule, puis chauffez au micro-ondes jusqu'à épaississement.
- Dissolvez la gélatine dans de l'eau chaude et ajoutez-la au mélange de fraises chaudes, en incorporant également la crème.
- Pour le glaçage, faites fondre le chocolat au micro-ondes, puis ajoutez la crème et le brandy.
- Démoisez le gâteau et remplissez-le avec la mousse de fraise, puis recouvrez-le de glaçage au chocolat.
- Réfrigérez le gâteau pendant au moins une heure pour qu'il se fixe.