
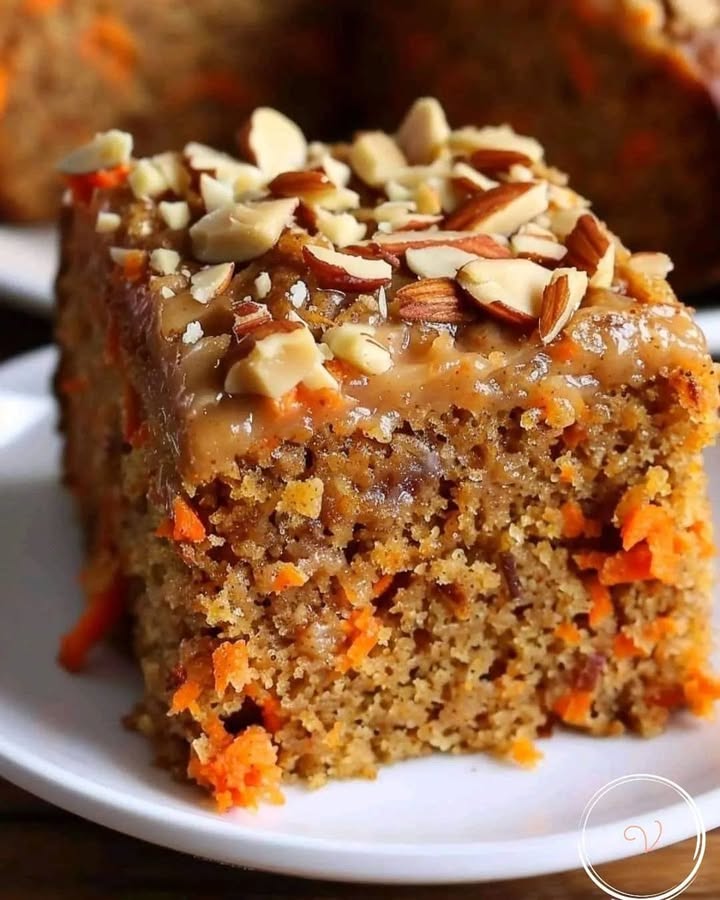
Mon Déliceux Gâteau à l’Avoine et aux Carottes : Une Huguette santé dans un plat
Vous connaissez ces jours où vous avez une envie de sucré, mais où vous souhaitez aussi vous sentir bien avec ce que vous mangez ? C’est exactement ce que j’ai ressenti lorsque j’ai créé ce Gâteau Avoine Carotte pour la première fois. C’était un dimanche pluvieux, les enfants étaient agités, et mes placards me demandaient une session de baking sans la corvée du supermarché. Ce qui a sorti du four était tout simplement magique – un gâteau moelleux, légèrement épicé, qui semblait gourmand mais regorgeait de bonnes choses. Il est vite devenu le dessert « sans culpabilité » favori de notre famille. Laissez-moi vous montrer comment réaliser ce gâteau simple et réconfortant.
La petite histoire douce derrière ce Gâteau aux Carottes et à l’Avoine
Le carrot cake a une longue histoire, qui remonte aux temps médiévaux où le sucre était rare et les sucrants comme les carottes étaient précieux. Ma version, ce Gâteau Avoine Carotte, est une revisite moderne et healthy du classique. Je voulais créer un gâteau nourrissant pour le breakfast, mais festif pour le dessert. En remplaçant la farine raffinée par des flocons d’avoine robustes et en utilisant du yaourt nature pour une humidité incomparable, cette recette mixe tradition et cuisine modernisée au mieux. C’est la preuve qu’un savoir ancestral et un placard bien rempli peuvent créer quelque chose nouveau et merveilleux.
Pourquoi Vous Aimerez Absolument Cette Recette
Ce n’est pas juste une autre recette de cake. Premièrement, elle est incroyablement facile et flexible – parfaite pour les apprentis bakers. Deuxièmement, elle est merveilleusement versatile : on peut prendre une part au breakfast, comme snack du afternoon, ou pour le dessert. Le mix des pommes et carottes râpées le garde inimaginablement moelleux pendant des jours. Et enfin, il est riche en fibres, vitamines et sucres naturels grâce au miel et aux fruits. Vous avez tout le comfort cosy d’un carrot cake classique sans la heavy frosting ou le sugar crash. C’est un cake feel-good à tous les sens.
Occasions Parfaites pour votre Gâteau Avoine Carotte
Ce gâteau est un vrai multi-talent. J’adore l’amener aux brunches casuals avec des amis – cela lance toujours des conversations sur le baking santé. C’est aussi un superstar pour les lunchboxs des kids (et des adults!). Je l’ai même servi comme dessert simple et élégant après un dîner hearty, accompagné d’un dollop de yogurt grec. Que ce soit une famille gathering, un picnic au parc ou juste un treat « parce que c’est Tuesday », ce cake s’intègre toujours.
Que Vous Aurez Need : La Liste des Ingredients
Rassembler ces simples ingredients est le premier pas vers le happiness du cake. Voilà ce dont vous aurez besoin :
- 1 cup d’avoine (130 g) – La base robuste de notre cake.
- 1 cup de yogurt nature (250 ml) – Pour une humidité incomparable et une texture tendre.
- 2 eggs – Ils combinent tout ensemble beautyfully.
- 2 tablespoons de miel ou syrup (50 g) – Pour une sweetness naturelle.
- 2 carrots, râpées (300 g) – La star sucrée et colorée.
- 2 apples, râpées (320 g) – Ajoute humidité et un hint d’acidité.
- Walnuts, quantité selon goût – Pour ce topping crunch essentiel.
Smart Swaps : Options de Substitution
Pas de yogurt nature ? Utilisez du yogurt grec ou même une alternative plant-based comme du yogurt almond. Pas de miel ? Le maple syrup ou l’agave nectar fonctionnent wonderfully. Pour une version nut-free, skip simplement les walnuts ou swap-les avec des sunflower seeds. Vous pouvez même utiliser une pear au lieu de l’apple. Cette recette est incroyablement adaptable avec ce que vous avez à la maison !
Let’s Bake ! Preparation Step-by-Step
Follow ces simples steps pour un Gâteau Avoine Carotte perfect every single time.
Step 1 : Prep votre Pan et Oven
Start par pré-heating votre oven à 180°C (350°F). Cela assure qu’il soit perfectly hot lorsque votre batter est ready. Prenez un cake tin, environ 23cm en diameter, et grease-le bien avec un peu de butter ou oil. J’aime ligne le bottom avec un circle de parchment paper pour un removal foolproof later. Place le tin préparé à côté. L’arôme du baking cake soon va fill your kitchen !
Step 2 : Hydrate the Oats
Dans un large mixing bowl, combine les oats et le yogurt nature. Mélange bien jusqu’à que chaque oat soit coated dans ce creamy yogurt. Maintenant, let ce mixture sit pour environ 10 minutes. Ce waiting time est crucial – il permet aux oats de soften et absorber le liquid, ce qui prévient une texture gritty et donne à notre cake une wonderful, tender consistency. Vous verrez le mixture thicken légèrement.
Pro tip : Utilisez ce temps pour râper vos carottes et pommes. Cela fait flow le process smoothly !
Step 3 : Incorporate Eggs et Sweetener
Après que les oats ont eu leur soak, crack les deux eggs dans le bowl. Utilisez un whisk ou fork pour battre tout ensemble vigorously. Vous souhaitez que les eggs soient fully incorporés, créer une base smooth, pale yellow. Next, drizzle dans votre miel ou syrup. Stir bien jusqu’au sweetener est evenly distribué dans le mixture. À ce stage, le batter va smell faintly sweet et wholesome.
Step 4 : Fold dans les Fruits et Veggies
Now pour la partie colorful ! Ajoutez vos carottes et pommes freshly grated au bowl. J’adore les tons bright orange et soft green qu’ils ajoutent. Utilisant une spatula, gently fold-les dans le batter jusqu’à qu’ils soient evenly distribués. Ne overmix ici ; juste assurez qu’il n’y a pas de big clumps d’oats ou fruit restants. Le batter sera thick, chunky et packed avec goodness.
Step 5 : Decorate et Bake
Versez le lush batter dans votre prepared cake tin. Utilisez la spatula pour smooth le top dans un layer even. Maintenant, prenez vos walnuts et scatter-les generously sur la surface. Press-les lightly afin qu’ils sticky. Slide le tin dans le oven pré-heated et bake pour 40-45 minutes. Le cake est done lorsqu’il est golden brown sur le top et un toothpick inserted dans le center sort clean.
Chef’s tip : Pour un extra flavor dimension, toast les walnuts lightly dans une pan dry avant de décorer. Cela élève leur nuttiness wonderfully !
Step 6 : Cool et Serve
Once baked, remove le cake de l’oven. Let cool dans le tin pour un good 10 minutes. Ce resting period permet à la structure de set, donc elle ne break pas lorsque vous le turn out. Then, carefully invert-le sur un wire rack, peel off le parchment paper si vous l’avez utilisé, et let cool completely. Slicing dans un warm cake est tempting, mais patience rewards you avec perfect slices.
Timing est Everything
Cette recette est blessedly quick. Preparation prend environ 15 minutes de active time. Baking nécessite 40-45 minutes dans l’oven. Ajoutez le cooling time de 10 minutes dans la pan et le temps pour le cake cool completely sur le rack, et vous regardez environ 1 hour et 15 minutes total du start au first delicious bite.
A Chef’s Little Secret
Mon secret pour un Gâteau Avoine Carotte extra-moist ? Je utilise le side fine du grater pour les carottes et les pommes. Cela créer presque un « puree » qui blend seamless dans le batter, releasing moisture maximum et sweetness dans tout le bake, ensuring chaque single bite est perfectly tender.
A Fun Fact About Vos Ingredients
Did vous know que combiner oats et yogurt est un fantastic pré-biotic et probiotic duo ? La fibre dans les oats feed la good bacteria du yogurt. Cela support un healthy digestive balance, faisant ce cake non seulement tasty mais aussi gently bénéficielle pour votre gut. C’est comme un friendly helper pour votre tummy !
Equipment Vous Aurez Need
Vous likely avez tout déjà ! Juste gather :
- Un cake tin de 23cm diameter (springform fonctionne great)
- Mixing bowl
- Grater
- Whisk ou fork
- Spatula
- Measuring cups/spoons
No fancy stand mixer requis – c’est du baking hands-on, joyful.
How à Store votre Masterpiece
Once completely cooled, vous pouvez store le cake dans un airtight container à température room pour up to 2 days. La moisture des fruits et yogurt le gardera wonderfully soft.
Pour storage longer, place-le dans le refrigerator où il sera fresh pour up to 5 days. La texture s’améliore en fait après un jour, devenant encore more dense et flavorful.
Vous pouvez aussi freeze ce cake ! Wrap les individual slices ou le whole cake (once fully cooled) tightly dans plastic wrap puis dans foil. Il tiendra perfectly pour up à 3 mois. Thaw à température room quand le craving strikes.
Mes Best Tips et Advice
- Drain le excess liquid : Si vos pommes grated semblent très watery, donnez à elles une gentle squeeze sur le sink avant l’ajouter au batter. Cela prévient le cake de devenir soggy.
- Test pour doneness : Ovens varient. Start checking à 40 minutes. Si le top brown trop quickly mais le center n’est pas done, cover le cake loosely avec un piece d’aluminum foil.
- Être creative avec les spices : Ajoute a teaspoon de cinnamon ou un pinch de nutmeg au batter pour un warm, spiced flavor qui pair beautifully avec les carottes et pommes.
Presentation Ideas pour Impress
Ce cake est beautiful dans sa simplicity. Pour une fancy touch, dust le top avec un light snowfall de powdered sugar ou cinnamon sugar just avant serving. Serve chaque slice avec un side de whipped cream cheese ou un scoop de vanilla yogurt. Pour un party, top avec un drizzle d’extra miel et quelques extra walnut halves. Cela semble stunning sur un rustic cake stand.
6 Delicious Variations à Try
Once vous avez mastered la base recette, le fun begins ! Voici six ways pour mix it up :
- Spiced Carrot & Oat Cake : Ajoutez 1 tsp cinnamon, ½ tsp ginger, et un pinch de cloves aux dry ingredients pour un warm, autumnal flavor.
- Tropical Twist : Replace l’apple avec grated zucchini et ajoutez ½ cup de shredded coconut et un handful de chopped macadamia nuts.
- Chocolate Chip Delight : Stir ½ cup de dark chocolate chips dans le batter avec les carottes et pommes pour un sweet surprise dans chaque bite.
- Lemon & Poppy Seed : Ajoutez le zest d’un lemon et 2 tablespoons de poppy seeds au batter pour un bright, citrusy note.
- Nutty Banana Bread Style : Replace un apple avec un mashed ripe banana et utilisez pecans au lieu de walnuts.
- Berry Burst : Fold in ½ cup de fresh ou frozen blueberries (tossed dans un peu de flour) à la very end pour bursts de juicy flavor.
Si vous cherchez plus de ideas pour desserts decadents, vous devriez essayer notre creamy Cinnamon Roll Cheesecake, notre lusciously buttery Kentucky Butter Cake, le simple comfort de nos Easy Apple Dumplings, ou les indulgent layers de nos Salted Caramel Billionaire Bars. Ils sont tous crowd-pleasers !
Common Mistakes pour Avoid
Mistake 1 : Not Drain les Fruits Gratés
C’est un oversight common. Les carottes et pommes, surtout lorsqu’elles sont très fresh, release beaucoup d’eau quand grated. Si vous les ajouter directement sans une light squeeze, all cet extra liquid va dans le batter. Cela peut faire votre Gâteau Avoine Carotte soggy dans le middle et prévenir de setting properly. Le fix est simple : après grating, gather les carottes et pommes dans vos hands ou dans un clean kitchen towel et donnez-les une gentle squeeze sur le sink. Vous sera surpris combien liquid sort, leading à un cake perfectly textured.
Mistake 2 : Overmix le Batter
When vous ajoute les dry et wet ingredients ensemble, c’est tempting de stir jusqu’à c’est completely smooth. Mais avec les oat-based cakes, overmix peut activer le gluten dans la flour (des oats) trop, leading à un cake tough, dense plutôt que tender, crumbly. Le key est de fold les ingredients gently. Une fois vous avez ajouté les carottes et pommes grated, utilisez une spatula et mix juste jusqu’à vous ne voyez plus dry pockets de flour. Un few lumps sont absolument fine et even desirable.
Mistake 3 : Sauter le Oat Hydration Step
Ne soyez tempted de juste throw all les ingredients ensemble au once ! Let les oats soak dans le yogurt pour 10 minutes est un step non-negotiable. Ce process softens les oats, permettant de absorber moisture avant baking. Si vous skip it, les oats vont tirer moisture du rest du cake pendant baking, resulting dans un produit final dry et une texture légèrement gritty. Set un timer, utilisez ces 10 minutes pour prep vos autres ingredients, et let le magic happen.
Mistake 4 : Underbaking le Center
Because ce cake est so moist des fruits et yogurt, il peut parfois *look* done sur l’outside tandis le center est encore wet. Relying solely sur color est un mistake. La golden rule est le toothpick test. Insert un clean toothpick ou thin knife dans le very center du cake. Il devrait sortir avec just quelques moist crumbs attached, mais pas avec wet, raw batter. Si c’est wet, donnez-lui autre 5 minutes et test encore. Patience assure un cake perfectly cooked.
Vos Questions Answered : FAQ
Can I faire ce oatmeal carrot cake gluten-free?
Absolument ! Le main flour component ici est les oats. Pour assurer le cake est gluten-free, vous devrez utiliser des oats certifiés gluten-free. Les oats sont naturellement gluten-free mais souvent processed dans des facilities qui manage wheat, leading à cross-contamination. En utilisant des oats certifiés et double-checking que tous autres ingredients (comme le yogurt) sont gluten-free, vous pouvez easily adapter cette recette. La texture sera juste as wonderful.
Can I utiliser steel-cut oats au lieu de rolled oats?
Je ne recommande pas l’utilisation de steel-cut oats pour cette recette. Les steel-cut oats sont beaucoup harder et nécessitent far longer pour cook et soften. Ils ne hydrateront pas properly pendant le brief soaking time ou le baking time, resulting dans un texture de cake unpleasant crunchy et gritty. Stick avec l’old-fashioned rolled oats ou quick oats pour les best, tender results.
Mon cake est very moist dans le middle, est-il undercooked?
Il pourrait être. Ce cake est meant pour être moist, mais il devrait ne pas être wet ou gooey dans le center. Si il feels overly damp ou sinks dans le middle après cooling, il likely needed more baking time. Next time, utilisez le toothpick test accurately. Also, assurez votre oven température est correct avec un oven thermometer. Un oven qui run trop cool peut causer underbaking.
Can I faire cette recette without eggs?
Yes, vous pouvez experimenter avec subs pour eggs, mais la texture changer légèrement. Pour une version vegan, essayez un « flax egg » (1 tbsp ground flaxseed mix avec 2.5 tbsp water per egg, let sit pour 5 mins). Ou, vous pouvez utiliser ¼ cup d’applesauce per egg. Le cake pourrait être légèrement denser et more fudgy, mais il sera still delicious. Assurez de faire le toothpick test, as baking times peut varier.
Que je peux utiliser au lieu de miel?
Vous avez plusieurs great options. Le maple syrup est un fantastic substitute 1:1 et ajoute un lovely flavor. L’agave nectar fonctionne bien aussi. Si vous besoin un option sugar-free, un syrup sugar-free avec flavor de maple peut être utilisé. Pour un flavor deeper, vous pourrait même utiliser brown rice syrup. Le goal est un sweetener liquid qui aide binder et moisten le cake.
Can I ajouter raisins ou autres dried fruit?
Of course ! Ajouter ½ cup de raisins, sultanas ou chopped dried apricots est une wonderful idea. Pour prévenir qu’ils sink au bottom et burn, toss-les dans un tiny bit de flour (ou oat flour) avant fold-les dans le batter. Ce light coating aide suspend-les evenly throughout le cake.
Why mon cake a sink dans le middle?
Un cake sinking dans le middle usually pointe à quelques issues : 1) Le cake était underbaked, donc la structure n’était pas set. 2) La door de l’oven était opened trop early ou trop often, causant un sudden température drop. 3) Il y avait trop de leavening agent (même si cette recette ne utilise pas baking powder, si vous avez ajouté, too much peut causer collapse). 4) Il y avait trop de liquid dans le batter d’undrained fruits. Check ces points pour votre next bake.
Combien servings cela cake fait-il?
Cette recette yields environ 8 generous slices. C’est perfect pour un dessert familial avec leftovers pour quelques jours de snacks. Si vous servez-le comme part d’un larger brunch ou buffet avec d’autres items, vous pourrait easily avoir 10-12 smaller slices de cela.
Can I bake cela dans un different pan, comme un loaf pan?
Vous sure pouvez ! Un standard loaf pan (approx. 22cm x 11cm) fonctionne well. Be aware que le baking time sera likely longer parce que le batter sera deeper. Start checking pour doneness à environ 50-55 minutes avec le trusty toothpick test. Le top pourrait brown more quickly, donc tent-le avec foil si besoin.
Est-ce cake suitable pour freezing?
Yes, il freeze beautifully ! Once completely cooled, wrap le whole cake (ou individual slices) tightly dans plastic wrap, puis dans aluminum foil ou place dans un freezer-safe bag. Il tiendra pour up à 3 mois. Thaw overnight dans le refrigerator ou pour quelques hours à température room. C’est un lifesaver pour healthy, ready-to-go snacks !
Ready pour Bake Votre Own?
So there vous avez – ma recette foolproof pour un delicious, wholesome Gâteau Avoine Carotte. Il est le genre de bake qui fill votre home avec un warm, comforting smell et leave tous feeling happy et nourished. J’espère qu’il devient un staple dans votre kitchen comme il est dans mine. Cela prouve que healthy eating peut être utterly delicious et deeply satisfying. Si vous loved cette recette et cherchez plus d’inspiration baking, ne forget pas d’explorer notre entire collection de wonderful cakes et pastries. Happy baking !
Equipment
- Moule à gâteau de 23 cm
- Bol de mélange
- Râpe
- Fouet ou fourchette
- Spatule
Ingrédients
- 130 g flocons d'avoine
- 250 ml yaourt nature
- 2 œufs
- 50 g miel ou sirop
- 300 g carottes, râpées
- 320 g pommes, râpées
- au goût noix
Instructions
- Préchauffez votre four à 180°C. Graissez un moule à gâteau de 23 cm de diamètre.
- Dans un grand bol, mélangez les flocons d'avoine et le yaourt nature. Laissez reposer 10 minutes.
- Ajoutez les œufs au mélange d'avoine et de yaourt, puis incorporez le miel ou le sirop.
- Incorporez les carottes et les pommes râpées au mélange.
- Versez la pâte dans le moule préparé, ajoutez les noix sur le dessus et appuyez légèrement.
- Faites cuire au four pendant 40-45 minutes. Laissez refroidir dans le moule pendant 10 minutes avant de démouler.
Notes
Nutrition

Je suis Céline, une véritable passionnée d’ustensiles et de matériel de cuisine ! J’adore tester, comparer et découvrir les meilleurs équipements pour rendre la cuisine plus efficace et agréable. Que ce soit un bon couteau, un robot performant ou une poêle incontournable, je suis toujours à la recherche des outils qui feront la différence. Mon but est de vous guider dans vos choix pour que vous ayez le bon matériel adapté à vos besoins.